FE-220 Advanced Manual (English)
Page 19
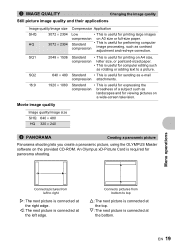
... quality/image size SHQ 640 × 480 HQ 320 × 240 2 PANORAMA Creating a panoramic picture Panorama shooting lets you create a panoramic picture, using the OLYMPUS Master software on A3 size or full-size paper. SQ1 SQ2 16:9 2048 × 1536 640 × 480 1920 × 1080 Standard • This is useful for... shooting. Menu operations Connects pictures from bottom to right Y: The next picture is required for printing large images compression on the provided CD-ROM. An Olympus xD-Picture Card is connected at the left edge.
... quality/image size SHQ 640 × 480 HQ 320 × 240 2 PANORAMA Creating a panoramic picture Panorama shooting lets you create a panoramic picture, using the OLYMPUS Master software on A3 size or full-size paper. SQ1 SQ2 16:9 2048 × 1536 640 × 480 1920 × 1080 Standard • This is useful for... shooting. Menu operations Connects pictures from bottom to right Y: The next picture is required for printing large images compression on the provided CD-ROM. An Olympus xD-Picture Card is connected at the left edge.
FE-220 Advanced Manual (English)
Page 27
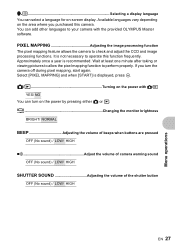
...the volume of the shutter button OFF (No sound) / LOW/ HIGH EN 27 Menu operations Approximately once a year is not necessary to operate this camera. You can select a language for on-screen display. If you purchased this function frequently. K/q Turning on the power by pressing either K or ...and when [START] is displayed, press i. Available languages vary depending on the area where you turn on the power with the provided OLYMPUS Master software. Wait at least one minute after taking or viewing pictures to allow the pixel mapping function to check and adjust the CCD and ...
...the volume of the shutter button OFF (No sound) / LOW/ HIGH EN 27 Menu operations Approximately once a year is not necessary to operate this camera. You can select a language for on-screen display. If you purchased this function frequently. K/q Turning on the power by pressing either K or ...and when [START] is displayed, press i. Available languages vary depending on the area where you turn on the power with the provided OLYMPUS Master software. Wait at least one minute after taking or viewing pictures to allow the pixel mapping function to check and adjust the CCD and ...

FE-220 Advanced Manual (English)
Page 39
... computer and download (transfer) the images to search for managing your digital images on your computer. Downloaded images are automatically sorted by date, allowing you to your computer using the OLYMPUS Master software, also provided with the camera. OLYMPUS Master is a software application for images quickly. ( Edit images • You can rotate images, trim them and...
... computer and download (transfer) the images to search for managing your digital images on your computer. Downloaded images are automatically sorted by date, allowing you to your computer using the OLYMPUS Master software, also provided with the camera. OLYMPUS Master is a software application for images quickly. ( Edit images • You can rotate images, trim them and...
FE-220 Advanced Manual (English)
Page 40
... not guaranteed when using an added USB port or IEEE 1394 port. • To install the software, you must log on the back cover of this manual. Using OLYMPUS Master Install the OLYMPUS Master software Before installing the OLYMPUS Master software, please confirm that your computer is compatible with administrators' privileges. For newer operating systems, please...
... not guaranteed when using an added USB port or IEEE 1394 port. • To install the software, you must log on the back cover of this manual. Using OLYMPUS Master Install the OLYMPUS Master software Before installing the OLYMPUS Master software, please confirm that your computer is compatible with administrators' privileges. For newer operating systems, please...
FE-220 Advanced Manual (English)
Page 41
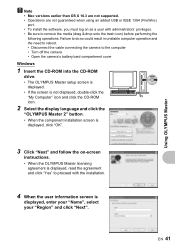
...8226; Operations are not guaranteed when using an added USB or IEEE 1394 (FireWire) port. • To install the software, you must log on -screen instructions. • When the OLYMPUS Master licensing agreement is displayed, enter your "Name", select your "Region" and click "Next". Failure to do so ... need to reboot. • Disconnect the cable connecting the camera to the computer • Turn off the camera • Open the camera's battery/card compartment cover Windows 1 Insert the CD-ROM into the CD-ROM drive. • The OLYMPUS Master setup screen is displayed. • If the screen ...
...8226; Operations are not guaranteed when using an added USB or IEEE 1394 (FireWire) port. • To install the software, you must log on -screen instructions. • When the OLYMPUS Master licensing agreement is displayed, enter your "Name", select your "Region" and click "Next". Failure to do so ... need to reboot. • Disconnect the cable connecting the camera to the computer • Turn off the camera • Open the camera's battery/card compartment cover Windows 1 Insert the CD-ROM into the CD-ROM drive. • The OLYMPUS Master setup screen is displayed. • If the screen ...

FE-220 Advanced Manual (English)
Page 42
5 When the setup type selection screen is retracted. 42 EN Monitor To install this software, click "Install". Using OLYMPUS Master • The installation begins. Macintosh 1 Insert the CD-ROM into the CD-ROM drive. • The CD-ROM window is displayed. •... installation. • The screen confirming that setup is completed is displayed. The screen confirming that installation is completed is displayed. Connecting the camera to a computer 1 Make sure the camera is turned off. • The monitor is off. • The lens is displayed, click "Install". • To select the ...
5 When the setup type selection screen is retracted. 42 EN Monitor To install this software, click "Install". Using OLYMPUS Master • The installation begins. Macintosh 1 Insert the CD-ROM into the CD-ROM drive. • The CD-ROM window is displayed. •... installation. • The screen confirming that setup is completed is displayed. The screen confirming that installation is completed is displayed. Connecting the camera to a computer 1 Make sure the camera is turned off. • The monitor is off. • The lens is displayed, click "Install". • To select the ...
FE-220 Advanced Manual (English)
Page 43
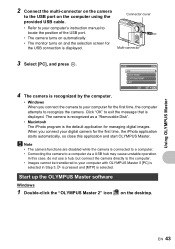
...is displayed. Start up the OLYMPUS Master software Windows 1 Double-click the "OLYMPUS Master 2" icon on the desktop. Click "OK" to your computer with OLYMPUS Master if [PC] is selected in Step 3, Y is pressed and [MTP] is displayed. EN 43 The camera is recognized as a "Removable ...Disk". • Macintosh The iPhoto program is recognized by the computer. • Windows When you connect your digital camera for the ...
...is displayed. Start up the OLYMPUS Master software Windows 1 Double-click the "OLYMPUS Master 2" icon on the desktop. Click "OK" to your computer with OLYMPUS Master if [PC] is selected in Step 3, Y is pressed and [MTP] is displayed. EN 43 The camera is recognized as a "Removable ...Disk". • Macintosh The iPhoto program is recognized by the computer. • Windows When you connect your digital camera for the ...
FE-220 Advanced Manual (English)
Page 54
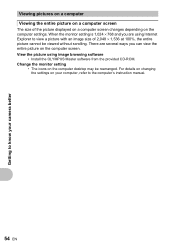
... • The icons on the computer desktop may be viewed without scrolling. There are using image browsing software • Install the OLYMPUS Master software from the provided CD-ROM. For details on changing the settings on your camera better Viewing pictures on a computer Viewing the entire picture on a computer screen The size of 2,048...
... • The icons on the computer desktop may be viewed without scrolling. There are using image browsing software • Install the OLYMPUS Master software from the provided CD-ROM. For details on changing the settings on your camera better Viewing pictures on a computer Viewing the entire picture on a computer screen The size of 2,048...
FE-220 Advanced Manual (English)
Page 55
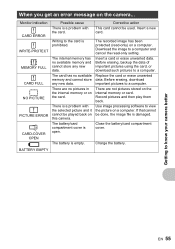
.../card compartment cover. There are not pictures stored on the card. Insert a new card. Use image processing software to a computer and cancel the read -only) on the camera... Charge the battery. There is damaged. The recorded image has been protected (read -only setting. Download the... image to view the picture on this camera. Writing to know your camera better EN 55 Replace the card or erase unwanted data. There are no available memory and cannot store any new data...
.../card compartment cover. There are not pictures stored on the card. Insert a new card. Use image processing software to a computer and cancel the read -only) on the camera... Charge the battery. There is damaged. The recorded image has been protected (read -only setting. Download the... image to view the picture on this camera. Writing to know your camera better EN 55 Replace the card or erase unwanted data. There are no available memory and cannot store any new data...

FE-220 Advanced Manual (English)
Page 65
...EN 65 Appendix Olympus assumes no responsibility for unauthorized photographing, use or other acts that interference will not occur in a particular installation. Copyright Notice All rights reserved. No part of these written materials or software, and in no event shall be used to connect the camera to USB ... profits, business interruption and loss of business information) arising from the use or inability to use these written materials or software, or for a Class B digital device, pursuant to Part 15 of the FCC Rules. This equipment has been tested and found to comply with respect...
...EN 65 Appendix Olympus assumes no responsibility for unauthorized photographing, use or other acts that interference will not occur in a particular installation. Copyright Notice All rights reserved. No part of these written materials or software, and in no event shall be used to connect the camera to USB ... profits, business interruption and loss of business information) arising from the use or inability to use these written materials or software, or for a Class B digital device, pursuant to Part 15 of the FCC Rules. This equipment has been tested and found to comply with respect...
FE-220 Basic Manual (English, Français, Español, Português)
Page 2
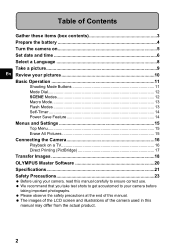
... this manual carefully to ensure correct use. The images of the LCD screen and illustrations of the camera used in this manual. Table of Contents Gather these items (box contents 3 Prepare the battery 4 Turn the camera on 5 Set date and time 6 Select a Language 8 Take a picture 9 En Review your ... Modes 13 Self-Timer 14 Power Save Feature 14 Menus and Settings 15 Top Menu 15 Erase All Pictures 15 Connecting the Camera 16 Playback on a TV 16 Direct Printing (PictBridge 17 Transfer Images 18 OLYMPUS Master Software 20 Specifications 21 Safety Precautions 23 Before using your...
... this manual carefully to ensure correct use. The images of the LCD screen and illustrations of the camera used in this manual. Table of Contents Gather these items (box contents 3 Prepare the battery 4 Turn the camera on 5 Set date and time 6 Select a Language 8 Take a picture 9 En Review your ... Modes 13 Self-Timer 14 Power Save Feature 14 Menus and Settings 15 Top Menu 15 Erase All Pictures 15 Connecting the Camera 16 Playback on a TV 16 Direct Printing (PictBridge 17 Transfer Images 18 OLYMPUS Master Software 20 Specifications 21 Safety Precautions 23 Before using your...
FE-220 Basic Manual (English, Français, Español, Português)
Page 8
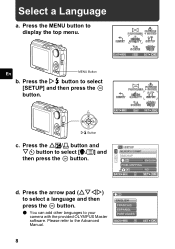
... to select [SETUP] and then press the i button. W ENGLISH FRANCAIS ESPAÑOL PORTUGUES BACK MENU SET OK 8 Press the Y# button to your camera with the provided OLYMPUS Master software. Press the OF/< button and NY button to the Advanced Manual. PICTURE PANORAMA + SOUND IMAGE RESET QUALITY SETUP EXIT MENU SCENE SILENT MODE...
... to select [SETUP] and then press the i button. W ENGLISH FRANCAIS ESPAÑOL PORTUGUES BACK MENU SET OK 8 Press the Y# button to your camera with the provided OLYMPUS Master software. Press the OF/< button and NY button to the Advanced Manual. PICTURE PANORAMA + SOUND IMAGE RESET QUALITY SETUP EXIT MENU SCENE SILENT MODE...

FE-220 Basic Manual (English, Français, Español, Português)
Page 15
IMAGE QUALITY Set the image quality of the picture you create a panoramic picture, using the OLYMPUS Master software from the provided CD-ROM. An Olympus xD-Picture Card is selected. SETUP Set the date, time, language, and operation sound, etc. SCENE Select a scene mode depending on the subject and shooting ...
IMAGE QUALITY Set the image quality of the picture you create a panoramic picture, using the OLYMPUS Master software from the provided CD-ROM. An Olympus xD-Picture Card is selected. SETUP Set the date, time, language, and operation sound, etc. SCENE Select a scene mode depending on the subject and shooting ...

FE-220 Basic Manual (English, Français, Español, Português)
Page 18
The monitor will now recognize your camera as a removable storage drive. USB PC EASY PRINT CUSTOM PRINT EXIT SET OK 18 En Connect the camera to the computer 1 Connect the camera and computer using the USB cable (included). Transfer Images Install the software 1 Insert the OLYMPUS Master CD-ROM. 2 Windows: Click the "OLYMPUS Master 2" button. Your PC will turn on -screen instructions. Macintosh: Double-click the "Setup" icon. 3 Simply follow the on automatically. USB Cable (provided) 2 1 2 Select [PC] on the monitor, and press i.
The monitor will now recognize your camera as a removable storage drive. USB PC EASY PRINT CUSTOM PRINT EXIT SET OK 18 En Connect the camera to the computer 1 Connect the camera and computer using the USB cable (included). Transfer Images Install the software 1 Insert the OLYMPUS Master CD-ROM. 2 Windows: Click the "OLYMPUS Master 2" button. Your PC will turn on -screen instructions. Macintosh: Double-click the "Setup" icon. 3 Simply follow the on automatically. USB Cable (provided) 2 1 2 Select [PC] on the monitor, and press i.
FE-220 Basic Manual (English, Français, Español, Português)
Page 19
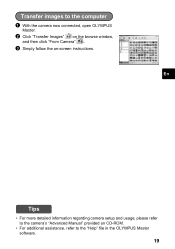
Transfer images to the computer 1 With the camera now connected, open OLYMPUS Master. 2 Click "Transfer Images" on the browse window, and then click "From Camera" . 3 Simply follow the on CD-ROM. • For additional assistance, refer to the camera's "Advanced Manual" provided on -screen instructions. En Tips • For more detailed information regarding camera setup and usage, please refer to the "Help" file in the OLYMPUS Master software. 19
Transfer images to the computer 1 With the camera now connected, open OLYMPUS Master. 2 Click "Transfer Images" on the browse window, and then click "From Camera" . 3 Simply follow the on CD-ROM. • For additional assistance, refer to the camera's "Advanced Manual" provided on -screen instructions. En Tips • For more detailed information regarding camera setup and usage, please refer to the "Help" file in the OLYMPUS Master software. 19

FE-220 Basic Manual (English, Français, Español, Português)
Page 20
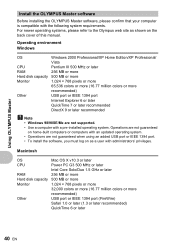
OLYMPUS Master Software OLYMPUS Master Software: Use this software to download pictures from the camera, view, organize, retouch, e-mail and print your digital pictures, movies and more! (System Requirements OS Windows 2000 Professional/XP Home Edition/XP ...Windows), Safari 1.0 or later, QuickTime 6 or later (Macintosh) For the latest support information, visit the Olympus website (http://www.olympus.com/digital) User Registration Register your camera when you install OLYMPUS Master to activate your warranty, receive notifications of software and camera firmware updates, and more. 20
OLYMPUS Master Software OLYMPUS Master Software: Use this software to download pictures from the camera, view, organize, retouch, e-mail and print your digital pictures, movies and more! (System Requirements OS Windows 2000 Professional/XP Home Edition/XP ...Windows), Safari 1.0 or later, QuickTime 6 or later (Macintosh) For the latest support information, visit the Olympus website (http://www.olympus.com/digital) User Registration Register your camera when you install OLYMPUS Master to activate your warranty, receive notifications of software and camera firmware updates, and more. 20


