
FE-140 Advanced Manual (English)
Page 33
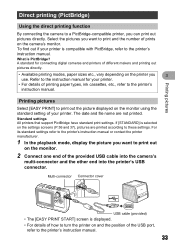
... is displayed. • For details of the provided USB cable into the camera's multi-connector and the other end into the printer's USB connector. The date and file name are printed according to the printer's instruction manual. 33 Refer to the instruction manual for connecting digital cameras and printers of different makers and printing out pictures...
... is displayed. • For details of the provided USB cable into the camera's multi-connector and the other end into the printer's USB connector. The date and file name are printed according to the printer's instruction manual. 33 Refer to the instruction manual for connecting digital cameras and printers of different makers and printing out pictures...

FE-140 Advanced Manual (English)
Page 34
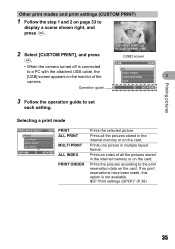
To print another picture, press X/Y to select a picture, and press the < button. • When you have finished, disconnect the USB cable from the camera with the picture 3 selection screen displayed. 4 Disconnect the USB cable from the printer. 3 Press the < button. • Printing starts. • When printing is finished, the picture selection screen is displayed. EASY PRINT START < PC/CUSTOM PRINT OK EXIT PRINT 5 Disconnect the USB cable from the camera. Printing pictures 34
To print another picture, press X/Y to select a picture, and press the < button. • When you have finished, disconnect the USB cable from the camera with the picture 3 selection screen displayed. 4 Disconnect the USB cable from the printer. 3 Press the < button. • Printing starts. • When printing is finished, the picture selection screen is displayed. EASY PRINT START < PC/CUSTOM PRINT OK EXIT PRINT 5 Disconnect the USB cable from the camera. Printing pictures 34
FE-140 Advanced Manual (English)
Page 35
.../CUSTOM PRINT OK 2 Select [CUSTOM PRINT], and press F. [USB] screen USB • When the camera turned off is not available. g"Print settings (DPOF)" (P.39) 35 Prints the pictures according to a PC with the attached USB cable, the EASY PRINT [USB] screen appears on the monitor of all the pictures stored in...have been made, this option is connected PC to the print reservation data on the card. Prints an index of the CUSTOM PRINT 3 camera. Prints one picture in the internal memory or on the card. Printing pictures Other print modes and print settings (CUSTOM PRINT) 1 ...
.../CUSTOM PRINT OK 2 Select [CUSTOM PRINT], and press F. [USB] screen USB • When the camera turned off is not available. g"Print settings (DPOF)" (P.39) 35 Prints the pictures according to a PC with the attached USB cable, the EASY PRINT [USB] screen appears on the monitor of all the pictures stored in...have been made, this option is connected PC to the print reservation data on the card. Prints an index of the CUSTOM PRINT 3 camera. Prints one picture in the internal memory or on the card. Printing pictures Other print modes and print settings (CUSTOM PRINT) 1 ...

FE-140 Advanced Manual (English)
Page 38
Printing pictures 6 Disconnect the USB cable from the camera. • The camera turns off. 7 Disconnect the USB cable from the printer. 3 38
Printing pictures 6 Disconnect the USB cable from the camera. • The camera turns off. 7 Disconnect the USB cable from the printer. 3 38

FE-140 Advanced Manual (English)
Page 43
... print images and make panoramic images using pictures taken in panorama mode. Install the OLYMPUS Master software gP.44 OLYMPUS Master CD-ROM USB cable Connect the camera to the computer gP.50 Computer equipped with a digital camera on your computer using the OLYMPUS Master software, also provided with the filter and correction functions Print images You can...
... print images and make panoramic images using pictures taken in panorama mode. Install the OLYMPUS Master software gP.44 OLYMPUS Master CD-ROM USB cable Connect the camera to the computer gP.50 Computer equipped with a digital camera on your computer using the OLYMPUS Master software, also provided with the filter and correction functions Print images You can...

FE-140 Advanced Manual (English)
Page 45
..., QuickTime 6 or later is not displayed, double-click the "My Computer" icon and click the CD- Failure to do so could result in USB port. • QuickTime 6 or later and Safari 1.0 or later should be installed on your computer. • Be sure to the computer. ...8226; The OLYMPUS Master setup screen is displayed. 4 • If the screen is already installed on -screen instructions. • When the QuickTime licensing agreement is required to proceed with a built-in unstable computer operation and the need to reboot. • Disconnect the cable connecting the camera to remove the...
..., QuickTime 6 or later is not displayed, double-click the "My Computer" icon and click the CD- Failure to do so could result in USB port. • QuickTime 6 or later and Safari 1.0 or later should be installed on your computer. • Be sure to the computer. ...8226; The OLYMPUS Master setup screen is displayed. 4 • If the screen is already installed on -screen instructions. • When the QuickTime licensing agreement is required to proceed with a built-in unstable computer operation and the need to reboot. • Disconnect the cable connecting the camera to remove the...

FE-140 Advanced Manual (English)
Page 48
...camera functions are disabled while the camera is displayed. When you connect the camera to the computer for the first time, the iPhoto application starts automatically, so close this application and start OLYMPUS Master. Connecting the camera to a computer Connecting the camera to a computer 1 Make sure the camera...managing digital images. Monitor Connector cover • Refer to your computer's instruction manual to locate the position of the USB port. 4 • The camera turns on automatically. • The monitor turns on the computer using the provided USB cable. Click...
...camera functions are disabled while the camera is displayed. When you connect the camera to the computer for the first time, the iPhoto application starts automatically, so close this application and start OLYMPUS Master. Connecting the camera to a computer Connecting the camera to a computer 1 Make sure the camera...managing digital images. Monitor Connector cover • Refer to your computer's instruction manual to locate the position of the USB port. 4 • The camera turns on automatically. • The monitor turns on the computer using the provided USB cable. Click...

FE-140 Advanced Manual (English)
Page 51
... Double-click the "My Computer" icon and right-click the "Removable Disk" icon to a computer 2 Make the following preparations for disconnecting the USB cable. Connecting the camera to display the menu. 2 Click "Eject" on the menu. Macintosh 1 The trash icon changes to the eject icon when the "Untitled" ...or "NO_NAME" icon on the eject icon. 3 Disconnect the USB cable from the camera and that the hardware can be displayed. Click the "Unplug or Eject Hardware" icon again and disconnect the cable. 51 Make sure that image data is displayed saying that all applications are ...
... Double-click the "My Computer" icon and right-click the "Removable Disk" icon to a computer 2 Make the following preparations for disconnecting the USB cable. Connecting the camera to display the menu. 2 Click "Eject" on the menu. Macintosh 1 The trash icon changes to the eject icon when the "Untitled" ...or "NO_NAME" icon on the eject icon. 3 Disconnect the USB cable from the camera and that the hardware can be displayed. Click the "Unplug or Eject Hardware" icon again and disconnect the cable. 51 Make sure that image data is displayed saying that all applications are ...

FE-140 Advanced Manual (English)
Page 54
The following environment is required to use the USB cable to connect the camera to the computer with the USB cable, double-click the files from the following folders on the provided OLYMPUS Master CD-ROM. (Drive name): \USB\INSTALL.EXE • Data transfer is not guaranteed in the "Photo Print" window, to return to download and save...
The following environment is required to use the USB cable to connect the camera to the computer with the USB cable, double-click the files from the following folders on the provided OLYMPUS Master CD-ROM. (Drive name): \USB\INSTALL.EXE • Data transfer is not guaranteed in the "Photo Print" window, to return to download and save...
FE-140 Advanced Manual (English)
Page 76
...the use of the information contained therein. Increase the distance between the camera and receiver. - Only the OLYMPUS-supplied USB cable should be used to connect the camera to provide reasonable protection against harmful interference in a residential installation. This... equipment has been tested and 6 found to operate this equipment. Consult your dealer or an experienced radio/TV technician for a Class B digital...
...the use of the information contained therein. Increase the distance between the camera and receiver. - Only the OLYMPUS-supplied USB cable should be used to connect the camera to provide reasonable protection against harmful interference in a residential installation. This... equipment has been tested and 6 found to operate this equipment. Consult your dealer or an experienced radio/TV technician for a Class B digital...

FE-140 Advanced Manual (English)
Page 79
... 33 SUNSET S 21 Super macro mode 12 T TFT 68 TITLE 27 Top menu 15 Total recording time 24 Trimming P 26, 37 U USB cable 33, 43, 48, 54 USB driver 44, 54 V Video cable 31 VIDEO OUT 31 X xD-Picture Card 19, 71 Z Zoom 11 ZOOM (SLIDE SHOW 23 Zoom bar 18 Zoom lever 11...
... 33 SUNSET S 21 Super macro mode 12 T TFT 68 TITLE 27 Top menu 15 Total recording time 24 Trimming P 26, 37 U USB cable 33, 43, 48, 54 USB driver 44, 54 V Video cable 31 VIDEO OUT 31 X xD-Picture Card 19, 71 Z Zoom 11 ZOOM (SLIDE SHOW 23 Zoom bar 18 Zoom lever 11...
FE-140 Basic Manual (English, Français, Español, Português)
Page 4
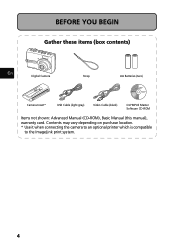
Contents may vary depending on purchase location. * Use it when connecting the camera to an optional printer which is compatible to the ImageLink print system. 4 BEFORE YOU BEGIN Gather these items (box contents) En Digital Camera Strap AA Batteries (two) Camera Insert* USB Cable (light gray) Video Cable (black) OLYMPUS Master Software CD-ROM Items not shown: Advanced Manual (CD-ROM), Basic Manual (this manual), warranty card.
Contents may vary depending on purchase location. * Use it when connecting the camera to an optional printer which is compatible to the ImageLink print system. 4 BEFORE YOU BEGIN Gather these items (box contents) En Digital Camera Strap AA Batteries (two) Camera Insert* USB Cable (light gray) Video Cable (black) OLYMPUS Master Software CD-ROM Items not shown: Advanced Manual (CD-ROM), Basic Manual (this manual), warranty card.

FE-140 Basic Manual (English, Français, Español, Português)
Page 8
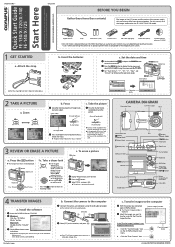
Macintosh: Double-click the En "Installer" icon. 3 Simply follow the on the monitor, and press F. USB cable 2 1 2 Select [PC] on -screen instructions. Step 4 Transfer Images TRANSFER IMAGES a. Your PC will turn on automatically. Connect the camera to the computer 1 Connect the camera and computer using the USB cable (provided). b. USB PC EASY PRINT CUSTOM PRINT EXIT SET OK 8 Install the software 1 Insert the OLYMPUS Master CD-ROM. 2 Windows: Click the "OLYMPUS Master" button. The monitor will now recognize your camera as a removable storage drive.
Macintosh: Double-click the En "Installer" icon. 3 Simply follow the on the monitor, and press F. USB cable 2 1 2 Select [PC] on -screen instructions. Step 4 Transfer Images TRANSFER IMAGES a. Your PC will turn on automatically. Connect the camera to the computer 1 Connect the camera and computer using the USB cable (provided). b. USB PC EASY PRINT CUSTOM PRINT EXIT SET OK 8 Install the software 1 Insert the OLYMPUS Master CD-ROM. 2 Windows: Click the "OLYMPUS Master" button. The monitor will now recognize your camera as a removable storage drive.

FE-140 Basic Manual (English, Français, Español, Português)
Page 19
You can print a picture with the picture selection screen displayed. Camera Insert (provided) 19 When you are finished, disconnect the USB cable from the camera with simple operations. 1 In playback mode, display the picture you may connect your camera directly to a PictBridge compatible printer such as the Olympus P-11 to the ImageLink print system by using the...
You can print a picture with the picture selection screen displayed. Camera Insert (provided) 19 When you are finished, disconnect the USB cable from the camera with simple operations. 1 In playback mode, display the picture you may connect your camera directly to a PictBridge compatible printer such as the Olympus P-11 to the ImageLink print system by using the...
FE-140 Quick Start Guide (English, Português)
Page 1
...and "minute" by following the operation guide. Connect the camera to shooting mode. For this manual may vary depending on the FE-130/X-720/X-740 model. Digital Camera Strap AA Batteries (two) Camera insert* USB Cable (light gray) Video Cable (black) OLYMPUS Master software CD-ROM Items not shown: Advanced Manual (...register your camera when you want to turn on automatically. Shutter Button Pictures will now recognize your subject. If the optional xD-Picture Card (hereinafter called "card") is permanently erased. Quick Start Guide FE-130/X-720/X-740 FE-140/X-725 ...
...and "minute" by following the operation guide. Connect the camera to shooting mode. For this manual may vary depending on the FE-130/X-720/X-740 model. Digital Camera Strap AA Batteries (two) Camera insert* USB Cable (light gray) Video Cable (black) OLYMPUS Master software CD-ROM Items not shown: Advanced Manual (...register your camera when you want to turn on automatically. Shutter Button Pictures will now recognize your subject. If the optional xD-Picture Card (hereinafter called "card") is permanently erased. Quick Start Guide FE-130/X-720/X-740 FE-140/X-725 ...


