
Pro8432WT - User Guide
Page 4
...service center if a liquid such as water enters in equipment malfunction or damage. Unplug the power cord and contact a customer service center if the printer is dropped or the cover is turned on, while printing. Do not throw toner cartridges and image drum cartridges into the eyes or mouth, ...flush with wet cloth. Unplug the power cord and remove foreign materials such as paper clips if they fall inside the printer. If the power plug remains inserted for your safety before using UPS (uninterruptible power source) or inverters is unusually hot, smoking, giving off...
...service center if a liquid such as water enters in equipment malfunction or damage. Unplug the power cord and contact a customer service center if the printer is dropped or the cover is turned on, while printing. Do not throw toner cartridges and image drum cartridges into the eyes or mouth, ...flush with wet cloth. Unplug the power cord and remove foreign materials such as paper clips if they fall inside the printer. If the power plug remains inserted for your safety before using UPS (uninterruptible power source) or inverters is unusually hot, smoking, giving off...

Pro8432WT - User Guide
Page 5
...ignored, may result in this document The following terms are described to know more detailed or related information. Indicates a printer you want to aid understanding of how to look when you want in equipment malfunction or damage. The initial setup descriptions including...network initial setting are noted along with this product. ●● Quick Guide This notes brief descriptions of this printer or the computer. Symbols [ ] " " < > button/key > Your Printer Description ●● Indicates menu names on the display screen. ●● Indicates menu, window, and ...
...ignored, may result in this document The following terms are described to know more detailed or related information. Indicates a printer you want to aid understanding of how to look when you want in equipment malfunction or damage. The initial setup descriptions including...network initial setting are noted along with this product. ●● Quick Guide This notes brief descriptions of this printer or the computer. Symbols [ ] " " < > button/key > Your Printer Description ●● Indicates menu names on the display screen. ●● Indicates menu, window, and ...

Pro8432WT - User Guide
Page 6
..., ozone, styrene, benzene, TVOC, and ultrafine particles conforms to the Eco Mark 155, "Printer" substance emission certification criteria. (Toner was tested by performing black and white and color printing with Oki Data genuine toner cartridges according to the appendix S-M of the Blue Angel RAL UZ-171:2012... test method.) - 6 - Notation used as OS X, and Pro8432WT is used in this manual The following notations may be used ...
..., ozone, styrene, benzene, TVOC, and ultrafine particles conforms to the Eco Mark 155, "Printer" substance emission certification criteria. (Toner was tested by performing black and white and color printing with Oki Data genuine toner cartridges according to the appendix S-M of the Blue Angel RAL UZ-171:2012... test method.) - 6 - Notation used as OS X, and Pro8432WT is used in this manual The following notations may be used ...

Pro8432WT - User Guide
Page 7
... Use the Function Key 13 Names of Components 13 Available Options...15 Checking the Placement Environment 16 Placement Environment 16 Placement Space...16 Preparing Your Printer 17 Unpacking...17 Installing Consumables 17 Loading Paper...19 Turning On/Off the Power 21 Installing Options...23 Test Printing from the...
... Use the Function Key 13 Names of Components 13 Available Options...15 Checking the Placement Environment 16 Placement Environment 16 Placement Space...16 Preparing Your Printer 17 Unpacking...17 Installing Consumables 17 Loading Paper...19 Turning On/Off the Power 21 Installing Options...23 Test Printing from the...
Pro8432WT - User Guide
Page 8
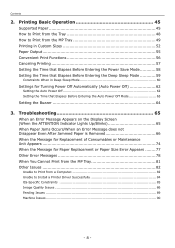
... or Paper Size Error Appears......... 77 Other Error Messages 78 When You Cannot Print from the MP Tray 81 Other Issues 82 Unable to Install a Printer Driver Successfully 84 OS-Specific Constraints 85 Image Quality Issues 86 Feeding Issues...89 Machine Issues...90 - 8 - Troubleshooting 65 When an Error Message Appears on...
... or Paper Size Error Appears......... 77 Other Error Messages 78 When You Cannot Print from the MP Tray 81 Other Issues 82 Unable to Install a Printer Driver Successfully 84 OS-Specific Constraints 85 Image Quality Issues 86 Feeding Issues...89 Machine Issues...90 - 8 - Troubleshooting 65 When an Error Message Appears on...

Pro8432WT - User Guide
Page 9
Appendix 113 Menu List of the Operator Panel 113 Checking the Printer's Status with the Display Screen 113 Menu List of the Printer 105 Cleaning Paper Feed Rollers 105 Cleaning LED Heads 107 Moving or Transporting Your Printer 109 Before Machine Disposal 112 5. Maintenance 92 Replacing Consumables and Maintenance Units 92 Replacing Toner Cartridges 93 Replacing the Image Drum 97 Replacing the Belt Unit 100 Replacing the Fuser Unit 103 Cleaning 105 Cleaning the Surface of the Operator Panel 114 Specifications 119 Index 125 Oki contact details 126 - 9 - Contents 4.
Appendix 113 Menu List of the Operator Panel 113 Checking the Printer's Status with the Display Screen 113 Menu List of the Printer 105 Cleaning Paper Feed Rollers 105 Cleaning LED Heads 107 Moving or Transporting Your Printer 109 Before Machine Disposal 112 5. Maintenance 92 Replacing Consumables and Maintenance Units 92 Replacing Toner Cartridges 93 Replacing the Image Drum 97 Replacing the Belt Unit 100 Replacing the Fuser Unit 103 Cleaning 105 Cleaning the Surface of the Operator Panel 114 Specifications 119 Index 125 Oki contact details 126 - 9 - Contents 4.

Pro8432WT - User Guide
Page 10
...operator panel Connecting a cable Installing a printer driver on a computer Adding printers on a computer Test printing from a computer Adding printers on /off the power ●● Installing options ●● Test printing from the printer 4. Setup How to operate ●●...; Checking names of product parts ●● Checking options 2. Preparing a Printer ●● Unpacking ●● Removing cushioning materials ●●...
...operator panel Connecting a cable Installing a printer driver on a computer Adding printers on a computer Test printing from a computer Adding printers on /off the power ●● Installing options ●● Test printing from the printer 4. Setup How to operate ●●...; Checking names of product parts ●● Checking options 2. Preparing a Printer ●● Unpacking ●● Removing cushioning materials ●●...

Pro8432WT - User Guide
Page 11
...white) ●● Quick Guide - 11 - Do not throw them separately. ●● Packaging and cushioning material are needed if transporting the printer. Procure them away. ●● Four image drums (cyan, yellow, magenta, white) Note ●● The image drums are not supplied with your... printer. Checking Package Contents Check that you have everything shown below. CAUTION It may cause injury! ●● At least two people are needed...
...white) ●● Quick Guide - 11 - Do not throw them separately. ●● Packaging and cushioning material are needed if transporting the printer. Procure them away. ●● Four image drums (cyan, yellow, magenta, white) Note ●● The image drums are not supplied with your... printer. Checking Package Contents Check that you have everything shown below. CAUTION It may cause injury! ●● At least two people are needed...

Pro8432WT - User Guide
Page 12
... Display screen button button button button button button button Ten-key pad key key indicator indicator Function Displays operating instructions and the status of the printer. Switches between on the operator panel and how to enter numbers and characters. Displays the help screen. Executes the following order: : 1 : 2 → a → b → c →...
... Display screen button button button button button button button Ten-key pad key key indicator indicator Function Displays operating instructions and the status of the printer. Switches between on the operator panel and how to enter numbers and characters. Displays the help screen. Executes the following order: : 1 : 2 → a → b → c →...

Pro8432WT - User Guide
Page 15
Operator Panel 1 1. Available Options The following options are available for your printer: ●● Additional RAM (256 MB or 512 MB) ●● 16 GB SD memory card kit ●● Wireless LAN module Reference ●● For details on how to install the options, refer to "Installing Options" P.23. Setup - 15 -
Operator Panel 1 1. Available Options The following options are available for your printer: ●● Additional RAM (256 MB or 512 MB) ●● 16 GB SD memory card kit ●● Wireless LAN module Reference ●● For details on how to install the options, refer to "Installing Options" P.23. Setup - 15 -

Pro8432WT - User Guide
Page 16
..., such as shown in the images below. ●● Top view 20 cm Note ●● Be careful of the printer is wide enough that the printer's feet securely on the surface. 1. Setup Checking the Placement Environment 1 ●●Checking the Placement Environment Placement Environment Placement Space... 60 cm ●● Side view 20 cm 70 cm 100 cm - 16 - It may cause a malfunction. ●● If placing your printer in a location where the humidity of the surrounding air is started (laboratory etc.). ●● Do not install near high temperature or the fire....
..., such as shown in the images below. ●● Top view 20 cm Note ●● Be careful of the printer is wide enough that the printer's feet securely on the surface. 1. Setup Checking the Placement Environment 1 ●●Checking the Placement Environment Placement Environment Placement Space... 60 cm ●● Side view 20 cm 70 cm 100 cm - 16 - It may cause a malfunction. ●● If placing your printer in a location where the humidity of the surrounding air is started (laboratory etc.). ●● Do not install near high temperature or the fire....

Pro8432WT - User Guide
Page 17
...may not be displayed correctly, or you may not be able to open the front cover (2) forward. Do not throw them away. 1 Remove your printer from the box and remove all four image drums from your finger into the recess on and off. Setup CAUTION It may open. 1 2 2 ...button (3) and open lever (1) to use the consumables or maintenance units provided with this printer at the back of your printer. 1 1 Insert your printer. 2 Remove the two strips of protective tape (1) at first. Otherwise, the life of the printer and pull the front cover open the output tray (4). 3 4 3 Take out all...
...may not be displayed correctly, or you may not be able to open the front cover (2) forward. Do not throw them away. 1 Remove your printer from the box and remove all four image drums from your finger into the recess on and off. Setup CAUTION It may open. 1 2 2 ...button (3) and open lever (1) to use the consumables or maintenance units provided with this printer at the back of your printer. 1 1 Insert your printer. 2 Remove the two strips of protective tape (1) at first. Otherwise, the life of the printer and pull the front cover open the output tray (4). 3 4 3 Take out all...

Pro8432WT - User Guide
Page 18
Setup - 18 - Preparing Your Printer 4 Remove the protective sheets and toner 1 covers from four image drums. x4 (C / Y / M / W) 5 Confirm that the image drum and the toner cartridge are of the same color, and then attach the toner cartridge to the image drum. 1.
Setup - 18 - Preparing Your Printer 4 Remove the protective sheets and toner 1 covers from four image drums. x4 (C / Y / M / W) 5 Confirm that the image drum and the toner cartridge are of the same color, and then attach the toner cartridge to the image drum. 1.

Pro8432WT - User Guide
Page 19
... the top or front cover is open does not disappear from the operator panel's display screen, make sure they are closed securely. 2 - 19 - Preparing Your Printer Loading Paper 1 Reference ●● Please refer to "Supported Paper" P.45 for information on how to load paper into...
... the top or front cover is open does not disappear from the operator panel's display screen, make sure they are closed securely. 2 - 19 - Preparing Your Printer Loading Paper 1 Reference ●● Please refer to "Supported Paper" P.45 for information on how to load paper into...

Pro8432WT - User Guide
Page 20
... loading the A6 size paper, move the paper stopper (4) forward and remove it once, then install it on the operator panel. - 20 - 1. Setup Preparing Your Printer 3 Slide the paper guide (3) and paper 1 stopper (4) to be loaded. 5 Load paper with the print side face down and press it . Straighten the edges of... paper matches the setting of the paper stack on a level surface. 6 Secure the loaded paper with a paper size dial options, set the dial to the printer.
... loading the A6 size paper, move the paper stopper (4) forward and remove it once, then install it on the operator panel. - 20 - 1. Setup Preparing Your Printer 3 Slide the paper guide (3) and paper 1 stopper (4) to be loaded. 5 Load paper with the print side face down and press it . Straighten the edges of... paper matches the setting of the paper stack on a level surface. 6 Secure the loaded paper with a paper size dial options, set the dial to the printer.

Pro8432WT - User Guide
Page 21
...●● Please do not connect with the ground of an extended code may incorrect-operate by the electric noise. Especially, a printer may not operate a printer normally by any means. ●● Make sure to connect with the ground terminal before connecting the power cord to the power supply... into the wall socket securely. ●● Do not touch the power cord, or printer, if your printer. 1 2 Plug the AC cord into the AC power socket of this printer is sufficient to operate this printer and other product for about 1 second to the same wall socket. There is a risk...
...●● Please do not connect with the ground of an extended code may incorrect-operate by the electric noise. Especially, a printer may not operate a printer normally by any means. ●● Make sure to connect with the ground terminal before connecting the power cord to the power supply... into the wall socket securely. ●● Do not touch the power cord, or printer, if your printer. 1 2 Plug the AC cord into the AC power socket of this printer is sufficient to operate this printer and other product for about 1 second to the same wall socket. There is a risk...

Pro8432WT - User Guide
Page 22
...mode to "Setting the Time that Elapses Before Entering the Deep Sleep Mode" P.59. Memo ●● By factory default, the time interval before the printer enters the deep sleep mode, refer to "Setting the Time that Elapses Before Entering the Power Save Mode" P.58. „„Deep Sleep Mode Your... from the power save mode to consecutive holidays or when on deep sleep mode, please refer to "Other Issues" P.82. Setup Preparing Your Printer Turning Off the Power 1 1 Hold down Please wait. For how to change the time that elapses before entering the power save mode, refer to ...
...mode to "Setting the Time that Elapses Before Entering the Deep Sleep Mode" P.59. Memo ●● By factory default, the time interval before the printer enters the deep sleep mode, refer to "Setting the Time that Elapses Before Entering the Power Save Mode" P.58. „„Deep Sleep Mode Your... from the power save mode to consecutive holidays or when on deep sleep mode, please refer to "Other Issues" P.82. Setup Preparing Your Printer Turning Off the Power 1 1 Hold down Please wait. For how to change the time that elapses before entering the power save mode, refer to ...
Pro8432WT - User Guide
Page 23
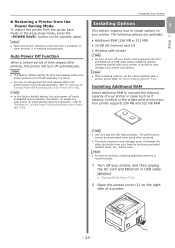
.... Installing Additional RAM Install additional RAM to increase the memory capacity of your printer and unplug the AC cord and Ethernet or USB cable before installing options. Note ●● Use only genuine Oki Data products. Setup ●● Additional RAM (256 MB or 512 MB) ●● 16 GB SD memory...
.... Installing Additional RAM Install additional RAM to increase the memory capacity of your printer and unplug the AC cord and Ethernet or USB cable before installing options. Note ●● Use only genuine Oki Data products. Setup ●● Additional RAM (256 MB or 512 MB) ●● 16 GB SD memory...

Pro8432WT - User Guide
Page 24
... are fitted with a connector of the metal plate (2), slide the metal plate downward and secure it toward the printer. If it is attached, remove the SD memory card. (1) Put your finger in the printer, then install the metal plate. 2 4 Make sure the LED (3) indicated by pushing it . 2 3 Note &#...9679;● Attach the SD memory card socket before installing the metal plate if the SD memory card socket was attached to the printer. - 24 - Setup 2 (2) Pinch the lower part of the metal plate (2), and pull it forward. 2 4 6 Install the metal plate (2). (1) First, insert the...
... are fitted with a connector of the metal plate (2), slide the metal plate downward and secure it toward the printer. If it is attached, remove the SD memory card. (1) Put your finger in the printer, then install the metal plate. 2 4 Make sure the LED (3) indicated by pushing it . 2 3 Note &#...9679;● Attach the SD memory card socket before installing the metal plate if the SD memory card socket was attached to the printer. - 24 - Setup 2 (2) Pinch the lower part of the metal plate (2), and pull it forward. 2 4 6 Install the metal plate (2). (1) First, insert the...

Pro8432WT - User Guide
Page 25
Preparing Your Printer 1 12 Press the scroll button several times to select [RAM] and press the button. 1. for memory expanded to 256 MB, it is [512 MB]; Note &#.... --For memory expanded to 512 MB, it is [768 MB]. Setup 1 8 Plug the AC cord and Ethernet or USB cable into your printer, and then turn off your printer and unplug the AC cord and Ethernet or USB cable, and then reinstall the additional RAM. 14 Press the button. 11 Press the...
Preparing Your Printer 1 12 Press the scroll button several times to select [RAM] and press the button. 1. for memory expanded to 256 MB, it is [512 MB]; Note &#.... --For memory expanded to 512 MB, it is [768 MB]. Setup 1 8 Plug the AC cord and Ethernet or USB cable into your printer, and then turn off your printer and unplug the AC cord and Ethernet or USB cable, and then reinstall the additional RAM. 14 Press the button. 11 Press the...


