
C911dn/C931dn Safety/Warranty/Regulatory Guide
Page 9
... strong oxidizers. : This product is electrically earthed/grounded before beginning operation. : Keep out of reach of this product in large quantities. Do not get in printers/copiers. 8. Keep away from excessive heat and sources of children. Personal protective equipments (glasses) are recommended when handling this product in large quantities. 9. 7.
... strong oxidizers. : This product is electrically earthed/grounded before beginning operation. : Keep out of reach of this product in large quantities. Do not get in printers/copiers. 8. Keep away from excessive heat and sources of children. Personal protective equipments (glasses) are recommended when handling this product in large quantities. 9. 7.

C911dn/C931dn Safety/Warranty/Regulatory Guide
Page 15
5. Keep away from excessive heat and sources of ignition such as described in printers/copiers. 8. Do not breathe dust. Refer to Other Sections : Avoid dust formation. Eliminate source of ignition. Vacuum or sweep the material into drains. Dispose of ...
5. Keep away from excessive heat and sources of ignition such as described in printers/copiers. 8. Do not breathe dust. Refer to Other Sections : Avoid dust formation. Eliminate source of ignition. Vacuum or sweep the material into drains. Dispose of ...

C911dn/C931dn/C941dn Basic User's Guide
Page 1
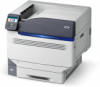
User's Manual Basic Preparing the printer to print 1 Before use 2 Setting Up 3 Printing 4 Basic Device Operations Appendix C911dn C931dn C941dn ES9411dn ES9431dn ES9541dn Index ˓This manual contains cautions on how to use this product safety. ɹBefore you use this product, please make sure that you read this manual. ˓Carefully store this manual close to hand so.
User's Manual Basic Preparing the printer to print 1 Before use 2 Setting Up 3 Printing 4 Basic Device Operations Appendix C911dn C931dn C941dn ES9411dn ES9431dn ES9541dn Index ˓This manual contains cautions on how to use this product safety. ɹBefore you use this product, please make sure that you read this manual. ˓Carefully store this manual close to hand so.

C911dn/C931dn/C941dn Basic User's Guide
Page 2
...as necessary Try using Spot Color. The e-manual is displayed. Basic User's Manual toPrperpinatring the printer 1 uBseefore 2 Setting Up 3 Printing 4 OBpearsaictiDonesvice ESE9SE59SC4499C13449Cd11139nd1d11ndnd1nndn ˓ɹC˓aBreTefhfouirslelymysaotnuouruaesletchotishnitmsaipanrnsoudcaauluccttl,ioospnelsetaoosnehhamonwadksteoos.uusree ...tthhiastpyrooudurectadsatfheitsy.manual. Further, basic uses from the control panel, and the network settings. Further, this first C911dn/C931dn/E9411dn/ES9431dn Set-up Guide 45583101EERev1 1 2 3 4 91.6 kg 5 1040 mm 41 inch ...
...as necessary Try using Spot Color. The e-manual is displayed. Basic User's Manual toPrperpinatring the printer 1 uBseefore 2 Setting Up 3 Printing 4 OBpearsaictiDonesvice ESE9SE59SC4499C13449Cd11139nd1d11ndnd1nndn ˓ɹC˓aBreTefhfouirslelymysaotnuouruaesletchotishnitmsaipanrnsoudcaauluccttl,ioospnelsetaoosnehhamonwadksteoos.uusree ...tthhiastpyrooudurectadsatfheitsy.manual. Further, basic uses from the control panel, and the network settings. Further, this first C911dn/C931dn/E9411dn/ES9431dn Set-up Guide 45583101EERev1 1 2 3 4 91.6 kg 5 1040 mm 41 inch ...

C911dn/C931dn/C941dn Basic User's Guide
Page 3
... PC connection type. Memo zz This example uses the Windows screens. You can register as a user from here. *2 Select the printer model. Close the "Software DVD-ROM". - 3 - You can install and set the device utility software. To learn the easy device ... *1: Access is only possible using a Macintosh, double-click the [OKI] icon. zzAbout the Enclosed "Software DVD-ROM" When the "software DVD-ROM" enclosed with the device is required. Click here to install the standard Describes the selected printer drivers. zz If using an internet-enabled environment. *2: To view ...
... PC connection type. Memo zz This example uses the Windows screens. You can register as a user from here. *2 Select the printer model. Close the "Software DVD-ROM". - 3 - You can install and set the device utility software. To learn the easy device ... *1: Access is only possible using a Macintosh, double-click the [OKI] icon. zzAbout the Enclosed "Software DVD-ROM" When the "software DVD-ROM" enclosed with the device is required. Click here to install the standard Describes the selected printer drivers. zz If using an internet-enabled environment. *2: To view ...

C911dn/C931dn/C941dn Basic User's Guide
Page 15
... Checking the product 23 Checking the Package Contents 23 Parts Nomenclature and Functions 25 Main Unit...25 Front/Right Side...25 Back/Left Side...26 Printer Interior...27 Front Interior...27 Right Side Interior...28 Left Side Interior...29 Interface...30 Control Panel...31 Main Control Panel Features 32 Control Panel...
... Checking the product 23 Checking the Package Contents 23 Parts Nomenclature and Functions 25 Main Unit...25 Front/Right Side...25 Back/Left Side...26 Printer Interior...27 Front Interior...27 Right Side Interior...28 Left Side Interior...29 Interface...30 Control Panel...31 Main Control Panel Features 32 Control Panel...

C911dn/C931dn/C941dn Basic User's Guide
Page 16
...Supply 57 Turning OFF the Power Supply 58 Test Printing Using the Printer Only 59 Printer Information 60 Connecting the PC 61 Flow for Installing Drivers on a PC 61 Operating Environment 62 Printer Driver Types 62 Connecting Cables 63 Connecting Using LAN Cables 63 ...Connecting Using USB Cables 64 Installer Printer Drivers (Windows 65 Network Connections...65 USB Connections...72 If Setup Fails...74 Installing Printer Drivers (Macintosh 74 Network Connections......
...Supply 57 Turning OFF the Power Supply 58 Test Printing Using the Printer Only 59 Printer Information 60 Connecting the PC 61 Flow for Installing Drivers on a PC 61 Operating Environment 62 Printer Driver Types 62 Connecting Cables 63 Connecting Using LAN Cables 63 ...Connecting Using USB Cables 64 Installer Printer Drivers (Windows 65 Network Connections...65 USB Connections...72 If Setup Fails...74 Installing Printer Drivers (Macintosh 74 Network Connections......

C911dn/C931dn/C941dn Basic User's Guide
Page 17
...111 Setting Power Save Mode 111 Setting the time before the printer enters power save mode 112 Setting sleep mode 113 Setting the time before the printer enters sleep mode 114 Restrictions in sleep mode 116 Printer driver utility restrictions 116 Network function restrictions 117 Setup to ...Turn OFF the Power Supply Automatically 118 Setting auto power OFF mode 118 Setting the time before the printer enters auto power OFF mode 119 Checking print quantities 120 Checking Consumables, and Remaining Maintenance Unit Quantities and Service Life 121 Canceling...
...111 Setting Power Save Mode 111 Setting the time before the printer enters power save mode 112 Setting sleep mode 113 Setting the time before the printer enters sleep mode 114 Restrictions in sleep mode 116 Printer driver utility restrictions 116 Network function restrictions 117 Setup to ...Turn OFF the Power Supply Automatically 118 Setting auto power OFF mode 118 Setting the time before the printer enters auto power OFF mode 119 Checking print quantities 120 Checking Consumables, and Remaining Maintenance Unit Quantities and Service Life 121 Canceling...

C911dn/C931dn/C941dn Basic User's Guide
Page 20
...manual page 61) 'VODUJPO Functions can be set using the control panel Various device functions can be set using the control panel. 1BOFM The printer status can be checked, and error messages and help displayed, on the control panel Either "Remaining toner quantity display" or "Tray information display...checking the control panel messages. (This manual page 31) 1TPBXWFJOSH Power consumption is reduced when the printer is not in the device, you can also be set such as a network printer High-quality, high-speed printing is possible from the control panel. Viable with C911/C931/C941/...
...manual page 61) 'VODUJPO Functions can be set using the control panel Various device functions can be set using the control panel. 1BOFM The printer status can be checked, and error messages and help displayed, on the control panel Either "Remaining toner quantity display" or "Tray information display...checking the control panel messages. (This manual page 31) 1TPBXWFJOSH Power consumption is reduced when the printer is not in the device, you can also be set such as a network printer High-quality, high-speed printing is possible from the control panel. Viable with C911/C931/C941/...

C911dn/C931dn/C941dn Basic User's Guide
Page 23
... or for the expansion tray. zz See "Mounting the Expansion Unit (Optional)" (P.50) for maintenance 1 Troubleshooting 2 Maintenance Index C911dn C931dn C941dn ES9411dn ES9431dn ES9541dn ˓Store this manual close to use 1 This chapter explains the package contents of the product and ... the box. 3 Printing CAUTION There is a separate package. User's Manual Basic Preparing the printer to print 1 Before use 2 Setting Up 3 Printing 4 Basic Device Operations Appendix C911dn C931dn C941dn ES9411dn ES9431dn ES9541dn Index ˓This manual contains cautions on how to use this ...
... or for the expansion tray. zz See "Mounting the Expansion Unit (Optional)" (P.50) for maintenance 1 Troubleshooting 2 Maintenance Index C911dn C931dn C941dn ES9411dn ES9431dn ES9541dn ˓Store this manual close to use 1 This chapter explains the package contents of the product and ... the box. 3 Printing CAUTION There is a separate package. User's Manual Basic Preparing the printer to print 1 Before use 2 Setting Up 3 Printing 4 Basic Device Operations Appendix C911dn C931dn C941dn ES9411dn ES9431dn ES9541dn Index ˓This manual contains cautions on how to use this ...

C911dn/C931dn/C941dn Basic User's Guide
Page 24
Prepare them safely. 2 3 4 Setting Up Printing Basic Device Operations Appendix Index - 24 - Do not discard them, but store them separately. 1 zz The packing case and buffer material are not included with the printer. Before use Checking the product Note zz LAN cables, USB cables, and hubs are required when shipping the device.
Prepare them safely. 2 3 4 Setting Up Printing Basic Device Operations Appendix Index - 24 - Do not discard them, but store them separately. 1 zz The packing case and buffer material are not included with the printer. Before use Checking the product Note zz LAN cables, USB cables, and hubs are required when shipping the device.

C911dn/C931dn/C941dn Basic User's Guide
Page 27
when "Display remaining toner quantity" has been "Mounting Consumables" (P.46) set inside the printer main unit before shipment from the factory. zzThe image drum is a consumable. 4 Basic Device Operations Appendix Index Belt unit This device copies ... When the waste toner box is full, a message is a replaceable maintenance part. - 27 - The waste toner box is displayed on the control panel. Printer Interior Front Interior Parts Nomenclature and Functions 1 2 Before use Setting Up 3 Printing Toner cartridge Slot zzThe remaining toner quantity is set in the slot. Belt...
when "Display remaining toner quantity" has been "Mounting Consumables" (P.46) set inside the printer main unit before shipment from the factory. zzThe image drum is a consumable. 4 Basic Device Operations Appendix Index Belt unit This device copies ... When the waste toner box is full, a message is a replaceable maintenance part. - 27 - The waste toner box is displayed on the control panel. Printer Interior Front Interior Parts Nomenclature and Functions 1 2 Before use Setting Up 3 Printing Toner cartridge Slot zzThe remaining toner quantity is set in the slot. Belt...

C911dn/C931dn/C941dn Basic User's Guide
Page 34
...hold either turn ON or flash, and a message will return to the standby screen. [CANCEL] button: The following statuses. [POWER SAVE] button: The printer will enter power save mode to return to the standby 3 screen. [HELP] button: Press the [HELP] button when it is lit to display the...the relevant help screen, press the [HELP] button again. Before use Setting Up Printing Parts Nomenclature and Functions „„Error Screen If a printer error occurs, the maintenance lamp will either the scroll button or to scroll through the pages at approx. 0.5-second intervals. To close the help ...
...hold either turn ON or flash, and a message will return to the standby screen. [CANCEL] button: The following statuses. [POWER SAVE] button: The printer will enter power save mode to return to the standby 3 screen. [HELP] button: Press the [HELP] button when it is lit to display the...the relevant help screen, press the [HELP] button again. Before use Setting Up Printing Parts Nomenclature and Functions „„Error Screen If a printer error occurs, the maintenance lamp will either the scroll button or to scroll through the pages at approx. 0.5-second intervals. To close the help ...
C911dn/C931dn/C941dn Basic User's Guide
Page 41
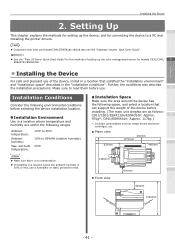
....) *: Includes consumables such as follows: C911/C931/ES9411dn/ES9431dn: Approx. 4 97kg*; wet-bulb temperature: 10ºC to 35ºC 10% to a PC and installing the printer drivers. Setting Up 1 This chapter explains the methods for setting up the color management server for connecting the device to 85%RH (relative humidity) 25...
....) *: Includes consumables such as follows: C911/C931/ES9411dn/ES9431dn: Approx. 4 97kg*; wet-bulb temperature: 10ºC to 35ºC 10% to a PC and installing the printer drivers. Setting Up 1 This chapter explains the methods for setting up the color management server for connecting the device to 85%RH (relative humidity) 25...

C911dn/C931dn/C941dn Basic User's Guide
Page 45
Before use 2 Setting Up 3 Printing 3 Remove the three carrying levers at the bottom of the printer ( ), and check the three locations of the carrying 4 handles ( ). Index - 45 - The trays and covers opening during transport may cause unexpected injury. Note 1 ...;The packing and protective equipment are used when shipping the device, so store them carefully. Installing the Device 2 Remove the cover bag enclosing the main printer unit.
Before use 2 Setting Up 3 Printing 3 Remove the three carrying levers at the bottom of the printer ( ), and check the three locations of the carrying 4 handles ( ). Index - 45 - The trays and covers opening during transport may cause unexpected injury. Note 1 ...;The packing and protective equipment are used when shipping the device, so store them carefully. Installing the Device 2 Remove the cover bag enclosing the main printer unit.

C911dn/C931dn/C941dn Basic User's Guide
Page 50
...the device. Note If placed on a table, the large-capacity expansion tray unit cannot be mounted to either the main printer unit or the expansion tray unit. The expansion tray unit has a large-capacity tray comprising the 1st and 3rd trays. The expansion trays...: TRY-C3G1) „„Expansion tray unit with casters (model: TRY-C3G2) ‰‰Mounting the expansion tray unit with casters to the main printer unit 4 Setting Up Printing Basic Device Operations Appendix Index - 50 - Before use Installing the Device Mounting the Expansion Unit (Optional) 1 Mount the ...
...the device. Note If placed on a table, the large-capacity expansion tray unit cannot be mounted to either the main printer unit or the expansion tray unit. The expansion tray unit has a large-capacity tray comprising the 1st and 3rd trays. The expansion trays...: TRY-C3G1) „„Expansion tray unit with casters (model: TRY-C3G2) ‰‰Mounting the expansion tray unit with casters to the main printer unit 4 Setting Up Printing Basic Device Operations Appendix Index - 50 - Before use Installing the Device Mounting the Expansion Unit (Optional) 1 Mount the ...

C911dn/C931dn/C941dn Basic User's Guide
Page 51
... device is approx. 97kg for models C911/C931/ES9411dn/ES9431dn, and approx. 117kg for model C941/ES9541dn, so make sure to use 2 Mount the main printer unit to lift. For how to the position of the vertical lines on the other while matching the main unit to turn OFF the device...
... device is approx. 97kg for models C911/C931/ES9411dn/ES9431dn, and approx. 117kg for model C941/ES9541dn, so make sure to use 2 Mount the main printer unit to lift. For how to the position of the vertical lines on the other while matching the main unit to turn OFF the device...

C911dn/C931dn/C941dn Basic User's Guide
Page 52
... large-capacity expansion tray unit, first mount the expansion tray 1 unit to the large-capacity expansion tray unit, and then mount the main printer unit to lock the casters. 2 Printer base hole 3 Protrusion 4 Protrusion 4 Loosen the nuts (x2) at the top of the feet on the casters (x2) at the front of...
... large-capacity expansion tray unit, first mount the expansion tray 1 unit to the large-capacity expansion tray unit, and then mount the main printer unit to lock the casters. 2 Printer base hole 3 Protrusion 4 Protrusion 4 Loosen the nuts (x2) at the top of the feet on the casters (x2) at the front of...

C911dn/C931dn/C941dn Basic User's Guide
Page 53
... replacing consumables or maintenance units, or setting paper in the tray, check the following points to prevent the printer from the ground. 5 Rotate the nuts and bolts at the top to secure the tray unit. Installing the Device If moving the device, rotate and ... nuts at the bottom of the large-capacity expansion tray unit, and move while remote from toppling. 1 zzDo not press the front cover when the printer font cover is necessary to implement "Connecting Cables" (P.63) and "Connecting Power Cables" (P.57) before making the settings for the...
... replacing consumables or maintenance units, or setting paper in the tray, check the following points to prevent the printer from the ground. 5 Rotate the nuts and bolts at the top to secure the tray unit. Installing the Device If moving the device, rotate and ... nuts at the bottom of the large-capacity expansion tray unit, and move while remote from toppling. 1 zzDo not press the front cover when the printer font cover is necessary to implement "Connecting Cables" (P.63) and "Connecting Power Cables" (P.57) before making the settings for the...

C911dn/C931dn/C941dn Basic User's Guide
Page 54
... Device Operations Appendix Index - 54 - Reference For the functions required by the HDD, see "Advanced". 2 „„Built-in the direction of the printer ( ), and open the door ( ). 3 Check that the internal LED lamp ( ) is OFF. 4 Align the screws (x2) on the built-in HDD to the holes on...
... Device Operations Appendix Index - 54 - Reference For the functions required by the HDD, see "Advanced". 2 „„Built-in the direction of the printer ( ), and open the door ( ). 3 Check that the internal LED lamp ( ) is OFF. 4 Align the screws (x2) on the built-in HDD to the holes on...


