
PrintSuperVision Configuration Guide
Page 4
...(Optional Link 55 Supplies Ordering Calendar 56 Reporting 57 Available Reports 57 Selecting Report Attributes 57 Toner Changes Report 58 Generating a Toner Changes Report 58 Scheduling a Toner Changes Report 59 Schedule Log Report 60 Supplies Usage Report 61 Printed Pages Report 62 Color/...69 Quickly Access a Group of Devices 69 Changing the Device Properties Displayed 70 Searching for a Device 72 Changing Languages 72 Downloading Oki Drivers 73 Print to Remote Locations 74 Creating a Maintenance Log / Managing Supplies Inventory 75 Viewing a Login Log 76 Clearing (Deleting...
...(Optional Link 55 Supplies Ordering Calendar 56 Reporting 57 Available Reports 57 Selecting Report Attributes 57 Toner Changes Report 58 Generating a Toner Changes Report 58 Scheduling a Toner Changes Report 59 Schedule Log Report 60 Supplies Usage Report 61 Printed Pages Report 62 Color/...69 Quickly Access a Group of Devices 69 Changing the Device Properties Displayed 70 Searching for a Device 72 Changing Languages 72 Downloading Oki Drivers 73 Print to Remote Locations 74 Creating a Maintenance Log / Managing Supplies Inventory 75 Viewing a Login Log 76 Clearing (Deleting...

PrintSuperVision Configuration Guide
Page 57
Reporting PSV can generate several reports that are available for reporting. Available Reports • Toner Changes Report (see page 58) • Schedule Log Report (see page 60) • Supplied Usage Report (see page 61) • Printed Pages Report... down menu. 57 • Reporting Most reports can be scheduled to add or delete the device attributes and properties that identify supplies use, predict toner replacement dates, indicate pages printed and export device properties. To select reporting attributes 1. Click Configure Properties and Attributes from the main menu. 2. Reports...
Reporting PSV can generate several reports that are available for reporting. Available Reports • Toner Changes Report (see page 58) • Schedule Log Report (see page 60) • Supplied Usage Report (see page 61) • Printed Pages Report... down menu. 57 • Reporting Most reports can be scheduled to add or delete the device attributes and properties that identify supplies use, predict toner replacement dates, indicate pages printed and export device properties. To select reporting attributes 1. Click Configure Properties and Attributes from the main menu. 2. Reports...

PrintSuperVision Configuration Guide
Page 58
... replacement for a group of devices and indicates if there was any toner remaining at the bottom of the screen (not shown in the Professional Edition. Select Reports from the main menu and Toner Changes Report from the drop down box. 58 • Reporting This report is not available in screen shot)... to include in identifying wasted toner as a result of replacement. Click the Save button at the time of changing the cartridge too soon. Select the desired device attributes that you ...
... replacement for a group of devices and indicates if there was any toner remaining at the bottom of the screen (not shown in the Professional Edition. Select Reports from the main menu and Toner Changes Report from the drop down box. 58 • Reporting This report is not available in screen shot)... to include in identifying wasted toner as a result of replacement. Click the Save button at the time of changing the cartridge too soon. Select the desired device attributes that you ...

PrintSuperVision Configuration Guide
Page 59
... links (highlighted in blue). Indicate either HTML or Excel format and click Show to make the data more readable. 3. Scheduling a Toner Changes Report A Toner Changes report can help you pinpoint toner remaining at on a particular date. Enter a range of devices to an individual or group. 1. Select a report format and the ... to run periodically and configured to be sent via email to report on the calendar icons to display results; Additional details for toner replacement are available by various table sizes to generate the report. Select a group of dates or click on .
... links (highlighted in blue). Indicate either HTML or Excel format and click Show to make the data more readable. 3. Scheduling a Toner Changes Report A Toner Changes report can help you pinpoint toner remaining at on a particular date. Enter a range of devices to an individual or group. 1. Select a report format and the ... to run periodically and configured to be sent via email to report on the calendar icons to display results; Additional details for toner replacement are available by various table sizes to generate the report. Select a group of dates or click on .

PrintSuperVision Configuration Guide
Page 60
Enter a date range and select the desired activity. 60 • Reporting The toner changes report will be generated and sent, indicate email recipients and click Save. Schedule Log Report The Schedule Log Report provides an activity status log. 1. 2. Click Schedule Logs. 2. Select a starting date and time, select a recurring interval for the report to be generated and sent to the recipient on the dates and times indicated.
Enter a date range and select the desired activity. 60 • Reporting The toner changes report will be generated and sent, indicate email recipients and click Save. Schedule Log Report The Schedule Log Report provides an activity status log. 1. 2. Click Schedule Logs. 2. Select a starting date and time, select a recurring interval for the report to be generated and sent to the recipient on the dates and times indicated.
PrintSuperVision Configuration Guide
Page 61
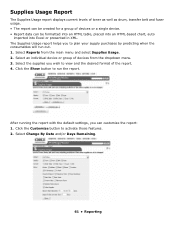
... or a single device. • Report data can be created for a group of the report. 4. Supplies Usage Report The Supplies Usage report displays current levels of toner as well as drum, transfer belt and fuser usage. • The report can be formatted into an HTML table, placed into an HTML-based chart...
... or a single device. • Report data can be created for a group of the report. 4. Supplies Usage Report The Supplies Usage report displays current levels of toner as well as drum, transfer belt and fuser usage. • The report can be formatted into an HTML table, placed into an HTML-based chart...
PrintSuperVision Configuration Guide
Page 69
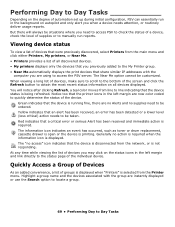
... and click the Refresh button to be customized. The Near Me option cannot be taken. The information icon indicates an event has occurred, such as toner or drum replacement, cassette drawer is open or the device is required. The "no action is required when the information icon is disconnected from the...
... and click the Refresh button to be customized. The Near Me option cannot be taken. The information icon indicates an event has occurred, such as toner or drum replacement, cassette drawer is open or the device is required. The "no action is required when the information icon is disconnected from the...
C610, C711 User's Guide (English)
Page 3
... fresh air. C610/C711 User's Guide Seek medical attention. Seek medical attention. If inhaled, move the person to an open . Spillages should be treated with toner powder: If swallowed, give small amounts of cold water and seek medical attention. Emergency First Aid Take care with cold water and soap to help...
... fresh air. C610/C711 User's Guide Seek medical attention. Seek medical attention. If inhaled, move the person to an open . Spillages should be treated with toner powder: If swallowed, give small amounts of cold water and seek medical attention. Emergency First Aid Take care with cold water and soap to help...
C610, C711 User's Guide (English)
Page 5
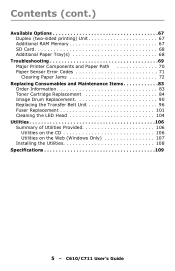
... Major Printer Components and Paper Path 70 Paper Sensor Error Codes 71 Clearing Paper Jams 72 Replacing Consumables and Maintenance Items 83 Order Information 83 Toner Cartridge Replacement 84 Image Drum Replacement 90 Replacing the Transfer Belt Unit 96 Fuser Replacement 101 Cleaning the LED Head 104 Utilities 106 Summary of...
... Major Printer Components and Paper Path 70 Paper Sensor Error Codes 71 Clearing Paper Jams 72 Replacing Consumables and Maintenance Items 83 Order Information 83 Toner Cartridge Replacement 84 Image Drum Replacement 90 Replacing the Transfer Belt Unit 96 Fuser Replacement 101 Cleaning the LED Head 104 Utilities 106 Summary of...

C610, C711 User's Guide (English)
Page 8
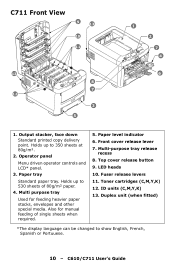
Output stacker, face down Standard printed copy delivery point. Also for feeding heavier paper stocks, envelopes and other special media. Top cover release button 9. Toner cartridges (C,M,Y,K) 12. C610/C711 User's Guide Holds up to 250 sheets at 80 g/m². 2. Multi purpose tray Used for manual feeding of 80 g/m² paper. 4. ...
Output stacker, face down Standard printed copy delivery point. Also for feeding heavier paper stocks, envelopes and other special media. Top cover release button 9. Toner cartridges (C,M,Y,K) 12. C610/C711 User's Guide Holds up to 250 sheets at 80 g/m². 2. Multi purpose tray Used for manual feeding of 80 g/m² paper. 4. ...
C610, C711 User's Guide (English)
Page 10
... sheets when required. 5. Front cover release lever 7. LED heads 10. C610/C711 User's Guide Paper level indicator 6. C711 Front View 9 13 10 11 13 8 7 12 3 5 1 2 7 4 6 1. Toner cartridges (C,M,Y,K) 12. Output stacker, face down Standard printed copy delivery point. Holds up to show English, French, Spanish or Portuuese. 10 - Operator panel Menu driven...
... sheets when required. 5. Front cover release lever 7. LED heads 10. C610/C711 User's Guide Paper level indicator 6. C711 Front View 9 13 10 11 13 8 7 12 3 5 1 2 7 4 6 1. Toner cartridges (C,M,Y,K) 12. Output stacker, face down Standard printed copy delivery point. Holds up to show English, French, Spanish or Portuuese. 10 - Operator panel Menu driven...
C610, C711 User's Guide (English)
Page 25
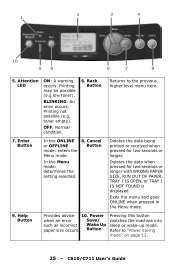
.... 25 - Power Save/ Wake Up Button Pressing this button switches the machine into sleep or wake-up mode. Attention LED ON: A warning occurs. toner empty). Help Button Provides advice when an error such as incorrect paper size occurs 10. Cancel Button In the Menu mode: determines the setting selected... PAPER SIZE, RUN OUT OF PAPER, TRAY 1 IS OPEN, or TRAY 1 IS NOT FOUND is displayed. 2 3 4 1 10 59 6 7 8 5. Printing may be possible (e.g low toner). BLINKING: An error occurs. OFF: Normal condition. 6. Deletes the data when pressed for two seconds or longer.
.... 25 - Power Save/ Wake Up Button Pressing this button switches the machine into sleep or wake-up mode. Attention LED ON: A warning occurs. toner empty). Help Button Provides advice when an error such as incorrect paper size occurs 10. Cancel Button In the Menu mode: determines the setting selected... PAPER SIZE, RUN OUT OF PAPER, TRAY 1 IS OPEN, or TRAY 1 IS NOT FOUND is displayed. 2 3 4 1 10 59 6 7 8 5. Printing may be possible (e.g low toner). BLINKING: An error occurs. OFF: Normal condition. 6. Deletes the data when pressed for two seconds or longer.
C610, C711 User's Guide (English)
Page 28
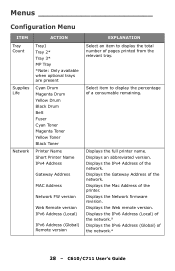
... Tray 2* Tray 3* MP Tray *Note: Only available when optional trays are present Cyan Drum Magenta Drum Yellow Drum Black Drum Belt Fuser Cyan Toner Magenta Toner Yellow Toner Black Toner Printer Name Short Printer Name IPv4 Address Gateway Address MAC Address Network FW version Web Remote version IPv6 Address (Local) IPv6 Address (Global) Remote...
... Tray 2* Tray 3* MP Tray *Note: Only available when optional trays are present Cyan Drum Magenta Drum Yellow Drum Black Drum Belt Fuser Cyan Toner Magenta Toner Yellow Toner Black Toner Printer Name Short Printer Name IPv4 Address Gateway Address MAC Address Network FW version Web Remote version IPv6 Address (Local) IPv6 Address (Global) Remote...

C610, C711 User's Guide (English)
Page 35
...scroll and Enter button. Select from On/Off. Select from 1/2/3/4/5/10/15/ 30/60/120/180 Minutes. Select action to take when toner sensor indicates low toner. Select from X Adjust/Y Adjust/ Duplex X Adjust/Duplex Y adjust. Select from Off/30 seconds/60 seconds. Select by scroll and...30 Sleep Time Default: 10 Clearable Warning Default: ONLINE Auto Continue Default: Off Manual Timeout Default: 60 Wait Timeout Default: 40 Low Toner Default: Continue Jam Recovery Default: On Error Report Default: Off Print Position Adjust Default: 0.00 EXPLANATION Note: only present if option ...
...scroll and Enter button. Select from On/Off. Select from 1/2/3/4/5/10/15/ 30/60/120/180 Minutes. Select action to take when toner sensor indicates low toner. Select from X Adjust/Y Adjust/ Duplex X Adjust/Duplex Y adjust. Select from Off/30 seconds/60 seconds. Select by scroll and...30 Sleep Time Default: 10 Clearable Warning Default: ONLINE Auto Continue Default: Off Manual Timeout Default: 60 Wait Timeout Default: 40 Low Toner Default: Continue Jam Recovery Default: On Error Report Default: Off Print Position Adjust Default: 0.00 EXPLANATION Note: only present if option ...
C610, C711 User's Guide (English)
Page 41
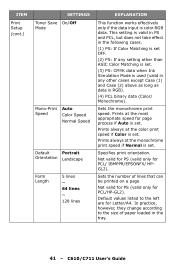
... RGB). (4) PCL binary data (Color/ Monochrome). In practice, however, they change according to the left are for PCL/HP-GL2). ITEM Print Setup (cont.) SETTINGS Toner Save On/Off Mode Mono-Print Speed Auto Color Speed Normal Speed Default Portrait Orientation Landscape Form Length 5 lines ~ 64 lines ~ 128 lines EXPLANATION This...
... RGB). (4) PCL binary data (Color/ Monochrome). In practice, however, they change according to the left are for PCL/HP-GL2). ITEM Print Setup (cont.) SETTINGS Toner Save On/Off Mode Mono-Print Speed Auto Color Speed Normal Speed Default Portrait Orientation Landscape Form Length 5 lines ~ 64 lines ~ 128 lines EXPLANATION This...

C610, C711 User's Guide (English)
Page 49
... as specification in CMYK color reduction in any individual color. This function is for the appropriate print density; CMYK On/Off Conversion Setting to the toner layer thickness. Selecting ENABLE will simplify the conversion process of CMYK data, which simulates standard colors in dark printing, selecting MEDIUM or LIGHT sometimes helps...
... as specification in CMYK color reduction in any individual color. This function is for the appropriate print density; CMYK On/Off Conversion Setting to the toner layer thickness. Selecting ENABLE will simplify the conversion process of CMYK data, which simulates standard colors in dark printing, selecting MEDIUM or LIGHT sometimes helps...

C610, C711 User's Guide (English)
Page 53
... not display a nearlife warning. Attention LED is lit when enabled, not lit if disabled. (Displays LCD message.) The temporary recovery by opening and closing of toner, drum, fuser, or belt occurs. ITEM SD Card Setup (cont.) Format Partition System Setup Near Life Status Near Life LED SETTINGS EXPLANATION PCL Common PS...
... not display a nearlife warning. Attention LED is lit when enabled, not lit if disabled. (Displays LCD message.) The temporary recovery by opening and closing of toner, drum, fuser, or belt occurs. ITEM SD Card Setup (cont.) Format Partition System Setup Near Life Status Near Life LED SETTINGS EXPLANATION PCL Common PS...
C610, C711 User's Guide (English)
Page 73
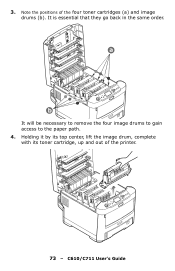
Holding it by its top center, lift the image drum, complete with its toner cartridge, up and out of the four toner cartridges (a) and image drums (b). a b It will be necessary to remove the four image drums to gain access to the paper path. 4. It is essential that they go back in the same order. 3. Note the positions of the printer. 73 - C610/C711 User's Guide
Holding it by its top center, lift the image drum, complete with its toner cartridge, up and out of the four toner cartridges (a) and image drums (b). a b It will be necessary to remove the four image drums to gain access to the paper path. 4. It is essential that they go back in the same order. 3. Note the positions of the printer. 73 - C610/C711 User's Guide

C610, C711 User's Guide (English)
Page 74
... Drum is very delicate and light sensitive. CAUTION! Do not touch it and do not expose it away from marking your furniture and to prevent toner from light. Put the assembly down gently onto a piece of the remaining image drum units. 74 - The green image drum surface at the base of...
... Drum is very delicate and light sensitive. CAUTION! Do not touch it and do not expose it away from marking your furniture and to prevent toner from light. Put the assembly down gently onto a piece of the remaining image drum units. 74 - The green image drum surface at the base of...
C610, C711 User's Guide (English)
Page 83
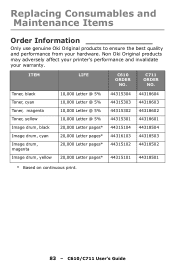
C610/C711 User's Guide C711 ORDER NO. Toner, black Toner, cyan Toner, magenta Toner, yellow Image drum, black Image drum, cyan Image drum, magenta Image drum, yellow 10,000 Letter @ 5% 10,000 Letter @ 5% 10,000 Letter @ 5% 10,000 ... 44318502 44318501 * Based on continuous print. 83 - Replacing Consumables and Maintenance Items Order Information Only use genuine Oki Original products to ensure the best quality and performance from your warranty. Non Oki Original products may adversely affect your printer's performance and invalidate your hardware. ITEM LIFE C610 ORDER NO.
C610/C711 User's Guide C711 ORDER NO. Toner, black Toner, cyan Toner, magenta Toner, yellow Image drum, black Image drum, cyan Image drum, magenta Image drum, yellow 10,000 Letter @ 5% 10,000 Letter @ 5% 10,000 Letter @ 5% 10,000 ... 44318502 44318501 * Based on continuous print. 83 - Replacing Consumables and Maintenance Items Order Information Only use genuine Oki Original products to ensure the best quality and performance from your warranty. Non Oki Original products may adversely affect your printer's performance and invalidate your hardware. ITEM LIFE C610 ORDER NO.


