
PrintSuperVision Configuration Guide
Page 58
...The Toner Change Report is particularly helpful in the Professional Edition. Toner Changes Report The "Toner Changes" Report shows the dates of the last toner cartridge replacement for a group of devices and indicates if there was any toner remaining at the bottom of the screen (not shown in all reports ...8226; Reporting This report is not available in identifying wasted toner as a result of replacement. Click the Save button at the time of changing the cartridge too soon. Select the desired device attributes that you want to include in screen shot) to save your selections.
...The Toner Change Report is particularly helpful in the Professional Edition. Toner Changes Report The "Toner Changes" Report shows the dates of the last toner cartridge replacement for a group of devices and indicates if there was any toner remaining at the bottom of the screen (not shown in all reports ...8226; Reporting This report is not available in identifying wasted toner as a result of replacement. Click the Save button at the time of changing the cartridge too soon. Select the desired device attributes that you want to include in screen shot) to save your selections.
C3600n Safety, Warranty and Regulatory Information (English, Fran栩s, Espa?ol, Portugu鱩
Page 3
... this product is less than 70 dB (A) as a safety feature and will only connect to fire or electric shock. Do not throw toner cartridges or image drum cartridges into the ventilation holes or operate this may lead to an earthed socket. The acoustic noise of this product may cause electric shock. Ensure...
... this product is less than 70 dB (A) as a safety feature and will only connect to fire or electric shock. Do not throw toner cartridges or image drum cartridges into the ventilation holes or operate this may lead to an earthed socket. The acoustic noise of this product may cause electric shock. Ensure...

C3600n Safety, Warranty and Regulatory Information (English, Fran栩s, Espa?ol, Portugu鱩
Page 4
...implied warranty lasts, so the above exclusion may result in your problem over the phone. English and Canada only Oki Data Americas, Inc. (Oki Data) warrants this C3600n (hereinafter "the Product") to be shipped to solve your credit card being charged the full price of the ...packaging materials you ship the Product, remove the image drums and toner cartridges to prevent damage to the Product during shipment: failure to the Product. Call 1-800654-3282 (1-800-OKI-DATA) for pickup by Oki Data's designated carrier. For the remaining printhead warranty period, replacement will...
...implied warranty lasts, so the above exclusion may result in your problem over the phone. English and Canada only Oki Data Americas, Inc. (Oki Data) warrants this C3600n (hereinafter "the Product") to be shipped to solve your credit card being charged the full price of the ...packaging materials you ship the Product, remove the image drums and toner cartridges to prevent damage to the Product during shipment: failure to the Product. Call 1-800654-3282 (1-800-OKI-DATA) for pickup by Oki Data's designated carrier. For the remaining printhead warranty period, replacement will...
C3600 Setup Guide (Eng, Fr, SP, BPort)
Page 4
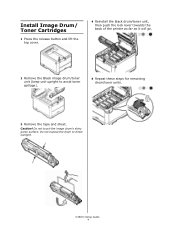
C3600n Setup Guide 4 Caution! Do not touch the image drum's shiny green surface. Do not expose the drum to avoid toner spillage). 5 Repeat these steps for remaining drum/toner units. 3 Remove the tape and sheet. Install Image Drum/ Toner Cartridges 1 Press the release button and lift the top cover. 4 Reinstall the black drum/toner unit, then push the lock lever towards the back of the printer as far as it will go. 2 Remove the Black image drum/toner unit (keep unit upright to direct sunlight.
C3600n Setup Guide 4 Caution! Do not touch the image drum's shiny green surface. Do not expose the drum to avoid toner spillage). 5 Repeat these steps for remaining drum/toner units. 3 Remove the tape and sheet. Install Image Drum/ Toner Cartridges 1 Press the release button and lift the top cover. 4 Reinstall the black drum/toner unit, then push the lock lever towards the back of the printer as far as it will go. 2 Remove the Black image drum/toner unit (keep unit upright to direct sunlight.

C3600 Setup Guide (Eng, Fr, SP, BPort)
Page 6
... Guide and mount it directly into a grounded wall outlet and turn on again. 3 Make sure the toner lock levers are in the locked position. C3600n Setup Guide 6 When the software is loaded in the printer. 2 Turn the printer off and on the printer. NOTE: Do not fill above paper... full indicator (A). See step 4 "Install Image Drum/Toner Cartridges" on the printer, do the following: 1 Make sure paper is installed, open the status monitor for an explanation of the printer. 4 Load the paper (...
... Guide and mount it directly into a grounded wall outlet and turn on again. 3 Make sure the toner lock levers are in the locked position. C3600n Setup Guide 6 When the software is loaded in the printer. 2 Turn the printer off and on the printer. NOTE: Do not fill above paper... full indicator (A). See step 4 "Install Image Drum/Toner Cartridges" on the printer, do the following: 1 Make sure paper is installed, open the status monitor for an explanation of the printer. 4 Load the paper (...

C3600n User Guide (English)
Page 4
... 76 Print Statistics menu 77 Printing settings 78 Changing the Status Monitor Display Language 78 Replacing Consumables and Maintenance Items 79 Part Numbers 79 Toner cartridge replacement 80 Image drum replacement 86 Replacing the belt unit 89 Fuser replacement 93 Cleaning the LED head 95 Installing additional memory 96 Part Numbers... Color Correction Utility 118 Color Swatch Utility 131 Direct Network Printing Utility (LPR 135 Network Printer Status Utility 137 Network Setup Utility 141 Index 142 C3600n User's Guide 4
... 76 Print Statistics menu 77 Printing settings 78 Changing the Status Monitor Display Language 78 Replacing Consumables and Maintenance Items 79 Part Numbers 79 Toner cartridge replacement 80 Image drum replacement 86 Replacing the belt unit 89 Fuser replacement 93 Cleaning the LED head 95 Installing additional memory 96 Part Numbers... Color Correction Utility 118 Color Swatch Utility 131 Direct Network Printing Utility (LPR 135 Network Printer Status Utility 137 Network Setup Utility 141 Index 142 C3600n User's Guide 4
C3600n User Guide (English)
Page 9
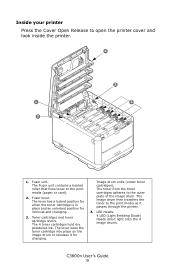
.... LED Heads. 4 LED (Light Emitting Diode) Heads direct light onto the 4 image drums. C3600n User's Guide 9 The toner from the toner cartridges adheres to the print media (paper or card). 2. Fuser lever. Toner cartridges and toner cartridge levers. The 4 toner cartridges hold dry powdered ink. The Fuser unit contains a heated roller that fixes toner to...
.... LED Heads. 4 LED (Light Emitting Diode) Heads direct light onto the 4 image drums. C3600n User's Guide 9 The toner from the toner cartridges adheres to the print media (paper or card). 2. Fuser lever. Toner cartridges and toner cartridge levers. The 4 toner cartridges hold dry powdered ink. The Fuser unit contains a heated roller that fixes toner to...
C3600n User Guide (English)
Page 63
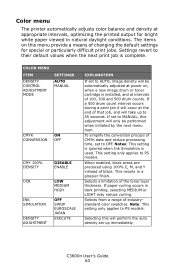
...Settings revert to OFF. To simplify the conversion process of the toner layer thickness. Note: This setting only applies to PS models. C3600n User's Guide 63 This results in dark printing, selecting MEDIUM or LIGHT may reduce curling. Selecting this will only be automatically adjusted at...density set to their default values when the next print job is used. The items on , when a new image drum or toner cartridge is installed, and at appropriate intervals, optimizing the printed output for special or particularly difficult print jobs. COLOR MENU ITEM DENSITY CONTROL ...
...Settings revert to OFF. To simplify the conversion process of the toner layer thickness. Note: This setting only applies to PS models. C3600n User's Guide 63 This results in dark printing, selecting MEDIUM or LIGHT may reduce curling. Selecting this will only be automatically adjusted at...density set to their default values when the next print job is used. The items on , when a new image drum or toner cartridge is installed, and at appropriate intervals, optimizing the printed output for special or particularly difficult print jobs. COLOR MENU ITEM DENSITY CONTROL ...

C3600n User Guide (English)
Page 80
... any kind. Follow any toner or get it off the printer and allow the fuser to cool for cyan, magenta, yellow and black. C3600n User's Guide 80 toner cartridge(s) until "TONER EMPTY" is a very fine dry powder. Do not use hot water, and never use a cool, damp cloth to place the ...new one each for about 10 minutes before opening the cover. They will make stains permanent. It is not enough, use solvents of the old cartridge responsibly by placing it inside the pack that you inhale any regulations, recommendations, etc., which may be in . Before changing the toner...
... any kind. Follow any toner or get it off the printer and allow the fuser to cool for cyan, magenta, yellow and black. C3600n User's Guide 80 toner cartridge(s) until "TONER EMPTY" is a very fine dry powder. Do not use hot water, and never use a cool, damp cloth to place the ...new one each for about 10 minutes before opening the cover. They will make stains permanent. It is not enough, use solvents of the old cartridge responsibly by placing it inside the pack that you inhale any regulations, recommendations, etc., which may be in . Before changing the toner...

C3600n User Guide (English)
Page 81
This area is clearly labelled. Note the positions of the 4 cartridges. ID Positions_Fig1_04.jpg 1 2 3 4 1. Yellow cartridge 2. 1. Magenta cartridge 4. If the printer has been powered on, the fuser may be hot. Press the cover release and open button_F5_23.jpg WARNING! Black cartridge C3600n User's Guide 81 Do not touch this area. 2. Cyan cartridge 3. cover open the printer's top cover fully.
This area is clearly labelled. Note the positions of the 4 cartridges. ID Positions_Fig1_04.jpg 1 2 3 4 1. Yellow cartridge 2. 1. Magenta cartridge 4. If the printer has been powered on, the fuser may be hot. Press the cover release and open button_F5_23.jpg WARNING! Black cartridge C3600n User's Guide 81 Do not touch this area. 2. Cyan cartridge 3. cover open the printer's top cover fully.
C3600n User Guide (English)
Page 82
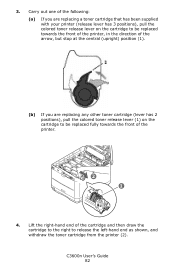
...3 positions_2.eps (b) If you are replacing any other toner cartridge (lever has 2 positions), pull the colored toner release lever (1) on the cartridge to release the left-hand end as shown, and withdraw the toner cartridge from the printer (2). C3600n User's Guide 82 Lift the right-hand end of the ...printer. Toner unLock_F5_01.jpg 2 1 4. Carry out one of the following: (a) If you are replacing a toner cartridge that has been supplied with your printer...
...3 positions_2.eps (b) If you are replacing any other toner cartridge (lever has 2 positions), pull the colored toner release lever (1) on the cartridge to release the left-hand end as shown, and withdraw the toner cartridge from the printer (2). C3600n User's Guide 82 Lift the right-hand end of the ...printer. Toner unLock_F5_01.jpg 2 1 4. Carry out one of the following: (a) If you are replacing a toner cartridge that has been supplied with your printer...

C3600n User Guide (English)
Page 83
... room light for longer than 5 minutes. Shake.jpg 8. Never expose the drum to direct sunlight or very bright room lighting. 6. Tape.jpg C3600n User's Guide 83 Remove the new cartridge from marking your furniture. Remove the wrapping material and peel off the adhesive tape from the underside of the printer for more...
... room light for longer than 5 minutes. Shake.jpg 8. Never expose the drum to direct sunlight or very bright room lighting. 6. Tape.jpg C3600n User's Guide 83 Remove the new cartridge from marking your furniture. Remove the wrapping material and peel off the adhesive tape from the underside of the printer for more...
C3600n User Guide (English)
Page 84
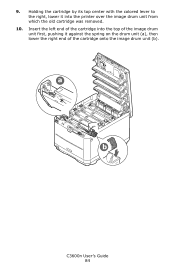
Holding the cartridge by its top center with the colored lever to the right, lower it into the top of the image drum unit first, pushing it against the spring on the drum unit (a), then lower the right end of the cartridge into the printer over the image drum unit from which the old cartridge was removed. 10. Insert the left end of the cartridge onto the image drum unit (b). Toner_replace_F5_03.jpg a b C3600n User's Guide 84 9.
Holding the cartridge by its top center with the colored lever to the right, lower it into the top of the image drum unit first, pushing it against the spring on the drum unit (a), then lower the right end of the cartridge into the printer over the image drum unit from which the old cartridge was removed. 10. Insert the left end of the cartridge onto the image drum unit (b). Toner_replace_F5_03.jpg a b C3600n User's Guide 84 9.
C3600n User Guide (English)
Page 85
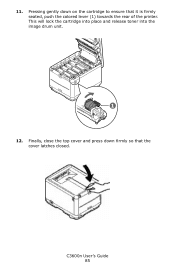
This will lock the cartridge into place and release toner into the image drum unit. Finally, close the top cover and press down on the cartridge to ensure that the cover latches closed. 11. cover close_F5_22.jpg C3600n User's Guide 85 toner in positon_lock_Fig1_15.jpg 1 12. Pressing gently down firmly so that it is firmly seated, push the colored lever (1) towards the rear of the printer.
This will lock the cartridge into place and release toner into the image drum unit. Finally, close the top cover and press down on the cartridge to ensure that the cover latches closed. 11. cover close_F5_22.jpg C3600n User's Guide 85 toner in positon_lock_Fig1_15.jpg 1 12. Pressing gently down firmly so that it is firmly seated, push the colored lever (1) towards the rear of the printer.
C3600n User Guide (English)
Page 86
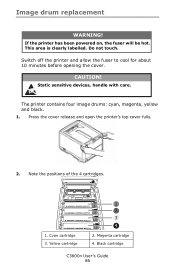
This area is clearly labelled. Do not touch. Yellow cartridge 1 2 3 4 2. Static sensitive devices, handle with care. Note the positions of the 4 cartridges. Magenta cartridge 4. CAUTION! I 1. Switch off the printer and allow the fuser to cool for about 10 minutes before opening the cover. Image drum ... cover open the printer's top cover fully. Antistatic symbol.jpg The printer contains four image drums: cyan, magenta, yellow and black. 1. Cyan cartridge 3. Black cartridge C3600n User's Guide 86 If the printer has been powered on, the fuser will be hot.
This area is clearly labelled. Do not touch. Yellow cartridge 1 2 3 4 2. Static sensitive devices, handle with care. Note the positions of the 4 cartridges. Magenta cartridge 4. CAUTION! I 1. Switch off the printer and allow the fuser to cool for about 10 minutes before opening the cover. Image drum ... cover open the printer's top cover fully. Antistatic symbol.jpg The printer contains four image drums: cyan, magenta, yellow and black. 1. Cyan cartridge 3. Black cartridge C3600n User's Guide 86 If the printer has been powered on, the fuser will be hot.
C3600n User Guide (English)
Page 87
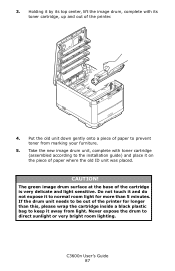
...printer. If the drum unit needs to be out of the printer for more than this, please wrap the cartridge inside a black plastic bag to normal room light for longer than 5 minutes. C3600n User's Guide 87 ID going out_Fig1_12.jpg 4. CAUTION! Holding it by its top center, lift the image... drum, complete with toner cartridge (assembled according to direct sunlight or very bright room lighting. Never expose the drum to...
...printer. If the drum unit needs to be out of the printer for more than this, please wrap the cartridge inside a black plastic bag to normal room light for longer than 5 minutes. C3600n User's Guide 87 ID going out_Fig1_12.jpg 4. CAUTION! Holding it by its top center, lift the image... drum, complete with toner cartridge (assembled according to direct sunlight or very bright room lighting. Never expose the drum to...

C3600n User Guide (English)
Page 89
... they go back in the same order. Press the cover release and open button_F5_23.jpg 2. Note the positions of the 4 cartridges. It is clearly labelled. Cyan cartridge 3. Black cartridge C3600n User's Guide 89 Magenta cartridge 4. Yellow cartridge 1 2 3 4 2. Replacing the belt unit The belt unit is located under the four image drums. This unit requires replacement approximately...
... they go back in the same order. Press the cover release and open button_F5_23.jpg 2. Note the positions of the 4 cartridges. It is clearly labelled. Cyan cartridge 3. Black cartridge C3600n User's Guide 89 Magenta cartridge 4. Yellow cartridge 1 2 3 4 2. Replacing the belt unit The belt unit is located under the four image drums. This unit requires replacement approximately...
C3600n User Guide (English)
Page 90
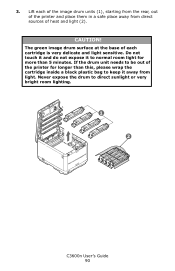
Never expose the drum to keep it away from direct sources of heat and light (2). IDs _ all out_cover_F8_19.jpg 1 2 C3600n User's Guide 90 3. CAUTION! Lift each cartridge is very delicate and light sensitive. If the drum unit needs to be out of the printer and place them in a safe place away from ... at the base of each of the image drum units (1), starting from the rear, out of the printer for more than this, please wrap the cartridge inside a black plastic bag to direct sunlight or very bright room lighting. Do not touch it and do not expose it to normal room light...
Never expose the drum to keep it away from direct sources of heat and light (2). IDs _ all out_cover_F8_19.jpg 1 2 C3600n User's Guide 90 3. CAUTION! Lift each cartridge is very delicate and light sensitive. If the drum unit needs to be out of the printer and place them in a safe place away from ... at the base of each of the image drum units (1), starting from the rear, out of the printer for more than this, please wrap the cartridge inside a black plastic bag to direct sunlight or very bright room lighting. Do not touch it and do not expose it to normal room light...
C3600n User Guide (English)
Page 92
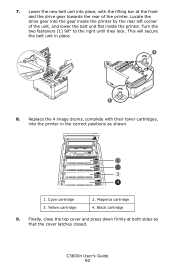
.... This will secure the belt unit in the correct positions as shown. Yellow cartridge 2. Locate the drive gear into place, with their toner cartridges, into the printer in place. ID Positions_Fig1_04.jpg 1 2 3 4 1. ...Replace the 4 image drums, complete with the lifting bar at both sides so that the cover latches closed. Turn the two fasteners (1) 90° to the right until they lock. Black cartridge 9. 7. belt_roll in _ F5_09.jpg 1 1 1 ock_F5_09_1.jpg 8. Magenta cartridge 4. C3600n...
.... This will secure the belt unit in the correct positions as shown. Yellow cartridge 2. Locate the drive gear into place, with their toner cartridges, into the printer in place. ID Positions_Fig1_04.jpg 1 2 3 4 1. ...Replace the 4 image drums, complete with the lifting bar at both sides so that the cover latches closed. Turn the two fasteners (1) 90° to the right until they lock. Black cartridge 9. 7. belt_roll in _ F5_09.jpg 1 1 1 ock_F5_09_1.jpg 8. Magenta cartridge 4. C3600n...

C3600n User Guide (English)
Page 102
cover open the printer's top cover fully. Note the positions of the 4 cartridges. Press the cover release and open button_F5_23.jpg WARNING! Do not touch. 3. If the printer has been powered on, the fuser will be hot. 2. ID Positions_Fig1_04.jpg 1 2 3 4 1. Black cartridge It will be necessary to remove the four image drums to gain access to the paper path. C3600n User's Guide 102 This area is clearly labelled. Magenta cartridge 4. Yellow cartridge 2. Cyan cartridge 3.
cover open the printer's top cover fully. Note the positions of the 4 cartridges. Press the cover release and open button_F5_23.jpg WARNING! Do not touch. 3. If the printer has been powered on, the fuser will be hot. 2. ID Positions_Fig1_04.jpg 1 2 3 4 1. Black cartridge It will be necessary to remove the four image drums to gain access to the paper path. C3600n User's Guide 102 This area is clearly labelled. Magenta cartridge 4. Yellow cartridge 2. Cyan cartridge 3.


