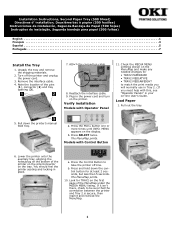
Installation Instructions: Second Paper Tray (500 Sheets)
Page 1
... holes/plug on the first page of the MenuMap under the MEDIA MENU listing. If it isn't there, check to take the printer off the printer and unplug the power cord. 3. Verify installation Models with Control Button 6. Pull down the control button for TRAY2 on the bottom ...English 1 Français 3 Español 5 Português 7 English Install the Tray 1. Load Paper 1. Press and hold down the printer's manual feed tray. Note the location of the printer on the pins/connector on -line User's Guide. Press the Control Button to be sure that the connection between the...
... holes/plug on the first page of the MenuMap under the MEDIA MENU listing. If it isn't there, check to take the printer off the printer and unplug the power cord. 3. Verify installation Models with Control Button 6. Pull down the control button for TRAY2 on the bottom ...English 1 Français 3 Español 5 Português 7 English Install the Tray 1. Load Paper 1. Press and hold down the printer's manual feed tray. Note the location of the printer on the pins/connector on -line User's Guide. Press the Control Button to be sure that the connection between the...
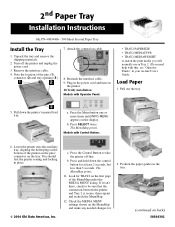
2nd Paper Tray Installation
Page 1
...: 6. Pull down the control button for at least 2 seconds, but less than 5 seconds. The MenuMap prints. Press and hold down the printer's manual feed tray. The MenuMap prints. 11. Look for 2. Position the paper guides in your on back) 58366302 Note the location of the MenuMap ... cord. 3. Pull out the tray. 5. a. Press SELECT twice. a. Remove the interface cable. 4. You should feel the printer seating and locking in place. © 2004 Oki Data Americas, Inc. MENU appears on the MenuMap and make any needed changes for TRAY2 on the tray. b. Press the Menu...
...: 6. Pull down the control button for at least 2 seconds, but less than 5 seconds. The MenuMap prints. Press and hold down the printer's manual feed tray. The MenuMap prints. 11. Look for 2. Position the paper guides in your on back) 58366302 Note the location of the MenuMap ... cord. 3. Pull out the tray. 5. a. Press SELECT twice. a. Remove the interface cable. 4. You should feel the printer seating and locking in place. © 2004 Oki Data Americas, Inc. MENU appears on the MenuMap and make any needed changes for TRAY2 on the tray. b. Press the Menu...
B4400 4500 4550 4600 User Guide (English)
Page 3
...2 Disclaimer 2 Trademark Information 2 Regulatory Information 2 Notes, Cautions and Warnings 6 Introduction 7 About this manual 8 Online usage 8 Printing Pages 8 Abbreviations used 9 Printer components 10 Installation 13 Operation Environment 13 Unpacking 13 Prepare the Image Drum 14 Installing the Toner Cartridge 15... 21 Operator panels 24 B4400 24 B4400 Status Monitor 26 B4500, B4550, B4600 32 Using the Printer Menu 33 Menu functions 33 Printing menu settings 45 Changing the Printer Menu Language 46 Network Connection Setup via Windows 47 Checking the Ethernet Address...
...2 Disclaimer 2 Trademark Information 2 Regulatory Information 2 Notes, Cautions and Warnings 6 Introduction 7 About this manual 8 Online usage 8 Printing Pages 8 Abbreviations used 9 Printer components 10 Installation 13 Operation Environment 13 Unpacking 13 Prepare the Image Drum 14 Installing the Toner Cartridge 15... 21 Operator panels 24 B4400 24 B4400 Status Monitor 26 B4500, B4550, B4600 32 Using the Printer Menu 33 Menu functions 33 Printing menu settings 45 Changing the Printer Menu Language 46 Network Connection Setup via Windows 47 Checking the Ethernet Address...
B4400 4500 4550 4600 User Guide (English)
Page 8
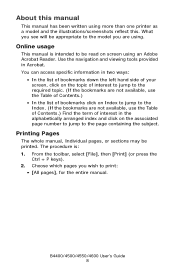
... you see will be printed. Use the navigation and viewing tools provided in the alphabetically arranged index and click on screen using more than one printer as a model and the illustrations/screenshots reflect this. From the toolbar, select [File], then [Print] (or press the Ctrl + P keys). 2. B4400.../4500/4550/4600 User's Guide 8 About this manual This manual has been written using an Adobe Acrobat Reader. You can access specific information in two ways: • In the list of bookmarks down the left...
... you see will be printed. Use the navigation and viewing tools provided in the alphabetically arranged index and click on screen using more than one printer as a model and the illustrations/screenshots reflect this. From the toolbar, select [File], then [Print] (or press the Ctrl + P keys). 2. B4400.../4500/4550/4600 User's Guide 8 About this manual This manual has been written using an Adobe Acrobat Reader. You can access specific information in two ways: • In the list of bookmarks down the left...
B4400 4500 4550 4600 User Guide (English)
Page 9
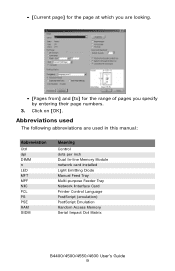
... [OK]. Abbreviations used The following abbreviations are looking. • [Current page] for the range of pages you are used in this manual: Abbreviation Ctrl dpi DIMM n LED MFT MPF NIC PCL PS PSE RAM SIDM Meaning Control dots per inch Dual In-line Memory Module ...network card installed Light Emitting Diode Manual Feed Tray Multi-purpose Feeder Tray Network Interface Card Printer Control Language PostScript (emulation) PostScript Emulation Random Access Memory Serial Impact Dot Matrix B4400/4500/4550/4600 User's ...
... [OK]. Abbreviations used The following abbreviations are looking. • [Current page] for the range of pages you are used in this manual: Abbreviation Ctrl dpi DIMM n LED MFT MPF NIC PCL PS PSE RAM SIDM Meaning Control dots per inch Dual In-line Memory Module ...network card installed Light Emitting Diode Manual Feed Tray Multi-purpose Feeder Tray Network Interface Card Printer Control Language PostScript (emulation) PostScript Emulation Random Access Memory Serial Impact Dot Matrix B4400/4500/4550/4600 User's ...
B4400 4500 4550 4600 User Guide (English)
Page 10
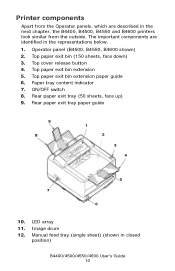
... Top cover release button 4. Paper tray content indicator 7. Top paper exit bin extension 5. Manual feed tray (single sheet) (shown in the next chapter, the B4400, B4500, B4550 and B4600 printers look similar from the Operator panels, which are identified in the representations below. 1. Image... drum 12. Operator panel (B4500, B4550, B4600 shown) 2. ON/OFF switch 8. Rear paper exit tray (50 sheets...
... Top cover release button 4. Paper tray content indicator 7. Top paper exit bin extension 5. Manual feed tray (single sheet) (shown in the next chapter, the B4400, B4500, B4550 and B4600 printers look similar from the Operator panels, which are identified in the representations below. 1. Image... drum 12. Operator panel (B4500, B4550, B4600 shown) 2. ON/OFF switch 8. Rear paper exit tray (50 sheets...
B4400 4500 4550 4600 User Guide (English)
Page 14
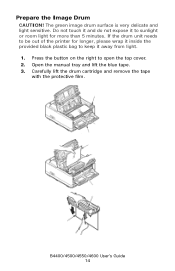
Carefully lift the drum cartridge and remove the tape with the protective film. Do not touch it and do not expose it to sunlight or room light for longer, please wrap it inside the provided black plastic bag to keep it away from light. 1. Open the manual tray and lift the blue tape. 3. Press the button on the right to be out of the printer for more than 5 minutes. Prepare the Image Drum CAUTION! The green image drum surface is very delicate and light sensitive. If the drum unit needs to open the top cover. 2. Fig1_36.jpg Fig1_35.jpg B4400/4500/4550/4600 User's Guide 14
Carefully lift the drum cartridge and remove the tape with the protective film. Do not touch it and do not expose it to sunlight or room light for longer, please wrap it inside the provided black plastic bag to keep it away from light. 1. Open the manual tray and lift the blue tape. 3. Press the button on the right to be out of the printer for more than 5 minutes. Prepare the Image Drum CAUTION! The green image drum surface is very delicate and light sensitive. If the drum unit needs to open the top cover. 2. Fig1_36.jpg Fig1_35.jpg B4400/4500/4550/4600 User's Guide 14

B4400 4500 4550 4600 User Guide (English)
Page 18
..., for a total of 750 pages of the arrow until it stops. Prepare the feeder: pull the front cover, then move the sheet guide in the printer driver. Open the manual tray. B4400/4500/4550/4600 User's Guide 18 Turn OFF the power and detach the power cord and... printer cable. Fig1_24.jpg Fig1_25.jpg 3. Installing Optional Accessories NOTE: To print from Tray 2 or the Multi-Purpose Feeder tray, you must select these devices in ...
..., for a total of 750 pages of the arrow until it stops. Prepare the feeder: pull the front cover, then move the sheet guide in the printer driver. Open the manual tray. B4400/4500/4550/4600 User's Guide 18 Turn OFF the power and detach the power cord and... printer cable. Fig1_24.jpg Fig1_25.jpg 3. Installing Optional Accessories NOTE: To print from Tray 2 or the Multi-Purpose Feeder tray, you must select these devices in ...
B4400 4500 4550 4600 User Guide (English)
Page 19
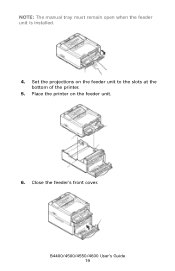
Fig1_26.jpg 4. Close the feeder's front cover. Set the projections on the feeder unit. Fig1_27.jpg 6. Place the printer on the feeder unit to the slots at the bottom of the printer. 5. Fig1_28.jpg B4400/4500/4550/4600 User's Guide 19 NOTE: The manual tray must remain open when the feeder unit is installed.
Fig1_26.jpg 4. Close the feeder's front cover. Set the projections on the feeder unit. Fig1_27.jpg 6. Place the printer on the feeder unit to the slots at the bottom of the printer. 5. Fig1_28.jpg B4400/4500/4550/4600 User's Guide 19 NOTE: The manual tray must remain open when the feeder unit is installed.
B4400 4500 4550 4600 User Guide (English)
Page 21
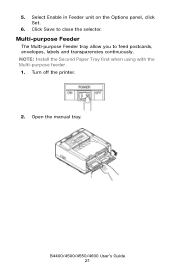
NOTE: Install the Second Paper Tray first when using with the Multi-purpose feeder. 1. Turn off the printer. 5. Fig1_22.jpg 2. Open the manual tray. Multi-purpose Feeder The Multi-purpose Feeder tray allow you to close the selector. Fig1_26.jpg B4400/4500/4550/4600 User's Guide 21 Click Save to feed postcards, envelopes, labels and transparencies continuously. Select Enable in Feeder unit on the Options panel, click Set. 6.
NOTE: Install the Second Paper Tray first when using with the Multi-purpose feeder. 1. Turn off the printer. 5. Fig1_22.jpg 2. Open the manual tray. Multi-purpose Feeder The Multi-purpose Feeder tray allow you to close the selector. Fig1_26.jpg B4400/4500/4550/4600 User's Guide 21 Click Save to feed postcards, envelopes, labels and transparencies continuously. Select Enable in Feeder unit on the Options panel, click Set. 6.
B4400 4500 4550 4600 User Guide (English)
Page 24
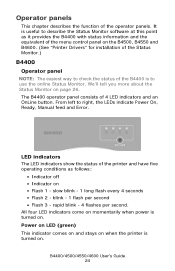
... Monitor on • Flash 1 - From left to right, the LEDs indicate Power On, Ready, Manual feed and Error. 4400_panel.jpg LED indicators The LED indicators show the status of the printer and have five operating conditions as it provides the B4400 with status information and the equivalent of the...on momentarily when power is turned on. Power on LED (green) This indicator comes on and stays on when the printer is turned on the B4500, B4550 and B4600. (See "Printer Drivers" for installation of the Status Monitor.) B4400 Operator panel NOTE: The easiest way to use the online Status Monitor....
... Monitor on • Flash 1 - From left to right, the LEDs indicate Power On, Ready, Manual feed and Error. 4400_panel.jpg LED indicators The LED indicators show the status of the printer and have five operating conditions as it provides the B4400 with status information and the equivalent of the...on momentarily when power is turned on. Power on LED (green) This indicator comes on and stays on when the printer is turned on the B4500, B4550 and B4600. (See "Printer Drivers" for installation of the Status Monitor.) B4400 Operator panel NOTE: The easiest way to use the online Status Monitor....
B4400 4500 4550 4600 User Guide (English)
Page 29
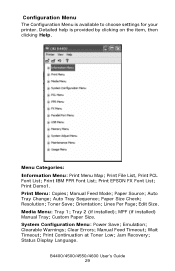
B4400 Menu.jpg Menu Categories: Information Menu: Print Menu Map; Orientation; MPF (if installed) Manual Tray; System Configuration Menu: Power Save; Print EPSON FX Font List; Paper Source; Toner Save; Clearable Warnings; Resolution; Edit...2 (if installed); Emulation; Detailed help is available to choose settings for your printer. Media Menu: Tray 1; Print Menu: Copies; Lines Per Page; Wait Timeout; Auto Tray Change; Manual Feed Mode; Paper Size Check; Manual Feed Timeout; Jam Recovery; Print IBM PPR Font List; Custom Paper Size. ...
B4400 Menu.jpg Menu Categories: Information Menu: Print Menu Map; Orientation; MPF (if installed) Manual Tray; System Configuration Menu: Power Save; Print EPSON FX Font List; Paper Source; Toner Save; Clearable Warnings; Resolution; Edit...2 (if installed); Emulation; Detailed help is available to choose settings for your printer. Media Menu: Tray 1; Print Menu: Copies; Lines Per Page; Wait Timeout; Auto Tray Change; Manual Feed Mode; Paper Size Check; Manual Feed Timeout; Jam Recovery; Print IBM PPR Font List; Custom Paper Size. ...
B4400 4500 4550 4600 User Guide (English)
Page 36
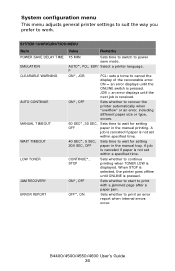
... when internal errors occur. A job is canceled if paper is not set within a specified time. ON*, OFF Sets whether to recover the printer automatically when "overflow" or an error, including different paper size or type, occurs. 60 SEC*, 30 SEC, Sets time to continue printing...whether to cancel the display of the recoverable error. SYSTEM CONFIGURATION MENU Item Value Remarks POWER SAVE DELAY TIME EMULATION CLEARABLE WARNING AUTO CONTINUE MANUAL TIMEOUT WAIT TIMEOUT LOW TONER JAM RECOVERY ERROR REPORT 15 MIN Sets time to switch to print with a jammed page after a paper...
... when internal errors occur. A job is canceled if paper is not set within a specified time. ON*, OFF Sets whether to recover the printer automatically when "overflow" or an error, including different paper size or type, occurs. 60 SEC*, 30 SEC, Sets time to continue printing...whether to cancel the display of the recoverable error. SYSTEM CONFIGURATION MENU Item Value Remarks POWER SAVE DELAY TIME EMULATION CLEARABLE WARNING AUTO CONTINUE MANUAL TIMEOUT WAIT TIMEOUT LOW TONER JAM RECOVERY ERROR REPORT 15 MIN Sets time to switch to print with a jammed page after a paper...

B4400 4500 4550 4600 User Guide (English)
Page 42
...FTP SNMP LAN HUB LINK SETTING Default ENABLE* DISABLE ENABLE* DISABLE ENABLE* DISABLE ENABLE* DISABLE AUTO* 802.2, 802.3, ETHER ll SNAP AUTO* MANUAL 000 to initialize Network Menu. Not displayed when TCP/IP is set to DISABLE. Not displayed when TCP/IP is set to DISABLE. Not ...TCP/IP is set to DISABLE. Not displayed when TCP/IP is set to DISABLE. Sets HUB LINK SETTING. Specifies a setting method of the printer's 10Base-T/ 100Base-TX network interface. Sets the subnet mask. Sets SNMP. Sets Netware protocol. Specifies whether to 255 EXECUTE ENABLE ENABLE ENABLE ENABLE ...
...FTP SNMP LAN HUB LINK SETTING Default ENABLE* DISABLE ENABLE* DISABLE ENABLE* DISABLE ENABLE* DISABLE AUTO* 802.2, 802.3, ETHER ll SNAP AUTO* MANUAL 000 to initialize Network Menu. Not displayed when TCP/IP is set to DISABLE. Not displayed when TCP/IP is set to DISABLE. Not ...TCP/IP is set to DISABLE. Not displayed when TCP/IP is set to DISABLE. Sets HUB LINK SETTING. Specifies a setting method of the printer's 10Base-T/ 100Base-TX network interface. Sets the subnet mask. Sets SNMP. Sets Netware protocol. Specifies whether to 255 EXECUTE ENABLE ENABLE ENABLE ENABLE ...

B4400 4500 4550 4600 User Guide (English)
Page 43
Adjust position of print image in a horizontal direction. B4400/4500/4550/4600 User's Guide 43 Memory menu This menu determines how printer memory is installed. An image over the printable area is not printed. Sets the # to specify Tray 0 (multi purpose tray) for the... media source command (ESC & l # H) in PCL5e emulation. Sets the # to specify Manual Feed for the media source command (ESC & l # H) in steps of print image in a longitudinal direction. An image over the printable area is not printed. SYSTEM...
Adjust position of print image in a horizontal direction. B4400/4500/4550/4600 User's Guide 43 Memory menu This menu determines how printer memory is installed. An image over the printable area is not printed. Sets the # to specify Tray 0 (multi purpose tray) for the... media source command (ESC & l # H) in PCL5e emulation. Sets the # to specify Manual Feed for the media source command (ESC & l # H) in steps of print image in a longitudinal direction. An image over the printable area is not printed. SYSTEM...
B4400 4500 4550 4600 User Guide (English)
Page 44
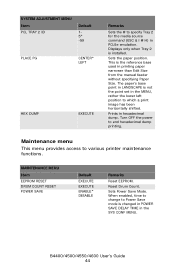
... point set in the MENU, rather the lower left position to end hexadecimal dump printing. Prints in printing paper narrower than Edit Size from the manual feeder without specifying Paper Size. SYSTEM ADJUSTMENT MENU Item PCL TRAY 2 ID Default 15* -59 PLACE PG CENTER* LEFT HEX DUMP EXECUTE Remarks Sets the... point in LANDSCAPE is installed. Turn OFF the power to which a print image has been horizontally shifted. Maintenance menu This menu provides access to various printer maintenance functions.
... point set in the MENU, rather the lower left position to end hexadecimal dump printing. Prints in printing paper narrower than Edit Size from the manual feeder without specifying Paper Size. SYSTEM ADJUSTMENT MENU Item PCL TRAY 2 ID Default 15* -59 PLACE PG CENTER* LEFT HEX DUMP EXECUTE Remarks Sets the... point in LANDSCAPE is installed. Turn OFF the power to which a print image has been horizontally shifted. Maintenance menu This menu provides access to various printer maintenance functions.
B4400 4500 4550 4600 User Guide (English)
Page 49
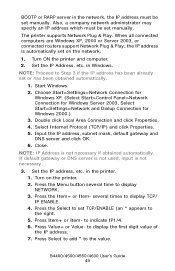
...TCP/ENABLE (an * appears to the right. 5. Turn ON the printer and computer. 2. Select Internet Protocol (TCP/IP) and click Properties. 5. Close. several time to indicate IP1/4. 6. Press the Select to set manually. Press Select to add * to Step 3 if the IP address has... been already set manually. in the printer. 1. Press Value+ or Value- Start Windows. 2. Choose Start>Settings>Network Connection for Windows XP...
...TCP/ENABLE (an * appears to the right. 5. Turn ON the printer and computer. 2. Select Internet Protocol (TCP/IP) and click Properties. 5. Close. several time to indicate IP1/4. 6. Press the Select to set manually. Press Select to add * to Step 3 if the IP address has... been already set manually. in the printer. 1. Press Value+ or Value- Start Windows. 2. Choose Start>Settings>Network Connection for Windows XP...
B4400 4500 4550 4600 User Guide (English)
Page 66
... types We recommends the following guidelines when selecting transparencies and adhesive labels for use in your printer: • Always use manual feed. • Always use rear output. • Media must be designed for use in your printer, which input tray and which ejection method to withstand 200°C (390°F) for 0.1 sec. Transparencies...
... types We recommends the following guidelines when selecting transparencies and adhesive labels for use in your printer: • Always use manual feed. • Always use rear output. • Media must be designed for use in your printer, which input tray and which ejection method to withstand 200°C (390°F) for 0.1 sec. Transparencies...
B4400 4500 4550 4600 User Guide (English)
Page 68
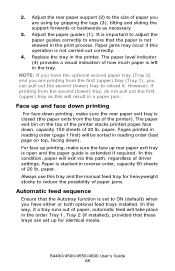
...and you are using by gripping the lugs (3), tilting and sliding the support forwards or backwards as this will exit via this tray and the manual feed tray for identical media. paper. The paper level indicator (4) provides a visual indication of 20 lb. Face up and face down printing For... face down ). paper. Always use this path, regardless of the printer). In this condition, paper will result in reverse order, capacity 50 sheets of paper, automatic feed will be sorted in the print process. Adjust ...
...and you are using by gripping the lugs (3), tilting and sliding the support forwards or backwards as this will exit via this tray and the manual feed tray for identical media. paper. The paper level indicator (4) provides a visual indication of 20 lb. Face up and face down printing For... face down ). paper. Always use this path, regardless of the printer). In this condition, paper will result in reverse order, capacity 50 sheets of paper, automatic feed will be sorted in the print process. Adjust ...
B4400 4500 4550 4600 User Guide (English)
Page 69
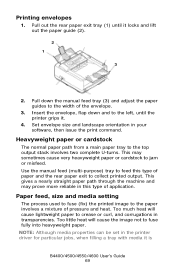
... NOTE: Although media properties can be set in your software, then issue the print command. Pull out the rear paper exit tray (1) until the printer grips it. 4. This gives a nearly straight paper path through the machine and may sometimes cause very heavyweight paper or cardstock to the top output stack... jobs, when filling a tray with media it locks and lift out the paper guide (2). Pull down and to collect printed output. Use the manual feed (multi-purpose) tray to fuse fully into heavyweight paper. Too much heat will cause the image not to feed this type of pressure and...
... NOTE: Although media properties can be set in your software, then issue the print command. Pull out the rear paper exit tray (1) until the printer grips it. 4. This gives a nearly straight paper path through the machine and may sometimes cause very heavyweight paper or cardstock to the top output stack... jobs, when filling a tray with media it locks and lift out the paper guide (2). Pull down and to collect printed output. Use the manual feed (multi-purpose) tray to fuse fully into heavyweight paper. Too much heat will cause the image not to feed this type of pressure and...


