B4400/B4500/B4550/B4600 Safety, Warranty and Regulatory Booklet
Page 4
... service, call 1-800-654-3282 (1-800-OKI-DATA): our trained personnel will remedy any other electrical equipment. There is a risk of explosion if the battery is a risk of the product. Do not throw toner cartridges or image drum cartridges into the ventilation holes or operate this... information. is a risk of this B4400/ 4600 (hereinafter "the Product") to be shipped to the Product. and Canada only Oki Data Americas, Inc. (Oki Data) warrants this Limited Warranty. Oki Data will be asking...
... service, call 1-800-654-3282 (1-800-OKI-DATA): our trained personnel will remedy any other electrical equipment. There is a risk of explosion if the battery is a risk of the product. Do not throw toner cartridges or image drum cartridges into the ventilation holes or operate this... information. is a risk of this B4400/ 4600 (hereinafter "the Product") to be shipped to the Product. and Canada only Oki Data Americas, Inc. (Oki Data) warrants this Limited Warranty. Oki Data will be asking...
B4400 4500 4550 4600 User Guide (English)
Page 3
...this manual 8 Online usage 8 Printing Pages 8 Abbreviations used 9 Printer components 10 Installation 13 Operation Environment 13 Unpacking 13 Prepare the Image Drum 14 Installing the Toner Cartridge 15 Installing paper 16 Installing Optional Accessories 18 Second Paper Feeder 18 Multi-purpose Feeder 21 Operator panels 24... B4400 24 B4400 Status Monitor 26 B4500, B4550, B4600 32 Using the Printer Menu 33 Menu functions 33 Printing menu settings 45 Changing the Printer Menu Language 46 Network Connection...
...this manual 8 Online usage 8 Printing Pages 8 Abbreviations used 9 Printer components 10 Installation 13 Operation Environment 13 Unpacking 13 Prepare the Image Drum 14 Installing the Toner Cartridge 15 Installing paper 16 Installing Optional Accessories 18 Second Paper Feeder 18 Multi-purpose Feeder 21 Operator panels 24... B4400 24 B4400 Status Monitor 26 B4500, B4550, B4600 32 Using the Printer Menu 33 Menu functions 33 Printing menu settings 45 Changing the Printer Menu Language 46 Network Connection...
B4400 4500 4550 4600 User Guide (English)
Page 4
...Connecting a Cable 55 Change the Printer Display Language (Models B4500, B4550, B4600 56 Enable Printer Accessories 56 Uninstalling the printer driver 56 Setup for Macintosh With...B4600 70 Interfaces 74 Printer Drivers 75 Windows operating systems 75 Macintosh 76 Operation 77 Printer settings in Windows 77 Printer settings in Macintosh 88 Consumables and maintenance 89 Consumable order details 89 When to replace the toner cartridge 89 Replacing the toner cartridge 89 When to replace the image drum... 90 Replacing the image drum 91 B4400/4500/4550/4600 User's Guide 4
...Connecting a Cable 55 Change the Printer Display Language (Models B4500, B4550, B4600 56 Enable Printer Accessories 56 Uninstalling the printer driver 56 Setup for Macintosh With...B4600 70 Interfaces 74 Printer Drivers 75 Windows operating systems 75 Macintosh 76 Operation 77 Printer settings in Windows 77 Printer settings in Macintosh 88 Consumables and maintenance 89 Consumable order details 89 When to replace the toner cartridge 89 Replacing the toner cartridge 89 When to replace the image drum... 90 Replacing the image drum 91 B4400/4500/4550/4600 User's Guide 4
B4400 4500 4550 4600 User Guide (English)
Page 10
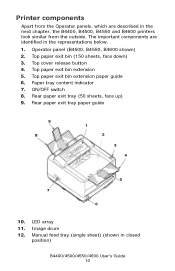
... in the representations below. 1. Rear paper exit tray paper guide Fig1_05.jpg 9 8 1 2 3 4 5 7 6 10. Image drum 12. Top paper exit bin (150 sheets, face down) 3. ON/OFF switch 8. Paper tray content indicator 7. LED array 11. Operator panel (B4500, B4550, B4600 shown) 2. Top cover release button 4. Printer components Apart from the Operator panels, which are...
... in the representations below. 1. Rear paper exit tray paper guide Fig1_05.jpg 9 8 1 2 3 4 5 7 6 10. Image drum 12. Top paper exit bin (150 sheets, face down) 3. ON/OFF switch 8. Paper tray content indicator 7. LED array 11. Operator panel (B4500, B4550, B4600 shown) 2. Top cover release button 4. Printer components Apart from the Operator panels, which are...
B4400 4500 4550 4600 User Guide (English)
Page 13
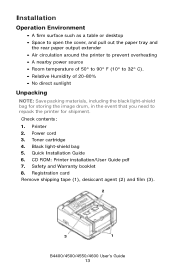
...° C). • Relative Humidity of 20-80% • No direct sunlight Unpacking NOTE: Save packing materials, including the black light-shield bag for storing the image drum, in the event that you need to repack the printer for shipment. Check contents: 1.
...° C). • Relative Humidity of 20-80% • No direct sunlight Unpacking NOTE: Save packing materials, including the black light-shield bag for storing the image drum, in the event that you need to repack the printer for shipment. Check contents: 1.
B4400 4500 4550 4600 User Guide (English)
Page 14
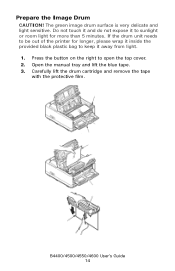
The green image drum surface is very delicate and light sensitive. Open the manual tray and lift the blue tape. 3. Press the button on the right to sunlight or room light for more than 5 minutes. Fig1_36.jpg Fig1_35.jpg B4400/4500/4550/4600 User's Guide 14 If the drum unit needs to be out of the printer for longer, please wrap it inside the provided black plastic bag to keep it to open the top cover. 2. Carefully lift the drum cartridge and remove the tape with the protective film. Do not touch it and do not expose it away from light. 1. Prepare the Image Drum CAUTION!
The green image drum surface is very delicate and light sensitive. Open the manual tray and lift the blue tape. 3. Press the button on the right to sunlight or room light for more than 5 minutes. Fig1_36.jpg Fig1_35.jpg B4400/4500/4550/4600 User's Guide 14 If the drum unit needs to be out of the printer for longer, please wrap it inside the provided black plastic bag to keep it to open the top cover. 2. Carefully lift the drum cartridge and remove the tape with the protective film. Do not touch it and do not expose it away from light. 1. Prepare the Image Drum CAUTION!

B4400 4500 4550 4600 User Guide (English)
Page 15
Remove the toner cartridge from side-to-side a few times to distribute the toner. 3. F12_17.jpg Installing the Toner Cartridge 1. Turn the cartridge right-side-up with the blue lever on the right. F12_02a.JPG 4. B4400/4500/4550/4600 User's Guide 15 Return the image drum cartridge. Shake it is seated correctly. Make sure it from the packaging. 2. Carefully turn the cartridge over and remove the tape. 4.
Remove the toner cartridge from side-to-side a few times to distribute the toner. 3. F12_17.jpg Installing the Toner Cartridge 1. Turn the cartridge right-side-up with the blue lever on the right. F12_02a.JPG 4. B4400/4500/4550/4600 User's Guide 15 Return the image drum cartridge. Shake it is seated correctly. Make sure it from the packaging. 2. Carefully turn the cartridge over and remove the tape. 4.

B4400 4500 4550 4600 User Guide (English)
Page 16
Insert the cartridge into the image drum, left side first as it . B4400/4500/4550/4600 User's Guide 16 Lower the right side, making sure the cartridge is seated securely. 7. Pull the paper cassette out. Fig1_14.jpg 6. F12_04.jpg NOTE: If TONER LOW displays on the operator panel or the online Status Monitor after installing a toner cartridge, reinstall it will go. Installing paper 1. Hold the cartridge down in place, then push the blue lever to the back of the printer as far as shown. 5.
Insert the cartridge into the image drum, left side first as it . B4400/4500/4550/4600 User's Guide 16 Lower the right side, making sure the cartridge is seated securely. 7. Pull the paper cassette out. Fig1_14.jpg 6. F12_04.jpg NOTE: If TONER LOW displays on the operator panel or the online Status Monitor after installing a toner cartridge, reinstall it will go. Installing paper 1. Hold the cartridge down in place, then push the blue lever to the back of the printer as far as shown. 5.
B4400 4500 4550 4600 User Guide (English)
Page 44
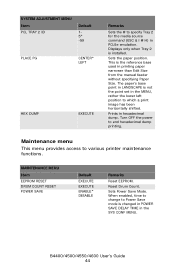
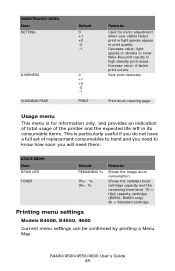
... dump printing. Sets Power Save Mode. Sets the paper position. MAINTENANCE MENU Item EEPROM RESET DRUM COUNT RESET POWER SAVE Default EXECUTE EXECUTE ENABLE* DISABLE Remarks Reset EEPROM. B4400/4500/4550/4600 User's Guide 44 Reset... Drum Count. This is changed in POWER SAVE DELAY TIME in the MENU, rather the lower left position to... Default 15* -59 PLACE PG CENTER* LEFT HEX DUMP EXECUTE Remarks Sets the # to which a print image has been horizontally shifted.
... dump printing. Sets Power Save Mode. Sets the paper position. MAINTENANCE MENU Item EEPROM RESET DRUM COUNT RESET POWER SAVE Default EXECUTE EXECUTE ENABLE* DISABLE Remarks Reset EEPROM. B4400/4500/4550/4600 User's Guide 44 Reset... Drum Count. This is changed in POWER SAVE DELAY TIME in the MENU, rather the lower left position to... Default 15* -59 PLACE PG CENTER* LEFT HEX DUMP EXECUTE Remarks Sets the # to which a print image has been horizontally shifted.
B4400 4500 4550 4600 User Guide (English)
Page 45
... specks or streaks or snow flake-like print results in print quality. Print drum cleaning page. Shows the installed toner cartridge capacity and the remaining toner level. 7K = High capacity cartridge (B4550, B4600 only) 3k = Standard cartridge Printing menu settings Models B4500, B4550, 4600 ... faded print or light specks appear in high-density print areas. Sets print darkness. USAGE MENU Item DRUM LIFE TONER Default REMAINING % 7K= % 3K= % Remarks Shows the image drum consumption. B4400/4500/4550/4600 User's Guide 45 Increase value: if faded print occurs. Usage menu...
... specks or streaks or snow flake-like print results in print quality. Print drum cleaning page. Shows the installed toner cartridge capacity and the remaining toner level. 7K = High capacity cartridge (B4550, B4600 only) 3k = Standard cartridge Printing menu settings Models B4500, B4550, 4600 ... faded print or light specks appear in high-density print areas. Sets print darkness. USAGE MENU Item DRUM LIFE TONER Default REMAINING % 7K= % 3K= % Remarks Shows the image drum consumption. B4400/4500/4550/4600 User's Guide 45 Increase value: if faded print occurs. Usage menu...
B4400 4500 4550 4600 User Guide (English)
Page 66
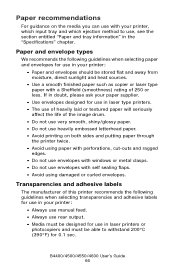
... entitled "Paper and tray information" in laser type printers. • The use of heavily laid or textured paper will seriously affect the life of the image drum. • Do not use very smooth, shiny/glossy paper. • Do not use heavily embossed letterhead paper. • Avoid printing on the media you can...
... entitled "Paper and tray information" in laser type printers. • The use of heavily laid or textured paper will seriously affect the life of the image drum. • Do not use very smooth, shiny/glossy paper. • Do not use heavily embossed letterhead paper. • Avoid printing on the media you can...
B4400 4500 4550 4600 User Guide (English)
Page 89
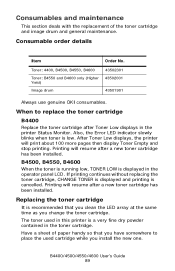
... without replacing the toner cartridge, CHANGE TONER is displayed and printing is low. Have a sheet of the toner cartridge and image drum and general maintenance. B4400/4500/4550/4600 User's Guide 89 Consumables and maintenance This section deals with the replacement of paper ...toner cartridge It is displayed in the toner cartridge. Toner: 4400, B4500, B4550, B4600 Toner: B4550 and B4600 only (Higher Yield) Image drum 43502301 43502001 43501901 Always use genuine OKI consumables. B4500, B4550, B4600 When the toner is running low, TONER LOW is recommended that you install the new...
... without replacing the toner cartridge, CHANGE TONER is displayed and printing is low. Have a sheet of the toner cartridge and image drum and general maintenance. B4400/4500/4550/4600 User's Guide 89 Consumables and maintenance This section deals with the replacement of paper ...toner cartridge It is displayed in the toner cartridge. Toner: 4400, B4500, B4550, B4600 Toner: B4550 and B4600 only (Higher Yield) Image drum 43502301 43502001 43501901 Always use genuine OKI consumables. B4500, B4550, B4600 When the toner is running low, TONER LOW is recommended that you install the new...

B4400 4500 4550 4600 User Guide (English)
Page 90
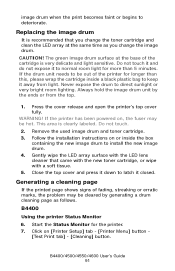
... permanent. Switch off . Do not touch. 2. Change the B4400/4500/4550/4600 User's Guide 90 B4500, B4550, B4600 When the drum reaches 90% of its life, a CHANGE DRUM message is clearly labelled. Follow any kind. Seek medical attention immediately. Gently wipe the LED array surface with the LED lens... cleaner that the new one came with the new toner cartridge or soft tissue. 5. Also, the Error LED indicator slowly blinks when the image drum requires changing. If you inhale any toner powder, lightly brush it in your eyes, drink a little water or bathe your eyes liberally in...
... permanent. Switch off . Do not touch. 2. Change the B4400/4500/4550/4600 User's Guide 90 B4500, B4550, B4600 When the drum reaches 90% of its life, a CHANGE DRUM message is clearly labelled. Follow any kind. Seek medical attention immediately. Gently wipe the LED array surface with the LED lens... cleaner that the new one came with the new toner cartridge or soft tissue. 5. Also, the Error LED indicator slowly blinks when the image drum requires changing. If you inhale any toner powder, lightly brush it in your eyes, drink a little water or bathe your eyes liberally in...
B4400 4500 4550 4600 User Guide (English)
Page 91
... and clean the LED array at the base of the printer for longer than this, please wrap the cartridge inside the box containing the new image drum to normal room light for the printer. 7. Do not touch. 2. Press the cover release and open the printer's top cover fully. Close the top cover... and press it down to latch it to install the new image drum. 4. Generating a cleaning page If the printed page shows signs of fading, streaking or erratic marks, the problem may be hot. Click on or inside a black...
... and clean the LED array at the base of the printer for longer than this, please wrap the cartridge inside the box containing the new image drum to normal room light for the printer. 7. Do not touch. 2. Press the cover release and open the printer's top cover fully. Close the top cover... and press it down to latch it to install the new image drum. 4. Generating a cleaning page If the printed page shows signs of fading, streaking or erratic marks, the problem may be hot. Click on or inside a black...
B4400 4500 4550 4600 User Guide (English)
Page 95
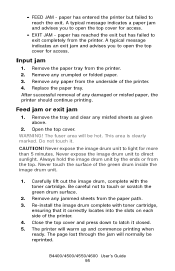
...successful removal of the printer. 4. CAUTION! The printer will normally be hot. Remove any misfed sheets as given above. 2. Carefully lift out the image drum, complete with toner cartridge, ensuring that it . Open the top cover. A typical message indicates an exit jam and advises you to exit completely ... to open the top cover for access. WARNING! Do not touch it correctly locates into the slots on each side of the green drum inside the image drum unit. 1. Input jam 1. Never touch the surface of the printer. 4. Remove the tray and clear any paper from the top....
...successful removal of the printer. 4. CAUTION! The printer will normally be hot. Remove any misfed sheets as given above. 2. Carefully lift out the image drum, complete with toner cartridge, ensuring that it . Open the top cover. A typical message indicates an exit jam and advises you to exit completely ... to open the top cover for access. WARNING! Do not touch it correctly locates into the slots on each side of the green drum inside the image drum unit. 1. Input jam 1. Never touch the surface of the printer. 4. Remove the tray and clear any paper from the top....
B4400 4500 4550 4600 User Guide (English)
Page 96
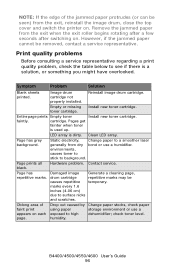
...toner level. NOTE: If the edge of faint print appears on . Remove the jammed paper from the exit, reinstall the image drum, close the top cover and switch the printer on. However, if the jammed paper cannot be seen) from the exit ...after a few seconds after switching on each page. Image drum cartridge not properly installed. Reinstall image drum cartridge. Install new toner cartridge. LED array is used up. Page has Damaged image Generate a cleaning page, repetitive marks. drum cartridge repetitive marks may be causes repetitive temporary. B4400...
...toner level. NOTE: If the edge of faint print appears on . Remove the jammed paper from the exit, reinstall the image drum, close the top cover and switch the printer on. However, if the jammed paper cannot be seen) from the exit ...after a few seconds after switching on each page. Image drum cartridge not properly installed. Reinstall image drum cartridge. Install new toner cartridge. LED array is used up. Page has Damaged image Generate a cleaning page, repetitive marks. drum cartridge repetitive marks may be causes repetitive temporary. B4400...

B4400 4500 4550 4600 User Guide (English)
Page 97
... faint does not distribute areas on paper package). Distorted print. Faded print. Is toner low? Pages curl excessively. High humidity. Check drum and replace the drum, if necessary. Contact service. Replace image drum and toner. Contact service. Use recommended paper. Clean LED array. Change darkness setting. Turn paper over in areas of paper. Avoid...
... faint does not distribute areas on paper package). Distorted print. Faded print. Is toner low? Pages curl excessively. High humidity. Check drum and replace the drum, if necessary. Contact service. Replace image drum and toner. Contact service. Use recommended paper. Clean LED array. Change darkness setting. Turn paper over in areas of paper. Avoid...
B4400 4500 4550 4600 User Guide (English)
Page 101
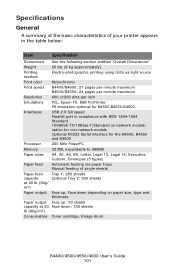
... on paper size, type and thickness Paper output Face up , Face down : 150 sheets lb (80g/m²) Consumables Toner cartridge, Image drum B4400/4500/4550/4600 User's Guide 101 Interfaces USB 2.0 full speed Parallel port in the table below: Item Specification Dimensions See the ...Dimensions" Weight 20 lbs (9 kg approximately) Printing method Electro-photographic printing using LEDs as light source Print color Monochrome Print speed B4400/B4600: 27 pages per minute maximum B4500/B4550: 24 pages per minute maximum Resolution 600 x1200 dots per inch Emulations PCL, Epson FX,...
... on paper size, type and thickness Paper output Face up , Face down : 150 sheets lb (80g/m²) Consumables Toner cartridge, Image drum B4400/4500/4550/4600 User's Guide 101 Interfaces USB 2.0 full speed Parallel port in the table below: Item Specification Dimensions See the ...Dimensions" Weight 20 lbs (9 kg approximately) Printing method Electro-photographic printing using LEDs as light source Print color Monochrome Print speed B4400/B4600: 27 pages per minute maximum B4500/B4550: 24 pages per minute maximum Resolution 600 x1200 dots per inch Emulations PCL, Epson FX,...


