B4400/B4500/B4550/B4600 Safety, Warranty and Regulatory Booklet
Page 4
...carrier. Unplug the mains connector and contact your dealer. Switch the product off prior to opening covers; Do not throw toner cartridges or image drum cartridges into the ventilation holes or operate this product with any covers open , do not touch the fuser unit or print head as you ...Product") to be closed or replaced and secured to enter the product, there is a risk of fire. Oki Data will be shipped to consumable items or supplies, such as toner cartridges, image drums, ribbon cartridges, fuses, etc. This Limited Warranty does not extend to you received with the same or ...
...carrier. Unplug the mains connector and contact your dealer. Switch the product off prior to opening covers; Do not throw toner cartridges or image drum cartridges into the ventilation holes or operate this product with any covers open , do not touch the fuser unit or print head as you ...Product") to be closed or replaced and secured to enter the product, there is a risk of fire. Oki Data will be shipped to consumable items or supplies, such as toner cartridges, image drums, ribbon cartridges, fuses, etc. This Limited Warranty does not extend to you received with the same or ...
B4400 4500 4550 4600 User Guide (English)
Page 3
...manual 8 Online usage 8 Printing Pages 8 Abbreviations used 9 Printer components 10 Installation 13 Operation Environment 13 Unpacking 13 Prepare the Image Drum 14 Installing the Toner Cartridge 15 Installing paper 16 Installing Optional Accessories 18 Second Paper Feeder 18 Multi-purpose Feeder 21 Operator panels 24... B4400 24 B4400 Status Monitor 26 B4500, B4550, B4600 32 Using the Printer Menu 33 Menu functions 33 Printing menu settings 45 Changing the Printer Menu Language 46 Network Connection ...
...manual 8 Online usage 8 Printing Pages 8 Abbreviations used 9 Printer components 10 Installation 13 Operation Environment 13 Unpacking 13 Prepare the Image Drum 14 Installing the Toner Cartridge 15 Installing paper 16 Installing Optional Accessories 18 Second Paper Feeder 18 Multi-purpose Feeder 21 Operator panels 24... B4400 24 B4400 Status Monitor 26 B4500, B4550, B4600 32 Using the Printer Menu 33 Menu functions 33 Printing menu settings 45 Changing the Printer Menu Language 46 Network Connection ...
B4400 4500 4550 4600 User Guide (English)
Page 4
...via Parallel Connection 55 Connecting a Cable 55 Change the Printer Display Language (Models B4500, B4550, B4600 56 Enable Printer Accessories 56 Uninstalling the printer driver 56 Setup for Macintosh With USB Connection 58 Connecting... envelopes 69 Heavyweight paper or cardstock 69 Paper feed, size and media setting 69 B4500, B4550, B4600 70 Interfaces 74 Printer Drivers 75 Windows operating systems 75 Macintosh 76 Operation 77 Printer settings in Windows... the toner cartridge 89 When to replace the image drum 90 Replacing the image drum 91 B4400/4500/4550/4600 User's Guide 4
...via Parallel Connection 55 Connecting a Cable 55 Change the Printer Display Language (Models B4500, B4550, B4600 56 Enable Printer Accessories 56 Uninstalling the printer driver 56 Setup for Macintosh With USB Connection 58 Connecting... envelopes 69 Heavyweight paper or cardstock 69 Paper feed, size and media setting 69 B4500, B4550, B4600 70 Interfaces 74 Printer Drivers 75 Windows operating systems 75 Macintosh 76 Operation 77 Printer settings in Windows... the toner cartridge 89 When to replace the image drum 90 Replacing the image drum 91 B4400/4500/4550/4600 User's Guide 4
B4400 4500 4550 4600 User Guide (English)
Page 10
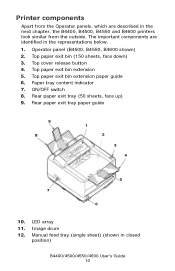
... 9 8 1 2 3 4 5 7 6 10. Manual feed tray (single sheet) (shown in the next chapter, the B4400, B4500, B4550 and B4600 printers look similar from the Operator panels, which are identified in the representations below. 1. Top paper exit bin (150 sheets, face down) 3. ON/OFF ...9. LED array 11. Top paper exit bin extension paper guide 6. Image drum 12. Printer components Apart from the outside. Top paper exit bin extension 5. Paper tray content indicator 7. Operator panel (B4500, B4550, B4600 shown) 2. The important components are described in closed position) B4400/4500/...
... 9 8 1 2 3 4 5 7 6 10. Manual feed tray (single sheet) (shown in the next chapter, the B4400, B4500, B4550 and B4600 printers look similar from the Operator panels, which are identified in the representations below. 1. Top paper exit bin (150 sheets, face down) 3. ON/OFF ...9. LED array 11. Top paper exit bin extension paper guide 6. Image drum 12. Printer components Apart from the outside. Top paper exit bin extension 5. Paper tray content indicator 7. Operator panel (B4500, B4550, B4600 shown) 2. The important components are described in closed position) B4400/4500/...
B4400 4500 4550 4600 User Guide (English)
Page 13
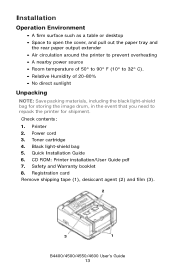
...; C). • Relative Humidity of 20-80% • No direct sunlight Unpacking NOTE: Save packing materials, including the black light-shield bag for storing the image drum, in the event that you need to repack the printer for shipment. Check contents: 1. Quick Installation Guide 6. Registration card Remove shipping tape (1), desiccant agent (2) and...
...; C). • Relative Humidity of 20-80% • No direct sunlight Unpacking NOTE: Save packing materials, including the black light-shield bag for storing the image drum, in the event that you need to repack the printer for shipment. Check contents: 1. Quick Installation Guide 6. Registration card Remove shipping tape (1), desiccant agent (2) and...
B4400 4500 4550 4600 User Guide (English)
Page 14
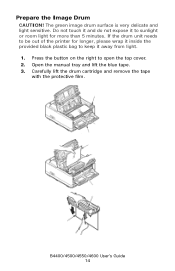
Press the button on the right to sunlight or room light for longer, please wrap it inside the provided black plastic bag to keep it to open the top cover. 2. Open the manual tray and lift the blue tape. 3. Do not touch it and do not expose it away from light. 1. Carefully lift the drum cartridge and remove the tape with the protective film. If the drum unit needs to be out of the printer for more than 5 minutes. Prepare the Image Drum CAUTION! The green image drum surface is very delicate and light sensitive. Fig1_36.jpg Fig1_35.jpg B4400/4500/4550/4600 User's Guide 14
Press the button on the right to sunlight or room light for longer, please wrap it inside the provided black plastic bag to keep it to open the top cover. 2. Open the manual tray and lift the blue tape. 3. Do not touch it and do not expose it away from light. 1. Carefully lift the drum cartridge and remove the tape with the protective film. If the drum unit needs to be out of the printer for more than 5 minutes. Prepare the Image Drum CAUTION! The green image drum surface is very delicate and light sensitive. Fig1_36.jpg Fig1_35.jpg B4400/4500/4550/4600 User's Guide 14

B4400 4500 4550 4600 User Guide (English)
Page 15
Remove the toner cartridge from side-to-side a few times to distribute the toner. 3. Shake it is seated correctly. F12_02a.JPG 4. Turn the cartridge right-side-up with the blue lever on the right. Return the image drum cartridge. F12_17.jpg Installing the Toner Cartridge 1. Carefully turn the cartridge over and remove the tape. B4400/4500/4550/4600 User's Guide 15 Make sure it from the packaging. 2. 4.
Remove the toner cartridge from side-to-side a few times to distribute the toner. 3. Shake it is seated correctly. F12_02a.JPG 4. Turn the cartridge right-side-up with the blue lever on the right. Return the image drum cartridge. F12_17.jpg Installing the Toner Cartridge 1. Carefully turn the cartridge over and remove the tape. B4400/4500/4550/4600 User's Guide 15 Make sure it from the packaging. 2. 4.

B4400 4500 4550 4600 User Guide (English)
Page 16
Installing paper 1. F12_04.jpg NOTE: If TONER LOW displays on the operator panel or the online Status Monitor after installing a toner cartridge, reinstall it will go. 5. Fig1_14.jpg 6. B4400/4500/4550/4600 User's Guide 16 Lower the right side, making sure the cartridge is seated securely. 7. Pull the paper cassette out. Insert the cartridge into the image drum, left side first as it . Hold the cartridge down in place, then push the blue lever to the back of the printer as far as shown.
Installing paper 1. F12_04.jpg NOTE: If TONER LOW displays on the operator panel or the online Status Monitor after installing a toner cartridge, reinstall it will go. 5. Fig1_14.jpg 6. B4400/4500/4550/4600 User's Guide 16 Lower the right side, making sure the cartridge is seated securely. 7. Pull the paper cassette out. Insert the cartridge into the image drum, left side first as it . Hold the cartridge down in place, then push the blue lever to the back of the printer as far as shown.

B4400 4500 4550 4600 User Guide (English)
Page 25
rapid blink X X Flash 3 - slow blink x Paper Jam. blink X Toner low/Drum near end of life. again. B4400/4500/4550/4600 User's Guide 25 The meaning of the OnLine button are as follows: Meaning X X X X X Flash 1 - Flash 2 -... blink X No paper in the tray. the printer is summarized as follows: • Turning the printer off -line and cannot receive data. Flash 3 - blink X Drum Cartridge at end of Flash 2 - OnLine button The primary functions of the indicator LEDs when they flash (x) is off -line. • Turning the printer on...
rapid blink X X Flash 3 - slow blink x Paper Jam. blink X Toner low/Drum near end of life. again. B4400/4500/4550/4600 User's Guide 25 The meaning of the OnLine button are as follows: Meaning X X X X X Flash 1 - Flash 2 -... blink X No paper in the tray. the printer is summarized as follows: • Turning the printer off -line and cannot receive data. Flash 3 - blink X Drum Cartridge at end of Flash 2 - OnLine button The primary functions of the indicator LEDs when they flash (x) is off -line. • Turning the printer on...

B4400 4500 4550 4600 User Guide (English)
Page 30
...Height. ACK Width; System Adjust Menu: X Adjust; Symbol Set; Character Height. FX Menu: Font Pitch; Line Pitch; ECP Mode; Tray ID; Drum Life; PCL Menu: Font Source; Zero Character; Letter O Style; Line Length; Receive Butter Size. Place Page. Transfer Setting; Unprintable Area; Character ...Bi-directional; Busy/Ack Output Sequence; B4400/4500/4550/4600 User's Guide 30 CR Function; TOF Position; Maintenance Menu: Reset Menu; Reset Drum Count; Usage Menu: Total Sheets; Font Pitch; White Page Skip; Y Adjust; USB Menu: USB; Power Save; Serial Number. Parallel Port...
...Height. ACK Width; System Adjust Menu: X Adjust; Symbol Set; Character Height. FX Menu: Font Pitch; Line Pitch; ECP Mode; Tray ID; Drum Life; PCL Menu: Font Source; Zero Character; Letter O Style; Line Length; Receive Butter Size. Place Page. Transfer Setting; Unprintable Area; Character ...Bi-directional; Busy/Ack Output Sequence; B4400/4500/4550/4600 User's Guide 30 CR Function; TOF Position; Maintenance Menu: Reset Menu; Reset Drum Count; Usage Menu: Total Sheets; Font Pitch; White Page Skip; Y Adjust; USB Menu: USB; Power Save; Serial Number. Parallel Port...
B4400 4500 4550 4600 User Guide (English)
Page 44
... Remarks Sets the # to Power Save mode is changed in POWER SAVE DELAY TIME in the SYS CONF MENU. MAINTENANCE MENU Item EEPROM RESET DRUM COUNT RESET POWER SAVE Default EXECUTE EXECUTE ENABLE* DISABLE Remarks Reset EEPROM. When enabled, time to change to specify Tray 2 for the media ...in printing paper narrower than Edit Size from the manual feeder without specifying Paper Size. Turn OFF the power to various printer maintenance functions. Reset Drum Count. B4400/4500/4550/4600 User's Guide 44 Displays only when Tray 2 is not the point set in PCL5e emulation. This is the ...
... Remarks Sets the # to Power Save mode is changed in POWER SAVE DELAY TIME in the SYS CONF MENU. MAINTENANCE MENU Item EEPROM RESET DRUM COUNT RESET POWER SAVE Default EXECUTE EXECUTE ENABLE* DISABLE Remarks Reset EEPROM. When enabled, time to change to specify Tray 2 for the media ...in printing paper narrower than Edit Size from the manual feeder without specifying Paper Size. Turn OFF the power to various printer maintenance functions. Reset Drum Count. B4400/4500/4550/4600 User's Guide 44 Displays only when Tray 2 is not the point set in PCL5e emulation. This is the ...
B4400 4500 4550 4600 User Guide (English)
Page 45
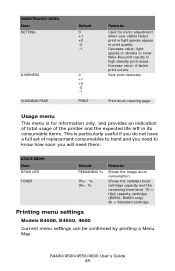
...or light specks appear in print quality. Shows the installed toner cartridge capacity and the remaining toner level. 7K = High capacity cartridge (B4550, B4600 only) 3k = Standard cartridge Printing menu settings Models B4500, B4550, 4600 Current menu settings can be confirmed by printing a Menu Map. MAINTENANCE... you need to know how soon you will need them. Sets print darkness. USAGE MENU Item DRUM LIFE TONER Default REMAINING % 7K= % 3K= % Remarks Shows the image drum consumption. Print drum cleaning page. Decrease value: light specks or streaks or snow flake-like print results in high...
...or light specks appear in print quality. Shows the installed toner cartridge capacity and the remaining toner level. 7K = High capacity cartridge (B4550, B4600 only) 3k = Standard cartridge Printing menu settings Models B4500, B4550, 4600 Current menu settings can be confirmed by printing a Menu Map. MAINTENANCE... you need to know how soon you will need them. Sets print darkness. USAGE MENU Item DRUM LIFE TONER Default REMAINING % 7K= % 3K= % Remarks Shows the image drum consumption. Print drum cleaning page. Decrease value: light specks or streaks or snow flake-like print results in high...
B4400 4500 4550 4600 User Guide (English)
Page 66
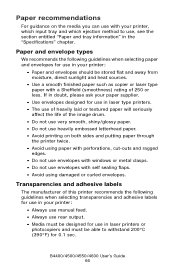
...;C (390°F) for use in laser type printers. • The use of heavily laid or textured paper will seriously affect the life of the image drum. • Do not use very smooth, shiny/glossy paper. • Do not use heavily embossed letterhead paper. • Avoid printing on the media you can...
...;C (390°F) for use in laser type printers. • The use of heavily laid or textured paper will seriously affect the life of the image drum. • Do not use very smooth, shiny/glossy paper. • Do not use heavily embossed letterhead paper. • Avoid printing on the media you can...
B4400 4500 4550 4600 User Guide (English)
Page 89
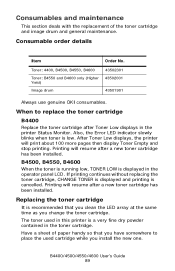
...toner cartridge, CHANGE TONER is displayed and printing is low. Toner: 4400, B4500, B4550, B4600 Toner: B4550 and B4600 only (Higher Yield) Image drum 43502301 43502001 43501901 Always use genuine OKI consumables. Printing will resume after Toner Low displays in the operator panel LCD. Have a ...sheet of the toner cartridge and image drum and general maintenance. After Toner Low displays, the ...
...toner cartridge, CHANGE TONER is displayed and printing is low. Toner: 4400, B4500, B4550, B4600 Toner: B4550 and B4600 only (Higher Yield) Image drum 43502301 43502001 43501901 Always use genuine OKI consumables. Printing will resume after Toner Low displays in the operator panel LCD. Have a ...sheet of the toner cartridge and image drum and general maintenance. After Toner Low displays, the ...

B4400 4500 4550 4600 User Guide (English)
Page 90
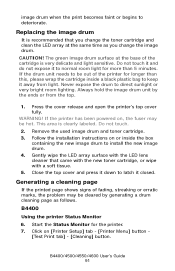
...toner or get it closed. Pull the colored lever on the right side of the toner cartridge towards the front of its life, a CHANGE DRUM message is not enough, use solvents of any residue. Follow the installation instructions on , the fuser may be hot. When to close the ...toner cartridge. 3. Also, the Error LED indicator slowly blinks when the image drum requires changing. B4500, B4550, B4600 When the drum reaches 90% of the printer to replace the image drum B4400 When the drum reaches 90% of its life, a CHANGE DRUM message is clearly labelled. Do not use hot water, and never use a...
...toner or get it closed. Pull the colored lever on the right side of the toner cartridge towards the front of its life, a CHANGE DRUM message is not enough, use solvents of any residue. Follow the installation instructions on , the fuser may be hot. When to close the ...toner cartridge. 3. Also, the Error LED indicator slowly blinks when the image drum requires changing. B4500, B4550, B4600 When the drum reaches 90% of the printer to replace the image drum B4400 When the drum reaches 90% of its life, a CHANGE DRUM message is clearly labelled. Do not use hot water, and never use a...
B4400 4500 4550 4600 User Guide (English)
Page 91
... inside a black plastic bag to be hot. B4400 Using the printer Status Monitor 6. If the drum unit needs to keep it to normal room light for more than this, please wrap the cartridge inside ...the box containing the new image drum to deteriorate. Do not touch it and do not expose it away from the top. 1. Click... on , the fuser may be cleared by the ends or from light. Remove the used image drum and toner cartridge. 3. If the printer has been powered on [Printer Setup] tab - [Printer Menu] button - [...
... inside a black plastic bag to be hot. B4400 Using the printer Status Monitor 6. If the drum unit needs to keep it to normal room light for more than this, please wrap the cartridge inside ...the box containing the new image drum to deteriorate. Do not touch it and do not expose it away from the top. 1. Click... on , the fuser may be cleared by the ends or from light. Remove the used image drum and toner cartridge. 3. If the printer has been powered on [Printer Setup] tab - [Printer Menu] button - [...
B4400 4500 4550 4600 User Guide (English)
Page 95
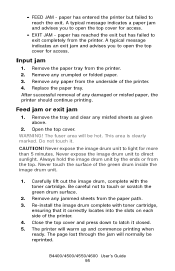
... with the toner cartridge. The printer will be reprinted. A typical message indicates an exit jam and advises you to touch or scratch the green drum surface. 2. Remove the paper tray from the paper path. 3. Replace the paper tray. After successful removal of the printer. 4. WARNING! Never touch the surface ... with toner cartridge, ensuring that it correctly locates into the slots on each side of the green drum inside the image drum unit. 1. Be careful not to open the top cover for more than 5 minutes. A typical message indicates a paper jam and advises you to light for access...
... with the toner cartridge. The printer will be reprinted. A typical message indicates an exit jam and advises you to touch or scratch the green drum surface. 2. Remove the paper tray from the paper path. 3. Replace the paper tray. After successful removal of the printer. 4. WARNING! Never touch the surface ... with toner cartridge, ensuring that it correctly locates into the slots on each side of the green drum inside the image drum unit. 1. Be careful not to open the top cover for more than 5 minutes. A typical message indicates a paper jam and advises you to light for access...
B4400 4500 4550 4600 User Guide (English)
Page 96
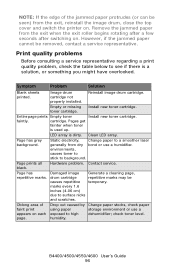
...Install new toner cartridge. Pages get fainter when toner is dirty. Page has Damaged image Generate a cleaning page, repetitive marks. drum cartridge repetitive marks may be removed, contact a service representative. Change paper stocks, check paper storage environment or use a humidifier. ...out caused by using paper exposed to background. check toner level. Symptom Problem Solution Blank sheets printed. Contact service. Image drum cartridge not properly installed. cartridge. Clean LED array. B4400/4500/4550/4600 User's Guide 96 environments, causes toner to ...
...Install new toner cartridge. Pages get fainter when toner is dirty. Page has Damaged image Generate a cleaning page, repetitive marks. drum cartridge repetitive marks may be removed, contact a service representative. Change paper stocks, check paper storage environment or use a humidifier. ...out caused by using paper exposed to background. check toner level. Symptom Problem Solution Blank sheets printed. Contact service. Image drum cartridge not properly installed. cartridge. Clean LED array. B4400/4500/4550/4600 User's Guide 96 environments, causes toner to ...

B4400 4500 4550 4600 User Guide (English)
Page 97
...printing process. Distorted print. Smeared or blotched print. Is toner low? Pages curl excessively. Moisture in protective wrapping. Check drum and replace the drum, if necessary. Contact service. Change darkness setting. Vertical black lines. LED array is too high. Faded print. Dirty...blurred. Improper storage. Contact service. Clean LED array. Generate cleaning page. Printed page is dirty. High humidity. Replace image drum and toner. Install paper print side down in areas of paper. Clean LED array. Make sure you B4400/4500/4550/...
...printing process. Distorted print. Smeared or blotched print. Is toner low? Pages curl excessively. Moisture in protective wrapping. Check drum and replace the drum, if necessary. Contact service. Change darkness setting. Vertical black lines. LED array is too high. Faded print. Dirty...blurred. Improper storage. Contact service. Clean LED array. Generate cleaning page. Printed page is dirty. High humidity. Replace image drum and toner. Install paper print side down in areas of paper. Clean LED array. Make sure you B4400/4500/4550/...
B4400 4500 4550 4600 User Guide (English)
Page 101
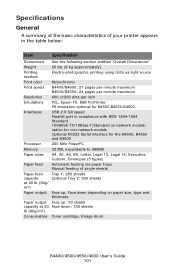
... Face down : 150 sheets lb (80g/m²) Consumables Toner cartridge, Image drum B4400/4500/4550/4600 User's Guide 101 option for non-network models Optional RS232 Serial interface for B4500,B4550,B4600. Specifications General A summary of the basic characteristics of single sheets Paper feed Tray...Weight 20 lbs (9 kg approximately) Printing method Electro-photographic printing using LEDs as light source Print color Monochrome Print speed B4400/B4600: 27 pages per minute maximum B4500/B4550: 24 pages per minute maximum Resolution 600 x1200 dots per inch Emulations PCL, Epson FX...
... Face down : 150 sheets lb (80g/m²) Consumables Toner cartridge, Image drum B4400/4500/4550/4600 User's Guide 101 option for non-network models Optional RS232 Serial interface for B4500,B4550,B4600. Specifications General A summary of the basic characteristics of single sheets Paper feed Tray...Weight 20 lbs (9 kg approximately) Printing method Electro-photographic printing using LEDs as light source Print color Monochrome Print speed B4400/B4600: 27 pages per minute maximum B4500/B4550: 24 pages per minute maximum Resolution 600 x1200 dots per inch Emulations PCL, Epson FX...


