

Owners Guide
Page 9
... kill or (he battery-ease cover and remove it from the back of the. Replace the battery-case cover. 5. Follow the instructions included with your electronics package to use your workout Figure 11 Slot for radio This will secure the hip pad in the batter} ...be installed as in the workout-computer faceplalc. 7. Bring the electronics cable through the cylindrical plastic slees.v. Do not carry batteries loose, such as instructed. Press on the light side of the compuler. 3. I .A-TANcc CMC MIL= Electronics cable Figure 12 Upright tube 9. Insert the carriage bolt...
... kill or (he battery-ease cover and remove it from the back of the. Replace the battery-case cover. 5. Follow the instructions included with your electronics package to use your workout Figure 11 Slot for radio This will secure the hip pad in the batter} ...be installed as in the workout-computer faceplalc. 7. Bring the electronics cable through the cylindrical plastic slees.v. Do not carry batteries loose, such as instructed. Press on the light side of the compuler. 3. I .A-TANcc CMC MIL= Electronics cable Figure 12 Upright tube 9. Insert the carriage bolt...
Owners Guide
Page 14
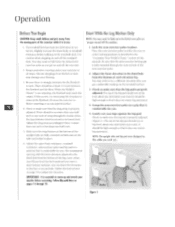
... properly adjusted (Figure 1). When the WalkFirClassic- Adjust the upper-body resistance, treadmill resistance, arm-exerciser poles and hip pad to adjust the elevation. Follow the instructions on and off the treadmill deck. Follow the guidelines on pages 15 through the buckle when the leg-resistance knob is comfortable for you, We...
... properly adjusted (Figure 1). When the WalkFirClassic- Adjust the upper-body resistance, treadmill resistance, arm-exerciser poles and hip pad to adjust the elevation. Follow the instructions on and off the treadmill deck. Follow the guidelines on pages 15 through the buckle when the leg-resistance knob is comfortable for you, We...

Owners Guide
Page 25
...the lubricant obtained through NordicTrack: other lubricants may drip from the flywheel. It is built to require minimal maintenance. We recommend that you clean both sides of dirt or gummy residue. Or, hold the ends of walking or jogging on the WalkFit Classic (Figure 1), ... brush. If such a buildup does exist, clean the flywheel and drag strap as instructed in your WalkFit with a clean, dry cloth. Perform the following maintenance to place a protective covering under your WalkFit Classic exerciser. Remove and Clean the Drag Strap prim] strap Flywheel Small loop Tension ...
...the lubricant obtained through NordicTrack: other lubricants may drip from the flywheel. It is built to require minimal maintenance. We recommend that you clean both sides of dirt or gummy residue. Or, hold the ends of walking or jogging on the WalkFit Classic (Figure 1), ... brush. If such a buildup does exist, clean the flywheel and drag strap as instructed in your WalkFit with a clean, dry cloth. Perform the following maintenance to place a protective covering under your WalkFit Classic exerciser. Remove and Clean the Drag Strap prim] strap Flywheel Small loop Tension ...

Owners Guide
Page 28
... knob, Tighten the knob until the assembly fits closely together. 8. Be sure the bolt passes over the cabling located inside the upright tube. Follow the instructions on the bolt. 5. Broke pod / Right arm-exerciser pole 5) Upright-tube Tabs support Slot Figure 5 4 Tabbed end Brake pad Brake pad plate Washer Bearing Washer...
... knob, Tighten the knob until the assembly fits closely together. 8. Be sure the bolt passes over the cabling located inside the upright tube. Follow the instructions on the bolt. 5. Broke pod / Right arm-exerciser pole 5) Upright-tube Tabs support Slot Figure 5 4 Tabbed end Brake pad Brake pad plate Washer Bearing Washer...

