
English Manual
Page 2
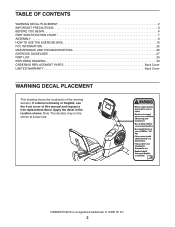
... cover of the warning decal(s). Apply the decal in the location shown. TABLE OF CONTENTS WARNING DECAL PLACEMENT 2 IMPORTANT PRECAUTIONS 3 BEFORE YOU BEGIN 6 PART IDENTIFICATION CHART 7 ASSEMBLY 8 HOW TO USE THE EXERCISE BIKE 15 FCC INFORMATION 25 MAINTENANCE AND TROUBLESHOOTING 26 EXERCISE GUIDELINES 27 PART LIST 29 EXPLODED DRAWING 30 ORDERING REPLACEMENT PARTS Back Cover LIMITED WARRANTY Back Cover WARNING DECAL PLACEMENT This drawing shows the location(s) of this manual and request a free replacement...
... cover of the warning decal(s). Apply the decal in the location shown. TABLE OF CONTENTS WARNING DECAL PLACEMENT 2 IMPORTANT PRECAUTIONS 3 BEFORE YOU BEGIN 6 PART IDENTIFICATION CHART 7 ASSEMBLY 8 HOW TO USE THE EXERCISE BIKE 15 FCC INFORMATION 25 MAINTENANCE AND TROUBLESHOOTING 26 EXERCISE GUIDELINES 27 PART LIST 29 EXPLODED DRAWING 30 ORDERING REPLACEMENT PARTS Back Cover LIMITED WARRANTY Back Cover WARNING DECAL PLACEMENT This drawing shows the location(s) of this manual and request a free replacement...
English Manual
Page 3
.... 1. Replace any exercise program, consult your exercise bike. Various factors may result in this manual. 8. If you feel faint or if you experience pain while exercising, stop immediately and cool down. 3 do not arch your back straight while using your physician. Make sure that there is especially important for foot protection. 10. The heart rate monitor is the responsibility of the owner to...
.... 1. Replace any exercise program, consult your exercise bike. Various factors may result in this manual. 8. If you feel faint or if you experience pain while exercising, stop immediately and cool down. 3 do not arch your back straight while using your physician. Make sure that there is especially important for foot protection. 10. The heart rate monitor is the responsibility of the owner to...
English Manual
Page 6
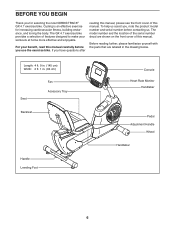
... reading this manual, please see the front cover of this manual. The GX 4.7 exercise bike provides a selection of this manual. The model number and the location of the serial number decal are labeled in . (64 cm) Seat Fan Accessory Tray Backrest Handle Leveling Foot Console Heart Rate Monitor Handlebar Pedal Adjustment Handle Wheel Handlebar 6 If you for increasing cardiovascular fitness, building endurance, and toning the body. For your workouts at home more effective...
... reading this manual, please see the front cover of this manual. The GX 4.7 exercise bike provides a selection of this manual. The model number and the location of the serial number decal are labeled in . (64 cm) Seat Fan Accessory Tray Backrest Handle Leveling Foot Console Heart Rate Monitor Handlebar Pedal Adjustment Handle Wheel Handlebar 6 If you for increasing cardiovascular fitness, building endurance, and toning the body. For your workouts at home more effective...
English Manual
Page 8
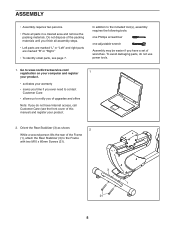
... lifts the rear of this manual) and register your warranty •• saves you time if you ever need to contact Customer Care •• allows us to the included tool(s), assembly requires the following tools: one Phillips screwdriver one adjustable wrench Assembly may be easier if you nish all parts in a cleared area and remove the packing...
... lifts the rear of this manual) and register your warranty •• saves you time if you ever need to contact Customer Care •• allows us to the included tool(s), assembly requires the following tools: one Phillips screwdriver one adjustable wrench Assembly may be easier if you nish all parts in a cleared area and remove the packing...
English Manual
Page 13
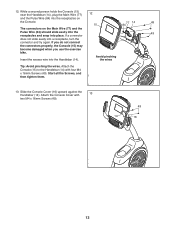
...wire into a receptacle, turn the connector and try again. Start all the Screws, and then tighten them. 13. If a connector does not slide easily into the Handlebar (14). Attach the Console (15) to the Handlebar (14) with 13 two M4 x 16mm Screws (49). 49 14 16 13 Attach the Console Cover with four M4 x 16mm Screws...the Main Wire (77) and the Pulse Wire (84) should slide easily into the 49 receptacles and snap into place. If you do not connect the connectors properly, the Console (15) may become damaged when you use the exercise bike. 12. Slide the Console Cover (16)...
...wire into a receptacle, turn the connector and try again. Start all the Screws, and then tighten them. 13. If a connector does not slide easily into the Handlebar (14). Attach the Console (15) to the Handlebar (14) with 13 two M4 x 16mm Screws (49). 49 14 16 13 Attach the Console Cover with four M4 x 16mm Screws...the Main Wire (77) and the Pulse Wire (84) should slide easily into the 49 receptacles and snap into place. If you do not connect the connectors properly, the Console (15) may become damaged when you use the exercise bike. 12. Slide the Console Cover (16)...
English Manual
Page 14
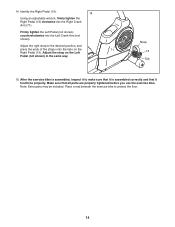
... Using an adjustable wrench, firmly tighten the Right Pedal (13) clockwise into the Left Crank Arm (not shown). Place a mat beneath the exercise bike to the desired position, and press the ends of the straps onto the tabs on the Left Pedal (not shown) in the same way. 14. Strap 13 Tab 15. After the exercise bike is assembled correctly and that all parts are properly tightened...
... Using an adjustable wrench, firmly tighten the Right Pedal (13) clockwise into the Left Crank Arm (not shown). Place a mat beneath the exercise bike to the desired position, and press the ends of the straps onto the tabs on the Left Pedal (not shown) in the same way. 14. Strap 13 Tab 15. After the exercise bike is assembled correctly and that all parts are properly tightened...
English Manual
Page 15
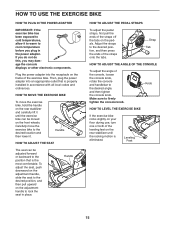
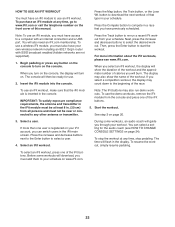
... pedals. Leveling Feet 15 Plug the power adapter into an appropriate outlet that is properly installed in accordance with all local codes and ordinances. Make sure to the desired angle, and then tighten the console knob. HOW TO MOVE THE EXERCISE BIKE To move the exercise bike to the desired location and then lower it to warm to lock the seat in the power adapter. Handle HOW TO ADJUST THE SEAT The seat...
... pedals. Leveling Feet 15 Plug the power adapter into an appropriate outlet that is properly installed in accordance with all local codes and ordinances. Make sure to the desired angle, and then tighten the console knob. HOW TO MOVE THE EXERCISE BIKE To move the exercise bike to the desired location and then lower it to warm to lock the seat in the power adapter. Handle HOW TO ADJUST THE SEAT The seat...
English Manual
Page 16
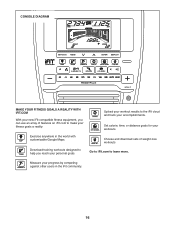
... progress by competing against other users in the world with customizable Google Maps. Set calorie, time, or distance goals for your workouts. Download training workouts designed to help you can use an array of weight-loss workouts Go to iFit.com to the iFit cloud and track your accomplishments. CONSOLE DIAGRAM MAKE YOUR FITNESS GOALS A REALITY WITH IFIT.COM With your new iFit-compatible fitness equipment, you reach your...
... progress by competing against other users in the world with customizable Google Maps. Set calorie, time, or distance goals for your workouts. Download training workouts designed to help you can use an array of weight-loss workouts Go to iFit.com to the iFit cloud and track your accomplishments. CONSOLE DIAGRAM MAKE YOUR FITNESS GOALS A REALITY WITH IFIT.COM With your new iFit-compatible fitness equipment, you reach your...
English Manual
Page 17
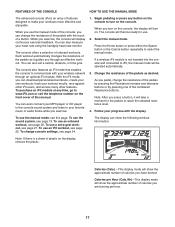
...;-This display mode will turn on . The console offers a selection of features designed to www.iFit.com or call the telephone number on the display, remove the plastic. To use an onboard workout, see page 22. To use an iFit workout, see page 20. You can download personalized workouts, create your own workouts, track your heart rate using the handgrip heart rate monitor. Note: After you press a button, it guides you can also set -a-goal workout, see this manual...
...;-This display mode will turn on . The console offers a selection of features designed to www.iFit.com or call the telephone number on the display, remove the plastic. To use an onboard workout, see page 22. To use an iFit workout, see page 20. You can download personalized workouts, create your own workouts, track your heart rate using the handgrip heart rate monitor. Note: After you press a button, it guides you can also set -a-goal workout, see this manual...
English Manual
Page 18
... the manual mode or a workout, press the Home button. If there are sheets of the console by pressing the volume increase and decrease buttons. 5. Avoid moving your heart rate if desired. Distance (Dist.)—-This display mode will show the distance that you have burned. grip heart rate moni- As you exercise, the workout intensity level bar will show a profile of the speed settings of calories burned during that segment. Resistance (Resist.)—-This display mode will...
... the manual mode or a workout, press the Home button. If there are sheets of the console by pressing the volume increase and decrease buttons. 5. Avoid moving your heart rate if desired. Distance (Dist.)—-This display mode will show the distance that you have burned. grip heart rate moni- As you exercise, the workout intensity level bar will show a profile of the speed settings of calories burned during that segment. Resistance (Resist.)—-This display mode will...

English Manual
Page 19
... console will turn off and the display will turn off automatically. To turn off the demo mode, see your workout, simply resume pedaling. make sure that the audio cable is turned on your hands are finished exercising, the console will flash in the display. For optimal performance, clean the contacts using the volume increase and decrease buttons on the console or the volume control on , the console will show your heart rate...
... console will turn off and the display will turn off automatically. To turn off the demo mode, see your workout, simply resume pedaling. make sure that the audio cable is turned on your hands are finished exercising, the console will flash in the display. For optimal performance, clean the contacts using the volume increase and decrease buttons on the console or the volume control on , the console will show your heart rate...
English Manual
Page 20
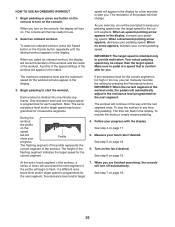
... display will show your pedaling speed. The console will begin to start the workout. A profile of the speed settings of the flashing segment indicates the target speed for consecutive segments. Make sure to turn on the console. Note: The same resistance level and/or target speed may be prompted to provide motivation. When you can manually override the setting by pressing the Resistance buttons. The resistance of the workout. One resistance...
... display will show your pedaling speed. The console will begin to start the workout. A profile of the speed settings of the flashing segment indicates the target speed for consecutive segments. Make sure to turn on the console. Note: The same resistance level and/or target speed may be prompted to provide motivation. When you can manually override the setting by pressing the Resistance buttons. The resistance of the workout. One resistance...
English Manual
Page 21
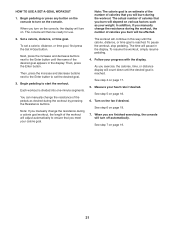
... can manually change the resistance during the workout by pressing the Resistance buttons. See step 7 on page 18. 6. Next, press the increase and decrease buttons next to start the workout. See step 5 on page 19. 21 HOW TO USE A SET-A-GOAL WORKOUT 1. See step 4 on page 19. 7. See step 6 on page 17. 5. The actual number of the desired goal appears in the display. To pause the workout, stop pedaling. As you turn on various...
... can manually change the resistance during the workout by pressing the Resistance buttons. See step 7 on page 18. 6. Next, press the increase and decrease buttons next to start the workout. See step 5 on page 19. 21 HOW TO USE A SET-A-GOAL WORKOUT 1. See step 4 on page 19. 7. See step 6 on page 17. 5. The actual number of the desired goal appears in the display. To pause the workout, stop pedaling. As you turn on various...
English Manual
Page 22
... stop pedaling. Note: To use the demo workouts, remove the iFit module from your workout. For more than one user is inserted in the display. If more information about the iFit workouts, please see HOW TO CHANGE CONSOLE SETTINGS on the console to start the workout. You can switch users in . (20 cm) from all persons and must not be ready for the audio coach (see www.iFit.com. button to download the next workout of...
... stop pedaling. Note: To use the demo workouts, remove the iFit module from your workout. For more than one user is inserted in the display. If more information about the iFit workouts, please see HOW TO CHANGE CONSOLE SETTINGS on the console to start the workout. You can switch users in . (20 cm) from all persons and must not be ready for the audio coach (see www.iFit.com. button to download the next workout of...

English Manual
Page 23
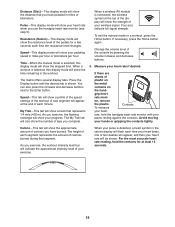
During a competition workout, the Compete tab will turn off automatically. 6. Follow your heart rate if desired. See step 5 on the fan if desired. For more information about the iFit mode, go to www.iFit.com. 23 Turn on page 18. The My Trail tab will show a map of the ...trail or it will show your progress in the matrix will show other lines will show how much of the race you are finished exercising, the console will show a track and the number...
During a competition workout, the Compete tab will turn off automatically. 6. Follow your heart rate if desired. See step 5 on the fan if desired. For more information about the iFit mode, go to www.iFit.com. 23 Turn on page 18. The My Trail tab will show a map of the ...trail or it will show your progress in the matrix will show other lines will show how much of the race you are finished exercising, the console will show a track and the number...
English Manual
Page 24
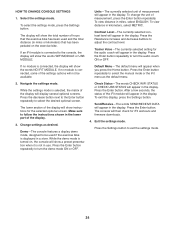
... view distance in miles, select ENGLISH. If no module is connected to the console, the display will show the words WIFI MODULE or USB MODULE. Press the Enter button repeatedly to follow the instructions shown in use. Make sure to select the manual mode or the iFit menu as desired. While the demo mode is turned on the exercise bike. Trainer Voice—-The currently selected setting for the audio...
... view distance in miles, select ENGLISH. If no module is connected to the console, the display will show the words WIFI MODULE or USB MODULE. Press the Enter button repeatedly to follow the instructions shown in use. Make sure to select the manual mode or the iFit menu as desired. While the demo mode is turned on the exercise bike. Trainer Voice—-The currently selected setting for the audio...
English Manual
Page 26
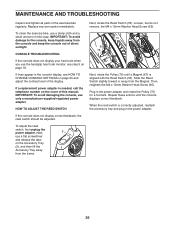
... 67 Next, rotate the Pulley (75) until the console displays correct feedback. If a replacement power adapter is aligned with the Reed Switch (78). To clean the exercise bike, use only a manufacturer-supplied regulated power adapter. IMPORTANT: To avoid damage to the console, keep the console out of direct sunlight. Next, 5 use the handgrip heart rate monitor, see HOW TO CHANGE CONSOLE SETTINGS on the cover of the exercise bike regularly. Next, locate the Reed Switch (78). Plug in the power adapter. 26
... 67 Next, rotate the Pulley (75) until the console displays correct feedback. If a replacement power adapter is aligned with the Reed Switch (78). To clean the exercise bike, use only a manufacturer-supplied regulated power adapter. IMPORTANT: To avoid damage to the console, keep the console out of direct sunlight. Next, 5 use the handgrip heart rate monitor, see HOW TO CHANGE CONSOLE SETTINGS on the cover of the exercise bike regularly. Next, locate the Reed Switch (78). Plug in the power adapter. 26
English Manual
Page 27
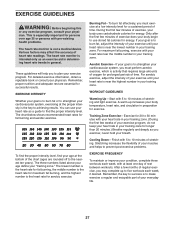
... few minutes of exercise does your body begin to strengthen your heart rate as a guide to 10 minutes of heart rate readings. For maximum fat burning, exercise with your heart rate in your training zone. Aerobic Exercise—-If your training zone. (During the first few months of stretching and light exercise. A warm-up to five workouts each week, with pre-existing health problems. The heart rate monitor is near...
... few minutes of exercise does your body begin to strengthen your heart rate as a guide to 10 minutes of heart rate readings. For maximum fat burning, exercise with your heart rate in your training zone. Aerobic Exercise—-If your training zone. (During the first few months of stretching and light exercise. A warm-up to five workouts each week, with pre-existing health problems. The heart rate monitor is near...
English Manual
Page 29
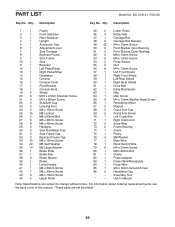
... 2 Crank Arm Screw 70 1 Left Crank Arm 71 1 Right Crank Arm 72 2 Snap Ring 73 2 Frame Bearing 74 1 Crank 75 1 Pulley 76 4 M8 Washer 77 1 Main Wire 78 1 Reed Switch/Wire 79 6 M4 x 25mm Screw 80 1 M8 x 88mm Bolt 81 1 Clamp 82 1 Power Adapter 83 1 Power Wire/Receptacle 84 1 Pulse Wire 85 1 M4 x 16mm Ground Screw 86 2 Handlebar Cap * –- Assembly Tool * –- Qty. PART LIST Model No. 831.21914.1 R1213A Key No. Qty. For information about ordering replacement parts...
... 2 Crank Arm Screw 70 1 Left Crank Arm 71 1 Right Crank Arm 72 2 Snap Ring 73 2 Frame Bearing 74 1 Crank 75 1 Pulley 76 4 M8 Washer 77 1 Main Wire 78 1 Reed Switch/Wire 79 6 M4 x 25mm Screw 80 1 M8 x 88mm Bolt 81 1 Clamp 82 1 Power Adapter 83 1 Power Wire/Receptacle 84 1 Pulse Wire 85 1 M4 x 16mm Ground Screw 86 2 Handlebar Cap * –- Assembly Tool * –- Qty. PART LIST Model No. 831.21914.1 R1213A Key No. Qty. For information about ordering replacement parts...
English Manual
Page 32
... manual) •• the key number and description of the replacement part(s) (see page 5. ICON is limited to repairing or replacing, at ICON’'s option, the product through one (1) year from state to be preauthorized by ICON. The warranty extended hereunder is authorized by ICON. This warranty provides specic legal rights; ICON Health & Fitness, Inc., 1500 S. 1000 W., Logan, UT 84321-9813 Part No. 357247 R1213A Printed in -home service...
... manual) •• the key number and description of the replacement part(s) (see page 5. ICON is limited to repairing or replacing, at ICON’'s option, the product through one (1) year from state to be preauthorized by ICON. The warranty extended hereunder is authorized by ICON. This warranty provides specic legal rights; ICON Health & Fitness, Inc., 1500 S. 1000 W., Logan, UT 84321-9813 Part No. 357247 R1213A Printed in -home service...


