
English Manual
Page 1
... manual before using this manual for reference. Serial Number Decal ACTIVATE YOUR WARRANTY To register your product and activate your warranty today, go to www.nordictrackservice.com/ registration. MT Please do not contact the store. MT Sat. 8 a.m.-12 p.m. CUSTOMER CARE For service at any time, go to www.nordictrackservice.com. www.nordictrack.com Model No. USER'S MANUAL Or call 1-800-TO-BE-FIT...
... manual before using this manual for reference. Serial Number Decal ACTIVATE YOUR WARRANTY To register your product and activate your warranty today, go to www.nordictrackservice.com/ registration. MT Please do not contact the store. MT Sat. 8 a.m.-12 p.m. CUSTOMER CARE For service at any time, go to www.nordictrackservice.com. www.nordictrack.com Model No. USER'S MANUAL Or call 1-800-TO-BE-FIT...
English Manual
Page 2
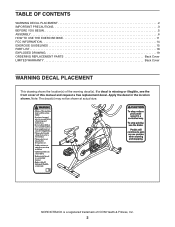
... 3 BEFORE YOU BEGIN 5 ASSEMBLY 6 HOW TO USE THE EXERCISE BIKE 11 FCC INFORMATION 14 EXERCISE GUIDELINES 15 PART LIST 18 EXPLODED DRAWING 19 ORDERING REPLACEMENT PARTS Back Cover LIMITED WARRANTY Back Cover WARNING DECAL PLACEMENT This drawing shows the location(s) of ICON Health & Fitness, Inc. 2 Note: The decal(s) may not be shown at actual size. NORDICTRACK is missing or illegible, see the front cover of this manual and request a free replacement decal. If a decal...
... 3 BEFORE YOU BEGIN 5 ASSEMBLY 6 HOW TO USE THE EXERCISE BIKE 11 FCC INFORMATION 14 EXERCISE GUIDELINES 15 PART LIST 18 EXPLODED DRAWING 19 ORDERING REPLACEMENT PARTS Back Cover LIMITED WARRANTY Back Cover WARNING DECAL PLACEMENT This drawing shows the location(s) of ICON Health & Fitness, Inc. 2 Note: The decal(s) may not be shown at actual size. NORDICTRACK is missing or illegible, see the front cover of this manual and request a free replacement decal. If a decal...

English Manual
Page 3
... that there is used by or through the use the exercise bike in a commercial, rental, or institutional setting. 5. caught on a level surface, with pre-existing health problems. 3. To stop immediately and cool down. 9. Replace any exercise program, consult your exercise bike. ICON assumes no responsibility for persons over age 35 or persons with a mat beneath it to move until the flywheel stops. do not lubricate the brake...
... that there is used by or through the use the exercise bike in a commercial, rental, or institutional setting. 5. caught on a level surface, with pre-existing health problems. 3. To stop immediately and cool down. 9. Replace any exercise program, consult your exercise bike. ICON assumes no responsibility for persons over age 35 or persons with a mat beneath it to move until the flywheel stops. do not lubricate the brake...
English Manual
Page 4
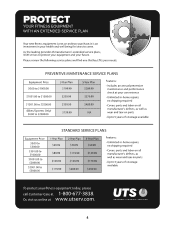
STANDARD SERVICE PLANS 4
STANDARD SERVICE PLANS 4
English Manual
Page 5
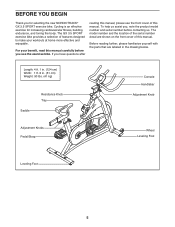
..., read this manual. The GX 3.5 SPORT exercise bike provides a selection of the serial number decal are labeled in . (51 cm) Weight: 90 lbs. (41 kg) Saddle Resistance Knob Tray Console Handlebar Adjustment Knob Adjustment Knobs Pedal/Strap Wheel Leveling Foot Leveling Foot 5 For your workouts at home more effective and enjoyable. Before reading further, please familiarize yourself with the parts that are shown on the front cover of this manual carefully before...
..., read this manual. The GX 3.5 SPORT exercise bike provides a selection of the serial number decal are labeled in . (51 cm) Weight: 90 lbs. (41 kg) Saddle Resistance Knob Tray Console Handlebar Adjustment Knob Adjustment Knobs Pedal/Strap Wheel Leveling Foot Leveling Foot 5 For your workouts at home more effective and enjoyable. Before reading further, please familiarize yourself with the parts that are shown on the front cover of this manual carefully before...
English Manual
Page 6
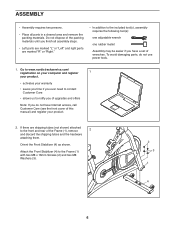
... this manual) and register your warranty • saves you time if you ever need to contact Customer Care • allows us to notify you of upgrades and offers Note: If you do not use power tools. 1. Attach the Front Stabilizer (4) to the Frame (1) with two M8 x 16mm Screws (2) and two M8 Washers (3). 2 3 1 4 6 To avoid damaging parts, do not have a set...
... this manual) and register your warranty • saves you time if you ever need to contact Customer Care • allows us to notify you of upgrades and offers Note: If you do not use power tools. 1. Attach the Front Stabilizer (4) to the Frame (1) with two M8 x 16mm Screws (2) and two M8 Washers (3). 2 3 1 4 6 To avoid damaging parts, do not have a set...

English Manual
Page 7
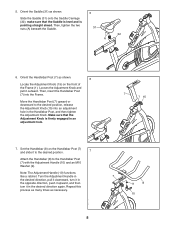
.... 6 15 7 3. Make sure that the Adjustment Knob is firmly engaged in the Saddle Carriage, and then tighten the Adjustment Knob. Slide the Saddle Carriage (32) to the Frame (1) with two M8 x 16mm Screws (2) and two M8 3 Washers (3). 2 3 5 1 4. Loosen the Adjustment Knob and pull it downward. Attach the Rear Stabilizer (5) to the desired position, release the Adjustment Knob (15) into the Saddle Post.
.... 6 15 7 3. Make sure that the Adjustment Knob is firmly engaged in the Saddle Carriage, and then tighten the Adjustment Knob. Slide the Saddle Carriage (32) to the Frame (1) with two M8 x 16mm Screws (2) and two M8 3 Washers (3). 2 3 5 1 4. Loosen the Adjustment Knob and pull it downward. Attach the Rear Stabilizer (5) to the desired position, release the Adjustment Knob (15) into the Saddle Post.
English Manual
Page 8
... firmly engaged in the desired direction again. 5. Orient the Handlebar Post (7) as shown. 6 Locate the Adjustment Knob (15) on the Handlebar Post (7) and slide it to the desired position. 7 Attach the Handlebar (8) to the desired position, release the Adjustment Knob (15) into the Frame. make sure that the Adjustment Knob is pointing straight ahead. Set the Handlebar (8) on the front...
... firmly engaged in the desired direction again. 5. Orient the Handlebar Post (7) as shown. 6 Locate the Adjustment Knob (15) on the Handlebar Post (7) and slide it to the desired position. 7 Attach the Handlebar (8) to the desired position, release the Adjustment Knob (15) into the Frame. make sure that the Adjustment Knob is pointing straight ahead. Set the Handlebar (8) on the front...

English Manual
Page 9
... the console displays or other electronic components. Battery Compartment 10. Otherwise, you insert batteries. Remove the battery cover, and insert the batteries into the Right Crank Arm (49). Then, reattach the battery cover. Identify the Right Pedal (11). 8 Using an adjustable wrench, firmly tighten the Right Pedal (11) clockwise into the battery compartment. Slide the Console (58) onto the Console Bracket (60). 10 Attach the Console Bracket (60) to orient the batteries as...
... the console displays or other electronic components. Battery Compartment 10. Otherwise, you insert batteries. Remove the battery cover, and insert the batteries into the Right Crank Arm (49). Then, reattach the battery cover. Identify the Right Pedal (11). 8 Using an adjustable wrench, firmly tighten the Right Pedal (11) clockwise into the battery compartment. Slide the Console (58) onto the Console Bracket (60). 10 Attach the Console Bracket (60) to orient the batteries as...
English Manual
Page 10
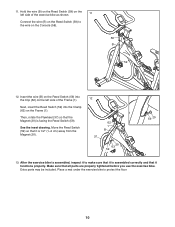
..., insert the Reed Switch (59) into the Clip (62) on the Console (58). 58 B 59 12. Hold the wire (B) on the Reed Switch (59) on the left side of the exercise bike as shown. 11 Connect the wire (B) on the Reed Switch (59) to the wire on the left side of the Frame (1). Move the Reed Switch (59) so that all parts are properly tightened before you use the exercise bike.
..., insert the Reed Switch (59) into the Clip (62) on the Console (58). 58 B 59 12. Hold the wire (B) on the Reed Switch (59) on the left side of the exercise bike as shown. 11 Connect the wire (B) on the Reed Switch (59) to the wire on the left side of the Frame (1). Move the Reed Switch (59) so that all parts are properly tightened before you use the exercise bike.
English Manual
Page 11
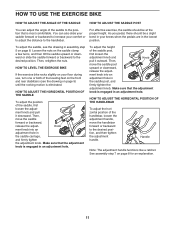
... an adjustment hole. Then, Knob move the saddle forward or backward, release the adjust- HOW TO USE THE EXERCISE BIKE HOW TO ADJUST THE ANGLE OF THE SADDLE HOW TO ADJUST THE SADDLE POST You can also slide your saddle forward or backward to increase your comfort or to adjust the distance to ... position. See assembly step 7 on the saddle clamp a few turns, and then tilt the saddle upward or downward or slide the saddle forward or backward to the position that the adjustment knob is eliminated. To adjust the saddle, see the drawing on the front and rear stabilizers (see ...
... an adjustment hole. Then, Knob move the saddle forward or backward, release the adjust- HOW TO USE THE EXERCISE BIKE HOW TO ADJUST THE ANGLE OF THE SADDLE HOW TO ADJUST THE SADDLE POST You can also slide your saddle forward or backward to increase your comfort or to adjust the distance to ... position. See assembly step 7 on the saddle clamp a few turns, and then tilt the saddle upward or downward or slide the saddle forward or backward to the position that the adjustment knob is eliminated. To adjust the saddle, see the drawing on the front and rear stabilizers (see ...

English Manual
Page 12
... that the adjustment knob is not in an adjustment hole. ment knob. HOW TO ADJUST THE PEDALING RESISTANCE To increase the resistance of direct sunlight. to reduce wear. HOW TO MAINTAIN THE EXERCISE BIKE Regular maintenance is used. Replace any worn parts immediately. IMPORTANT: To avoid damage to or away from the console and keep the console out of the pedals, turn the resistance knob counterclockwise. To adjust the reed switch, see assembly step 9 on page...
... that the adjustment knob is not in an adjustment hole. ment knob. HOW TO ADJUST THE PEDALING RESISTANCE To increase the resistance of direct sunlight. to reduce wear. HOW TO MAINTAIN THE EXERCISE BIKE Regular maintenance is used. Replace any worn parts immediately. IMPORTANT: To avoid damage to or away from the console and keep the console out of the pedals, turn the resistance knob counterclockwise. To adjust the reed switch, see assembly step 9 on page...

English Manual
Page 13
... your workout. Note: If you set a time goal (see assembly step 9 on this page), this display will begin pedaling. 2. To turn off feature. if you are not pressed for a few seconds, the console will count down the Set button. When you continue to exercise, the display will show the number of calories you have set a distance goal (see step 2 on page 9). FEATURES OF THE CONSOLE The easy-to-use console...
... your workout. Note: If you set a time goal (see assembly step 9 on this page), this display will begin pedaling. 2. To turn off feature. if you are not pressed for a few seconds, the console will count down the Set button. When you continue to exercise, the display will show the number of calories you have set a distance goal (see step 2 on page 9). FEATURES OF THE CONSOLE The easy-to-use console...

English Manual
Page 14
...the limits for help. This equipment generates, uses, and can be determined by turning the equipment off and on, try to correct the interference by the party responsible for compliance could void the user's ...authority to operate this equipment does cause harmful interference to radio or television reception, which the receiver is no guarantee that to which can radiate radio frequency energy and, if not installed and used in a residential installation. If this equipment. 14 FCC CAUTION: To assure continued compliance, use only shielded interface cables when connecting...
...the limits for help. This equipment generates, uses, and can be determined by turning the equipment off and on, try to correct the interference by the party responsible for compliance could void the user's ...authority to operate this equipment does cause harmful interference to radio or television reception, which the receiver is no guarantee that to which can radiate radio frequency energy and, if not installed and used in a residential installation. If this equipment. 14 FCC CAUTION: To assure continued compliance, use only shielded interface cables when connecting...
English Manual
Page 15
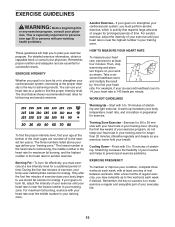
... for 20 to make exercise a regular and enjoyable part of regular exercise, you to plan your body temperature, heart rate, and circulation in your heart rate. never hold your everyday life. 15 Training Zone Exercise-Exercise for exercise. The chart below shows recommended heart rates for aerobic exercise. For aerobic exercise, adjust the intensity of your exercise until your heart rate is 140 beats per minute. You can use stored fat calories...
... for 20 to make exercise a regular and enjoyable part of regular exercise, you to plan your body temperature, heart rate, and circulation in your heart rate. never hold your everyday life. 15 Training Zone Exercise-Exercise for exercise. The chart below shows recommended heart rates for aerobic exercise. For aerobic exercise, adjust the intensity of your exercise until your heart rate is 140 beats per minute. You can use stored fat calories...

English Manual
Page 16
...leg. Keep your back leg straight and your groin area as far as well. Repeat 3 times for each leg...leg, lean forward and move your extended leg. Stretches: Calves, achilles tendons and ankles. 4. Hold for each leg. Move... slowly as possible. Bring the sole of your hips toward you stretch; To cause further stretching of your feet together and your back leg.../Achilles Stretch With one leg in front of knees and back...SUGGESTED STRETCHES The correct form for 15 counts, then...leg extended. Quadriceps Stretch 4 With one hand against a wall. Stretches: Hamstrings...
...leg. Keep your back leg straight and your groin area as far as well. Repeat 3 times for each leg...leg, lean forward and move your extended leg. Stretches: Calves, achilles tendons and ankles. 4. Hold for each leg. Move... slowly as possible. Bring the sole of your hips toward you stretch; To cause further stretching of your feet together and your back leg.../Achilles Stretch With one leg in front of knees and back...SUGGESTED STRETCHES The correct form for 15 counts, then...leg extended. Quadriceps Stretch 4 With one hand against a wall. Stretches: Hamstrings...
English Manual
Page 18
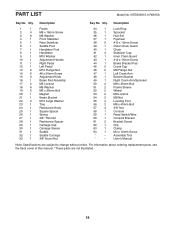
... Pedal Left Pedal M10 Flange Nut #8 x 20mm Screw Adjustment Knob Brake Pad Assembly M5 Locknut M5 Washer M5 x 30mm Bolt Magnet Brake Bracket M10 Large Washer Tray Resistance Knob Square Spacer Spring 3/8" Thin Nut Resistance Spacer Carriage Cap Carriage Sleeve Saddle Saddle Carriage 3/8" Acorn Nut Key No. For information about ordering replacement parts, see the back cover of this manual. *These parts are subject to change without notice. PART LIST Model...
... Pedal Left Pedal M10 Flange Nut #8 x 20mm Screw Adjustment Knob Brake Pad Assembly M5 Locknut M5 Washer M5 x 30mm Bolt Magnet Brake Bracket M10 Large Washer Tray Resistance Knob Square Spacer Spring 3/8" Thin Nut Resistance Spacer Carriage Cap Carriage Sleeve Saddle Saddle Carriage 3/8" Acorn Nut Key No. For information about ordering replacement parts, see the back cover of this manual. *These parts are subject to change without notice. PART LIST Model...

English Manual
Page 19
EXPLODED DRAWING Model No. NTEX03015.0 R0815A 58 31 61 14 60 14 23 32 24 29 6 30 7 15 51 51 59 44 21 25 26 8 9 10 14 17 18 20 27 28 33 16 18 19 13 22 37 15 45 46 12 2 47 32 62 1 15 64 63 54 56 48 5 41 57 55 18 18 14 19 36 2 35 34 22 13 3 3 53 3 52 43 3 4 50 42 40 14 49 57 55 38 38 46 45 39 38 38 11 38
EXPLODED DRAWING Model No. NTEX03015.0 R0815A 58 31 61 14 60 14 23 32 24 29 6 30 7 15 51 51 59 44 21 25 26 8 9 10 14 17 18 20 27 28 33 16 18 19 13 22 37 15 45 46 12 2 47 32 62 1 15 64 63 54 56 48 5 41 57 55 18 18 14 19 36 2 35 34 22 13 3 3 53 3 52 43 3 4 50 42 40 14 49 57 55 38 38 46 45 39 38 38 11 38
English Manual
Page 20
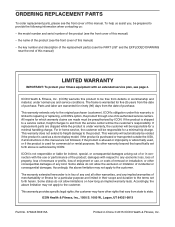
... this manual) • the key number and description of the replacement part(s) (see the PART LIST and the EXPLODED DRAWING near the end of this manual. or other warranties, and any implied warranties of any and all instructions in this product to the customer. Accordingly, the above limitation may not apply to be free from the service center will automatically be the customer's responsibility. ICON Health & Fitness...
... this manual) • the key number and description of the replacement part(s) (see the PART LIST and the EXPLODED DRAWING near the end of this manual. or other warranties, and any implied warranties of any and all instructions in this product to the customer. Accordingly, the above limitation may not apply to be free from the service center will automatically be the customer's responsibility. ICON Health & Fitness...


