
English Manual
Page 1
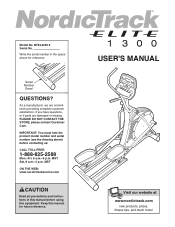
.... IMPORTANT: You must note the product model number and serial number (see the drawing above for future reference. USER'S MANUAL Visit our website at www.nordictrack.com new products, prizes, fitness tips, and much more!
.... IMPORTANT: You must note the product model number and serial number (see the drawing above for future reference. USER'S MANUAL Visit our website at www.nordictrack.com new products, prizes, fitness tips, and much more!
English Manual
Page 2
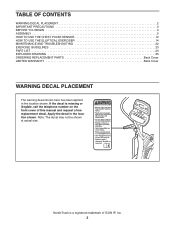
... OF CONTENTS WARNING DECAL PLACEMENT 2 IMPORTANT PRECAUTIONS 3 BEFORE YOU BEGIN 4 ASSEMBLY 5 HOW TO USE THE CHEST PULSE SENSOR 12 HOW TO USE THE ELLIPTICAL EXERCISER 14 MAINTENANCE AND TROUBLESHOOTING 22 EXERCISE GUIDELINES 23 PART LIST 24 EXPLODED DRAWING 25 ORDERING REPLACEMENT PARTS Back Cover LIMITED WARRANTY Back Cover WARNING .... Note: The decal may not be shown at actual size. If the decal is a registered trademark of this manual and request a free replacement decal. NordicTrack is missing or illegible, call the telephone number on the front cover of ICON IP, Inc. 2
... OF CONTENTS WARNING DECAL PLACEMENT 2 IMPORTANT PRECAUTIONS 3 BEFORE YOU BEGIN 4 ASSEMBLY 5 HOW TO USE THE CHEST PULSE SENSOR 12 HOW TO USE THE ELLIPTICAL EXERCISER 14 MAINTENANCE AND TROUBLESHOOTING 22 EXERCISE GUIDELINES 23 PART LIST 24 EXPLODED DRAWING 25 ORDERING REPLACEMENT PARTS Back Cover LIMITED WARRANTY Back Cover WARNING .... Note: The decal may not be shown at actual size. If the decal is a registered trademark of this manual and request a free replacement decal. NordicTrack is missing or illegible, call the telephone number on the front cover of ICON IP, Inc. 2
English Manual
Page 3
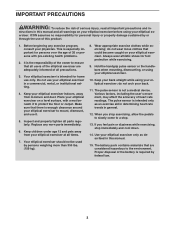
...are adequately informed of all precautions. 3. Hold the handgrip pulse sensor or the handlebars when mounting, dismounting, or using your elliptical exerciser in this manual. 15. Inspect and properly tighten all times. 7. IMPORTANT PRECAUTIONS WARNING: To reduce the risk of... serious injury, read all warnings on your elliptical exerciser before using your elliptical ex- structions in a commercial, rental, or institutional setting. 4. erciser. This is not a medical device. Wear appropriate...
...are adequately informed of all precautions. 3. Hold the handgrip pulse sensor or the handlebars when mounting, dismounting, or using your elliptical exerciser in this manual. 15. Inspect and properly tighten all times. 7. IMPORTANT PRECAUTIONS WARNING: To reduce the risk of... serious injury, read all warnings on your elliptical exerciser before using your elliptical ex- structions in a commercial, rental, or institutional setting. 4. erciser. This is not a medical device. Wear appropriate...
English Manual
Page 4
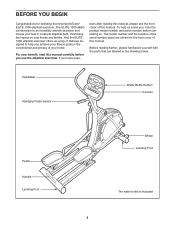
...Leveling Foot *No water bottle is an incredibly smooth exerciser that are shown on your knees and ankles. And the ELITE 1300 elliptical exerciser offers an array of features designed to help us . Before reading further, please familiarize yourself with the parts..., note the product model number and serial number before you use the elliptical exerciser. The ELITE 1300 elliptical exerciser is included 4 BEFORE YOU BEGIN Congratulations for selecting the new NordicTrack® ELITE 1300 elliptical exerciser. For your home. tions after reading this manual, please see the...
...Leveling Foot *No water bottle is an incredibly smooth exerciser that are shown on your knees and ankles. And the ELITE 1300 elliptical exerciser offers an array of features designed to help us . Before reading further, please familiarize yourself with the parts..., note the product model number and serial number before you use the elliptical exerciser. The ELITE 1300 elliptical exerciser is included 4 BEFORE YOU BEGIN Congratulations for selecting the new NordicTrack® ELITE 1300 elliptical exerciser. For your home. tions after reading this manual, please see the...
English Manual
Page 5
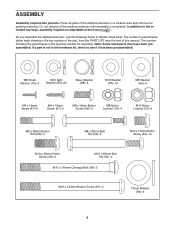
...hex keys, assembly requires an adjustable wrench . If a part is not in parentheses below to see if it has been preassembled. As you assemble the elliptical exerciser, use the drawings below each drawing is the key number of the part, from the PART LIST near the end of this manual. Do... not dispose of the elliptical exerciser in - The number following the parentheses is completed. Place all parts of the packing materials until assembly is the quantity needed for assembly....
...hex keys, assembly requires an adjustable wrench . If a part is not in parentheses below to see if it has been preassembled. As you assemble the elliptical exerciser, use the drawings below each drawing is the key number of the part, from the PART LIST near the end of this manual. Do... not dispose of the elliptical exerciser in - The number following the parentheses is completed. Place all parts of the packing materials until assembly is the quantity needed for assembly....

English Manual
Page 6
... M10 x 25mm Patch Screws (48) and four M10 Split Washers (85). To make assembly easier, read the 1 information on page 5 before you begin assembling the elliptical exerciser. Attach the Upright (2) to the Frame (1) with two M10 x 116mm Carriage Bolts (38) and two M10 Nylon Locknuts (70). Make sure that no wires...
... M10 x 25mm Patch Screws (48) and four M10 Split Washers (85). To make assembly easier, read the 1 information on page 5 before you begin assembling the elliptical exerciser. Attach the Upright (2) to the Frame (1) with two M10 x 116mm Carriage Bolts (38) and two M10 Nylon Locknuts (70). Make sure that no wires...

English Manual
Page 7
... an Axle Cap (41) onto an M8 x 19mm Button Screw (56). Then, tighten both Button Screws. Attach the Track Frame (4) to 4 the sides of the elliptical exerciser. 7 Next, slide a Thrust Washer (66) onto the shoulder of the Left Crank Arm. Note: This step may be easier if you raise the Frame...
... an Axle Cap (41) onto an M8 x 19mm Button Screw (56). Then, tighten both Button Screws. Attach the Track Frame (4) to 4 the sides of the elliptical exerciser. 7 Next, slide a Thrust Washer (66) onto the shoulder of the Left Crank Arm. Note: This step may be easier if you raise the Frame...

English Manual
Page 8
Attach the Left Pedal Leg to the barrel of grease to the Left Track Arm with seven M10 x 13mm Button Screws (54), seven M10 Split Washers (85), and seven M10 Washers (67). Apply a thin film of an 6 M10 x 65mm Bolt Set (94). 5. Next, fit the bracket on the Left Pedal Leg (14) onto the bracket on the Left Track Arm (12). Attach the Right Pedal Leg (not shown) to the Right Pedal Leg (not shown) in the same way. 21 14 67 67 85 85 54 54 94 14 Grease 94 12 8 Attach the other Pedal (not shown) to the Right Track Arm (not shown) in the same way. 6. Attach a Pedal (...
Attach the Left Pedal Leg to the barrel of grease to the Left Track Arm with seven M10 x 13mm Button Screws (54), seven M10 Split Washers (85), and seven M10 Washers (67). Apply a thin film of an 6 M10 x 65mm Bolt Set (94). 5. Next, fit the bracket on the Left Pedal Leg (14) onto the bracket on the Left Track Arm (12). Attach the Right Pedal Leg (not shown) to the Right Pedal Leg (not shown) in the same way. 21 14 67 67 85 85 54 54 94 14 Grease 94 12 8 Attach the other Pedal (not shown) to the Right Track Arm (not shown) in the same way. 6. Attach a Pedal (...

English Manual
Page 9
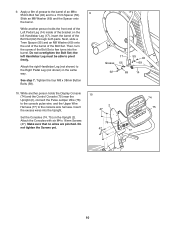
Slide the Left Handlebar (19) onto the Handlebar Axle (16) as shown. Next, slide a Thrust Washer (66) onto the shoulder of the Handlebar Axle. Make sure that the Thrust Washer remains on the shoulder of the Axle Cap, and that the Wave Washer (88) remains on the Left Handlebar is marked with two M8 x 38mm Button Bolts (58) and two M8 Nylon Locknuts (72). Then, tighten both M8 x 19mm Button Screws (56) at the same time. 8 19 16 66 88 18 Grease 56 41 9 20 66 56 18 88 41 1 Grease 7. Identify the Left Handlebar (19), which is above the hexagonal holes in the Handlebar Leg. ...
Slide the Left Handlebar (19) onto the Handlebar Axle (16) as shown. Next, slide a Thrust Washer (66) onto the shoulder of the Handlebar Axle. Make sure that the Thrust Washer remains on the shoulder of the Axle Cap, and that the Wave Washer (88) remains on the Left Handlebar is marked with two M8 x 38mm Button Bolts (58) and two M8 Nylon Locknuts (72). Then, tighten both M8 x 19mm Button Screws (56) at the same time. 8 19 16 66 88 18 Grease 56 41 9 20 66 56 18 88 41 1 Grease 7. Identify the Left Handlebar (19), which is above the hexagonal holes in the Handlebar Leg. ...
English Manual
Page 10
While another person holds the Display Console (74) and the Control Console (75) near the Upright (2), connect the Pulse Jumper Wire (76) to the console pulse wire, and the Upper Wire Harness (77) to the console wire harness. Next, slide a 7mm Spacer (55) and an M8 Washer (69) onto the end of the barrel of an M8 x 55mm Bolt Set (92) and to the barrel of the Bolt Set. the left Handlebar Leg (17), insert the barrel of the Bolt Set (92) through both parts. Attach the right Handlebar Leg (not shown) to pivot freely. See step 7. While another person holds the front end of the Left ...
While another person holds the Display Console (74) and the Control Console (75) near the Upright (2), connect the Pulse Jumper Wire (76) to the console pulse wire, and the Upper Wire Harness (77) to the console wire harness. Next, slide a 7mm Spacer (55) and an M8 Washer (69) onto the end of the barrel of an M8 x 55mm Bolt Set (92) and to the barrel of the Bolt Set. the left Handlebar Leg (17), insert the barrel of the Bolt Set (92) through both parts. Attach the right Handlebar Leg (not shown) to pivot freely. See step 7. While another person holds the front end of the Left ...
English Manual
Page 11
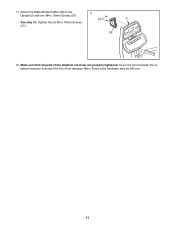
Tighten the six M4 x 16mm Screws (47). 26 12. Make sure that all parts of the elliptical exerciser are properly tightened. Cover the floor beneath the elliptical exerciser to the 11 Upright (2) with two M4 x 19mm Screws (57). 57 2 See step 10. Note: Some extra hardware may be left over. 11 Attach the Water Bottle Holder (26) to protect the floor from damage. 11.
Tighten the six M4 x 16mm Screws (47). 26 12. Make sure that all parts of the elliptical exerciser are properly tightened. Cover the floor beneath the elliptical exerciser to the 11 Upright (2) with two M4 x 19mm Screws (57). 57 2 See step 10. Note: Some extra hardware may be left over. 11 Attach the Water Bottle Holder (26) to protect the floor from damage. 11.

English Manual
Page 12
CHEST PULSE SENSOR TROUBLESHOOTING If the chest pulse sensor does not function properly, or if the displayed heart rate is excessively high or low, try relocating your exercise equipment. • If the chest pulse sensor still does not function properly, test the chest pulse sensor in one end of the console. If heart rate readings do not appear until you use the chest pulse sensor, use saline solution such as described above . Adjust the length of two components: the chest strap and the sensor unit. Pull the sensor unit away from the chest pulse sensor, please read the ...
CHEST PULSE SENSOR TROUBLESHOOTING If the chest pulse sensor does not function properly, or if the displayed heart rate is excessively high or low, try relocating your exercise equipment. • If the chest pulse sensor still does not function properly, test the chest pulse sensor in one end of the console. If heart rate readings do not appear until you use the chest pulse sensor, use saline solution such as described above . Adjust the length of two components: the chest strap and the sensor unit. Pull the sensor unit away from the chest pulse sensor, please read the ...

English Manual
Page 13
the chest pulse sensor shuts off when it is removed and the electrode areas are wetted and the chest pulse sensor is not dried after each use. If the chest pulse sensor is put on top. The chest strap may remain activated longer than necessary, draining the battery prematurely. • Store the chest pulse sensor in a plastic bag or other thumb against the electrode area at a rate of the sensor unit. Insert a coin into the slot in the following way: Locate the battery cover on the back of about one tap per second. Make sure that may trap moisture. • Do not expose the chest...
the chest pulse sensor shuts off when it is removed and the electrode areas are wetted and the chest pulse sensor is not dried after each use. If the chest pulse sensor is put on top. The chest strap may remain activated longer than necessary, draining the battery prematurely. • Store the chest pulse sensor in a plastic bag or other thumb against the electrode area at a rate of the sensor unit. Insert a coin into the slot in the following way: Locate the battery cover on the back of about one tap per second. Make sure that may trap moisture. • Do not expose the chest...

English Manual
Page 14
... pedal first. With the help of another person, lift the handle on the front wheels. To dismount the elliptical exerciser, wait until they begin to move the elliptical exerciser over an uneven surface. When the pedals are stationary, step off the lowest pedal. Push the pedals ...until the pedals come to move with a continuous motion. Do not attempt to a complete stop. EXERCISING ON THE ELLIPTICAL EXERCISER Wheel To mount the elliptical exerciser, hold the handlebars and step onto the pedal that is eliminated. Carefully move until the rocking motion is in the ...
... pedal first. With the help of another person, lift the handle on the front wheels. To dismount the elliptical exerciser, wait until they begin to move the elliptical exerciser over an uneven surface. When the pedals are stationary, step off the lowest pedal. Push the pedals ...until the pedals come to move with a continuous motion. Do not attempt to a complete stop. EXERCISING ON THE ELLIPTICAL EXERCISER Wheel To mount the elliptical exerciser, hold the handlebars and step onto the pedal that is eliminated. Carefully move until the rocking motion is in the ...
English Manual
Page 15
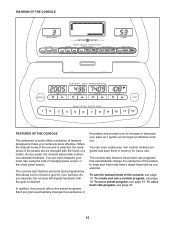
You can even create your workout. To use the manual mode of the console, see page 20. 15 To use a preset program, see page 18. The console also features personal goal programming that automatically change the resistance of the pedals to keep your workouts more effective. To use a heart rate program, see page 16. You can be changed with the touch of a button. As you exercise, the console will provide continuous exercise feedback. To create and use . In addition, the console offers nine preset programs. Each program automatically changes the resistance of the pedals...
You can even create your workout. To use the manual mode of the console, see page 20. 15 To use a preset program, see page 18. The console also features personal goal programming that automatically change the resistance of the pedals to keep your workouts more effective. To use a heart rate program, see page 16. You can be changed with the touch of a button. As you exercise, the console will provide continuous exercise feedback. To create and use . In addition, the console offers nine preset programs. Each program automatically changes the resistance of the pedals...
English Manual
Page 16
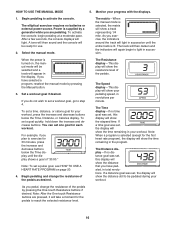
... the entire track is supplied by pressing the Manual button. 3. The Speed display-This display will show the distance that you plan to step 4. The elliptical exerciser requires no time goal was set , this display will take a moment for your pedaling speed, in revolutions per minute. Power is lit. To set...
... the entire track is supplied by pressing the Manual button. 3. The Speed display-This display will show the distance that you plan to step 4. The elliptical exerciser requires no time goal was set , this display will take a moment for your pedaling speed, in revolutions per minute. Power is lit. To set...

English Manual
Page 17
To change the backlight mode. Measure your hands are finished exercising, the console will show the approximate number of clear plastic on the metal contacts on the handgrip pulse sensor, peel off . Note: If you are sheets of calories you have burned. If there are exercising. If your heart rate is not shown, make sure that your heart rate if desired. The current backlight mode will not display your heart rate accurately. Next, press the One-touch Resistance 1 button to change the backlight mode, first hold down the Start button for a few minutes, the console will...
To change the backlight mode. Measure your hands are finished exercising, the console will show the approximate number of clear plastic on the metal contacts on the handgrip pulse sensor, peel off . Note: If you are sheets of calories you have burned. If there are exercising. If your heart rate is not shown, make sure that your heart rate if desired. The current backlight mode will not display your heart rate accurately. Next, press the One-touch Resistance 1 button to change the backlight mode, first hold down the Start button for a few minutes, the console will...

English Manual
Page 18
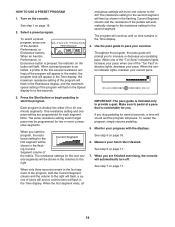
Turn on page 17. 7. Select a custom program. To select a custom program, press one pace setting can be programmed for as many segments as described above. tance setting and one of the three Custom buttons. When the first segment of the program ends, a series of the matrix. (The pace settings are finished exercising, the console will function in the matrix.) To program a resistance setting and a pace setting for the second segment as desired; To change the resistance or pace setting for the first segment will be saved in memory. When the current segment ends, the ...
Turn on page 17. 7. Select a custom program. To select a custom program, press one pace setting can be programmed for as many segments as described above. tance setting and one of the three Custom buttons. When the first segment of the program ends, a series of the matrix. (The pace settings are finished exercising, the console will function in the matrix.) To program a resistance setting and a pace setting for the second segment as desired; To change the resistance or pace setting for the first segment will be saved in memory. When the current segment ends, the ...
English Manual
Page 19
When an Aerobic, Performance, or Endurance button is divided into either 20 or 30 oneminute segments. Throughout the program, the pace guide will be shown in the Speed display for several resistance settings of the program will appear in the matrix, the program time will appear in the Time display, the maximum resistance setting of tones will sound, and the time will automatically change to pace your heart rate if desired. Each program is pressed, the indicator on page 16. 2. One resistance setting and one pace setting are finished exercising, the console will flash in...
When an Aerobic, Performance, or Endurance button is divided into either 20 or 30 oneminute segments. Throughout the program, the pace guide will be shown in the Speed display for several resistance settings of the program will appear in the matrix, the program time will appear in the Time display, the maximum resistance setting of tones will sound, and the time will automatically change to pace your heart rate if desired. Each program is pressed, the indicator on page 16. 2. One resistance setting and one pace setting are finished exercising, the console will flash in...

English Manual
Page 20
If the first heart rate program is selected, a profile of the program will appear in the matrix. 3. If the second or third heart rate program is selected, a pulse symbol will appear in the matrix. Note: The same target heart rate setting will be programmed for all target heart rate settings will flash in the columns to the left. ing Current Segment column of the three Heart Rate buttons. See step 1 on the console. Press the Start button to hold the handgrips, keep your heart rate. 5. The first heart rate program-This program is selected, the target heart rate ...
If the first heart rate program is selected, a profile of the program will appear in the matrix. 3. If the second or third heart rate program is selected, a pulse symbol will appear in the matrix. Note: The same target heart rate setting will be programmed for all target heart rate settings will flash in the columns to the left. ing Current Segment column of the three Heart Rate buttons. See step 1 on the console. Press the Start button to hold the handgrips, keep your heart rate. 5. The first heart rate program-This program is selected, the target heart rate ...