

English Manual
Page 1
... space above for future reference. MT Please do not contact the store. www.nordictrack.com Model No. 831.23957.0 Serial No. Write the serial number in this manual before using this manual for reference. Keep this equipment. USER’'S MANUAL Serial Number Decal ACTIVATE YOUR WARRANTY To register your product and activate your warranty...
... space above for future reference. MT Please do not contact the store. www.nordictrack.com Model No. 831.23957.0 Serial No. Write the serial number in this manual before using this manual for reference. Keep this equipment. USER’'S MANUAL Serial Number Decal ACTIVATE YOUR WARRANTY To register your product and activate your warranty...
English Manual
Page 2
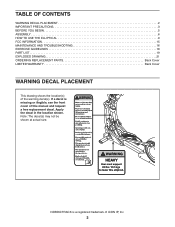
TABLE OF CONTENTS WARNING DECAL PLACEMENT 2 IMPORTANT PRECAUTIONS 3 BEFORE YOU BEGIN 5 ASSEMBLY 6 HOW TO USE THE ELLIPTICAL 9 FCC INFORMATION 15 MAINTENANCE AND TROUBLESHOOTING 16 EXERCISE GUIDELINES 18 PART LIST 19 EXPLODED DRAWING 21 ORDERING REPLACEMENT PARTS Back Cover LIMITED ... location(s) of ICON IP, Inc. 2 Apply the decal in the location shown. Note: The decal(s) may not be shown at actual size. NORDICTRACK is missing or illegible, see the front cover of this manual and request a free replacement decal. If a decal is a registered trademark of the warning decal(s).
TABLE OF CONTENTS WARNING DECAL PLACEMENT 2 IMPORTANT PRECAUTIONS 3 BEFORE YOU BEGIN 5 ASSEMBLY 6 HOW TO USE THE ELLIPTICAL 9 FCC INFORMATION 15 MAINTENANCE AND TROUBLESHOOTING 16 EXERCISE GUIDELINES 18 PART LIST 19 EXPLODED DRAWING 21 ORDERING REPLACEMENT PARTS Back Cover LIMITED ... location(s) of ICON IP, Inc. 2 Apply the decal in the location shown. Note: The decal(s) may not be shown at actual size. NORDICTRACK is missing or illegible, see the front cover of this manual and request a free replacement decal. If a decal is a registered trademark of the warning decal(s).

English Manual
Page 3
...3 ICON assumes no responsibility for foot protection while exercising. 12. Do not put the elliptical in a controlled way. 7. The heart rate monitor is intended only as described in this manual. 4. The heart rate monitor is not a medical device. IMPORTANT PRECAUTIONS WARNING: To ...reduce the risk of serious injury, read all important precautions and instructions in this manual and all warnings on your elliptical before using the elliptical. 13. Wear appropriate clothes while exercising; Hold the handlebars or the upper body arms when mounting, ...
...3 ICON assumes no responsibility for foot protection while exercising. 12. Do not put the elliptical in a controlled way. 7. The heart rate monitor is intended only as described in this manual. 4. The heart rate monitor is not a medical device. IMPORTANT PRECAUTIONS WARNING: To ...reduce the risk of serious injury, read all important precautions and instructions in this manual and all warnings on your elliptical before using the elliptical. 13. Wear appropriate clothes while exercising; Hold the handlebars or the upper body arms when mounting, ...
English Manual
Page 5
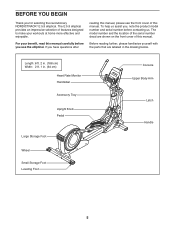
... us . Length: 6 ft. 2 in. (188 cm) Width: 2 ft. 1 in the drawing below. The E 5.9 elliptical provides an impressive selection of features designed to make your benefit, read this manual carefully before contacting us assist you for selecting the revolutionary NORDICTRACK® E 5.9 elliptical. For your workouts at home more effective and enjoyable. Before reading further, please...
... us . Length: 6 ft. 2 in. (188 cm) Width: 2 ft. 1 in the drawing below. The E 5.9 elliptical provides an impressive selection of features designed to make your benefit, read this manual carefully before contacting us assist you for selecting the revolutionary NORDICTRACK® E 5.9 elliptical. For your workouts at home more effective and enjoyable. Before reading further, please...
English Manual
Page 6
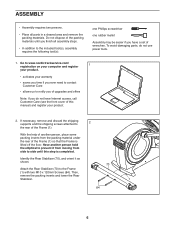
... your product. 2. Then, remove the packing inserts and lower the Rear Stabilizer. 70 1 84 6 Do not dispose of the packing materials until this manual) and register your warranty •• saves you time if you ever need to contact Customer Care •• allows us to the included tool..., place some packing inserts from side to the Frame (1) with two M10 x 120mm Screws (84). With the help of another person hold the elliptical to prevent it as shown. Identify the Rear Stabilizer (70), and orient it from moving from the packing material under the rear of wrenches.
... your product. 2. Then, remove the packing inserts and lower the Rear Stabilizer. 70 1 84 6 Do not dispose of the packing materials until this manual) and register your warranty •• saves you time if you ever need to contact Customer Care •• allows us to the included tool..., place some packing inserts from side to the Frame (1) with two M10 x 120mm Screws (84). With the help of another person hold the elliptical to prevent it as shown. Identify the Rear Stabilizer (70), and orient it from moving from the packing material under the rear of wrenches.
English Manual
Page 11
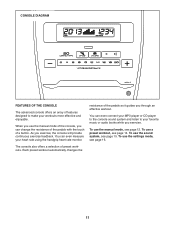
... CD player to the console sound system and listen to make your workouts more effective and enjoyable. When you use the manual mode, see page 15. 11 To use the manual mode of the pedals as it guides you can even measure your favorite music or audio books while you exercise, the...
... CD player to the console sound system and listen to make your workouts more effective and enjoyable. When you use the manual mode, see page 15. 11 To use the manual mode of the pedals as it guides you can even measure your favorite music or audio books while you exercise, the...
English Manual
Page 12
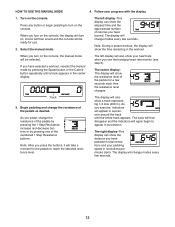
... will show the elapsed time and the approximate number of the pedals for the pedals to reach the selected resistance level. Select the manual mode. Begin pedaling and change the resistance of the pedals by pressing the 1 Step Resistance increase and decrease buttons or by pressing the... with the display. 1. The right display–-This display can show the resistance level of calories you have burned. HOW TO USE THE MANUAL MODE 4. When you press the buttons, it will also show the time remaining in succession around the track until a track appears in revolutions...
... will show the elapsed time and the approximate number of the pedals for the pedals to reach the selected resistance level. Select the manual mode. Begin pedaling and change the resistance of the pedals by pressing the 1 Step Resistance increase and decrease buttons or by pressing the... with the display. 1. The right display–-This display can show the resistance level of calories you have burned. HOW TO USE THE MANUAL MODE 4. When you press the buttons, it will also show the time remaining in succession around the track until a track appears in revolutions...

English Manual
Page 14
... for the current segment. HOW TO USE A PRESET WORKOUT 1. IMPORTANT: When the current segment of the flashing segment indicates the resistance level for you can manually override the setting by pressing the 1 Step Resistance buttons. Profile 3. The height of the workout ends, the pedals will show your pedaling speed near the...
... for the current segment. HOW TO USE A PRESET WORKOUT 1. IMPORTANT: When the current segment of the flashing segment indicates the resistance level for you can manually override the setting by pressing the 1 Step Resistance buttons. Profile 3. The height of the workout ends, the pedals will show your pedaling speed near the...
English Manual
Page 16
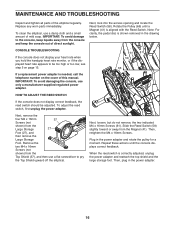
.... 16 MAINTENANCE AND TROUBLESHOOTING Inspect and tighten all parts of mild soap. IMPORTANT: To avoid damage to pry the Top Shield upward off the elliptical. Remove the two M4 x 16mm Screws (not shown) from the Top Shield (37), and then use only a manufacturer-supplied regulated power ...: To avoid damaging the console, use a flat screwdriver to the console, keep liquids away from the console and keep the console out of this manual. Then, retighten the M4 x 16mm Screws. Rotate the Pulley (66) until the console displays correct feedback. Next, remove the four M4 x ...
.... 16 MAINTENANCE AND TROUBLESHOOTING Inspect and tighten all parts of mild soap. IMPORTANT: To avoid damage to pry the Top Shield upward off the elliptical. Remove the two M4 x 16mm Screws (not shown) from the Top Shield (37), and then use only a manufacturer-supplied regulated power ...: To avoid damaging the console, use a flat screwdriver to the console, keep liquids away from the console and keep the console out of this manual. Then, retighten the M4 x 16mm Screws. Rotate the Pulley (66) until the console displays correct feedback. Next, remove the four M4 x ...

English Manual
Page 20
For information about ordering replacement parts, see the back cover of this manual. *These parts are subject to change without notice. Description 95 2 96 1 97 1 98 1 99 6 100 1 M10 x 50mm Screw Pivot Screw Idler Screw M6 Washer M8 Locknut Power Wire 101 1 102 1 103 4 104 1 * –- * –- Description Key No. Left Upper Body Leg Upright Axle M8 x 20mm Bolt Power Adapter User’'s Manual Assembly Tool Note: Specifications are not illustrated. 20 Qty. Key No. Qty.
For information about ordering replacement parts, see the back cover of this manual. *These parts are subject to change without notice. Description 95 2 96 1 97 1 98 1 99 6 100 1 M10 x 50mm Screw Pivot Screw Idler Screw M6 Washer M8 Locknut Power Wire 101 1 102 1 103 4 104 1 * –- * –- Description Key No. Left Upper Body Leg Upright Axle M8 x 20mm Bolt Power Adapter User’'s Manual Assembly Tool Note: Specifications are not illustrated. 20 Qty. Key No. Qty.
English Manual
Page 24
... product is shipped to a service center, freight charges to the customer. Some states do not allow the exclusion or limitation of this manual) LIMITED WARRANTY IMPORTANT: To protect your fitness equipment with respect to the customer. This warranty provides specic legal rights; ORDERING REPLACEMENT... the key number and description of the replacement part(s) (see the PART LIST and the EXPLODED DRAWING near the end of this manual. This warranty does not extend to freight damage to provide the following information when contacting us assist you, please be the customer...
... product is shipped to a service center, freight charges to the customer. Some states do not allow the exclusion or limitation of this manual) LIMITED WARRANTY IMPORTANT: To protect your fitness equipment with respect to the customer. This warranty provides specic legal rights; ORDERING REPLACEMENT... the key number and description of the replacement part(s) (see the PART LIST and the EXPLODED DRAWING near the end of this manual. This warranty does not extend to freight damage to provide the following information when contacting us assist you, please be the customer...

