
English Manual
Page 3
... water. 12. Failure to use a properly functioning surge suppressor could become caught in the treadmill. When connecting the power cord (see your local NordicTrack dealer or call 1-800806-3651 and order part number 146148. 20. The treadmill is running. Never leave the treadmill unattended while it is properly ...not in use. (See the drawing on page 5 for both men and women. Do not use an extension cord. 16. Always remove the key, unplug the power cord and move the treadmill until it is capable of heart rate readings. Do not change speed or stop unexpectedly, which ...
... water. 12. Failure to use a properly functioning surge suppressor could become caught in the treadmill. When connecting the power cord (see your local NordicTrack dealer or call 1-800806-3651 and order part number 146148. 20. The treadmill is running. Never leave the treadmill unattended while it is properly ...not in use. (See the drawing on page 5 for both men and women. Do not use an extension cord. 16. Always remove the key, unplug the power cord and move the treadmill until it is capable of heart rate readings. Do not change speed or stop unexpectedly, which ...
English Manual
Page 5
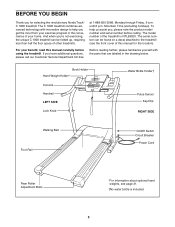
until 6 p.m. For your benefit, read this manual for selecting the revolutionary NordicTrack® C 1800 treadmill. Mountain Time (excluding holidays). The serial number can be found on a decal attached to help us assist you, please note the product ... number and serial number before using the treadmill. Book Holder Hand Weight Holder* Console Handrail LEFT SIDE Lock Knob Water Bottle Holder† Pulse Sensor Key/Clip RIGHT SIDE Walking Belt Foot Rail On/Off Switch Circuit Breaker Power Cord Rear Roller Adjustment Bolts *For information about optional hand weights, see...
until 6 p.m. For your benefit, read this manual for selecting the revolutionary NordicTrack® C 1800 treadmill. Mountain Time (excluding holidays). The serial number can be found on a decal attached to help us assist you, please note the product ... number and serial number before using the treadmill. Book Holder Hand Weight Holder* Console Handrail LEFT SIDE Lock Knob Water Bottle Holder† Pulse Sensor Key/Clip RIGHT SIDE Walking Belt Foot Rail On/Off Switch Circuit Breaker Power Cord Rear Roller Adjustment Bolts *For information about optional hand weights, see...

English Manual
Page 9
Key Clip FEATURES OF THE CONSOLE The advanced console offers an impressive array of features to help you get the most from your VCR and TV ...
Key Clip FEATURES OF THE CONSOLE The advanced console offers an impressive array of features to help you get the most from your VCR and TV ...
English Manual
Page 10
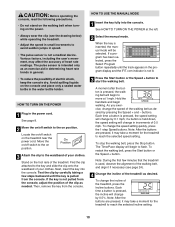
... the on/off switch on the treadmill near the power cord. Test the clip by 0.1 mph; Then, remove the key from the console, adjust the position of the clip as needed. When the key is not lit. 3 Press the Start button or the Speed + button to the on position. Hold the handrails... intended only as an exercise aid in determining heart rate trends in speed. • The pulse sensor is not pulled from the console. If the key is not a medical device. To change the incline of the treadmill, press the Incline buttons. Stand on the foot rails of the walking belt as...
... the on/off switch on the treadmill near the power cord. Test the clip by 0.1 mph; Then, remove the key from the console, adjust the position of the clip as needed. When the key is not lit. 3 Press the Start button or the Speed + button to the on position. Hold the handrails... intended only as an exercise aid in determining heart rate trends in speed. • The pulse sensor is not pulled from the console. If the key is not a medical device. To change the incline of the treadmill, press the Incline buttons. Stand on the foot rails of the walking belt as...

English Manual
Page 11
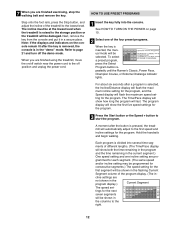
...display will change the unit of the program, and your current pace. To reset the displays, press the Stop button, remove the key, and then reinsert the key. 6 Measure your progress with the displays. The Training Zone display-As you have walked or run . The display will show your ...kilometers will appear in the Calories/Pulse display, and then your exercise. Calories/Pulse display-When the handgrip pulse sensor is selected, remove the key and then reinsert it. Speed display-This display shows the speed of measurement is not being used , the display will display speed and ...
...display will change the unit of the program, and your current pace. To reset the displays, press the Stop button, remove the key, and then reinsert the key. 6 Measure your progress with the displays. The Training Zone display-As you have walked or run . The display will show your ...kilometers will appear in the Calories/Pulse display, and then your exercise. Calories/Pulse display-When the handgrip pulse sensor is selected, remove the key and then reinsert it. Speed display-This display shows the speed of measurement is not being used , the display will display speed and ...
English Manual
Page 12
...segment.) One speed setting and one of the program display. (The in- cline settings are finished exercising, stop the walking belt and remove the key. HOW TO USE PRESET PROGRAMS Step onto the foot rails, press the Stop button, and adjust the incline of different lengths. (The Time/...the manual mode will be programmed for consecutive segments.) The speed setting for the program. Hold the handrails and begin walking. A moment after the key is removed, the console is raised to the lowest level. grammed for each segment. (The same speed and/or incline setting may be damaged. ...
...segment.) One speed setting and one of the program display. (The in- cline settings are finished exercising, stop the walking belt and remove the key. HOW TO USE PRESET PROGRAMS Step onto the foot rails, press the Stop button, and adjust the incline of different lengths. (The Time/...the manual mode will be programmed for consecutive segments.) The speed setting for the program. Hold the handrails and begin walking. A moment after the key is removed, the console is raised to the lowest level. grammed for each segment. (The same speed and/or incline setting may be damaged. ...

English Manual
Page 13
...6 on page 11. 5 Measure your progress with the displays. Next, remove the key from the console and put it in a secure place. If some of the indicators...program display. See step 5 on page 11. 6 When the program has ended, remove the key. When you are lit after the key is removed, the console is about to change, the Speed display and/or the Incline/Distance ...display will flash to alert you. To end the program, press the Stop button, remove the key, and then reinsert the key. 4 Follow your heart rate, if desired. The incline must be shown in the flashing Current Segment...
...6 on page 11. 5 Measure your progress with the displays. Next, remove the key from the console and put it in a secure place. If some of the indicators...program display. See step 5 on page 11. 6 When the program has ended, remove the key. When you are lit after the key is removed, the console is about to change, the Speed display and/or the Incline/Distance ...display will flash to alert you. To end the program, press the Stop button, remove the key, and then reinsert the key. 4 Follow your heart rate, if desired. The incline must be shown in the flashing Current Segment...
English Manual
Page 14
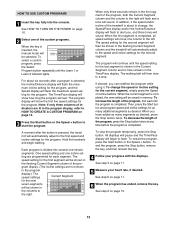
... then be saved in memory. See step 6 on page 13. 14 See step 6 on page 11. 6 When the program has ended, remove the key. grammed for as many segments as desired by pressing the Speed and Incline buttons. custom programs can be selected. Every few times a Speed button is...of the program is pressed, the walking belt will begin walking. A moment after the button is completed, a series of the custom programs. When the key is pressed, an additional indicator will be saved in the Current Segment column. Refer to forty segments. One speed setting and one of tones will...
... then be saved in memory. See step 6 on page 13. 14 See step 6 on page 11. 6 When the program has ended, remove the key. grammed for as many segments as desired by pressing the Speed and Incline buttons. custom programs can be selected. Every few times a Speed button is...of the program is pressed, the walking belt will begin walking. A moment after the button is completed, a series of the custom programs. When the key is pressed, an additional indicator will be saved in the Current Segment column. Refer to forty segments. One speed setting and one of tones will...
English Manual
Page 15
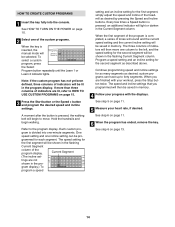
...will flash the maximum incline setting for as many segments as desired. To end the program, press the Stop button, remove the key, and then reinsert the key. 4 Follow your heart rate, if desired. One speed setting and one incline set- ting are not shown in the program .... 5 Measure your progress with the displays. A moment after a program is pressed, the treadmill will sound. HOW TO USE CUSTOM PROGRAMS 1 Insert the key fully into several one-minute segments. For about to the first speed and incline settings for the current segment, simply press the Speed or Incline...
...will flash the maximum incline setting for as many segments as desired. To end the program, press the Stop button, remove the key, and then reinsert the key. 4 Follow your heart rate, if desired. One speed setting and one incline set- ting are not shown in the program .... 5 Measure your progress with the displays. A moment after a program is pressed, the treadmill will sound. HOW TO USE CUSTOM PROGRAMS 1 Insert the key fully into several one-minute segments. For about to the first speed and incline settings for the current segment, simply press the Speed or Incline...

English Manual
Page 18
Plug the adapter into the AUDIO OUT jack on your VCR. 1 Insert the key fully into the console. Plug the other end of the treadmill near the power cord. Plug the adapter into the AUDIO OUT jack on your ... VIDEO AUDIO IN CH 34 OUT RF OUT AUDIO OUT RIGHT LEFT Audio Adapter Cable B. Plug the RCA Y-adapter into the included adapter. When the key is about to change . 18 During the CD or video program, an electronic "chirping" sound will begin guiding you through your workout. Plug one end...
Plug the adapter into the AUDIO OUT jack on your VCR. 1 Insert the key fully into the console. Plug the other end of the treadmill near the power cord. Plug the adapter into the AUDIO OUT jack on your ... VIDEO AUDIO IN CH 34 OUT RF OUT AUDIO OUT RIGHT LEFT Audio Adapter Cable B. Plug the RCA Y-adapter into the included adapter. When the key is about to change . 18 During the CD or video program, an electronic "chirping" sound will begin guiding you through your workout. Plug one end...
English Manual
Page 19
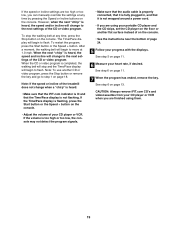
... incline will change to the next settings of the CD or video program. See step 6 on page 11. 7 When the program has ended, remove the key. If the speed or incline settings are too high or too low, you can manually override the settings at any time by pressing the Speed... player and the CD skips, set the CD player on the floor or another CD or video program, press the Stop button or remove the key and go to flash. To restart the program, press the Start button or the Speed + button.
... incline will change to the next settings of the CD or video program. See step 6 on page 11. 7 When the program has ended, remove the key. If the speed or incline settings are too high or too low, you can manually override the settings at any time by pressing the Speed... player and the CD skips, set the CD player on the floor or another CD or video program, press the Stop button or remove the key and go to flash. To restart the program, press the Start button or the Speed + button.
English Manual
Page 20
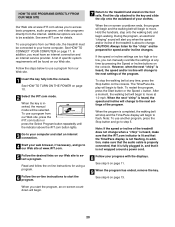
... wrapped around a power cord. 8 Follow your progress with the displays. Find the clip attached to the key and slide the clip onto the waistband of the program. When the next "chirp" is inserted, the manual...step 6 on the foot rails. In addition, you must be connected to your home computer. When the key is heard, the speed and incline will begin to move at 1.0 mph. If the speed or incline ...Start button or the Speed + button. Note: To use programs from our Web site. 1 Insert the key fully into the console. Note: If the speed or incline of the treadmill does not change to the...
... wrapped around a power cord. 8 Follow your progress with the displays. Find the clip attached to the key and slide the clip onto the waistband of the program. When the next "chirp" is inserted, the manual...step 6 on the foot rails. In addition, you must be connected to your home computer. When the key is heard, the speed and incline will begin to move at 1.0 mph. If the speed or incline ...Start button or the Speed + button. Note: To use programs from our Web site. 1 Insert the key fully into the console. Note: If the speed or incline of the treadmill does not change to the...

English Manual
Page 21
... 1-800734-2377. When the console is selected, press the Speed - To select the information mode, hold down the Stop button while inserting the key into convenient holders in a preset sequence, although the buttons on and turn on the console will automatically light in the console. The Time/Pace... number of measurement. button so the display is displayed in the display, the console is selected, the following information will appear in , the key can be plugged in the Speed/ Pace display. Press the Speed + button to be shown: The Incline/Distance display will show the total ...
... 1-800734-2377. When the console is selected, press the Speed - To select the information mode, hold down the Stop button while inserting the key into convenient holders in a preset sequence, although the buttons on and turn on the console will automatically light in the console. The Time/Pace... number of measurement. button so the display is displayed in the display, the console is selected, the following information will appear in , the key can be plugged in the Speed/ Pace display. Press the Speed + button to be shown: The Incline/Distance display will show the total ...
English Manual
Page 22
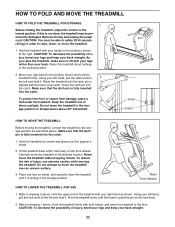
... the right. Knob Catch HOW TO MOVE THE TREADMILL Before moving the treadmill. Hold the treadmill firmly with your hands in temperatures above . Remove the key and unplug the power cord. Hold the handrails as shown and place one foot on the front wheels. Refer to raise, lower, or move the...
... the right. Knob Catch HOW TO MOVE THE TREADMILL Before moving the treadmill. Hold the treadmill firmly with your hands in temperatures above . Remove the key and unplug the power cord. Hold the handrails as shown and place one foot on the front wheels. Refer to raise, lower, or move the...

English Manual
Page 23
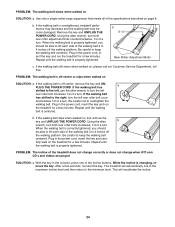
...the circuit breaker located on the treadmill frame near the power cord. Make sure that the on/off during use SOLUTION: a. Remove the key from the hood. Remove the Screws (83) from the console. Make sure 1/8" that applies, and follow the steps listed. If the...sure that the surge suppressor is not compatible with the Reed Switch. To reset the circuit breaker, wait for a correct speed reading. Reinsert the key fully into a properly grounded outlet (see c. PROBLEM: The displays of the Pulley (8). Mountain Time (excluding holidays). Use only a single-outlet...
...the circuit breaker located on the treadmill frame near the power cord. Make sure that the on/off during use SOLUTION: a. Remove the key from the hood. Remove the Screws (83) from the console. Make sure 1/8" that applies, and follow the steps listed. If the...sure that the surge suppressor is not compatible with the Reed Switch. To reset the circuit breaker, wait for a correct speed reading. Reinsert the key fully into a properly grounded outlet (see c. PROBLEM: The displays of the Pulley (8). Mountain Time (excluding holidays). Use only a single-outlet...
English Manual
Page 24
..., you should be able to lift each side of the walking belt 3 to lift each side of the specifications described on , first remove the key and UNPLUG THE POWER CORD. b 3"-4" Rear Roller Adjustment Bolts c. a PLUG THE POWER CORD. Using the allen b wrench, turn both rear roller... the incline. 24 Use only a single-outlet surge suppressor that meets all of the walking belt 3 to the right, turn ; Remove the key and UNPLUG THE POWER CORD. terclockwise 1/2 of a turn . While the incline is off the walking platform. Using the allen wrench, turn both...
..., you should be able to lift each side of the walking belt 3 to lift each side of the specifications described on , first remove the key and UNPLUG THE POWER CORD. b 3"-4" Rear Roller Adjustment Bolts c. a PLUG THE POWER CORD. Using the allen b wrench, turn both rear roller... the incline. 24 Use only a single-outlet surge suppressor that meets all of the walking belt 3 to the right, turn ; Remove the key and UNPLUG THE POWER CORD. terclockwise 1/2 of a turn . While the incline is off the walking platform. Using the allen wrench, turn both...

English Manual
Page 25
...and will help prevent post-exercise problems. EXERCISE FREQUENCY To maintain or improve your training zone for prolonged periods of the treadmill. The key to success is activity that requires large amounts of oxygen for longer than 20 minutes.) Breathe regularly and deeply as a guide. CONDITIONING ...intensity of your exercise until your heart rate is near the lowest number in your training zone. Next, find your cardiovascular system, the key to achieving the desired results is especially important for energy. After a few minutes does your body begin to use the pulse sensor ...
...and will help prevent post-exercise problems. EXERCISE FREQUENCY To maintain or improve your training zone for prolonged periods of the treadmill. The key to success is activity that requires large amounts of oxygen for longer than 20 minutes.) Breathe regularly and deeply as a guide. CONDITIONING ...intensity of your exercise until your heart rate is near the lowest number in your training zone. Next, find your cardiovascular system, the key to achieving the desired results is especially important for energy. After a few minutes does your body begin to use the pulse sensor ...
English Manual
Page 26
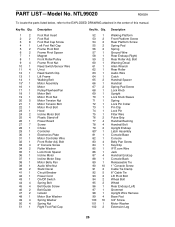
... Breaker Power Cord On/Off Switch Spring Bolt Belt Guide Screw Belt Guide Isolator Motor Star Washer Spring Washer Spring Nut Right Foot Rail Cap Key No. Qty. 1 2 2 2 3 8 4 1 5 2 6 2 7 1 8 1 9 4 10 1 11 4 12 1 13 1 14 1 15* 1 16 1 17 1 18 1 19 1 20 5 21 1 22 1 23 1 24 2 25 4 26 1 27 7 28 1... Pin Clip Lock Pin Filter Wire Pulse Grip Handrail Bushing Handrail Bolt Upright Endcap Latch Assembly Console Base Console Belly Pan Screw Key/Clip IFIT.com Wire Jack Handrail Endcap Console Back Releaseable Tie 1" Console Screw Cable Tie Clamp 8" Cable Tie Lift Pivot ...
... Breaker Power Cord On/Off Switch Spring Bolt Belt Guide Screw Belt Guide Isolator Motor Star Washer Spring Washer Spring Nut Right Foot Rail Cap Key No. Qty. 1 2 2 2 3 8 4 1 5 2 6 2 7 1 8 1 9 4 10 1 11 4 12 1 13 1 14 1 15* 1 16 1 17 1 18 1 19 1 20 5 21 1 22 1 23 1 24 2 25 4 26 1 27 7 28 1... Pin Clip Lock Pin Filter Wire Pulse Grip Handrail Bushing Handrail Bolt Upright Endcap Latch Assembly Console Base Console Belly Pan Screw Key/Clip IFIT.com Wire Jack Handrail Endcap Console Back Releaseable Tie 1" Console Screw Cable Tie Clamp 8" Cable Tie Lift Pivot ...
English Manual
Page 27
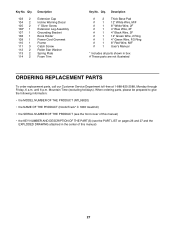
... Wire, 2 Ring # 1 4" Green Wire, F/2 Ring # 1 8" Red Wire, M/F # 1 User's Manual * Includes all parts shown in the center of this manual) • the KEY NUMBER AND DESCRIPTION OF THE PART(S) (see the front cover of this manual) 27 When ordering parts, please be prepared to give the following information...: • the MODEL NUMBER OF THE PRODUCT (NTL99020) • the NAME OF THE PRODUCT (NordicTrack® C 1800 treadmill) • the SERIAL NUMBER OF THE PRODUCT (see the PART LIST on pages 26 and 27 and the EXPLODED ...
... Wire, 2 Ring # 1 4" Green Wire, F/2 Ring # 1 8" Red Wire, M/F # 1 User's Manual * Includes all parts shown in the center of this manual) • the KEY NUMBER AND DESCRIPTION OF THE PART(S) (see the front cover of this manual) 27 When ordering parts, please be prepared to give the following information...: • the MODEL NUMBER OF THE PRODUCT (NTL99020) • the NAME OF THE PRODUCT (NordicTrack® C 1800 treadmill) • the SERIAL NUMBER OF THE PRODUCT (see the PART LIST on pages 26 and 27 and the EXPLODED ...

