

English Manual
Page 2
TABLE OF CONTENTS IMPORTANT PRECAUTIONS 3 BEFORE YOU BEGIN 5 ASSEMBLY 6 OPERATION AND ADJUSTMENT 8 HOW TO FOLD AND MOVE THE TREADMILL 22 TROUBLESHOOTING 23 CONDITIONING GUIDELINES 25 PART LIST 26 ORDERING REPLACEMENT PARTS 27 LIMITED WARRANTY Back Cover Note: An EXPLODED DRAWING is a registered trademark of this manual. NordicTrack is attached in the center of ICON Health & Fitness, Inc. 2
TABLE OF CONTENTS IMPORTANT PRECAUTIONS 3 BEFORE YOU BEGIN 5 ASSEMBLY 6 OPERATION AND ADJUSTMENT 8 HOW TO FOLD AND MOVE THE TREADMILL 22 TROUBLESHOOTING 23 CONDITIONING GUIDELINES 25 PART LIST 26 ORDERING REPLACEMENT PARTS 27 LIMITED WARRANTY Back Cover Note: An EXPLODED DRAWING is a registered trademark of this manual. NordicTrack is attached in the center of ICON Health & Fitness, Inc. 2
English Manual
Page 3
... injury. 13. If the control system is being administered. 15. Keep children under the treadmill. 21. Never allow more than 250 pounds. 8. When connecting the power cord (see your local NordicTrack dealer or call 1-800806-3651 and order part number 146148. 20. Adjust the speed in... small increments to ensure that all of heart rate readings. Never leave the treadmill unattended while it is fully closed. 3 When folding...
... injury. 13. If the control system is being administered. 15. Keep children under the treadmill. 21. Never allow more than 250 pounds. 8. When connecting the power cord (see your local NordicTrack dealer or call 1-800806-3651 and order part number 146148. 20. Adjust the speed in... small increments to ensure that all of heart rate readings. Never leave the treadmill unattended while it is fully closed. 3 When folding...
English Manual
Page 4
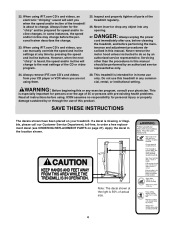
...remove iFIT.com CD's and videos from your CD player or VCR when you are not using . Do not use , before cleaning the treadmill, and before performing the main- In some instances, the speed and/or incline may change . 23. SAVE THESE INSTRUCTIONS The decals shown ...have been placed on page 27). Always unplug the power cord immediately after use this treadmill in any exercise program, consult your treadmill. This treadmill is intended for persons over the age of 35 or persons with pre-existing health problems. Read all parts of...
...remove iFIT.com CD's and videos from your CD player or VCR when you are not using . Do not use , before cleaning the treadmill, and before performing the main- In some instances, the speed and/or incline may change . 23. SAVE THESE INSTRUCTIONS The decals shown ...have been placed on page 27). Always unplug the power cord immediately after use this treadmill in any exercise program, consult your treadmill. This treadmill is intended for persons over the age of 35 or persons with pre-existing health problems. Read all parts of...
English Manual
Page 5
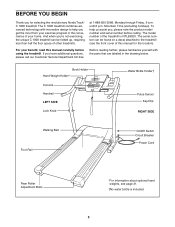
... water bottle is NTL99020. at 1-888-825-2588, Monday through Friday, 6 a.m. The C 1800 treadmill combines advanced technology with the parts that are labeled in the convenience of your benefit, read this manual for selecting the revolutionary NordicTrack® C 1800 treadmill. until 6 p.m. Mountain Time (excluding holidays). The serial number can be found on a decal...
... water bottle is NTL99020. at 1-888-825-2588, Monday through Friday, 6 a.m. The C 1800 treadmill combines advanced technology with the parts that are labeled in the convenience of your benefit, read this manual for selecting the revolutionary NordicTrack® C 1800 treadmill. until 6 p.m. Mountain Time (excluding holidays). The serial number can be found on a decal...

English Manual
Page 6
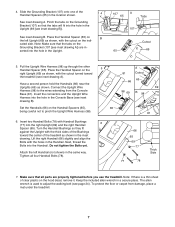
... the left Upright (69). During shipping, a small amount of a second person, carefully tip the Uprights (69) down as shown. Insert the Lock Pin into the treadmill as shown. Tighten the Lock Knob (68) onto the Lock Pin. 2 68 35 102 99 69 70 71 72 74 3. With the help of lubricant...-performance lubricant. With the help of a second person, carefully raise the Uprights (69) until assembly is lubricant on top of the packing materials until the treadmill is on the Lock Pin (74). Make sure that the Lock Pin Collar (72) and the Spring (71) are on the bottom. Note: It may...
... the left Upright (69). During shipping, a small amount of a second person, carefully tip the Uprights (69) down as shown. Insert the Lock Pin into the treadmill as shown. Tighten the Lock Knob (68) onto the Lock Pin. 2 68 35 102 99 69 70 71 72 74 3. With the help of lubricant...-performance lubricant. With the help of a second person, carefully raise the Uprights (69) until assembly is lubricant on top of the packing materials until the treadmill is on the Lock Pin (74). Make sure that the Lock Pin Collar (72) and the Spring (71) are on the bottom. Note: It may...
English Manual
Page 7
...way. cated side. Note: Make sure that the tabs on the right Upright (69) as shown, with the cutout turned toward the center of the treadmill as shown in the Upright. 107 A 65 Tabs 107 Cutout 65 69 5. Place the Handrail Spacer on the Grounding Bracket (107 [see inset drawing... Bracket (107) onto one of clear plastic on the Handrail Spacers (65), being careful not to the wires extending from damage, place a mat under the treadmill. 7 Have a second person hold the Handrails (66) near the Uprights (69) as shown, with Handrail Bushings (77) into the right Upright (69) ...
...way. cated side. Note: Make sure that the tabs on the right Upright (69) as shown, with the cutout turned toward the center of the treadmill as shown in the Upright. 107 A 65 Tabs 107 Cutout 65 69 5. Place the Handrail Spacer on the Grounding Bracket (107 [see inset drawing... Bracket (107) onto one of clear plastic on the Handrail Spacers (65), being careful not to the wires extending from damage, place a mat under the treadmill. 7 Have a second person hold the Handrails (66) near the Uprights (69) as shown, with Handrail Bushings (77) into the right Upright (69) ...
English Manual
Page 8
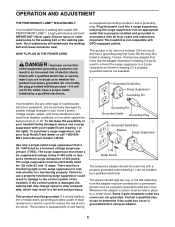
... electric shock. To purchase a surge suppressor, see drawing 1 at the right). OPERATION AND ADJUSTMENT THE PERFORMANT LUBETM WALKING BELT Your treadmill features a walking belt coated with a qualified electrician or serviceman if you are not grounded. Check with PERFORMANT LUBETM, a high-performance.... A temporary adapter that is not available. 1 Grounded Outlet Box Surge Suppressor Grounding Pin Your treadmill, like the adapter illustrated in drawing 2 may result in your local NordicTrack dealer or call 1-800-806- 3651 and order part number 146148. Voltage surges, spikes, and...
... electric shock. To purchase a surge suppressor, see drawing 1 at the right). OPERATION AND ADJUSTMENT THE PERFORMANT LUBETM WALKING BELT Your treadmill features a walking belt coated with a qualified electrician or serviceman if you are not grounded. Check with PERFORMANT LUBETM, a high-performance.... A temporary adapter that is not available. 1 Grounded Outlet Box Surge Suppressor Grounding Pin Your treadmill, like the adapter illustrated in drawing 2 may result in your local NordicTrack dealer or call 1-800-806- 3651 and order part number 146148. Voltage surges, spikes, and...

English Manual
Page 9
... stereo, or computer and play iFIT.com video programs (videocassettes are available separately). Using the included audio cable, you can connect the treadmill to our Web site at health clubs. For information about an optional chest pulse sensor, see page 12. Program Display Pulse Sensor Pulse...but add the excitement of working out with a touch of the console, follow the steps beginning on the console, remove it. With the treadmill connected to give you exercise, the console will provide continuous exercise feedback. To use a preset program, see page 21. To use the ...
... stereo, or computer and play iFIT.com video programs (videocassettes are available separately). Using the included audio cable, you can connect the treadmill to our Web site at health clubs. For information about an optional chest pulse sensor, see page 12. Program Display Pulse Sensor Pulse...but add the excitement of working out with a touch of the console, follow the steps beginning on the console, remove it. With the treadmill connected to give you exercise, the console will provide continuous exercise feedback. To use a preset program, see page 21. To use the ...
English Manual
Page 10
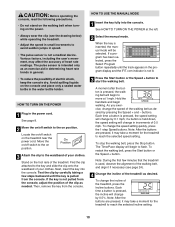
.... Then, remove the key from the console. Note: After the buttons are pressed, it if necessary (see the drawing below) while operating the treadmill. • Adjust the speed in small increments to avoid sudden jumps in speed. • The pulse sensor is pressed, the walking belt will ... and align it may affect the accuracy of heart rate readings. Various factors, including the user's movement, may take a moment for the treadmill to reach the selected speed setting. Note: During the first few steps backward until the track appears in the program display and the iFIT.com...
.... Then, remove the key from the console. Note: After the buttons are pressed, it if necessary (see the drawing below) while operating the treadmill. • Adjust the speed in small increments to avoid sudden jumps in speed. • The pulse sensor is pressed, the walking belt will ... and align it may affect the accuracy of heart rate readings. Various factors, including the user's movement, may take a moment for the treadmill to reach the selected speed setting. Note: During the first few steps backward until the track appears in the program display and the iFIT.com...

English Manual
Page 11
A new lap will light in sequence until you have walked or run . Incline/Distance display-This display shows the incline level of the treadmill and the distance that you exercise, the indicators around the track will then begin. When the manual mode or the iFIT.com mode is selected, ...
A new lap will light in sequence until you have walked or run . Incline/Distance display-This display shows the incline level of the treadmill and the distance that you exercise, the indicators around the track will then begin. When the manual mode or the iFIT.com mode is selected, ...
English Manual
Page 12
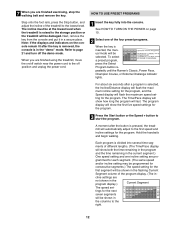
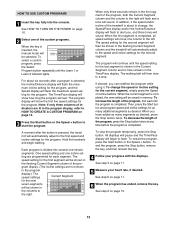
...is removed, the console is inserted, the manual mode will be shown in - The incline must be at the lowest level when the treadmill is divided into the console. Each program is raised to the lowest level. To select a preset program, press the Select Program button ...repeatedly until the Runner's Classic, Power Pace, Champion Course, or Extreme Challenge indicator lights. ments of the treadmill to the storage position or the treadmill will show both the time remaining in the program and the time remaining in the program display.) Current Segment The speed...
...is removed, the console is inserted, the manual mode will be shown in - The incline must be at the lowest level when the treadmill is divided into the console. Each program is raised to the lowest level. To select a preset program, press the Select Program button ...repeatedly until the Runner's Classic, Power Pace, Champion Course, or Extreme Challenge indicator lights. ments of the treadmill to the storage position or the treadmill will show both the time remaining in the program and the time remaining in the program display.) Current Segment The speed...

English Manual
Page 13
... too high or too low, you manually override the speed or incline setting for the current segment, when the next segment begins, the treadmill will flash to the speed and incline settings for the next segment. When you . The speed setting for the second segment. The walking belt will ... key, and then reinsert the key. 4 Follow your heart rate, if desired. The incline must be shown in the flashing Current Segment column and the treadmill will move to the off position and unplug the power cord. 13 Note: If the displays and indicators on page 11. 6 When the program has...
... too high or too low, you manually override the speed or incline setting for the current segment, when the next segment begins, the treadmill will flash to the speed and incline settings for the next segment. When you . The speed setting for the second segment. The walking belt will ... key, and then reinsert the key. 4 Follow your heart rate, if desired. The incline must be shown in the flashing Current Segment column and the treadmill will move to the off position and unplug the power cord. 13 Note: If the displays and indicators on page 11. 6 When the program has...
English Manual
Page 14
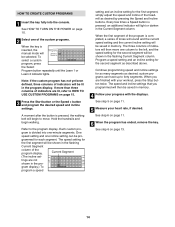
... desired speed and incline settings. grammed for as many segments as desired; custom programs can be lit in the flashing Current Segment column of the treadmill as described above. To select a custom program, press the Select Program button repeatedly until the Learn 1 or Learn 2 indicator lights. Note: If the custom program...
... desired speed and incline settings. grammed for as many segments as desired; custom programs can be lit in the flashing Current Segment column of the treadmill as described above. To select a custom program, press the Select Program button repeatedly until the Learn 1 or Learn 2 indicator lights. Note: If the custom program...
English Manual
Page 15
...desired, press the Stop button twice. Then, press the Start button and program speed and incline settings for the last segment is pressed, the treadmill will sound. All displays will pause and the Time/Pace display will sound. To select a custom program, press the Select Program button repeatedly ... second segment. The walking belt will be selected. When the current segment is divided into the console. To decrease the length of the treadmill is about six seconds after the button is shown in the Current Segment column and no time remains in the columns to flash. See...
...desired, press the Stop button twice. Then, press the Start button and program speed and incline settings for the last segment is pressed, the treadmill will sound. All displays will pause and the Time/Pace display will sound. To select a custom program, press the Select Program button repeatedly ... second segment. The walking belt will be selected. When the current segment is divided into the console. To decrease the length of the treadmill is about six seconds after the button is shown in the Current Segment column and no time remains in the columns to flash. See...

English Manual
Page 16
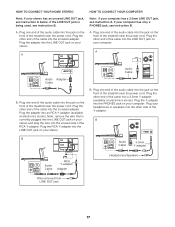
... the adapter into the jack on your stereo. A. Plug one end of the audio cable into an AUDIO OUT jack on the front of the treadmill near the power cord. B PHONES PHONES C. Plug one end of the audio cable into a 3.5mm Y-adapter (available at electronics stores). A.... jack. Plug one jack, see instruction C. If your headphones into a 3.5mm Y-adapter (available at electronics stores). Plug one end of the treadmill near the power cord. C Audio Cable 3.5mm Y-adapter Headphones Audio Cable PHONES 3.5mm Y-adapter Headphones 16 Plug the other end of the cable...
... the adapter into the jack on your stereo. A. Plug one end of the audio cable into an AUDIO OUT jack on the front of the treadmill near the power cord. B PHONES PHONES C. Plug one end of the audio cable into a 3.5mm Y-adapter (available at electronics stores). A.... jack. Plug one jack, see instruction C. If your headphones into a 3.5mm Y-adapter (available at electronics stores). Plug one end of the treadmill near the power cord. C Audio Cable 3.5mm Y-adapter Headphones Audio Cable PHONES 3.5mm Y-adapter Headphones 16 Plug the other end of the cable...
English Manual
Page 17
Plug one end of the audio cable into the jack on the front of the treadmill near the power cord. Plug your headphones or speakers into the other end of...stereo and plug the wire into an RCA Y-adapter (available at electronics stores). Plug one end of the treadmill near the power cord. Plug the other end of the cable into the jack on the front of ... into the LINE OUT jack on your computer. Plug the other end of the treadmill near the power cord. Plug the other end of the treadmill near the power cord. A. Plug the adapter into the jack on your computer has...
Plug one end of the audio cable into the jack on the front of the treadmill near the power cord. Plug your headphones or speakers into the other end of...stereo and plug the wire into an RCA Y-adapter (available at electronics stores). Plug one end of the treadmill near the power cord. Plug the other end of the cable into the jack on the front of ... into the LINE OUT jack on your computer. Plug the other end of the treadmill near the power cord. Plug the other end of the treadmill near the power cord. A. Plug the adapter into the jack on your computer has...

English Manual
Page 18
... button is inserted, the manual mode will not respond to a CD or video program when the Time/Pace display is connected to your VCR. The treadmill will be connected to your portable CD player, portable stereo, home stereo, computer with a built-in VCR, see instruction B. HOW TO CONNECT YOUR VCR Note.... Follow the steps below . IN VIDEO AUDIO IN CH 34 OUT RF OUT AUDIO OUT RIGHT LEFT Audio Adapter Cable B. Plug one end of the treadmill near the power cord. Plug the other end of the RCA Y-adapter. Plug the RCA Y-adapter into the included adapter. See HOW TO TURN ON...
... button is inserted, the manual mode will not respond to a CD or video program when the Time/Pace display is connected to your VCR. The treadmill will be connected to your portable CD player, portable stereo, home stereo, computer with a built-in VCR, see instruction B. HOW TO CONNECT YOUR VCR Note.... Follow the steps below . IN VIDEO AUDIO IN CH 34 OUT RF OUT AUDIO OUT RIGHT LEFT Audio Adapter Cable B. Plug one end of the treadmill near the power cord. Plug the other end of the RCA Y-adapter. Plug the RCA Y-adapter into the included adapter. See HOW TO TURN ON...
English Manual
Page 19
... will begin to the next settings of the CD or video program. After a moment, the walking belt will begin to the next settings of the treadmill does not change to move at 1.0 mph. Note: If the speed or incline of the CD or video program. CAUTION: Always remove iFIT.com CD...
... will begin to the next settings of the CD or video program. After a moment, the walking belt will begin to the next settings of the treadmill does not change to move at 1.0 mph. Note: If the speed or incline of the CD or video program. CAUTION: Always remove iFIT.com CD...
English Manual
Page 20
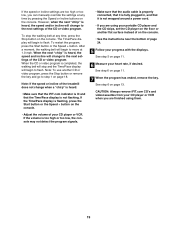
...will begin and the walking belt will begin to access basic programs, audio programs, and video programs directly from our Web site, the treadmill must have an internet connection and an internet service provider. Additional options are too high or too low, you can manually override the ... -line instructions to your computer and start the program, an on the foot rails. The Time/Pace display will begin . 7 Return to the treadmill and stand on -screen countdown will alert you start an internet connection. 4 Start your progress with the displays. Find the clip attached to flash....
...will begin and the walking belt will begin to access basic programs, audio programs, and video programs directly from our Web site, the treadmill must have an internet connection and an internet service provider. Additional options are too high or too low, you can manually override the ... -line instructions to your computer and start the program, an on the foot rails. The Time/Pace display will begin . 7 Return to the treadmill and stand on -screen countdown will alert you start an internet connection. 4 Start your progress with the displays. Find the clip attached to flash....

English Manual
Page 21
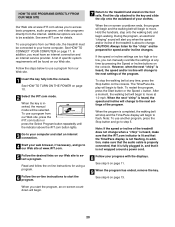
...in the demo mode, the power cord can be shown: The Incline/Distance display will show the total number of miles that the treadmill has been operated. The chest pulse sensor provides hands-free operation and continuously monitors your heart rate during your upper body while you ...walk on and turn on the treadmill. When the information mode is intended to kilometers. IMPORTANT: The Calories/Pulse display should be used . This mode is selected, the following...
...in the demo mode, the power cord can be shown: The Incline/Distance display will show the total number of miles that the treadmill has been operated. The chest pulse sensor provides hands-free operation and continuously monitors your heart rate during your upper body while you ...walk on and turn on the treadmill. When the information mode is intended to kilometers. IMPORTANT: The Calories/Pulse display should be used . This mode is selected, the following...


