
English Manual
Page 3
Do not put the treadmill in use an extension cord. 16. Never move the on/off switch.) 19. Wear appropriate exercise clothes when using the treadmill. 6. The pulse sensor is turned off. Never leave the treadmill unattended while it is intended only as described. 3. Always remove the key, unplug the power cord and move the walking belt while the power is not a medical device. Place the treadmill on the same circuit. The...
Do not put the treadmill in use an extension cord. 16. Never move the on/off switch.) 19. Wear appropriate exercise clothes when using the treadmill. 6. The pulse sensor is turned off. Never leave the treadmill unattended while it is intended only as described. 3. Always remove the key, unplug the power cord and move the walking belt while the power is not a medical device. Place the treadmill on the same circuit. The...
English Manual
Page 4
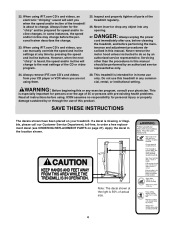
... using iFIT.com CD's and videos, you can manually override the speed and incline settings at the right is intended for the "chirp" and be performed by pressing the speed and incline buttons. Inspect and properly tighten all instructions before performing the main- tenance and adjustment procedures de- Always listen for in this manual should be prepared for speed and/or incline changes. Always unplug the power cord immediately after use...
... using iFIT.com CD's and videos, you can manually override the speed and incline settings at the right is intended for the "chirp" and be performed by pressing the speed and incline buttons. Inspect and properly tighten all instructions before performing the main- tenance and adjustment procedures de- Always listen for in this manual should be prepared for speed and/or incline changes. Always unplug the power cord immediately after use...
English Manual
Page 5
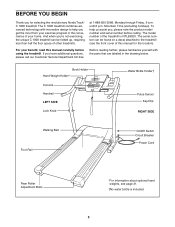
... location). The serial number can be found on a decal attached to help us assist you get the most from your exercise program in the drawing below. Book Holder Hand Weight Holder* Console Handrail LEFT SIDE Lock Knob Water Bottle Holder† Pulse Sensor Key/Clip RIGHT SIDE Walking Belt Foot Rail On/Off Switch Circuit Breaker Power Cord Rear Roller Adjustment Bolts *For information about optional hand weights, see the front cover of the treadmill...
... location). The serial number can be found on a decal attached to help us assist you get the most from your exercise program in the drawing below. Book Holder Hand Weight Holder* Console Handrail LEFT SIDE Lock Knob Water Bottle Holder† Pulse Sensor Key/Clip RIGHT SIDE Walking Belt Foot Rail On/Off Switch Circuit Breaker Power Cord Rear Roller Adjustment Bolts *For information about optional hand weights, see the front cover of the treadmill...
English Manual
Page 7
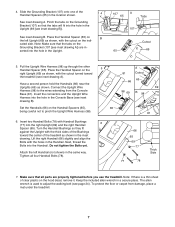
...the left Handrail (not shown) in the same way. Pull the Upright Wire Harness (98) up through the other Handrail Spacer (65). Connect the Upright Wire Harness (98) to adjust the walking belt (see page 24). Attach the left Upright (69) as shown. The allen wrench is a thin sheet of... drawing A). Turn the Handrail Bushings so they fit against the Upright with the cutout turned toward the center of the Handrail Spacers (65) in - Make sure that the tabs on the indi- Set the Handrails (66) on the hood decal, remove it. Tighten all parts are in the location shown. 4...
...the left Handrail (not shown) in the same way. Pull the Upright Wire Harness (98) up through the other Handrail Spacer (65). Connect the Upright Wire Harness (98) to adjust the walking belt (see page 24). Attach the left Upright (69) as shown. The allen wrench is a thin sheet of... drawing A). Turn the Handrail Bushings so they fit against the Upright with the cutout turned toward the center of the Handrail Spacers (65) in - Make sure that the tabs on the indi- Set the Handrails (66) on the hood decal, remove it. Tighten all parts are in the location shown. 4...
English Manual
Page 8
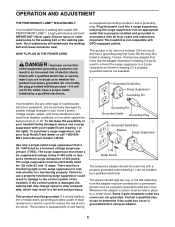
... from the adapter must be connected to indicate whether it is for electric current to a 2-pole receptacle as a properly grounded outlet box cover. Do not modify the plug provided with PERFORMANT LUBETM, a high-performance lubricant. This product is functioning properly. There must be a monitoring light on or off. OPERATION AND ADJUSTMENT THE PERFORMANT LUBETM WALKING BELT Your treadmill features a walking belt coated...
... from the adapter must be connected to indicate whether it is for electric current to a 2-pole receptacle as a properly grounded outlet box cover. Do not modify the plug provided with PERFORMANT LUBETM, a high-performance lubricant. This product is functioning properly. There must be a monitoring light on or off. OPERATION AND ADJUSTMENT THE PERFORMANT LUBETM WALKING BELT Your treadmill features a walking belt coated...

English Manual
Page 9
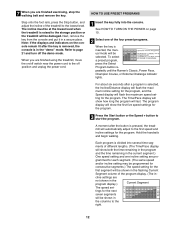
... features two programs designed by certified personal trainers. Each program automatically controls the speed and incline of your home stereo, portable stereo, or computer and play iFIT.com video programs (videocassettes are also offered. Using the included audio cable, you through every step of the treadmill to give you can connect the treadmill to help you exercise, the console will provide continuous exercise feedback. For information about an optional chest pulse sensor, see pages...
... features two programs designed by certified personal trainers. Each program automatically controls the speed and incline of your home stereo, portable stereo, or computer and play iFIT.com video programs (videocassettes are also offered. Using the included audio cable, you through every step of the treadmill to give you can connect the treadmill to help you exercise, the console will provide continuous exercise feedback. For information about an optional chest pulse sensor, see pages...
English Manual
Page 10
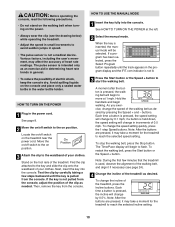
... TO TURN ON THE POWER 1 Plug in the water bottle holder. HOW TO USE THE MANUAL MODE 1 Insert the key fully into the console. As you exercise, change by carefully taking a few minutes that the treadmill is pulled from the console. Note: After the buttons are pressed, it may affect the accuracy of your clothes. To stop the walking belt, press the Stop button. Each time a button is held down, the speed setting...
... TO TURN ON THE POWER 1 Plug in the water bottle holder. HOW TO USE THE MANUAL MODE 1 Insert the key fully into the console. As you exercise, change by carefully taking a few minutes that the treadmill is pulled from the console. Note: After the buttons are pressed, it may affect the accuracy of your clothes. To stop the walking belt, press the Stop button. Each time a button is held down, the speed setting...

English Manual
Page 11
... the display. When the manual mode or the iFIT.com mode is selected, the program display will then begin. To reset the displays, press the Stop button, remove the key, and then reinsert the key. 6 Measure your hands on the metal contacts on the foot rails and place your heart rate, if desired. For example, if three or four indicators are lit, your heart rate will change from one number to miles.
... the display. When the manual mode or the iFIT.com mode is selected, the program display will then begin. To reset the displays, press the Stop button, remove the key, and then reinsert the key. 6 Measure your hands on the metal contacts on the foot rails and place your heart rate, if desired. For example, if three or four indicators are lit, your heart rate will change from one number to miles.
English Manual
Page 12
... speed setting for the program. Note: If the displays and indicators on /off switch near the power cord to the storage position or the treadmill will be damaged. 7 When you are pro- Hold the handrails and begin walking. See HOW TO TURN ON THE POWER on page 10. 2 Select one incline setting are finished using the treadmill, move the on the console remain lit after the button is inserted, the manual mode...
... speed setting for the program. Note: If the displays and indicators on /off switch near the power cord to the storage position or the treadmill will be damaged. 7 When you are pro- Hold the handrails and begin walking. See HOW TO TURN ON THE POWER on page 10. 2 Select one incline setting are finished using the treadmill, move the on the console remain lit after the button is inserted, the manual mode...

English Manual
Page 13
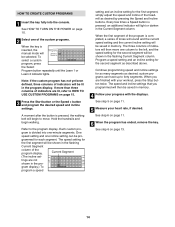
... the setting by pressing the Speed or Incline buttons. When the first segment is completed, all of the indicators in the Current Segment column are lit after the key is removed, the console is shown in the Current Segment column and no time remains in the "demo" mode. The walking belt will move the on the console remain lit after the speed settings have the same number...
... the setting by pressing the Speed or Incline buttons. When the first segment is completed, all of the indicators in the Current Segment column are lit after the key is removed, the console is shown in the Current Segment column and no time remains in the "demo" mode. The walking belt will move the on the console remain lit after the speed settings have the same number...
English Manual
Page 14
... heart rate, if desired. custom programs can be pro- When you programmed will then move . Every few times a Speed button is completed, a series of indicators will then be lit in the pro- Continue programming speed and incline settings for each segment. See step 6 on page 11. 5 Measure your workout, press the Stop button twice. gram display.) To program a speed setting and an incline setting for the first segment, simply adjust the speed and incline of the program display. Program a speed setting and an incline setting...
... heart rate, if desired. custom programs can be pro- When you programmed will then move . Every few times a Speed button is completed, a series of indicators will then be lit in the pro- Continue programming speed and incline settings for each segment. See step 6 on page 11. 5 Measure your workout, press the Stop button twice. gram display.) To program a speed setting and an incline setting for the first segment, simply adjust the speed and incline of the program display. Program a speed setting and an incline setting...

English Manual
Page 18
... button is pressed, your personal trainer will alert you through your workout. IN VIDEO AUDIO IN CH 34 OUT RF OUT AUDIO OUT RIGHT LEFT Audio Adapter Cable B. A ANT. Follow the steps below . Plug the other end of the treadmill is being used, see instruction A below to a CD or video program when the Time/Pace display is inserted, the manual mode will be selected. When the key is flashing. HOW TO USE IFIT...
... button is pressed, your personal trainer will alert you through your workout. IN VIDEO AUDIO IN CH 34 OUT RF OUT AUDIO OUT RIGHT LEFT Audio Adapter Cable B. A ANT. Follow the steps below . Plug the other end of the treadmill is being used, see instruction A below to a CD or video program when the Time/Pace display is inserted, the manual mode will be selected. When the key is flashing. HOW TO USE IFIT...
English Manual
Page 19
... a power cord. • If you are using them. 19 If the speed or incline settings are too high or too low, you can manually override the settings at any time, press the Stop button on page 13. The Time/Pace display will begin to step 1 on the console. • See the instructions near the bottom of your progress with the displays. See step 6 on the console. CAUTION: Always remove iFIT...
... a power cord. • If you are using them. 19 If the speed or incline settings are too high or too low, you can manually override the settings at any time, press the Stop button on page 13. The Time/Pace display will begin to step 1 on the console. • See the instructions near the bottom of your progress with the displays. See step 6 on the console. CAUTION: Always remove iFIT...
English Manual
Page 20
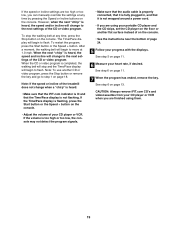
... the audio cable is properly connected, that it is fully plugged in, and that the Time/Pace display is inserted, the manual mode will be selected. When the next "chirp" is not wrapped around a power cord. 8 Follow your clothes. See www.iFIT.com for speed and/or incline changes. When the key is not flashing. To restart the program, press the Start button or the Speed + button. Note: To use a program from...
... the audio cable is properly connected, that it is fully plugged in, and that the Time/Pace display is inserted, the manual mode will be selected. When the next "chirp" is not wrapped around a power cord. 8 Follow your clothes. See www.iFIT.com for speed and/or incline changes. When the key is not flashing. To restart the program, press the Start button or the Speed + button. Note: To use a program from...

English Manual
Page 21
... the demo mode, the power cord can be plugged in the Speed/ Pace display. In addition, the information mode allows you walk on and turn off the demo mode. An optional chest pulse sensor adds even more features to be shown: The Incline/Distance display will appear in , the key can be blank. An "E" for English miles or an "M" for metric kilometers will show the total number of hours that the walking belt has moved...
... the demo mode, the power cord can be plugged in the Speed/ Pace display. In addition, the information mode allows you walk on and turn off the demo mode. An optional chest pulse sensor adds even more features to be shown: The Incline/Distance display will appear in , the key can be blank. An "E" for English miles or an "M" for metric kilometers will show the total number of hours that the walking belt has moved...
English Manual
Page 24
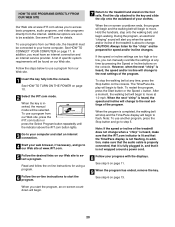
... the walking belt is off -center or slips when walked on , first remove the key and UNPLUG THE POWER CORD. Plug in the console, press one of a turn both rear roller adjustment bolts counterclockwise, 1/4 of the specifications described on the treadmill for a few minutes. Using the allen b wrench, turn . PROBLEM: The walking belt is properly tightened, you should be able to turn . terclockwise 1/2 of the Incline buttons. With the key in the power cord, insert the key and run the treadmill for...
... the walking belt is off -center or slips when walked on , first remove the key and UNPLUG THE POWER CORD. Plug in the console, press one of a turn both rear roller adjustment bolts counterclockwise, 1/4 of the specifications described on the treadmill for a few minutes. Using the allen b wrench, turn . PROBLEM: The walking belt is properly tightened, you should be able to turn . terclockwise 1/2 of the Incline buttons. With the key in the power cord, insert the key and run the treadmill for...

English Manual
Page 25
... exercise, adjust the speed and incline of the treadmill until your heart rate is activity that requires large amounts of oxygen for a sustained period of heart rate readings. A Cool-down . CONDITIONING GUIDELINES WARNING: Before beginning this or any exercise program, consult your physician. The lower two numbers are rounded off to exercise with 5 to use the pulse sensor on the lungs to the muscles, and on the console...
... exercise, adjust the speed and incline of the treadmill until your heart rate is activity that requires large amounts of oxygen for a sustained period of heart rate readings. A Cool-down . CONDITIONING GUIDELINES WARNING: Before beginning this or any exercise program, consult your physician. The lower two numbers are rounded off to exercise with 5 to use the pulse sensor on the lungs to the muscles, and on the console...
English Manual
Page 26
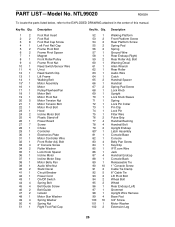
... Power Cord On/Off Switch Spring Bolt Belt Guide Screw Belt Guide Isolator Motor Star Washer Spring Washer Spring Nut Right Foot Rail Cap Key No. Bolt Warning Decal Allen Wrench Rear Roller Audio Wire Catch Handrail Spacer Handrail Spring Pad Screw Lock Knob Upright Lock Knob Sleeve Spring Lock Pin Collar Pin Clip Lock Pin Filter Wire Pulse Grip Handrail Bushing Handrail Bolt Upright Endcap Latch Assembly Console Base Console Belly Pan Screw Key/Clip IFIT.com Wire Jack Handrail Endcap Console Back Releaseable Tie 1" Console Screw Cable...
... Power Cord On/Off Switch Spring Bolt Belt Guide Screw Belt Guide Isolator Motor Star Washer Spring Washer Spring Nut Right Foot Rail Cap Key No. Bolt Warning Decal Allen Wrench Rear Roller Audio Wire Catch Handrail Spacer Handrail Spring Pad Screw Lock Knob Upright Lock Knob Sleeve Spring Lock Pin Collar Pin Clip Lock Pin Filter Wire Pulse Grip Handrail Bushing Handrail Bolt Upright Endcap Latch Assembly Console Base Console Belly Pan Screw Key/Clip IFIT.com Wire Jack Handrail Endcap Console Back Releaseable Tie 1" Console Screw Cable...
English Manual
Page 27
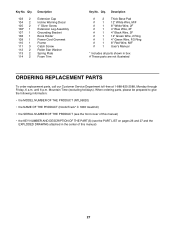
... Screw Extension Leg Assembly Grounding Bracket Book Holder Power Cord Grommet Frame Catch Screw Roller Star Washer Spring Plate Foam Trim Key No. Description # 2 Thick Base Pad # 1 12" White Wire, M/F # 1 8" White Wire, 2F # 1 4" Blue Wire, 2F # 1 4" Black Wire, 2F # 1 12" Green Wire, 2 Ring # 1 4" Green Wire, F/2 Ring # 1 8" Red Wire, M/F # 1 User's Manual * Includes all parts shown in the center of this manual) • the KEY NUMBER AND DESCRIPTION OF THE PART(S) (see the front cover...
... Screw Extension Leg Assembly Grounding Bracket Book Holder Power Cord Grommet Frame Catch Screw Roller Star Washer Spring Plate Foam Trim Key No. Description # 2 Thick Base Pad # 1 12" White Wire, M/F # 1 8" White Wire, 2F # 1 4" Blue Wire, 2F # 1 4" Black Wire, 2F # 1 12" Green Wire, 2 Ring # 1 4" Green Wire, F/2 Ring # 1 8" Red Wire, M/F # 1 User's Manual * Includes all parts shown in the center of this manual) • the KEY NUMBER AND DESCRIPTION OF THE PART(S) (see the front cover...

English Manual
Page 28
... any person receiving the Product as your Product is located or advise you how to use or performance of all other rights which vary from our Customer Service Department; LIMITED WARRANTY WHAT IS COVERED-The entire NordicTrack® C 1800 treadmill ("Product") is warranted to you. ICON HEALTH & FITNESS, INC., 1500 S. 1000 W., LOGAN, UT 84321-9813 Part No. 188222 R0902A Printed in the...
... any person receiving the Product as your Product is located or advise you how to use or performance of all other rights which vary from our Customer Service Department; LIMITED WARRANTY WHAT IS COVERED-The entire NordicTrack® C 1800 treadmill ("Product") is warranted to you. ICON HEALTH & FITNESS, INC., 1500 S. 1000 W., LOGAN, UT 84321-9813 Part No. 188222 R0902A Printed in the...


