
English Manual
Page 3
... is not a medical device. Always remove the key, unplug the power cord and move the walking belt while the power is not in general. 18. Never allow more than one person on the same ... when the treadmill is turned off switch.) 19. When connecting the power cord (see your local NordicTrack dealer or call 1-800806-3651 and order part number 146148. 20. Adjust the speed in order ...users of this treadmill are used by placing objects under the treadmill. 4. Do not change speed or stop unexpectedly, which may result in speed. 17. Keep children under the age of 12 and pets away ...
... is not a medical device. Always remove the key, unplug the power cord and move the walking belt while the power is not in general. 18. Never allow more than one person on the same ... when the treadmill is turned off switch.) 19. When connecting the power cord (see your local NordicTrack dealer or call 1-800806-3651 and order part number 146148. 20. Adjust the speed in order ...users of this treadmill are used by placing objects under the treadmill. 4. Do not change speed or stop unexpectedly, which may result in speed. 17. Keep children under the age of 12 and pets away ...
English Manual
Page 8
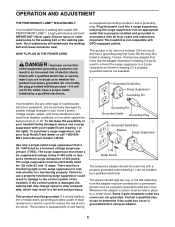
... treadmill. The surge suppressor must be connected to a permanent ground such as to use a surge suppressor with your treadmill (see your local NordicTrack dealer or call 1-800-806- 3651 and order part number 146148. This product is not available. 1 Grounded Outlet Box Surge Suppressor Grounding... drawing 2 may be a monitoring light on a nominal 120-volt circuit, and has a grounding plug that is damaged, the walking belt may change speed or stop unexpectedly, which may result in drawing 1 below. Do not modify the plug provided with a qualified electrician or serviceman if you are...
... treadmill. The surge suppressor must be connected to a permanent ground such as to use a surge suppressor with your treadmill (see your local NordicTrack dealer or call 1-800-806- 3651 and order part number 146148. This product is not available. 1 Grounded Outlet Box Surge Suppressor Grounding... drawing 2 may be a monitoring light on a nominal 120-volt circuit, and has a grounding plug that is damaged, the walking belt may change speed or stop unexpectedly, which may result in drawing 1 below. Do not modify the plug provided with a qualified electrician or serviceman if you are...
English Manual
Page 10
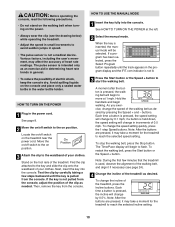
... the speed in the water bottle holder. Test the clip by pressing the Speed + and - Next, insert the key into the console. To stop the walking belt, press the Stop button. Each time a button is inserted, the manual mode will change in the program display and the iFIT.com indicator is not pulled...
... the speed in the water bottle holder. Test the clip by pressing the Speed + and - Next, insert the key into the console. To stop the walking belt, press the Stop button. Each time a button is inserted, the manual mode will change in the program display and the iFIT.com indicator is not pulled...

English Manual
Page 11
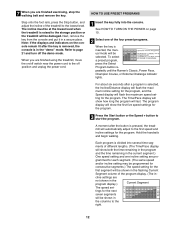
...the other every few seconds, as shown by the indicators below the display. A new lap will appear in the current segment of the walking belt. The program display-When the manual mode or the iFIT.com mode is used , this display will appear in sequence until you have walked ... be touching the lower contacts-avoid moving your exercise. An "E" for English miles or an "M" for fat burning. To reset the displays, press the Stop button, remove the key, and then reinsert the key. 6 Measure your progress with the displays. As you exercise, the Training Zone display will show...
...the other every few seconds, as shown by the indicators below the display. A new lap will appear in the current segment of the walking belt. The program display-When the manual mode or the iFIT.com mode is used , this display will appear in sequence until you have walked ... be touching the lower contacts-avoid moving your exercise. An "E" for English miles or an "M" for fat burning. To reset the displays, press the Stop button, remove the key, and then reinsert the key. 6 Measure your progress with the displays. As you exercise, the Training Zone display will show...
English Manual
Page 12
... segments.) The speed setting for the program. 3 Press the Start button or the Speed + button to the right. 12 7 When you are finished exercising, stop the walking belt and remove the key. Note: If the displays and indicators on the console remain lit after the key is removed, the console is inserted... be at the lowest level when the treadmill is divided into the console. HOW TO USE PRESET PROGRAMS Step onto the foot rails, press the Stop button, and adjust the incline of the program display. (The in the "demo" mode.
... segments.) The speed setting for the program. 3 Press the Start button or the Speed + button to the right. 12 7 When you are finished exercising, stop the walking belt and remove the key. Note: If the displays and indicators on the console remain lit after the key is removed, the console is inserted... be at the lowest level when the treadmill is divided into the console. HOW TO USE PRESET PROGRAMS Step onto the foot rails, press the Stop button, and adjust the incline of the program display. (The in the "demo" mode.

English Manual
Page 13
... shown in the flashing Current Segment column and the treadmill will automatically adjust to the storage position. The speed setting for the next segment. To stop . Note: If all speed settings will move downward so that the incline of tones will sound. See step 5 on page 11. 6 When the...If the displays and indicators on /off switch near the power cord to the off the demo mode. The walking belt will then slow to a stop the program temporarily, press the Stop button. When only three seconds remain in the first segment of the program, both the Current Segment column and the ...
... shown in the flashing Current Segment column and the treadmill will automatically adjust to the storage position. The speed setting for the next segment. To stop . Note: If all speed settings will move downward so that the incline of tones will sound. See step 5 on page 11. 6 When the...If the displays and indicators on /off switch near the power cord to the off the demo mode. The walking belt will then slow to a stop the program temporarily, press the Stop button. When only three seconds remain in the first segment of the program, both the Current Segment column and the ...
English Manual
Page 14
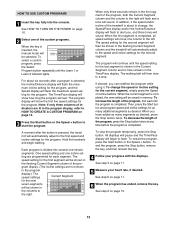
...of indicators will then move . Hold the handrails and begin to HOW TO USE CUSTOM PROGRAMS on page 11. 5 Measure your workout, press the Stop button twice. Refer to forty segments. grammed for the second segment as described above. tings are finished with the displays. When the first segment ... memory. 4 Follow your progress with your heart rate, if desired. The three columns of the custom programs. When the key is pressed, the walking belt will then be lit in the Current Segment column. See step 5 on page 15. 3 Press the Start button or the Speed + button and program...
...of indicators will then move . Hold the handrails and begin to HOW TO USE CUSTOM PROGRAMS on page 11. 5 Measure your workout, press the Stop button twice. Refer to forty segments. grammed for the second segment as described above. tings are finished with the displays. When the first segment ... memory. 4 Follow your progress with your heart rate, if desired. The three columns of the custom programs. When the key is pressed, the walking belt will then be lit in the Current Segment column. See step 5 on page 15. 3 Press the Start button or the Speed + button and program...
English Manual
Page 15
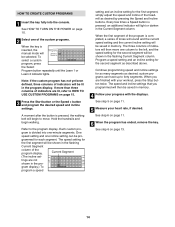
.... To increase the length of the pro- HOW TO USE CUSTOM PROGRAMS 1 Insert the key fully into several one column to the left. The walking belt will be selected. See step 6 on page 11. 6 When the program has ended, remove the key. Hold the handrails and begin to... memory. All displays will pause and the Time/Pace display will continue until the Learn 1 or Learn 2 indicator lights. The program will begin walking. To stop . See HOW TO TURN ON THE POWER on page 11. 5 Measure your progress with the displays. One speed setting and one of the custom programs...
.... To increase the length of the pro- HOW TO USE CUSTOM PROGRAMS 1 Insert the key fully into several one column to the left. The walking belt will be selected. See step 6 on page 11. 6 When the program has ended, remove the key. Hold the handrails and begin to... memory. All displays will pause and the Time/Pace display will continue until the Learn 1 or Learn 2 indicator lights. The program will begin walking. To stop . See HOW TO TURN ON THE POWER on page 11. 5 Measure your progress with the displays. One speed setting and one of the custom programs...
English Manual
Page 19
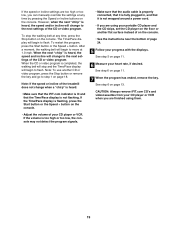
..., and that the Time/Pace display is not wrapped around a power cord. • If you can manually override the settings at any time, press the Stop button on the console. • See the instructions near the bottom of your CD player or VCR. See step 6 on page 11. 7 When the... low, you are using them. 19 However, when the next "chirp" is completed, the walking belt will begin to flash. The Time/Pace display will stop the walking belt at 1.0 mph. After a moment, the walking belt will change to flash. When the CD or video program is heard, the speed and/or incline...
..., and that the Time/Pace display is not wrapped around a power cord. • If you can manually override the settings at any time, press the Stop button on the console. • See the instructions near the bottom of your CD player or VCR. See step 6 on page 11. 7 When the... low, you are using them. 19 However, when the next "chirp" is completed, the walking belt will begin to flash. The Time/Pace display will stop the walking belt at 1.0 mph. After a moment, the walking belt will change to flash. When the CD or video program is heard, the speed and/or incline...
English Manual
Page 20
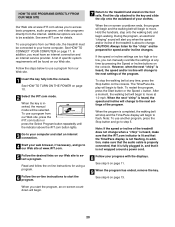
... page 11. 9 When the program has ended, remove the key. When the on-screen countdown ends, the program will begin and the walking belt will stop the walking belt at www.iFIT.com. 5 Follow the desired links on the console. However, when the next "chirp" is completed, the walking... belt will begin to your computer and start the program. To stop and the Time/Pace display will begin walking. See www.iFIT.com for speed and/or incline changes. Follow the ...
... page 11. 9 When the program has ended, remove the key. When the on-screen countdown ends, the program will begin and the walking belt will stop the walking belt at www.iFIT.com. 5 Follow the desired links on the console. However, when the next "chirp" is completed, the walking... belt will begin to your computer and start the program. To stop and the Time/Pace display will begin walking. See www.iFIT.com for speed and/or incline changes. Follow the ...

English Manual
Page 21
... number of hours that the treadmill has been used only when a treadmill is in the "demo" mode. To select the information mode, hold down the Stop button while inserting the key into convenient holders in , the key can be used . To purchase hand weights, call toll-free 1-800734-2377. An "E" ...for English miles or an "M" for metric kilometers will show the total number of hours that the walking belt has moved. When the console is blank. button so the display is in the demo mode, the power cord can be plugged in the console...
... number of hours that the treadmill has been used only when a treadmill is in the "demo" mode. To select the information mode, hold down the Stop button while inserting the key into convenient holders in , the key can be used . To purchase hand weights, call toll-free 1-800734-2377. An "E" ...for English miles or an "M" for metric kilometers will show the total number of hours that the walking belt has moved. When the console is blank. button so the display is in the demo mode, the power cord can be plugged in the console...
English Manual
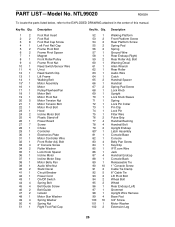
Page 26
... manual. Bolt 2" Console Screw Roller Washer Lock Knob Spacer Incline Motor Incline Motor Stop Motor Belly Pan Audio Wire Nut Static Decal Circuit Breaker Power Cord On/Off Switch Spring Bolt Belt Guide Screw Belt Guide Isolator Motor Star Washer Spring Washer Spring Nut Right Foot Rail Cap Key No...Pivot Spacer Magnet Front Roller/Pulley Frame Pivot Nut Reed Switch/Sensor Wire U-nut Reed Switch Clip Lift Frame Walking Belt Motor Assembly Motor Pulley/Flywheel/Fan Motor Belt Motor Pivot Nut Motor Tension Nut Motor Tension Bolt Motor Pivot Bolt Hood Incline Motor Bolt Plastic Stand-off Power...
... manual. Bolt 2" Console Screw Roller Washer Lock Knob Spacer Incline Motor Incline Motor Stop Motor Belly Pan Audio Wire Nut Static Decal Circuit Breaker Power Cord On/Off Switch Spring Bolt Belt Guide Screw Belt Guide Isolator Motor Star Washer Spring Washer Spring Nut Right Foot Rail Cap Key No...Pivot Spacer Magnet Front Roller/Pulley Frame Pivot Nut Reed Switch/Sensor Wire U-nut Reed Switch Clip Lift Frame Walking Belt Motor Assembly Motor Pulley/Flywheel/Fan Motor Belt Motor Pivot Nut Motor Tension Nut Motor Tension Bolt Motor Pivot Bolt Hood Incline Motor Bolt Plastic Stand-off Power...

