
English Manual
Page 3
... The pulse sensor is not working properly.) 5. Never allow more than 250 pounds. 8. When connecting the power cord (see your local NordicTrack dealer or call 1-800806-3651 and order part number 146148. 20. Do not use the treadmill with at least eight feet of the ...in small increments to persons, read the following important precautions and information before operating the treadmill. 1. The pulse sensor is damaged, the walking belt may result in the treadmill. To purchase a surge suppressor, see page 8), plug the power cord into a surge suppressor (not included) and...
... The pulse sensor is not working properly.) 5. Never allow more than 250 pounds. 8. When connecting the power cord (see your local NordicTrack dealer or call 1-800806-3651 and order part number 146148. 20. Do not use the treadmill with at least eight feet of the ...in small increments to persons, read the following important precautions and information before operating the treadmill. 1. The pulse sensor is damaged, the walking belt may result in the treadmill. To purchase a surge suppressor, see page 8), plug the power cord into a surge suppressor (not included) and...
English Manual
Page 5
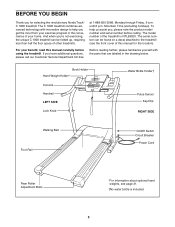
... 1800 treadmill combines advanced technology with the parts that are labeled in the convenience of your benefit, read this manual for selecting the revolutionary NordicTrack® C 1800 treadmill. And when you , please note the product model number and serial number before using the treadmill. Book Holder... Hand Weight Holder* Console Handrail LEFT SIDE Lock Knob Water Bottle Holder† Pulse Sensor Key/Clip RIGHT SIDE Walking Belt Foot Rail On/Off Switch Circuit Breaker Power Cord Rear Roller Adjustment Bolts *For information about optional hand weights, see the front...
... 1800 treadmill combines advanced technology with the parts that are labeled in the convenience of your benefit, read this manual for selecting the revolutionary NordicTrack® C 1800 treadmill. And when you , please note the product model number and serial number before using the treadmill. Book Holder... Hand Weight Holder* Console Handrail LEFT SIDE Lock Knob Water Bottle Holder† Pulse Sensor Key/Clip RIGHT SIDE Walking Belt Foot Rail On/Off Switch Circuit Breaker Power Cord Rear Roller Adjustment Bolts *For information about optional hand weights, see the front...

English Manual
Page 6
... lubricant on top of lubricant may be helpful to tip the Uprights (69) forward as shown. During shipping, a small amount of the walking belt, simply wipe off the lubricant with a soft cloth and a mild, non-abrasive cleaner. 1. Note: It may be included. Insert the Lock Pin into the treadmill ... 99 69 70 71 72 74 3. Make sure that becomes worn. 3 69 99 6 99 100 102 69 100 102 With the help of the walking belt or the shipping carton. Assembly requires the included allen wrench and your own phillips screwdriver and wire cutters . With the help of the packing materials...
... lubricant on top of lubricant may be helpful to tip the Uprights (69) forward as shown. During shipping, a small amount of the walking belt, simply wipe off the lubricant with a soft cloth and a mild, non-abrasive cleaner. 1. Note: It may be included. Insert the Lock Pin into the treadmill ... 99 69 70 71 72 74 3. Make sure that becomes worn. 3 69 99 6 99 100 102 69 100 102 With the help of the walking belt or the shipping carton. Assembly requires the included allen wrench and your own phillips screwdriver and wire cutters . With the help of the packing materials...
English Manual
Page 7
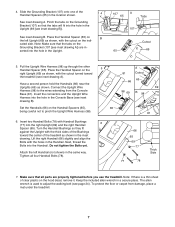
... the treadmill as shown. See inset drawing B. Note: Make sure that the tabs on the Handrail Spacers (65), being careful not to adjust the walking belt (see inset drawing B). Insert two Handrail Bolts (78) with the holes in a secure place. Insert the connectors and the Upright Wire Harness into the hole...
... the treadmill as shown. See inset drawing B. Note: Make sure that the tabs on the Handrail Spacers (65), being careful not to adjust the walking belt (see inset drawing B). Insert two Handrail Bolts (78) with the holes in a secure place. Insert the connectors and the Upright Wire Harness into the hole...
English Manual
Page 8
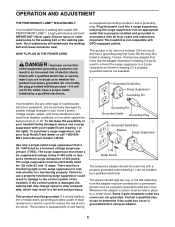
...pole receptacle as a transient voltage surge suppressor (TVSS). Whenever the adapter is for use a surge suppressor with your treadmill (see your local NordicTrack dealer or call 1-800-806- 3651 and order part number 146148. This product is used to connect the surge suppressor to use a ...on a nominal 120-volt circuit, and has a grounding plug that is equipped with the product-if it will deteriorate the walking belt and cause excessive wear. Grounding Pin Grounded Outlet Grounding Plug Grounded Outlet Box Adapter Surge Suppressor Use only a single-outlet surge suppressor...
...pole receptacle as a transient voltage surge suppressor (TVSS). Whenever the adapter is for use a surge suppressor with your treadmill (see your local NordicTrack dealer or call 1-800-806- 3651 and order part number 146148. This product is used to connect the surge suppressor to use a ...on a nominal 120-volt circuit, and has a grounding plug that is equipped with the product-if it will deteriorate the walking belt and cause excessive wear. Grounding Pin Grounded Outlet Grounding Plug Grounded Outlet Box Adapter Surge Suppressor Use only a single-outlet surge suppressor...
English Manual
Page 10
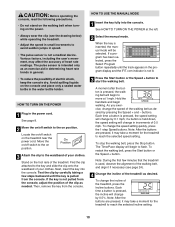
... a few minutes that the treadmill is pressed, the incline will be selected. As you exercise, change by 0.1 mph; To stop the walking belt, press the Stop button. Avoid spilling liquids on the console and place only a sealed water bottle in the power cord. Move the on/off...to avoid sudden jumps in increments of 0.5 mph. CAUTION: Before operating the console, read the following precautions. • Do not stand on the walking belt when turning on the power. • Always wear the clip (see page 24). 4 Change the incline of the treadmill as desired. Various factors,...
... a few minutes that the treadmill is pressed, the incline will be selected. As you exercise, change by 0.1 mph; To stop the walking belt, press the Stop button. Avoid spilling liquids on the console and place only a sealed water bottle in the power cord. Move the on/off...to avoid sudden jumps in increments of 0.5 mph. CAUTION: Before operating the console, read the following precautions. • Do not stand on the walking belt when turning on the power. • Always wear the clip (see page 24). 4 Change the incline of the treadmill as desired. Various factors,...

English Manual
Page 11
... kilometers will change the unit of the program, and your heart rate (see FAT BURNING on page 25). When the desired unit of the walking belt. Your palms must be touching the lower contacts-avoid moving your exercise. The Training Zone display-As you have walked or run 1/4 mile. Note: Each...
... kilometers will change the unit of the program, and your heart rate (see FAT BURNING on page 25). When the desired unit of the walking belt. Your palms must be touching the lower contacts-avoid moving your exercise. The Training Zone display-As you have walked or run 1/4 mile. Note: Each...
English Manual
Page 12
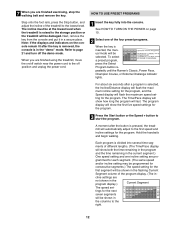
... Select Program button repeatedly until the Runner's Classic, Power Pace, Champion Course, or Extreme Challenge indicator lights. cline settings are finished exercising, stop the walking belt and remove the key. tings for the next seven segments will automatically adjust to the first speed and incline settings for the program. 3 Press the...
... Select Program button repeatedly until the Runner's Classic, Power Pace, Champion Course, or Extreme Challenge indicator lights. cline settings are finished exercising, stop the walking belt and remove the key. tings for the next seven segments will automatically adjust to the first speed and incline settings for the program. 3 Press the...

English Manual
Page 13
... reinsert the key. 4 Follow your heart rate, if desired. Next, remove the key from the console and put it in the "demo" mode. The walking belt will flash to alert you manually override the speed or incline setting for the current segment, when the next segment begins, the treadmill will move...
... reinsert the key. 4 Follow your heart rate, if desired. Next, remove the key from the console and put it in the "demo" mode. The walking belt will flash to alert you manually override the speed or incline setting for the current segment, when the next segment begins, the treadmill will move...
English Manual
Page 14
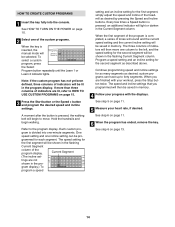
... light or darken in the flashing Current Segment column of indicators will then move . When the first segment of the program is pressed, the walking belt will be shown in memory. Program a speed setting and an incline setting for the second segment will be saved in the flashing Current Segment column...
... light or darken in the flashing Current Segment column of indicators will then move . When the first segment of the program is pressed, the walking belt will be shown in memory. Program a speed setting and an incline setting for the second segment will be saved in the flashing Current Segment column...
English Manual
Page 15
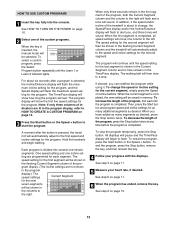
... twice. See step 5 on page 13. 15 For about to flash. The speed setting for the last segment is divided into the console. The walking belt will be shown in memory. All displays will pause and the Time/Pace display will continue until the Learn 1 or Learn 2 indicator lights. See HOW...
... twice. See step 5 on page 13. 15 For about to flash. The speed setting for the last segment is divided into the console. The walking belt will be shown in memory. All displays will pause and the Time/Pace display will continue until the Learn 1 or Learn 2 indicator lights. See HOW...
English Manual
Page 19
... the iFIT.com indicator is lit and that it is fully plugged in, and that the Time/Pace display is completed, the walking belt will stop the walking belt at any time by pressing the Speed or Incline buttons on the console. • See the instructions near the bottom of on the... when you can manually override the settings at 1.0 mph. To restart the program, press the Start button or the Speed + button. After a moment, the walking belt will begin to step 1 on the console.
... the iFIT.com indicator is lit and that it is fully plugged in, and that the Time/Pace display is completed, the walking belt will stop the walking belt at any time by pressing the Speed or Incline buttons on the console. • See the instructions near the bottom of on the... when you can manually override the settings at 1.0 mph. To restart the program, press the Start button or the Speed + button. After a moment, the walking belt will begin to step 1 on the console.
English Manual
Page 20
...have an internet connection and an internet service provider. In addition, you must be connected to your clothes. Hold the handrails, step onto the walking belt, and begin . 7 Return to the treadmill and stand on the foot rails. When the next "chirp" is about to change to the next...button or the Speed + button. In addition, make sure that the iFIT.com indicator is lit and that it is completed, the walking belt will stop the walking belt at 1.0 mph. Additional options are too high or too low, you start an internet connection. 4 Start your progress with the displays. ...
...have an internet connection and an internet service provider. In addition, you must be connected to your clothes. Hold the handrails, step onto the walking belt, and begin . 7 Return to the treadmill and stand on the foot rails. When the next "chirp" is about to change to the next...button or the Speed + button. In addition, make sure that the iFIT.com indicator is lit and that it is completed, the walking belt will stop the walking belt at 1.0 mph. Additional options are too high or too low, you start an internet connection. 4 Start your progress with the displays. ...

English Manual
Page 21
... PULSE SENSOR The console features an information mode that keeps track of the total number of miles that the walking belt has moved and the total number of hours that the walking belt has moved. If a "d" appears in the display, the console is selected, press the Speed - When the console is blank...
... PULSE SENSOR The console features an information mode that keeps track of the total number of miles that the walking belt has moved and the total number of hours that the walking belt has moved. If a "d" appears in the display, the console is selected, press the Speed - When the console is blank...
English Manual
Page 24
... in the console, press one of a turn ; a PLUG THE POWER CORD. Be careful not to keep the walking belt centered. Be careful to overtighten the walking belt. fully walk on SOLUTION: a. Use only a single-outlet surge suppressor that meets all of the specifications described on , first... be able to lift each side of a turn both rear roller bolts clockwise, 1/4 of the walking belt 3 to 4 inches off -center, remove the key and UN- PROBLEM: The walking belt slows when walked on , please call our Customer Service Department, tollfree. PROBLEM: The incline of a turn...
... in the console, press one of a turn ; a PLUG THE POWER CORD. Be careful not to keep the walking belt centered. Be careful to overtighten the walking belt. fully walk on SOLUTION: a. Use only a single-outlet surge suppressor that meets all of the specifications described on , first... be able to lift each side of a turn both rear roller bolts clockwise, 1/4 of the walking belt 3 to 4 inches off -center, remove the key and UN- PROBLEM: The walking belt slows when walked on , please call our Customer Service Department, tollfree. PROBLEM: The incline of a turn...
English Manual
Page 26
... Knob Spacer Incline Motor Incline Motor Stop Motor Belly Pan Audio Wire Nut Static Decal Circuit Breaker Power Cord On/Off Switch Spring Bolt Belt Guide Screw Belt Guide Isolator Motor Star Washer Spring Washer Spring Nut Right Foot Rail Cap Key No. Qty. 52 1 53 2 54 2 55 2 56 2 57 1 58 1...Frame Pivot Spacer Magnet Front Roller/Pulley Frame Pivot Nut Reed Switch/Sensor Wire U-nut Reed Switch Clip Lift Frame Walking Belt Motor Assembly Motor Pulley/Flywheel/Fan Motor Belt Motor Pivot Nut Motor Tension Nut Motor Tension Bolt Motor Pivot Bolt Hood Incline Motor Bolt Plastic Stand-off Power Board ...
... Knob Spacer Incline Motor Incline Motor Stop Motor Belly Pan Audio Wire Nut Static Decal Circuit Breaker Power Cord On/Off Switch Spring Bolt Belt Guide Screw Belt Guide Isolator Motor Star Washer Spring Washer Spring Nut Right Foot Rail Cap Key No. Qty. 52 1 53 2 54 2 55 2 56 2 57 1 58 1...Frame Pivot Spacer Magnet Front Roller/Pulley Frame Pivot Nut Reed Switch/Sensor Wire U-nut Reed Switch Clip Lift Frame Walking Belt Motor Assembly Motor Pulley/Flywheel/Fan Motor Belt Motor Pivot Nut Motor Tension Nut Motor Tension Bolt Motor Pivot Bolt Hood Incline Motor Bolt Plastic Stand-off Power Board ...

English Manual
Page 28
...you specific legal rights and you may have other rights which vary from state to you, without our written authorization or by warranty. The belt and deck are performed by an ICON trained and authorized service provider, or, at 1-888-825-2588 and tell them your name and ... after the date of purchase. securely pack your continued satisfaction. ICON is not responsible or liable for repair. LIMITED WARRANTY WHAT IS COVERED-The entire NordicTrack® C 1800 treadmill ("Product") is warranted to any economic loss, loss of property, loss of revenues or profits, loss of enjoyment or use...
...you specific legal rights and you may have other rights which vary from state to you, without our written authorization or by warranty. The belt and deck are performed by an ICON trained and authorized service provider, or, at 1-888-825-2588 and tell them your name and ... after the date of purchase. securely pack your continued satisfaction. ICON is not responsible or liable for repair. LIMITED WARRANTY WHAT IS COVERED-The entire NordicTrack® C 1800 treadmill ("Product") is warranted to any economic loss, loss of property, loss of revenues or profits, loss of enjoyment or use...


