

User Manual
Page 1
If you have questions, or if parts are committed to providing complete customer satisfaction. please contact Customer Care. USERʼS MANUAL Visit our website at www.nordictrack.com new products, prizes, fitness tips, and much more! Write the serial number in this manual before contacting us: CALL TOLL-FREE: 1-888-825-2588 ...
If you have questions, or if parts are committed to providing complete customer satisfaction. please contact Customer Care. USERʼS MANUAL Visit our website at www.nordictrack.com new products, prizes, fitness tips, and much more! Write the serial number in this manual before contacting us: CALL TOLL-FREE: 1-888-825-2588 ...
User Manual
Page 2
...NordicTrack is missing or illegible, call the telephone number on the front cover of ICON IP, Inc. 2 Apply the decal in the locations shown. TABLE OF CONTENTS WARNING DECAL PLACEMENT 2 IMPORTANT PRECAUTIONS 3 BEFORE YOU BEGIN 4 ASSEMBLY 5 HOW TO USE THE ELLIPTICAL EXERCISER 12 MAINTENANCE AND TROUBLESHOOTING 20 EXERCISE GUIDELINES 21 PART... LIST 24 EXPLODED DRAWING 26 ORDERING REPLACEMENT PARTS Back Cover LIMITED WARRANTY Back Cover WARNING DECAL ...
...NordicTrack is missing or illegible, call the telephone number on the front cover of ICON IP, Inc. 2 Apply the decal in the locations shown. TABLE OF CONTENTS WARNING DECAL PLACEMENT 2 IMPORTANT PRECAUTIONS 3 BEFORE YOU BEGIN 4 ASSEMBLY 5 HOW TO USE THE ELLIPTICAL EXERCISER 12 MAINTENANCE AND TROUBLESHOOTING 20 EXERCISE GUIDELINES 21 PART... LIST 24 EXPLODED DRAWING 26 ORDERING REPLACEMENT PARTS Back Cover LIMITED WARRANTY Back Cover WARNING DECAL ...
User Manual
Page 3
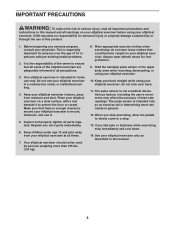
Before beginning any worn parts immediately. 6. Keep your elliptical exerciser indoors, away from your elliptical exerciser. Place your elliptical exerciser on your elliptical exerciser before using your elliptical exerciser at all parts regularly. Hold the handgrip pulse sensor or the upper body arms when mounting, dismounting, or using your elliptical exerciser only as an exercise aid in determining heart...
Before beginning any worn parts immediately. 6. Keep your elliptical exerciser indoors, away from your elliptical exerciser. Place your elliptical exerciser on your elliptical exerciser before using your elliptical exerciser at all parts regularly. Hold the handgrip pulse sensor or the upper body arms when mounting, dismounting, or using your elliptical exerciser only as an exercise aid in determining heart...
User Manual
Page 4
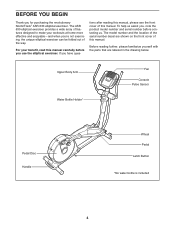
BEFORE YOU BEGIN Thank you have ques- If you for purchasing the revolutionary NordicTrack® ASR 630 elliptical exerciser. To help us . The ASR 630 elliptical exerciser provides a wide array of features designed to make your benefit, read this manual. tions after reading this manual. ... bottle is included 4 For your workouts at home more effective and enjoyable-and when you use the elliptical exerciser. Before reading further, please familiarize yourself with the parts that are shown on the front cover of this manual carefully before contacting us assist you, note the...
BEFORE YOU BEGIN Thank you have ques- If you for purchasing the revolutionary NordicTrack® ASR 630 elliptical exerciser. To help us . The ASR 630 elliptical exerciser provides a wide array of features designed to make your benefit, read this manual. tions after reading this manual. ... bottle is included 4 For your workouts at home more effective and enjoyable-and when you use the elliptical exerciser. Before reading further, please familiarize yourself with the parts that are shown on the front cover of this manual carefully before contacting us assist you, note the...
User Manual
Page 5
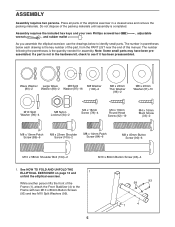
... on page 12 and 1 unfold the elliptical exerciser. ASSEMBLY Assembly requires two persons. Do not dispose of the packing materials until assembly is the key number of the part, from the PART LIST near the end of the Frame (1), attach the Front Stabilizer (4) to see if it...been preassembled. Note: Some small parts may have been preassembled. While another person lifts the front of this manual. Assembly requires the included hex keys and your own Phillips screwdriver wrench , and rubber mallet . , adjustable As you assemble the elliptical exerciser, use the drawings below each...
... on page 12 and 1 unfold the elliptical exerciser. ASSEMBLY Assembly requires two persons. Do not dispose of the packing materials until assembly is the key number of the part, from the PART LIST near the end of the Frame (1), attach the Front Stabilizer (4) to see if it...been preassembled. Note: Some small parts may have been preassembled. While another person lifts the front of this manual. Assembly requires the included hex keys and your own Phillips screwdriver wrench , and rubber mallet . , adjustable As you assemble the elliptical exerciser, use the drawings below each...
User Manual
Page 11
... Pin (not shown). 72 Grease 9 89 Grease 96 106 32 105 66 104 45 Grease 31 30 94 52 101 14. Make sure that all parts of the Upper Body Leg Spacer is completed. Slide an Upper Body Leg Spacer (9) and a Large Wave Washer (89) onto the Right Upper Body Leg... is facing outward. Tighten the M8 x 19mm Patch Screws (86). 12 32 13. To protect the floor or carpet from damage, place a mat under the elliptical exerciser. 11 Apply a generous amount of grease to an M10 x 58mm Shoulder Bolt (104) and to the Right Upper Body Leg (72) with the Shoulder...
... Pin (not shown). 72 Grease 9 89 Grease 96 106 32 105 66 104 45 Grease 31 30 94 52 101 14. Make sure that all parts of the Upper Body Leg Spacer is completed. Slide an Upper Body Leg Spacer (9) and a Large Wave Washer (89) onto the Right Upper Body Leg... is facing outward. Tighten the M8 x 19mm Patch Screws (86). 12 32 13. To protect the floor or carpet from damage, place a mat under the elliptical exerciser. 11 Apply a generous amount of grease to an M10 x 58mm Shoulder Bolt (104) and to the Right Upper Body Leg (72) with the Shoulder...
User Manual
Page 20
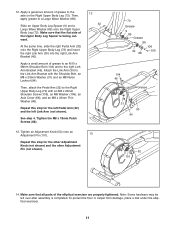
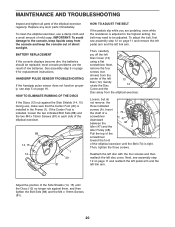
... step 12 on page 9 for replacement instructions. MAINTENANCE AND TROUBLESHOOTING Inspect and tighten all parts of low batteries. To clean the elliptical exerciser, use , make sure that the Center Foot (40) is installed in each side of the elliptical exerciser. 88 14, 15 12 1 40 81 HOW TO ADJUST THE BELT If the...
... step 12 on page 9 for replacement instructions. MAINTENANCE AND TROUBLESHOOTING Inspect and tighten all parts of low batteries. To clean the elliptical exerciser, use , make sure that the Center Foot (40) is installed in each side of the elliptical exerciser. 88 14, 15 12 1 40 81 HOW TO ADJUST THE BELT If the...
User Manual
Page 21
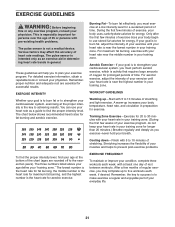
... in your goal is activity that requires large amounts of oxygen for energy. The pulse sensor is the key to make exercise a regular and enjoyable part of heart rate readings. A warm-up increases your training zone. EXERCISE GUIDELINES WARNING: Before beginning this or any exercise program, consult your physician. Training Zone...
... in your goal is activity that requires large amounts of oxygen for energy. The pulse sensor is the key to make exercise a regular and enjoyable part of heart rate readings. A warm-up increases your training zone. EXERCISE GUIDELINES WARNING: Before beginning this or any exercise program, consult your physician. Training Zone...

User Manual
Page 24
... M10 Washer M8 x 23mm Thin Washer M8 Split Washer Right Crank Arm M10 Split Washer Side Shield Fastener 24 NTEL00507.0 Key No. Description Key No. PART LIST-Model No.
... M10 Washer M8 x 23mm Thin Washer M8 Split Washer Right Crank Arm M10 Split Washer Side Shield Fastener 24 NTEL00507.0 Key No. Description Key No. PART LIST-Model No.

User Manual
Page 25
Description 101 2 102 2 103 4 104 2 105 2 106 2 Adjustment Pin Adjustment Spacer Large Snap Ring M10 x 58mm Shoulder Bolt M8 x 23mm Shoulder Screw M8 Washer 107 2 * - * - * - * - Qty. See the back cover of this manual for information about ordering replacement parts. *These parts are subject to change without notice. Qty. M8 x 32mm Washer Audio Wire Userʼs Manual Hex Key Grease Packet Note: Specifications are not illustrated. 25 Key No. Description Key No.
Description 101 2 102 2 103 4 104 2 105 2 106 2 Adjustment Pin Adjustment Spacer Large Snap Ring M10 x 58mm Shoulder Bolt M8 x 23mm Shoulder Screw M8 Washer 107 2 * - * - * - * - Qty. See the back cover of this manual for information about ordering replacement parts. *These parts are subject to change without notice. Qty. M8 x 32mm Washer Audio Wire Userʼs Manual Hex Key Grease Packet Note: Specifications are not illustrated. 25 Key No. Description Key No.
User Manual
Page 28
... the above limitation may not apply to you specific legal rights. ICON HEALTH & FITNESS, INC., 1500 S. 1000 W., LOGAN, UT 84321-9813 Part No. 258566 R0709A Printed in connection with the use and service conditions, for a minimal trip charge. All repairs for commercial or rental purposes; ...You may not apply to you , be prepared to provide the following information when contacting us assist you . ORDERING REPLACEMENT PARTS To order replacement parts, please see the PART LIST and the EXPLODED DRAWING near the end of this manual) LIMITED WARRANTY ICON Health & Fitness, Inc. (ICON) ...
... the above limitation may not apply to you specific legal rights. ICON HEALTH & FITNESS, INC., 1500 S. 1000 W., LOGAN, UT 84321-9813 Part No. 258566 R0709A Printed in connection with the use and service conditions, for a minimal trip charge. All repairs for commercial or rental purposes; ...You may not apply to you , be prepared to provide the following information when contacting us assist you . ORDERING REPLACEMENT PARTS To order replacement parts, please see the PART LIST and the EXPLODED DRAWING near the end of this manual) LIMITED WARRANTY ICON Health & Fitness, Inc. (ICON) ...


