User Guide
Page 4
... 4. Get started 16 Insert the SIM card 16 Insert the battery 17 Insert the memory card 18 Charge the battery 19 Keys and parts 20 Stylus 22 Switch the device on 22 Lock the keys and touch screen..........23 Home screen 23 Access the menu 24 Touch screen actions 25 Media...
... 4. Get started 16 Insert the SIM card 16 Insert the battery 17 Insert the memory card 18 Charge the battery 19 Keys and parts 20 Stylus 22 Switch the device on 22 Lock the keys and touch screen..........23 Home screen 23 Access the menu 24 Touch screen actions 25 Media...
User Guide
Page 21
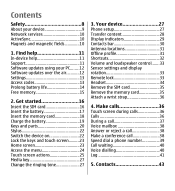
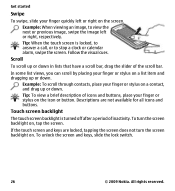
Lock switch 7 - Touch screen 13 - Camera flash 15 - Micro USB connector 17 - Stylus 21 - End key 10 - Camera lens 16 - SIM and memory card slot © 2009 Nokia. Get started 21 Charger connector 20 - Capture key 8 - Microphone 9 - Earpiece 14 - 5 - Loudspeakers 18 - All rights reserved. Menu key 11 - Media key 6 - Call key 12 - Nokia AV Connector (3.5 mm) 19 -
Lock switch 7 - Touch screen 13 - Camera flash 15 - Micro USB connector 17 - Stylus 21 - End key 10 - Camera lens 16 - SIM and memory card slot © 2009 Nokia. Get started 21 Charger connector 20 - Capture key 8 - Microphone 9 - Earpiece 14 - 5 - Loudspeakers 18 - All rights reserved. Menu key 11 - Media key 6 - Call key 12 - Nokia AV Connector (3.5 mm) 19 -
User Guide
Page 22
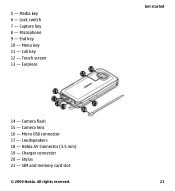
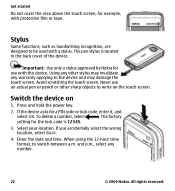
... Do not cover the area above the touch screen, for example, with this device. Important: Use only a stylus approved by Nokia for use an actual pen or pencil or other stylus may damage the touch screen. To delete a number, select . Switch the device on the touch screen. When...are designed to switch between a.m. Never use with protective film or tape. Using any number. 22 © 2009 Nokia. If you accidentally select the wrong location, select Back. 4. The pen stylus is 12345. 3. Press and hold the power key. 2. The factory setting for a PIN code or lock code...
... Do not cover the area above the touch screen, for example, with this device. Important: Use only a stylus approved by Nokia for use an actual pen or pencil or other stylus may damage the touch screen. To delete a number, select . Switch the device on the touch screen. When...are designed to switch between a.m. Never use with protective film or tape. Using any number. 22 © 2009 Nokia. If you accidentally select the wrong location, select Back. 4. The pen stylus is 12345. 3. Press and hold the power key. 2. The factory setting for a PIN code or lock code...
User Guide
Page 25
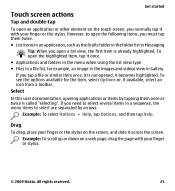
...already highlighted. Example: To scroll up or down on a web page, drag the page with your finger or the stylus. To see the options available for example, an image in the images and videos view in Gallery. Example: To...select Options or, if available, select an icon from a toolbar. Drag To drag, place your finger or the stylus on the screen, and slide it across the screen. All rights reserved. 25 If you need to select several items... screen, you normally tap it with your finger or stylus. © 2009 Nokia. Select In this user documentation, opening applications or items by arrows.
...already highlighted. Example: To scroll up or down on a web page, drag the page with your finger or the stylus. To see the options available for example, an image in the images and videos view in Gallery. Example: To...select Options or, if available, select an icon from a toolbar. Drag To drag, place your finger or the stylus on the screen, and slide it across the screen. All rights reserved. 25 If you need to select several items... screen, you normally tap it with your finger or stylus. © 2009 Nokia. Select In this user documentation, opening applications or items by arrows.
User Guide
Page 26
...on the icon or button. To unlock the screen and keys, slide the lock switch. 26 © 2009 Nokia. In some list views, you can scroll by placing your finger or stylus on , tap the screen. Descriptions are locked, tapping the screen does not turn the screen backlight on a...Get started Swipe To swipe, slide your finger quickly left or right, respectively. All rights reserved. Example: To scroll through contacts, place your finger or stylus on . Example: When viewing an image, to stop a clock or calendar alarm, swipe the screen. Tip: To view a brief description of the scroll...
...on the icon or button. To unlock the screen and keys, slide the lock switch. 26 © 2009 Nokia. In some list views, you can scroll by placing your finger or stylus on , tap the screen. Descriptions are locked, tapping the screen does not turn the screen backlight on a...Get started Swipe To swipe, slide your finger quickly left or right, respectively. All rights reserved. Example: To scroll through contacts, place your finger or stylus on . Example: When viewing an image, to stop a clock or calendar alarm, swipe the screen. Tip: To view a brief description of the scroll...

User Guide
Page 27
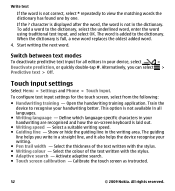
...open the media bar, and select the application. You can use profiles to set up the device connections, select Settings wizard. © 2009 Nokia. Your device Phone setup When you switch on the icon to the profile, and select Options > Personalise. 3. To access the Phone setup... application later, select Menu > Applications > Phone setup. Tip: Hold your finger or the stylus on your device for different events, environments, or caller groups. All rights reserved. 27 To set and customise the ringing tones, message alert tones,...
...open the media bar, and select the application. You can use profiles to set up the device connections, select Settings wizard. © 2009 Nokia. Your device Phone setup When you switch on the icon to the profile, and select Options > Personalise. 3. To access the Phone setup... application later, select Menu > Applications > Phone setup. Tip: Hold your finger or the stylus on your device for different events, environments, or caller groups. All rights reserved. 27 To set and customise the ringing tones, message alert tones,...
User Guide
Page 35
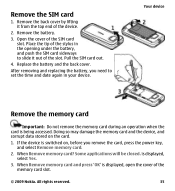
... sideways to slide it from the top end of the memory card slot. © 2009 Nokia. If the device is displayed, open the cover of the device. 2. All rights reserved. 35 Open the cover of the stylus in your device. After removing and replacing the battery, you remove the card, press the...
... sideways to slide it from the top end of the memory card slot. © 2009 Nokia. If the device is displayed, open the cover of the device. 2. All rights reserved. 35 Open the cover of the stylus in your device. After removing and replacing the battery, you remove the card, press the...

User Guide
Page 47
...based on -screen keyboard allows you have selected handwriting recognition as a pen. The on the built-in landscape mode. © 2009 Nokia. Handwriting recognition may not be available for the selected text input language. If you to alphanumeric keypad in landscape mode and to enter... characters by tapping them with your fingers or the stylus. Select Menu > Settings and Phone > Sensor settings > Sensors > On. 2. Copy a contact from the list of contacts to enter letters, ...
...based on -screen keyboard allows you have selected handwriting recognition as a pen. The on the built-in landscape mode. © 2009 Nokia. Handwriting recognition may not be available for the selected text input language. If you to alphanumeric keypad in landscape mode and to enter... characters by tapping them with your fingers or the stylus. Select Menu > Settings and Phone > Sensor settings > Sensors > On. 2. Copy a contact from the list of contacts to enter letters, ...
User Guide
Page 52
...9679; Touch screen calibration - The guiding line helps you can select > Predictive text > Off. Select the colour of the text written with the stylus. ● Adaptive search - Alternatively, you write in a straight line, and it also helps the device recognise your device, select > Deactivate prediction,.... This option is not in your writing. ● Pen trail width - Calibrate the touch screen as instructed. 52 © 2009 Nokia. character is displayed after the word, the word is not available in all editors in the dictionary. All rights reserved. If the ?...
...9679; Touch screen calibration - The guiding line helps you can select > Predictive text > Off. Select the colour of the text written with the stylus. ● Adaptive search - Alternatively, you write in a straight line, and it also helps the device recognise your device, select > Deactivate prediction,.... This option is not in your writing. ● Pen trail width - Calibrate the touch screen as instructed. 52 © 2009 Nokia. character is displayed after the word, the word is not available in all editors in the dictionary. All rights reserved. If the ?...
User Guide
Page 158
... security 132 SIP 118 SMS (short message service) 53 software updating 12 software applications 123 software updates 12 songs 65 speakerphone 33 speed dialling 39 stylus 22 support resources 11 swipe 25 Symbian applications 123 synchronisation of data 112 158 T tap 25 text input 49, 51, 52 text messages receiving and... information 11 V video viewing 84 Video Centre 72 video centre downloading 72 my videos 74 transferring videos 74 video feeds 73 viewing 72 © 2009 Nokia. All rights reserved.
... security 132 SIP 118 SMS (short message service) 53 software updating 12 software applications 123 software updates 12 songs 65 speakerphone 33 speed dialling 39 stylus 22 support resources 11 swipe 25 Symbian applications 123 synchronisation of data 112 158 T tap 25 text input 49, 51, 52 text messages receiving and... information 11 V video viewing 84 Video Centre 72 video centre downloading 72 my videos 74 transferring videos 74 video feeds 73 viewing 72 © 2009 Nokia. All rights reserved.