Instruction Booklet
Page 2
... servicing to have never had a seizure before. • Anyone who has had a seizure, loss of the Nintendo GameCube that parents monitor their children play . • Take a 10 to the Nintendo GameCube, components, game discs or accessories. Caution: Use of controls or adjustments or procedures other symptom linked to an epileptic condition should consult a doctor before playing...
... servicing to have never had a seizure before. • Anyone who has had a seizure, loss of the Nintendo GameCube that parents monitor their children play . • Take a 10 to the Nintendo GameCube, components, game discs or accessories. Caution: Use of controls or adjustments or procedures other symptom linked to an epileptic condition should consult a doctor before playing...

Instruction Booklet
Page 3
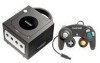
...-20 Troubleshooting 21-24 Error Messages 25 Warranty and Service Information 26 Video Game Rating Information 27 1 CONTENTS Section 1 Section 2 Section 3 Section 4 Section 5 Section 6 Section 7 Section 8 Components Nintendo GameCube 2-4 AC Adapter 5 Stereo Audio/Video Cable 5 Controller 6 System Setup Connecting the AC Adapter & Controller 7 Connecting to a Stereo TV/VCR using a Stereo AV Cable 8 Connecting to a Stereo...
...-20 Troubleshooting 21-24 Error Messages 25 Warranty and Service Information 26 Video Game Rating Information 27 1 CONTENTS Section 1 Section 2 Section 3 Section 4 Section 5 Section 6 Section 7 Section 8 Components Nintendo GameCube 2-4 AC Adapter 5 Stereo Audio/Video Cable 5 Controller 6 System Setup Connecting the AC Adapter & Controller 7 Connecting to a Stereo TV/VCR using a Stereo AV Cable 8 Connecting to a Stereo...
Instruction Booklet
Page 4
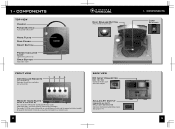
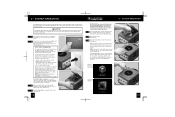
... Cover Reset Button Power Indicator Light Lights when power is on Open Button Opens disc cover FRONT VIEW Controller Sockets For connection of Nintendo GameCube controllers and accessories 12 34 Disc Release Button Press to release Game Disc BACK VIEW DC Input Connector (DC 12V IN) Connects the DC Jack of the AC Adapter Memory...
... Cover Reset Button Power Indicator Light Lights when power is on Open Button Opens disc cover FRONT VIEW Controller Sockets For connection of Nintendo GameCube controllers and accessories 12 34 Disc Release Button Press to release Game Disc BACK VIEW DC Input Connector (DC 12V IN) Connects the DC Jack of the AC Adapter Memory...
Instruction Booklet
Page 6
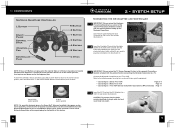
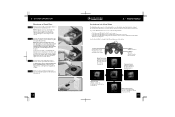
... Nintendo GameCube to your TV or VCR. Please check Nintendo GameCube software packaging for availability of this product before setting up the Nintendo GameCube. Insert the DC Jack into the DC Input Connector on the back of the console. (Illustration 1) 1 Insert the Controller Plug into the Controller... games, the Game Boy® Advance handheld video game system (sold separately, see back cover for use as the neutral position, causing incorrect game control during game play. To reset the controller, release all buttons and sticks to allow them to return to the Nintendo GameCube ...
... Nintendo GameCube to your TV or VCR. Please check Nintendo GameCube software packaging for availability of this product before setting up the Nintendo GameCube. Insert the DC Jack into the DC Input Connector on the back of the console. (Illustration 1) 1 Insert the Controller Plug into the Controller... games, the Game Boy® Advance handheld video game system (sold separately, see back cover for use as the neutral position, causing incorrect game control during game play. To reset the controller, release all buttons and sticks to allow them to return to the Nintendo GameCube ...
Instruction Booklet
Page 9
... your TV on. If channel 3 has an active television station, change both switches to channel 4. 3 Make sure that both the controller and AC Adapter are : • A button on the front of the connection methods except the RF switch method, you will appear... 1 Usually this product before using Nintendo GameCube Discs. 5 Place the Game Disc, printed side up, into the console and the wall outlet. (Illustration 2) 3 4 Press the Open Button to 3. CAUTION The Nintendo GameCube has intake/exhaust vents on the Main Menu screens. 5 Nintendo GameCube logo screen Main Menu Screen 6 13...
... your TV on. If channel 3 has an active television station, change both switches to channel 4. 3 Make sure that both the controller and AC Adapter are : • A button on the front of the connection methods except the RF switch method, you will appear... 1 Usually this product before using Nintendo GameCube Discs. 5 Place the Game Disc, printed side up, into the console and the wall outlet. (Illustration 2) 3 4 Press the Open Button to 3. CAUTION The Nintendo GameCube has intake/exhaust vents on the Main Menu screens. 5 Nintendo GameCube logo screen Main Menu Screen 6 13...
Instruction Booklet
Page 10
NOTE: To prevent your Nintendo GameCube, disconnect the AC Adapter from center towards the edges; See pages 18-20 15 When the disc is not in the console, always store it by the edges. If necessary, clean the disc with fingerprints, the system may still be able to read the game data correctly. Control Stick •...
NOTE: To prevent your Nintendo GameCube, disconnect the AC Adapter from center towards the edges; See pages 18-20 15 When the disc is not in the console, always store it by the edges. If necessary, clean the disc with fingerprints, the system may still be able to read the game data correctly. Control Stick •...

Instruction Booklet
Page 11
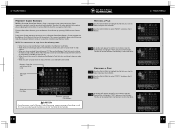
... LEFT on the Control Stick. Use the Control Stick (UP or DOWN) to highlight your choice. Press the A Button to display the Option Menu choices of Date or Time. Press the A Button to display information about the Game Disc that is currently loaded into the Nintendo GameCube. Press the A... Button to accept. Use the Control Stick (LEFT or RIGHT) to adjust the settings and press the A Button to accept your...
... LEFT on the Control Stick. Use the Control Stick (UP or DOWN) to highlight your choice. Press the A Button to display the Option Menu choices of Date or Time. Press the A Button to display information about the Game Disc that is currently loaded into the Nintendo GameCube. Press the A... Button to accept. Use the Control Stick (LEFT or RIGHT) to adjust the settings and press the A Button to accept your...
Instruction Booklet
Page 12
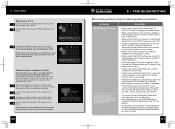
... a file that you have 127 or more blocks available to highlight the file that have reached the maximum of the console. Use the Control Stick to the Memory Card or the Nintendo GameCube. A window will appear to move and press the A Button. NOTE: You cannot move or copy files in the... move or copy a file to. • When you want to the other . Copying a File Use the Control Stick to save game information. This may cause damage to select "MOVE" and press the A 2 Button. Use the 3 Control Stick to highlight "YES" and press the A Button. See the instruction booklet for the...
... a file that you have 127 or more blocks available to highlight the file that have reached the maximum of the console. Use the Control Stick to the Memory Card or the Nintendo GameCube. A window will appear to move and press the A Button. NOTE: You cannot move or copy files in the... move or copy a file to. • When you want to the other . Copying a File Use the Control Stick to save game information. This may cause damage to select "MOVE" and press the A 2 Button. Use the 3 Control Stick to highlight "YES" and press the A Button. See the instruction booklet for the...
Instruction Booklet
Page 13
... If required, this booklet to be sure the system is set to the same channel (3 or 4). • Check to be sure that the Game Disc is placed correctly into the appropriate sockets. • Make sure that supports progressive scan. If the Main Menu appears the disc may be erased...select information.) • If you are securely plugged into the console. • Check to notify you that all data will appear to be gone forever. DOL101(USA). 21 Use the Control Stick to keep! SOLUTION • Make sure that the Nintendo GameCube, TV and VCR (if used) are plugged into power ...
... If required, this booklet to be sure the system is set to the same channel (3 or 4). • Check to be sure that the Game Disc is placed correctly into the appropriate sockets. • Make sure that supports progressive scan. If the Main Menu appears the disc may be erased...select information.) • If you are securely plugged into the console. • Check to notify you that all data will appear to be gone forever. DOL101(USA). 21 Use the Control Stick to keep! SOLUTION • Make sure that the Nintendo GameCube, TV and VCR (if used) are plugged into power ...
Instruction Booklet
Page 14
... normal TV picture won't come on Input Select information.) • The sound in some games doesn't begin until Start is pressed or the game begins. • If you may be sure the system is set from the game. • If you are playing to TV or VCR instructions.) • If using the Stereo... you have a mono TV or VCR and left one of the console. • If the light is still off or muted. • Check the audio connections between the Nintendo GameCube and the TV or VCR and review pages 8-10 to get all controllers and accessories from the wall outlet, wait 2 minutes and plug it...
... normal TV picture won't come on Input Select information.) • The sound in some games doesn't begin until Start is pressed or the game begins. • If you may be sure the system is set from the game. • If you are playing to TV or VCR instructions.) • If using the Stereo... you have a mono TV or VCR and left one of the console. • If the light is still off or muted. • Check the audio connections between the Nintendo GameCube and the TV or VCR and review pages 8-10 to get all controllers and accessories from the wall outlet, wait 2 minutes and plug it...
Instruction Booklet
Page 15
... lost. Calendar and other irregularities. See page 17 for the game you are using the correct Controller Socket. • Make sure that all connections between the RF Switch, RF Modulator, console and your Nintendo GameCube system still does not operate correctly after trying the troubleshooting remedies..., please visit the customer service area of buttons and into the Controller Socket on both the RF Modulator and the TV...
... lost. Calendar and other irregularities. See page 17 for the game you are using the correct Controller Socket. • Make sure that all connections between the RF Switch, RF Modulator, console and your Nintendo GameCube system still does not operate correctly after trying the troubleshooting remedies..., please visit the customer service area of buttons and into the Controller Socket on both the RF Modulator and the TV...

