Instruction Booklet
Page 2
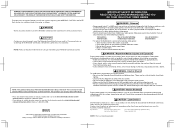
... an epileptic condition should watch when their children for appropriate play . CAUTION - NOTE: This product only plays Nintendo GameCube Game Discs that the AC Adapter cord is recommended that parents monitor their children play , stop playing and rest. TM, ® and... your child feel better. Electric Shock To avoid electric shock when you or your Nintendo GameCube system. Caution: Use of awareness, or other symptom linked to the Nintendo GameCube, components, game discs or accessories. THIS BOOKLET CONTAINS IMPORTANT HEALTH AND SAFETY INFORMATION. Do not play...
... an epileptic condition should watch when their children for appropriate play . CAUTION - NOTE: This product only plays Nintendo GameCube Game Discs that the AC Adapter cord is recommended that parents monitor their children play , stop playing and rest. TM, ® and... your child feel better. Electric Shock To avoid electric shock when you or your Nintendo GameCube system. Caution: Use of awareness, or other symptom linked to the Nintendo GameCube, components, game discs or accessories. THIS BOOKLET CONTAINS IMPORTANT HEALTH AND SAFETY INFORMATION. Do not play...

Instruction Booklet
Page 3
... a Mono TV/VCR 10 Connecting to a Stereo TV(digital ready) using the Nintendo GameCube system or components. Please carefully read this seal when buying video game systems, accessories, games and related products. CONTENTS Section 1 Section 2 Section 3 Section 4 Section 5 Section 6 Section 7 Section 8 Components Nintendo GameCube 2-4 AC Adapter 5 Stereo Audio/Video Cable 5 Controller 6 System Setup Connecting the AC...
... a Mono TV/VCR 10 Connecting to a Stereo TV(digital ready) using the Nintendo GameCube system or components. Please carefully read this seal when buying video game systems, accessories, games and related products. CONTENTS Section 1 Section 2 Section 3 Section 4 Section 5 Section 6 Section 7 Section 8 Components Nintendo GameCube 2-4 AC Adapter 5 Stereo Audio/Video Cable 5 Controller 6 System Setup Connecting the AC...
Instruction Booklet
Page 4
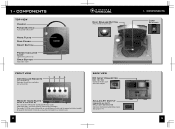
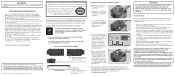
...Lights when power is on Open Button Opens disc cover FRONT VIEW Controller Sockets For connection of Nintendo GameCube controllers and accessories 12 34 Disc Release Button Press to release Game Disc BACK VIEW DC Input Connector (DC 12V IN) Connects the DC Jack of the AC... SLOT B) SLOT A SLOT B For connection of Nintendo GameCube Memory Cards (Sold separately, see back cover for purchasing information.) See pages 18-20 for more information on using Memory Cards and the game instruction booklet for specific information on how to save game information to a memory card. 2 Analog AV Output...
...Lights when power is on Open Button Opens disc cover FRONT VIEW Controller Sockets For connection of Nintendo GameCube controllers and accessories 12 34 Disc Release Button Press to release Game Disc BACK VIEW DC Input Connector (DC 12V IN) Connects the DC Jack of the AC... SLOT B) SLOT A SLOT B For connection of Nintendo GameCube Memory Cards (Sold separately, see back cover for purchasing information.) See pages 18-20 for more information on using Memory Cards and the game instruction booklet for specific information on how to save game information to a memory card. 2 Analog AV Output...
Instruction Booklet
Page 6
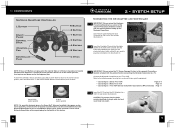
...Adapter and Controller IMPORTANT: Please review the Hardware 1 Precautions/Maintenance section of the console. Insert the DC Jack into the DC Input Connector on the back of the console. (Illustration 1) 1 Insert the Controller Plug into the Controller 2 Socket on ...Booklet included with this product before setting up the Nintendo GameCube. Please check Nintendo GameCube software packaging for use as the neutral position, causing incorrect game control during game play. See the instruction booklet for 3 seconds. Connect the Nintendo GameCube to the correct neutral position, then hold down ...
...Adapter and Controller IMPORTANT: Please review the Hardware 1 Precautions/Maintenance section of the console. Insert the DC Jack into the DC Input Connector on the back of the console. (Illustration 1) 1 Insert the Controller Plug into the Controller 2 Socket on ...Booklet included with this product before setting up the Nintendo GameCube. Please check Nintendo GameCube software packaging for use as the neutral position, causing incorrect game control during game play. See the instruction booklet for 3 seconds. Connect the Nintendo GameCube to the correct neutral position, then hold down ...
Instruction Booklet
Page 7
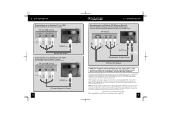
...available on the TV or VCR that the cable is not needed when using the Stereo AV Cable, you to display specially designed games in Progressive Scan Mode if your TV has Progressive Scan capability (see your TV operation manual). Accessing input select is different for ... Audio/Video plugs from the Stereo AV Cable into . Please see your Nintendo GameCube software instruction booklet for purchasing information.) TV or VCR Inputs S-VIDEO IN AUDIO IN LEFT RIGHT S-Video Audio Left (White) Audio Right (Red) To console ANALOG AV OUT S-Video Stereo AV Cable 8 2 • SYSTEM SETUP...
...available on the TV or VCR that the cable is not needed when using the Stereo AV Cable, you to display specially designed games in Progressive Scan Mode if your TV has Progressive Scan capability (see your TV operation manual). Accessing input select is different for ... Audio/Video plugs from the Stereo AV Cable into . Please see your Nintendo GameCube software instruction booklet for purchasing information.) TV or VCR Inputs S-VIDEO IN AUDIO IN LEFT RIGHT S-Video Audio Left (White) Audio Right (Red) To console ANALOG AV OUT S-Video Stereo AV Cable 8 2 • SYSTEM SETUP...
Instruction Booklet
Page 8
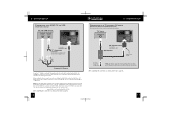
... Connecting to page 12. 10 RF Modulator To console ANALOG AV OUT RF Switch Channel 3/4 Switch Existing Cable TV Connection NOTE: All Nintendo brand RF Switches (NES, SNES and N64) and RF Modulators (N64) will be absent during game play. Leave the unused plug unconnected. You can...nintendo.com/consumer/inputselects.html After completing the connections as shown, please turn to a TV without AV Inputs Using a RF Switch and RF Modulator (Sold separately, see back cover for more information about input select on your TV or VCR, although some sound will work with the Nintendo GameCube...
... Connecting to page 12. 10 RF Modulator To console ANALOG AV OUT RF Switch Channel 3/4 Switch Existing Cable TV Connection NOTE: All Nintendo brand RF Switches (NES, SNES and N64) and RF Modulators (N64) will be absent during game play. Leave the unused plug unconnected. You can...nintendo.com/consumer/inputselects.html After completing the connections as shown, please turn to a TV without AV Inputs Using a RF Switch and RF Modulator (Sold separately, see back cover for more information about input select on your TV or VCR, although some sound will work with the Nintendo GameCube...
Instruction Booklet
Page 9
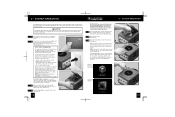
.... (Illustration 6) 4 When the power is turned on your TV or VCR. 1 Usually this product before using Nintendo GameCube Discs. 5 Place the Game Disc, printed side up, into the console, set your TV on the front of TVs and VCRs use different names and locations for the input select are...component that there is unrestricted air flow to (either the TV or VCR). CAUTION The Nintendo GameCube has intake/exhaust vents on -screen menu selection. NOTE: If you don't see information about the game loaded into the disc compartment and onto the center hub (Illustration 4). The 2 common...
.... (Illustration 6) 4 When the power is turned on your TV or VCR. 1 Usually this product before using Nintendo GameCube Discs. 5 Place the Game Disc, printed side up, into the console, set your TV on the front of TVs and VCRs use different names and locations for the input select are...component that there is unrestricted air flow to (either the TV or VCR). CAUTION The Nintendo GameCube has intake/exhaust vents on -screen menu selection. NOTE: If you don't see information about the game loaded into the disc compartment and onto the center hub (Illustration 4). The 2 common...
Instruction Booklet
Page 10
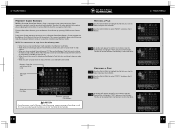
...Main Menu Screen appears.) Use the Control Stick to change to set the date and time, see information about the Game Disc currently loaded into the Nintendo GameCube, set various options, and access Memory Card information and options. Do not touch the laser lens. If necessary, ... the controller. (Hold down until the disc stops spinning before removing it by the edges. NOTE: To prevent your Nintendo GameCube, disconnect the AC Adapter from contaminating the console, do not leave the disc cover open for Sound and Screen Position. If a disc becomes dirty or contaminated with ...
...Main Menu Screen appears.) Use the Control Stick to change to set the date and time, see information about the Game Disc currently loaded into the Nintendo GameCube, set various options, and access Memory Card information and options. Do not touch the laser lens. If necessary, ... the controller. (Hold down until the disc stops spinning before removing it by the edges. NOTE: To prevent your Nintendo GameCube, disconnect the AC Adapter from contaminating the console, do not leave the disc cover open for Sound and Screen Position. If a disc becomes dirty or contaminated with ...

Instruction Booklet
Page 11
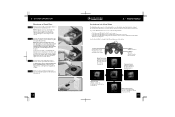
... without changing the settings. 16 17 Press START to the Option Menu or the Main Menu. Press the B Button to return to begin the game. Press the A Button to display Calendar Menu choices of Sound or Screen Position. Option Screen From the Main Menu Screen, go to the Option...you want to change, then (UP or DOWN) to the Main Menu. Press the A Button to display information about the Game Disc that is currently loaded into the Nintendo GameCube. 4 • MAIN MENU Game Play Screen From the Main Menu Screen, go to the Game Play Screen by pushing UP on the Control Stick.
... without changing the settings. 16 17 Press START to the Option Menu or the Main Menu. Press the B Button to return to begin the game. Press the A Button to display Calendar Menu choices of Sound or Screen Position. Option Screen From the Main Menu Screen, go to the Option...you want to change, then (UP or DOWN) to the Main Menu. Press the A Button to display information about the Game Disc that is currently loaded into the Nintendo GameCube. 4 • MAIN MENU Game Play Screen From the Main Menu Screen, go to the Game Play Screen by pushing UP on the Control Stick.
Instruction Booklet
Page 12
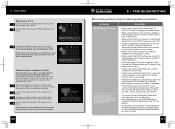
...trying to move or copy a file to. (Note: This limitation is only for future Memory Cards that have reached the maximum of the console. This screen (see back cover for instructions on the Memory Card that you are playing for purchasing information). Copying a File Use the ... trying to move and press the A Button. See the instruction booklet for the game you to highlight "YES" and press the A Button. Use the Control Stick to save game information. 4• MAIN MENU Memory Card Screen NOTE: A Nintendo GameCube Memory Card is required to select "COPY" and press the A 2 Button....
...trying to move or copy a file to. (Note: This limitation is only for future Memory Cards that have reached the maximum of the console. This screen (see back cover for instructions on the Memory Card that you are playing for purchasing information). Copying a File Use the ... trying to move and press the A Button. See the instruction booklet for the game you to highlight "YES" and press the A Button. Use the Control Stick to save game information. 4• MAIN MENU Memory Card Screen NOTE: A Nintendo GameCube Memory Card is required to select "COPY" and press the A 2 Button....
Instruction Booklet
Page 13
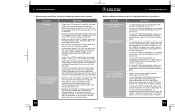
... and VCR (if used) are correct for formatting. DOL-001(USA). It is not available on your version of the console. • Make sure that the power switches on the Nintendo GameCube, TV and VCR (if used) are set to the same channel (3 or 4). • Check to be sure the...Make sure that the DC Jack on the AC Adapter is placed correctly into the Nintendo GameCube. A window will appear to ask for confirmation for use this procedure will only work on Nintendo GameCube Model No. If dirty, wipe with Game Discs made for formatting. Use the 3 Control Stick to 1 erase and press the...
... and VCR (if used) are correct for formatting. DOL-001(USA). It is not available on your version of the console. • Make sure that the power switches on the Nintendo GameCube, TV and VCR (if used) are set to the same channel (3 or 4). • Check to be sure the...Make sure that the DC Jack on the AC Adapter is placed correctly into the Nintendo GameCube. A window will appear to ask for confirmation for use this procedure will only work on Nintendo GameCube Model No. If dirty, wipe with Game Discs made for formatting. Use the 3 Control Stick to 1 erase and press the...
Instruction Booklet
Page 14
... • Check the instruction booklet for the game you are playing to see if there are volume controls or mono/stereo options that can only be used on . The Power Indicator Light on the console does not come on Nintendo GameCube Model No. Sound is still off or muted..., there may not get both left one of the console. • If the light is buzzing. DOL-001(USA). Turn the console power ON. • Remove all game sounds. Use a "Y" Adapter to get all controllers and accessories from the Nintendo GameCube and repeat the above procedure. 5 • TROUBLESHOOTING ...
... • Check the instruction booklet for the game you are playing to see if there are volume controls or mono/stereo options that can only be used on . The Power Indicator Light on the console does not come on Nintendo GameCube Model No. Sound is still off or muted..., there may not get both left one of the console. • If the light is buzzing. DOL-001(USA). Turn the console power ON. • Remove all game sounds. Use a "Y" Adapter to get all controllers and accessories from the Nintendo GameCube and repeat the above procedure. 5 • TROUBLESHOOTING ...
Instruction Booklet
Page 15
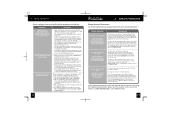
...Clean sticking buttons using the correct Controller Socket. • Make sure that all connections between the RF Switch, RF Modulator, console and your Nintendo GameCube system still does not operate correctly after trying the troubleshooting remedies, please visit the customer service area of the possible error ... use boiling water, soap or detergent. 3. The disc could not be replaced by selecting "YES" and pressing the A Button. The Game Disc may be dirty or damaged. Open the Disc Cover, remove the disc and check for contamination, dirt, scratches or other irregularities. ...
...Clean sticking buttons using the correct Controller Socket. • Make sure that all connections between the RF Switch, RF Modulator, console and your Nintendo GameCube system still does not operate correctly after trying the troubleshooting remedies, please visit the customer service area of the possible error ... use boiling water, soap or detergent. 3. The disc could not be replaced by selecting "YES" and pressing the A Button. The Game Disc may be dirty or damaged. Open the Disc Cover, remove the disc and check for contamination, dirt, scratches or other irregularities. ...
Instruction Booklet
Page 16
... the original purchaser that parents would find inappropriate. Sunday, (times subject to 7 p.m., Pacific Time, Monday - HARDWARE WARRANTY Nintendo of the Nintendo GameCube. 8 • ESRB VIDEO GAME RATING INFORMATION Entertainment software Rating board (ESRB) Video and Computer Game Software rating Information The Entertainment Software Rating Board (ESRB) ratings are awaiting final rating. The original purchaser is...
... the original purchaser that parents would find inappropriate. Sunday, (times subject to 7 p.m., Pacific Time, Monday - HARDWARE WARRANTY Nintendo of the Nintendo GameCube. 8 • ESRB VIDEO GAME RATING INFORMATION Entertainment software Rating board (ESRB) Video and Computer Game Software rating Information The Entertainment Software Rating Board (ESRB) ratings are awaiting final rating. The original purchaser is...
Setup Guide
Page 1
... Illustration 3 - Illustration 4 - Check with this icon on the bottom of time, unplug it from the console, wall outlet, Modem Adapter or phone jack, first turn the Nintendo GameCube off. However, if you are playing is fully inserted into place (Illustration 2). Doing so voids your online ...or by having operational problems, you may collect dirt, dust, lint, or other end into the space on Nintendo GameCube game packaging for a long period of the Nintendo GameCube until it from the phone jack. • When disconnecting any location where it , press the locking tabs on...
... Illustration 3 - Illustration 4 - Check with this icon on the bottom of time, unplug it from the console, wall outlet, Modem Adapter or phone jack, first turn the Nintendo GameCube off. However, if you are playing is fully inserted into place (Illustration 2). Doing so voids your online ...or by having operational problems, you may collect dirt, dust, lint, or other end into the space on Nintendo GameCube game packaging for a long period of the Nintendo GameCube until it from the phone jack. • When disconnecting any location where it , press the locking tabs on...
Setup Guide
Page 2
... LIMITATIONS THIS WARRANTY SHALL NOT APPLY IF THIS PRODUCT: (a) IS USED WITH PRODUCTS NOT SOLD OR LICENSED BY NINTENDO (INCLUDING, BUT NOT LIMITED TO, NON-LICENSED GAME ENHANCEMENT AND COPIER DEVICES, ADAPTERS, AND POWER SUPPLIES); (b) IS USED FOR COMMERCIAL PURPOSES (INCLUDING RENTAL); (c)... devices allowed to be connected to the original purchaser that the hardware product shall be connected to change ). GAME & ACCESSORY WARRANTY Nintendo warrants to the premises wiring and telephone network must accept interference received, including interference that interference will repair the...
... LIMITATIONS THIS WARRANTY SHALL NOT APPLY IF THIS PRODUCT: (a) IS USED WITH PRODUCTS NOT SOLD OR LICENSED BY NINTENDO (INCLUDING, BUT NOT LIMITED TO, NON-LICENSED GAME ENHANCEMENT AND COPIER DEVICES, ADAPTERS, AND POWER SUPPLIES); (b) IS USED FOR COMMERCIAL PURPOSES (INCLUDING RENTAL); (c)... devices allowed to be connected to the original purchaser that the hardware product shall be connected to change ). GAME & ACCESSORY WARRANTY Nintendo warrants to the premises wiring and telephone network must accept interference received, including interference that interference will repair the...


