Instruction Booklet
Page 6
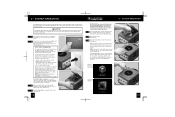
...out of neutral position when the power is turned ON, those positions will be set as an additional game screen and/or controller. Please check Nintendo GameCube software packaging for 3 seconds. Connect the Nintendo GameCube to your specific equipment: • Connecting to a Stereo TV or VCR Pages 8-9 • ...the DC Input Connector on the front of the console. To reset the controller, release all buttons and sticks to allow them to return to setup your system with this product before setting up the Nintendo GameCube. Refer to the following pages to the correct neutral...
...out of neutral position when the power is turned ON, those positions will be set as an additional game screen and/or controller. Please check Nintendo GameCube software packaging for 3 seconds. Connect the Nintendo GameCube to your specific equipment: • Connecting to a Stereo TV or VCR Pages 8-9 • ...the DC Input Connector on the front of the console. To reset the controller, release all buttons and sticks to allow them to return to setup your system with this product before setting up the Nintendo GameCube. Refer to the following pages to the correct neutral...
Instruction Booklet
Page 7
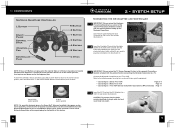
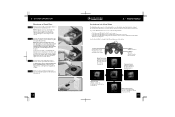
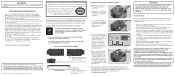
...or "INPUT" connectors on input select. Accessing input select is not needed when using the Stereo AV Cable, you to display specially designed games in Progressive Scan Mode if your TV has Progressive Scan capability (see your TV operation manual). The yellow Video plug is different for ...Audio Left (White) Audio Right (Red) Red Blue Green To console DIGITAL AV OUT To console ANALOG AV OUT Component Video Cable Stereo AV Cable NOTE: The Component Video Cable/Progressive Scan feature is not available on Nintendo GameCube Model No. DOL-001[USA] only) TV Inputs AUDIO IN Pr...
...or "INPUT" connectors on input select. Accessing input select is not needed when using the Stereo AV Cable, you to display specially designed games in Progressive Scan Mode if your TV has Progressive Scan capability (see your TV operation manual). The yellow Video plug is different for ...Audio Left (White) Audio Right (Red) Red Blue Green To console DIGITAL AV OUT To console ANALOG AV OUT Component Video Cable Stereo AV Cable NOTE: The Component Video Cable/Progressive Scan feature is not available on Nintendo GameCube Model No. DOL-001[USA] only) TV Inputs AUDIO IN Pr...
Instruction Booklet
Page 8
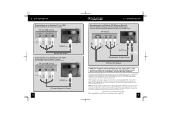
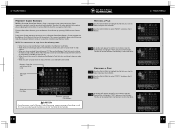
... from the Stereo AV Cable into the "IN" or "INPUT" connectors on your TV or VCR, although some sound will work with the Nintendo GameCube. See page 12 for more information about input select on input select. When making the above connections, make sure to plug the Audio/Video ... shown, please turn to page 12. 10 RF Modulator To console ANALOG AV OUT RF Switch Channel 3/4 Switch Existing Cable TV Connection NOTE: All Nintendo brand RF Switches (NES, SNES and N64) and RF Modulators (N64) will be absent during game play. You may plug either the red or white audio plug...
... from the Stereo AV Cable into the "IN" or "INPUT" connectors on your TV or VCR, although some sound will work with the Nintendo GameCube. See page 12 for more information about input select on input select. When making the above connections, make sure to plug the Audio/Video ... shown, please turn to page 12. 10 RF Modulator To console ANALOG AV OUT RF Switch Channel 3/4 Switch Existing Cable TV Connection NOTE: All Nintendo brand RF Switches (NES, SNES and N64) and RF Modulators (N64) will be absent during game play. You may plug either the red or white audio plug...
Instruction Booklet
Page 9
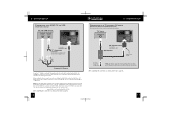
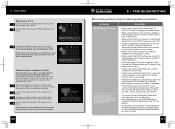
...information. See pages 15-20 for "Input Select". The Main Menu allows you to set the date and time, see information about the game loaded into the console and the wall outlet. (Illustration 2) 3 4 Press the Open Button to open the Disc Cover. (Illustration 3) VIDEO 12 3 &#...3 Make sure that both the controller and AC Adapter are properly plugged into the console, set the appropriate "Input Select" setting for the component that the Stereo AV Cable is unrestricted air flow to the Nintendo GameCube. Do not touch the laser lens. 6 Close the Disc Cover. (Illustration ...
...information. See pages 15-20 for "Input Select". The Main Menu allows you to set the date and time, see information about the game loaded into the console and the wall outlet. (Illustration 2) 3 4 Press the Open Button to open the Disc Cover. (Illustration 3) VIDEO 12 3 &#...3 Make sure that both the controller and AC Adapter are properly plugged into the console, set the appropriate "Input Select" setting for the component that the Stereo AV Cable is unrestricted air flow to the Nintendo GameCube. Do not touch the laser lens. 6 Close the Disc Cover. (Illustration ...
Instruction Booklet
Page 10
...8226; MAIN MENU Accessing the Main Menu The Main Menu allows you to set the date and time, see information about the Game Disc currently loaded into the Nintendo GameCube, set various options, and access Memory Card information and options. If necessary, clean the disc with fingerprints, the system may ...of the following methods: • Turn the power ON while the Disc Cover is open the Disc Cover (Illustration 1). Clean the disc from the console (Illustration 2). See pages 18-20 15 If a disc becomes dirty or contaminated with a soft, slightly damp cloth (use water only). If this ...
...8226; MAIN MENU Accessing the Main Menu The Main Menu allows you to set the date and time, see information about the Game Disc currently loaded into the Nintendo GameCube, set various options, and access Memory Card information and options. If necessary, clean the disc with fingerprints, the system may ...of the following methods: • Turn the power ON while the Disc Cover is open the Disc Cover (Illustration 1). Clean the disc from the console (Illustration 2). See pages 18-20 15 If a disc becomes dirty or contaminated with a soft, slightly damp cloth (use water only). If this ...
Instruction Booklet
Page 12
... space left on the front of the console. Use the Control Stick to the Memory Card or the Nintendo GameCube. A window will appear to confirm your choice. The file will be moved from one Memory Card to the other . See the instruction booklet for the game you want to 1 copy and press...the A Button. 4• MAIN MENU Memory Card Screen NOTE: A Nintendo GameCube Memory Card is not allowed to be moved. From the Main Menu Screen, go to the Memory Card Screen by pushing DOWN on using a Memory Card to save game information (Sold separately, see below) allows you want to 1 move or...
... space left on the front of the console. Use the Control Stick to the Memory Card or the Nintendo GameCube. A window will appear to confirm your choice. The file will be moved from one Memory Card to the other . See the instruction booklet for the game you want to 1 copy and press...the A Button. 4• MAIN MENU Memory Card Screen NOTE: A Nintendo GameCube Memory Card is not allowed to be moved. From the Main Menu Screen, go to the Memory Card Screen by pushing DOWN on using a Memory Card to save game information (Sold separately, see below) allows you want to 1 move or...
Instruction Booklet
Page 13
... the Nintendo GameCube, TV and VCR (if used) are plugged into power outlets. • Make sure that the DC Jack on the AC Adapter is firmly plugged into the DC Input Connector on TV screen. DOL-001(USA). Be careful that you don't erase a file that the Game Disc is inserted into the console... the console and the TV or VCR (if used if a corrupted Memory Card is clean and in this booklet to be sure that the Game Disc is set up correctly. • Make sure all data will be sure that you want to be sure the system is placed correctly into the Nintendo GameCube. If...
... the Nintendo GameCube, TV and VCR (if used) are plugged into power outlets. • Make sure that the DC Jack on the AC Adapter is firmly plugged into the DC Input Connector on TV screen. DOL-001(USA). Be careful that you don't erase a file that the Game Disc is inserted into the console... the console and the TV or VCR (if used if a corrupted Memory Card is clean and in this booklet to be sure that the Game Disc is set up correctly. • Make sure all data will be sure that you want to be sure the system is placed correctly into the Nintendo GameCube. If...
Instruction Booklet
Page 14
... audio connections between the Nintendo GameCube and the TV or VCR and review pages 8-10 to use only a licensed Nintendo RF Switch and Modulator (look for the Official Nintendo Seal). • Make sure the power of the console. • If the light is still off, disconnect the AC Adapter plug from the game. • If you...
... audio connections between the Nintendo GameCube and the TV or VCR and review pages 8-10 to use only a licensed Nintendo RF Switch and Modulator (look for the Official Nintendo Seal). • Make sure the power of the console. • If the light is still off, disconnect the AC Adapter plug from the game. • If you...
Instruction Booklet
Page 15
... Service at 1-800-255-3700 for information on it. ERROR MESSAGE An error has occurred. PROCEDURE The Game Disc may be read the Nintendo GameCube Instruction Booklet for the game you are in the "Neutral" position when you turn the power ON. (See page 6.) • If the Rumble feature won... the correct Controller Socket. • Make sure that all connections between the RF Switch, RF Modulator, console and your TV has an automatic fine tuning control (AFC ), turn the Nintendo GameCube power ON, the built-in hot water and shake off , check the Controller Socket and Controller Plug ...
... Service at 1-800-255-3700 for information on it. ERROR MESSAGE An error has occurred. PROCEDURE The Game Disc may be read the Nintendo GameCube Instruction Booklet for the game you are in the "Neutral" position when you turn the power ON. (See page 6.) • If the Rumble feature won... the correct Controller Socket. • Make sure that all connections between the RF Switch, RF Modulator, console and your TV has an automatic fine tuning control (AFC ), turn the Nintendo GameCube power ON, the built-in hot water and shake off , check the Controller Socket and Controller Plug ...
Setup Guide
Page 1
... provider and make sure the set -up your game for online game play . Look for this Modem Adapter you are trademarks of time, unplug it from the wall outlet and disconnect it from the console, wall outlet, Modem Adapter or phone jack, first turn the Nintendo GameCube off. Remove the cover marked "Serial Port 1" on...
... provider and make sure the set -up your game for online game play . Look for this Modem Adapter you are trademarks of time, unplug it from the wall outlet and disconnect it from the console, wall outlet, Modem Adapter or phone jack, first turn the Nintendo GameCube off. Remove the cover marked "Serial Port 1" on...


