
User Manual
Page 1
En The Guide to Digital Photography with the DIGITAL CAMERA En
En The Guide to Digital Photography with the DIGITAL CAMERA En
User Manual
Page 2
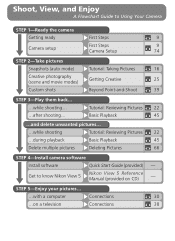
Get to Using Your Camera STEP 1-Ready the camera Getting ready First Steps 9 Camera setup First Steps Camera Setup 9 74 STEP 2-Take pictures Snapshots (auto mode) Tutorial: Taking Pictures 16 Creative photography (scene and movie ...while shooting Tutorial: Reviewing Pictures 22 ...during playback Basic Playback 45 Delete multiple pictures Deleting Pictures 66 STEP 4-Install camera software Install software Quick Start Guide (provided) - Shoot, View, and Enjoy A Flowchart Guide to know Nikon View 5 Nikon View 5 Reference Manual (provided on a television Connections 38
Get to Using Your Camera STEP 1-Ready the camera Getting ready First Steps 9 Camera setup First Steps Camera Setup 9 74 STEP 2-Take pictures Snapshots (auto mode) Tutorial: Taking Pictures 16 Creative photography (scene and movie ...while shooting Tutorial: Reviewing Pictures 22 ...during playback Basic Playback 45 Delete multiple pictures Deleting Pictures 66 STEP 4-Install camera software Install software Quick Start Guide (provided) - Shoot, View, and Enjoy A Flowchart Guide to know Nikon View 5 Nikon View 5 Reference Manual (provided on a television Connections 38
User Manual
Page 3
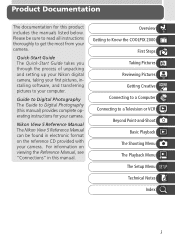
... Manual The Nikon View 5 Reference Manual can be sure to read all instructions thoroughly to Digital Photography (this manual) provides complete operating instructions for this manual. Overview Getting to Know the COOLPIX 2000 First Steps Taking Pictures Reviewing Pictures Getting Creative Connecting to...through the process of unpacking and setting up your Nikon digital camera, taking your computer. Guide to Digital Photography The Guide to get the most from your camera. Product Documentation The documentation for your camera. Please be found in this product includes the ...
... Manual The Nikon View 5 Reference Manual can be sure to read all instructions thoroughly to Digital Photography (this manual) provides complete operating instructions for this manual. Overview Getting to Know the COOLPIX 2000 First Steps Taking Pictures Reviewing Pictures Getting Creative Connecting to...through the process of unpacking and setting up your Nikon digital camera, taking your computer. Guide to Digital Photography The Guide to get the most from your camera. Product Documentation The documentation for your camera. Please be found in this product includes the ...
User Manual
Page 4
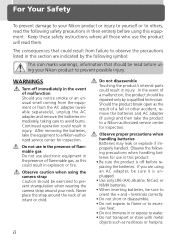
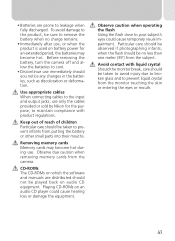
...for inspection. Observe caution when using your Nikon product to prevent possible injury. Do not use in the presence of flammable gas Do not use the product will read them. The consequences that should be read before using the camera strap Caution should be exercised to prevent strangulation... water. • Do not transport or store with metal objects such as this equipment. For Your Safety To prevent damage to your Nikon product or injury to yourself or to others, read the following safety precautions in their entirety before replacing the batteries. After removing the ...
...for inspection. Observe caution when using your Nikon product to prevent possible injury. Do not use in the presence of flammable gas Do not use the product will read them. The consequences that should be read before using the camera strap Caution should be exercised to prevent strangulation... water. • Do not transport or store with metal objects such as this equipment. For Your Safety To prevent damage to your Nikon product or injury to yourself or to others, read the following safety precautions in their entirety before replacing the batteries. After removing the ...
User Manual
Page 5
...not be played back on battery power for the purpose, to remove the battery when no less than one meter (39˝) from the camera. Keep out of reach of children Particular care should be taken to avoid injury due to broken glass and to your subject's eyes could cause... hearing loss or damage the equipment. Before removing the battery, turn the camera off and allow the batteries to cool. • Discontinue use only the cables provided or sold by Nikon for an extended period, the batteries may become hot. Removing memory cards Memory cards may become...
...not be played back on battery power for the purpose, to remove the battery when no less than one meter (39˝) from the camera. Keep out of reach of children Particular care should be taken to avoid injury due to broken glass and to your subject's eyes could cause... hearing loss or damage the equipment. Before removing the battery, turn the camera off and allow the batteries to cool. • Discontinue use only the cables provided or sold by Nikon for an extended period, the batteries may become hot. Removing memory cards Memory cards may become...

User Manual
Page 7
... registered trademarks of unused postage stamps or post cards issued by law from being in possession of material that has been digitally copied or reproduced by means of a scanner, digital camera or other countries. Zip is a registered trademark of Iomega Corporation in this manual or the other trade names mentioned in... non-commercial use by public agencies and private groups, ID cards, and tickets, such as passes and meal coupons. • Comply with your Nikon product are circulated in Canada CAUTION This class B digital apparatus meets all requirements of SanDisk Corporation.
... registered trademarks of unused postage stamps or post cards issued by law from being in possession of material that has been digitally copied or reproduced by means of a scanner, digital camera or other countries. Zip is a registered trademark of Iomega Corporation in this manual or the other trade names mentioned in... non-commercial use by public agencies and private groups, ID cards, and tickets, such as passes and meal coupons. • Comply with your Nikon product are circulated in Canada CAUTION This class B digital apparatus meets all requirements of SanDisk Corporation.
User Manual
Page 8
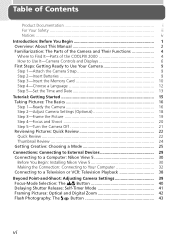
...This Manual 2 Familiarization: The Parts of the Camera and Their Functions 4 Where to Find It-Parts of the COOLPIX 2000 4 How to Use It-Camera Controls and Displays 6 First Steps: Getting Ready to Use Your Camera 9 Step 1-Attach the Camera Strap 9 Step 2-Insert Batteries 9 Step 3-...Nikon View 5 30 Making the Connection: Connecting to Your Computer 32 Connecting to a Television or VCR: Television Playback 38 Beyond Point-and-Shoot: Adjusting Camera Settings 39 Focus-Mode Selection: The Button 40 Delaying Shutter Release: Self-Timer Mode 41 Framing Pictures: Optical and Digital...
...This Manual 2 Familiarization: The Parts of the Camera and Their Functions 4 Where to Find It-Parts of the COOLPIX 2000 4 How to Use It-Camera Controls and Displays 6 First Steps: Getting Ready to Use Your Camera 9 Step 1-Attach the Camera Strap 9 Step 2-Insert Batteries 9 Step 3-...Nikon View 5 30 Making the Connection: Connecting to Your Computer 32 Connecting to a Television or VCR: Television Playback 38 Beyond Point-and-Shoot: Adjusting Camera Settings 39 Focus-Mode Selection: The Button 40 Delaying Shutter Release: Self-Timer Mode 41 Framing Pictures: Optical and Digital...

User Manual
Page 9
...48 Taking a Closer Look: Playback Zoom 49 Creating a Small Copy of a Picture: Small Picture 50 Movie Playback 52 Menu Guide: Using Camera Menus 53 The Shooting Menu: Fine-Tuning Shooting Options 54 Making Effective Use of Memory: Image Quality and Size 56 Keeping Colors True: ...Show 68 Safeguarding Valuable Pictures: Protect 70 Ordering Prints: Print Set 71 Marking All Pictures for Transfer: Auto Transfer 73 The Setup Menu: Camera Setup 74 Adjusting Monitor Brightness: Brightness 75 Formatting Memory Cards: CF Card Format 75 Conserving Battery Power: Auto Off 76 Choosing a Video ...
...48 Taking a Closer Look: Playback Zoom 49 Creating a Small Copy of a Picture: Small Picture 50 Movie Playback 52 Menu Guide: Using Camera Menus 53 The Shooting Menu: Fine-Tuning Shooting Options 54 Making Effective Use of Memory: Image Quality and Size 56 Keeping Colors True: ...Show 68 Safeguarding Valuable Pictures: Protect 70 Ordering Prints: Print Set 71 Marking All Pictures for Transfer: Auto Transfer 73 The Setup Menu: Camera Setup 74 Adjusting Monitor Brightness: Brightness 75 Formatting Memory Cards: CF Card Format 75 Conserving Battery Power: Auto Off 76 Choosing a Video ...
User Manual
Page 11
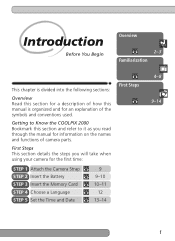
... into the following sections: Overview Read this section for a description of how this section and refer to Know the COOLPIX 2000 Bookmark this manual is organized and for the first time: STEP 1 Attach the Camera Strap STEP 2 Insert the Battery STEP 3 Insert the Memory Card STEP 4 Choose a Language STEP 5 Set the Time and... the manual for information on the names and functions of the symbols and conventions used. Getting to it as you will take when using your camera for an explanation of...
... into the following sections: Overview Read this section for a description of how this section and refer to Know the COOLPIX 2000 Bookmark this manual is organized and for the first time: STEP 1 Attach the Camera Strap STEP 2 Insert the Battery STEP 3 Insert the Memory Card STEP 4 Choose a Language STEP 5 Set the Time and... the manual for information on the names and functions of the symbols and conventions used. Getting to it as you will take when using your camera for an explanation of...
User Manual
Page 12
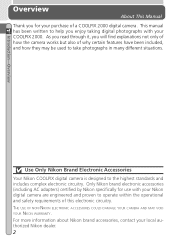
.... As you read through it, you for use with your purchase of a COOLPIX 2000 digital camera. Only Nikon brand electronic accessories (including AC adapters) certified by Nikon specifically for your COOLPIX 2000. For more information about Nikon brand accessories, contact your Nikon digital camera are engineered and proven to the highest standards and includes complex electronic circuitry. Overview About This Manual Thank...
.... As you read through it, you for use with your purchase of a COOLPIX 2000 digital camera. Only Nikon brand electronic accessories (including AC adapters) certified by Nikon specifically for your COOLPIX 2000. For more information about Nikon brand accessories, contact your Nikon digital camera are engineered and proven to the highest standards and includes complex electronic circuitry. Overview About This Manual Thank...
User Manual
Page 13
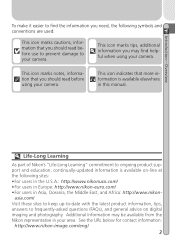
...This icon marks cautions, information that you should read before using your camera. This icon indicates that more information is available on digital imaging and photography. See the URL below for contact information: http://www.nikon-image.com/eng/ 3 This icon marks notes, information that you... should read before use to prevent damage to your camera. Introduction-Overview To make it ...
...This icon marks cautions, information that you should read before using your camera. This icon indicates that more information is available on digital imaging and photography. See the URL below for contact information: http://www.nikon-image.com/eng/ 3 This icon marks notes, information that you... should read before use to prevent damage to your camera. Introduction-Overview To make it ...
User Manual
Page 14
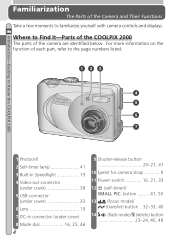
... . 32-33, 40 14 (flash mode)/ (delete) button 23-24, 46, 48 Introduction-Getting to Know the COOLPIX 2000 Familiarization The Parts of the Camera and Their Functions Take a few moments to Find It-Parts of the COOLPIX 2000 The parts of each part, refer to the page numbers listed. 123 4 5 6 7 1 Photocell 2 Self-timer lamp... connector (under cover 33 6 Lens 19 7 DC-in connector (under cover) 8 Mode dial 16, 25, 46 4 9 Shutter-release button 20-21, 41 10 Eyelet for camera strap 9 11 Power switch 16, 21, 33 12 (self-timer)/ SMALL PIC. For more information on the function of the...
... . 32-33, 40 14 (flash mode)/ (delete) button 23-24, 46, 48 Introduction-Getting to Know the COOLPIX 2000 Familiarization The Parts of the Camera and Their Functions Take a few moments to Find It-Parts of the COOLPIX 2000 The parts of each part, refer to the page numbers listed. 123 4 5 6 7 1 Photocell 2 Self-timer lamp... connector (under cover 33 6 Lens 19 7 DC-in connector (under cover) 8 Mode dial 16, 25, 46 4 9 Shutter-release button 20-21, 41 10 Eyelet for camera strap 9 11 Power switch 16, 21, 33 12 (self-timer)/ SMALL PIC. For more information on the function of the...
User Manual
Page 16
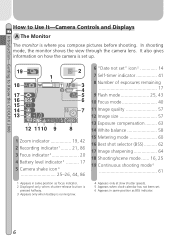
... 7 AUTO 9999 12 11 10 9 8 1 Zoom indicator 19, 42 2 Recording indicator 1 ........ 21, 86 3 Focus indicator 2 20 4 Battery level indicator 3 .......... 17 5 Camera shake icon 4 25-26, 44, 86 6 "Date not set" icon 5 14 7 Self-timer indicator 41 8 Number of exposures remaining 17 9 Flash mode 25, 43 10...button is pressed halfway. 3 Appears only when battery is where you compose pictures before shooting. Introduction-Getting to Know the COOLPIX 2000 How to Use It-Camera Controls and Displays A The Monitor The monitor is running low. 4 Appears only at slow shutter speeds. 5 Appears ...
... 7 AUTO 9999 12 11 10 9 8 1 Zoom indicator 19, 42 2 Recording indicator 1 ........ 21, 86 3 Focus indicator 2 20 4 Battery level indicator 3 .......... 17 5 Camera shake icon 4 25-26, 44, 86 6 "Date not set" icon 5 14 7 Self-timer indicator 41 8 Number of exposures remaining 17 9 Flash mode 25, 43 10...button is pressed halfway. 3 Appears only when battery is where you compose pictures before shooting. Introduction-Getting to Know the COOLPIX 2000 How to Use It-Camera Controls and Displays A The Monitor The monitor is running low. 4 Appears only at slow shutter speeds. 5 Appears ...
User Manual
Page 17
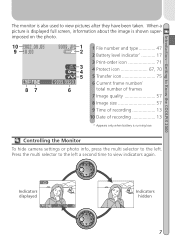
Controlling the Monitor To hide camera settings or photo info, press the multi selector to view indicators again. JPG 1 2 3 4 5 9999/9999 6 1 File number and type 47 2 Battery level indicator 17 3 Print-... to view pictures after they have been taken. Press the multi selector to the left a second time to the left. Introduction-Getting to Know the COOLPIX 2000 The monitor is running low. When a picture is displayed full screen, information about the image is shown superimposed on the photo. 10 2002 .08 .05...
Controlling the Monitor To hide camera settings or photo info, press the multi selector to view indicators again. JPG 1 2 3 4 5 9999/9999 6 1 File number and type 47 2 Battery level indicator 17 3 Print-... to view pictures after they have been taken. Press the multi selector to the left a second time to the left. Introduction-Getting to Know the COOLPIX 2000 The monitor is running low. When a picture is displayed full screen, information about the image is shown superimposed on the photo. 10 2002 .08 .05...

User Manual
Page 18
Introduction-Getting to Know the COOLPIX 2000 B The Multi Selector The multi selector is used to navigate through camera menus, to page through or select pictures during playback, scroll images during playback zoom, and to control the display of indicators in the monitor. 8
Introduction-Getting to Know the COOLPIX 2000 B The Multi Selector The multi selector is used to navigate through camera menus, to page through or select pictures during playback, scroll images during playback zoom, and to control the display of indicators in the monitor. 8
User Manual
Page 19
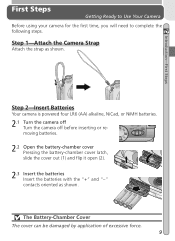
... to complete the following steps. Step 1-Attach the Camera Strap Attach the strap as shown. The Battery-Chamber Cover The cover can be damaged by application of excessive force. 9 Introduction-First Steps Step 2-Insert Batteries Your camera is powered four LR6 (AA) alkaline, NiCad, ...or NiMH batteries. 2.1 Turn the camera off Turn the camera off before inserting or removing batteries. 2.2 Open the battery-chamber cover Pressing the ...
... to complete the following steps. Step 1-Attach the Camera Strap Attach the strap as shown. The Battery-Chamber Cover The cover can be damaged by application of excessive force. 9 Introduction-First Steps Step 2-Insert Batteries Your camera is powered four LR6 (AA) alkaline, NiCad, ...or NiMH batteries. 2.1 Turn the camera off Turn the camera off before inserting or removing batteries. 2.2 Open the battery-chamber cover Pressing the ...
User Manual
Page 20
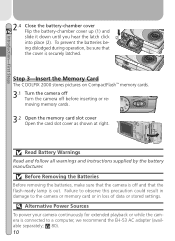
..., be sure that the flash-ready lamp is securely latched. Before Removing the Batteries Before removing the batteries, make sure that the camera is off before inserting or removing memory cards. 3.2 Open the memory card slot cover Open the card slot cover as shown at right...3-Insert the Memory Card The COOLPIX 2000 stores pictures on CompactFlash™ memory cards. 3.1 Turn the camera off Turn the camera off and that the cover is out. Alternative Power Sources To power your camera continuously for extended playback or while the camera is connected to the camera or memory card or in...
..., be sure that the flash-ready lamp is securely latched. Before Removing the Batteries Before removing the batteries, make sure that the camera is off before inserting or removing memory cards. 3.2 Open the memory card slot cover Open the card slot cover as shown at right...3-Insert the Memory Card The COOLPIX 2000 stores pictures on CompactFlash™ memory cards. 3.1 Turn the camera off Turn the camera off and that the cover is out. Alternative Power Sources To power your camera continuously for extended playback or while the camera is connected to the camera or memory card or in...

User Manual
Page 21
Other memory cards, however, must be formatted before closing the cover may partially eject the card, causing errors when the camera is firmly seated in face up until it is turned on formatting memory cards, see "The Setup Menu: Formatting Memory Cards" ( 75). 11 For information ... Card Slot Cover Fold the eject button over and close the memory card slot cover. Introduction-First Steps 3.3 Insert the memory card Holding the camera with your camera is the term used to make room for more pictures. If the eject button is upright when the cover is closed, closing the memory...
Other memory cards, however, must be formatted before closing the cover may partially eject the card, causing errors when the camera is firmly seated in face up until it is turned on formatting memory cards, see "The Setup Menu: Formatting Memory Cards" ( 75). 11 For information ... Card Slot Cover Fold the eject button over and close the memory card slot cover. Introduction-First Steps 3.3 Insert the memory card Holding the camera with your camera is the term used to make room for more pictures. If the eject button is upright when the cover is closed, closing the memory...
User Manual
Page 22
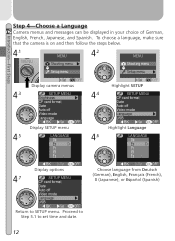
... from Deutsch (German), English, Français (French), (Japanese), or Español (Spanish) 12 Introduction-First Steps Step 4-Choose a Language Camera menus and messages can be displayed in your choice of German, English, French, Japanese, and Spanish. Proceed to Step 5.1 to SETUP menu. To choose ...on and then follow the steps below. 4.1 MENU 4.2 MENU Shooting menu Shooting menu Setup menu Setup menu Set OFF Display camera menus Set OFF Highlight SETUP 4.3 SETUP MENU Brightness CF card format Date Auto off Video mode Language BK Set OFF Display ...
... from Deutsch (German), English, Français (French), (Japanese), or Español (Spanish) 12 Introduction-First Steps Step 4-Choose a Language Camera menus and messages can be displayed in your choice of German, English, French, Japanese, and Spanish. Proceed to Step 5.1 to SETUP menu. To choose ...on and then follow the steps below. 4.1 MENU 4.2 MENU Shooting menu Shooting menu Setup menu Setup menu Set OFF Display camera menus Set OFF Highlight SETUP 4.3 SETUP MENU Brightness CF card format Date Auto off Video mode Language BK Set OFF Display ...
User Manual
Page 23
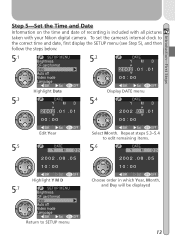
Repeat steps 5.3-5.4 to SETUP menu BK Set OFF Choose order in which Year, Month, and Day will be displayed 13 To set the camera's internal clock to the correct time and date, first display the SETUP menu (see Step 5), and then follow the steps below. 5.1 SETUP MENU Brightness 5.2 CF .... Introduction-First Steps Step 5-Set the Time and Date Information on the time and date of recording is included with all pictures taken with your Nikon digital camera.
Repeat steps 5.3-5.4 to SETUP menu BK Set OFF Choose order in which Year, Month, and Day will be displayed 13 To set the camera's internal clock to the correct time and date, first display the SETUP menu (see Step 5), and then follow the steps below. 5.1 SETUP MENU Brightness 5.2 CF .... Introduction-First Steps Step 5-Set the Time and Date Information on the time and date of recording is included with all pictures taken with your Nikon digital camera.


