
User Manual
Page 2
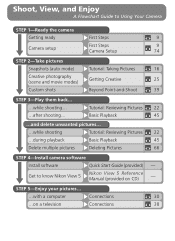
...9 Camera setup First Steps Camera Setup 9 74 STEP 2-Take pictures Snapshots (auto mode) Tutorial: Taking Pictures 16 Creative photography (scene and movie modes) Getting Creative 25 Custom shots Beyond Point-and-Shoot 39 STEP 3-Play them back... ...while shooting... ...after shooting... Tutorial: Reviewing Pictures 22 Basic Playback 45 ...and delete unwanted pictures... ...while shooting Tutorial: Reviewing Pictures 22 ...during playback Basic Playback 45 Delete multiple pictures Deleting Pictures 66 STEP 4-Install camera software Install software Quick Start Guide...
...9 Camera setup First Steps Camera Setup 9 74 STEP 2-Take pictures Snapshots (auto mode) Tutorial: Taking Pictures 16 Creative photography (scene and movie modes) Getting Creative 25 Custom shots Beyond Point-and-Shoot 39 STEP 3-Play them back... ...while shooting... ...after shooting... Tutorial: Reviewing Pictures 22 Basic Playback 45 ...and delete unwanted pictures... ...while shooting Tutorial: Reviewing Pictures 22 ...during playback Basic Playback 45 Delete multiple pictures Deleting Pictures 66 STEP 4-Install camera software Install software Quick Start Guide...
User Manual
Page 3
Quick-Start Guide The Quick-Start Guide takes you through the process of unpacking and setting up your Nikon digital camera, taking your first pictures, installing software, and transferring pictures to Digital Photography (this manual) provides complete operating instructions for this manual. Guide to Digital Photography The Guide to your camera. Overview Getting to Know the COOLPIX 2000 First Steps Taking Pictures Reviewing Pictures Getting Creative Connecting to a Computer Connecting to get the most from your camera. For information on the reference CD provided with ...
Quick-Start Guide The Quick-Start Guide takes you through the process of unpacking and setting up your Nikon digital camera, taking your first pictures, installing software, and transferring pictures to Digital Photography (this manual) provides complete operating instructions for this manual. Guide to Digital Photography The Guide to your camera. Overview Getting to Know the COOLPIX 2000 First Steps Taking Pictures Reviewing Pictures Getting Creative Connecting to a Computer Connecting to get the most from your camera. For information on the reference CD provided with ...
User Manual
Page 8
... This Manual 2 Familiarization: The Parts of the Camera and Their Functions 4 Where to Find It-Parts of the COOLPIX 2000 4 How to Use It-Camera Controls and Displays 6 First Steps: Getting Ready to Use Your Camera 9 Step 1-Attach the Camera Strap 9 Step 2-Insert Batteries 9 Step 3-Insert the Memory Card 10 Step 4-Choose a Language 12 Step 5-Set the Time and Date 13 Tutorial: Getting Started 15 Taking Pictures: The Basics 16 Step 1-Ready the Camera 16 Step 2-Adjust Camera Settings...
... This Manual 2 Familiarization: The Parts of the Camera and Their Functions 4 Where to Find It-Parts of the COOLPIX 2000 4 How to Use It-Camera Controls and Displays 6 First Steps: Getting Ready to Use Your Camera 9 Step 1-Attach the Camera Strap 9 Step 2-Insert Batteries 9 Step 3-Insert the Memory Card 10 Step 4-Choose a Language 12 Step 5-Set the Time and Date 13 Tutorial: Getting Started 15 Taking Pictures: The Basics 16 Step 1-Ready the Camera 16 Step 2-Adjust Camera Settings...

User Manual
Page 9
...-Tuning Shooting Options 54 Making Effective Use of Memory: Image Quality and Size 56 Keeping Colors True: White Balance 58 Measuring Light: Metering 60 Taking Pictures in a Sequence: Continuous 61 Getting Sharper Pictures: BSS (Best Shot Selector 62 Adjusting Exposure: Exp 63 Making Edges More Distinct: Image Sharpening 64 The Playback Menu: Managing Pictures 65 Deleting Pictures: Delete 66 Automated Playback: Slide Show 68 Safeguarding Valuable Pictures: Protect 70 Ordering Prints: Print Set 71 Marking All Pictures for Transfer: Auto Transfer 73 The Setup Menu: Camera Setup 74...
...-Tuning Shooting Options 54 Making Effective Use of Memory: Image Quality and Size 56 Keeping Colors True: White Balance 58 Measuring Light: Metering 60 Taking Pictures in a Sequence: Continuous 61 Getting Sharper Pictures: BSS (Best Shot Selector 62 Adjusting Exposure: Exp 63 Making Edges More Distinct: Image Sharpening 64 The Playback Menu: Managing Pictures 65 Deleting Pictures: Delete 66 Automated Playback: Slide Show 68 Safeguarding Valuable Pictures: Protect 70 Ordering Prints: Print Set 71 Marking All Pictures for Transfer: Auto Transfer 73 The Setup Menu: Camera Setup 74...
User Manual
Page 16
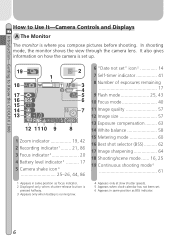
... COOLPIX 2000 How to Use It-Camera Controls and Displays A The Monitor The monitor is running low. 4 Appears only at slow shutter speeds. 5 Appears when clock-calendar has not been set " icon 5 14 7 Self-timer indicator 41 8 Number of exposures remaining 17 9 Flash mode 25, 43 10 Focus mode 40 11 Image quality 57 12 Image size 57 13 Exposure compensation ......... 63 14 White balance 58 15 Metering mode 60 16 Best shot selector (BSS 62 17 Image...
... COOLPIX 2000 How to Use It-Camera Controls and Displays A The Monitor The monitor is running low. 4 Appears only at slow shutter speeds. 5 Appears when clock-calendar has not been set " icon 5 14 7 Self-timer indicator 41 8 Number of exposures remaining 17 9 Flash mode 25, 43 10 Focus mode 40 11 Image quality 57 12 Image size 57 13 Exposure compensation ......... 63 14 White balance 58 15 Metering mode 60 16 Best shot selector (BSS 62 17 Image...
User Manual
Page 31
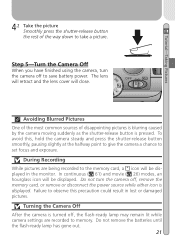
... way down to save battery power. In continuous ( 61) and movie ( 26) modes, an hourglass icon will be displayed in lost or damaged pictures. Turning the Camera Off After the camera is turned off, the flash-ready lamp may remain lit while camera settings are being recorded to memory. During Recording While pictures are recorded to the memory card, a icon will close. To avoid this, hold the camera steady and press the shutter-release button smoothly, pausing...
... way down to save battery power. In continuous ( 61) and movie ( 26) modes, an hourglass icon will be displayed in lost or damaged pictures. Turning the Camera Off After the camera is turned off, the flash-ready lamp may remain lit while camera settings are being recorded to memory. During Recording While pictures are recorded to the memory card, a icon will close. To avoid this, hold the camera steady and press the shutter-release button smoothly, pausing...
User Manual
Page 32
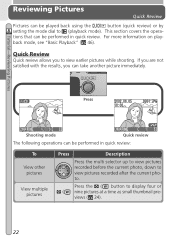
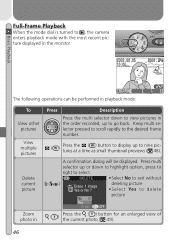
... photo, down to display four or ( ) nine pictures at a time as small thumbnail pre- Quick Review Quick review allows you can take another picture immediately. If you are not satisfied with the results, you to (playback mode). This section covers the operations that can be performed in quick review. Press 1632 FINE AUTO 8 Shooting mode 1632 FINE 0001/0008 Quick review The following operations can be played back using the QUICK button (quick review) or by setting the mode...
... photo, down to display four or ( ) nine pictures at a time as small thumbnail pre- Quick Review Quick review allows you can take another picture immediately. If you are not satisfied with the results, you to (playback mode). This section covers the operations that can be performed in quick review. Press 1632 FINE AUTO 8 Shooting mode 1632 FINE 0001/0008 Quick review The following operations can be played back using the QUICK button (quick review) or by setting the mode...
User Manual
Page 33
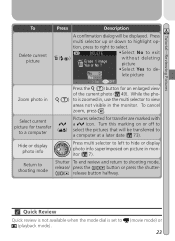
... or display photo info superimposed on or off to ) select the pictures that will be transferred to a computer at a later date ( 73). Quick Review Quick review is not available when the mode dial is zoomed in, use the multi selector to view areas not visible in the monitor. Select current picture for transfer are marked with a icon. Return to shooting mode Shutter To end review and return to highlight op- Turn...
... or display photo info superimposed on or off to ) select the pictures that will be transferred to a computer at a later date ( 73). Quick Review Quick review is not available when the mode dial is zoomed in, use the multi selector to view areas not visible in the monitor. Select current picture for transfer are marked with a icon. Return to shooting mode Shutter To end review and return to highlight op- Turn...
User Manual
Page 40
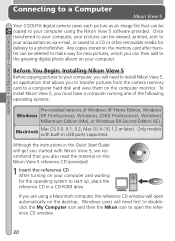
... pictures can be copied to your computer using a Macintosh computer, the reference CD window will get you can be deleted to make way for the operating system to start up, place the reference CD in USB ports supported. Connections-Connecting to a Computer Connecting to a Computer Nikon View 5 Your COOLPIX digital camera saves each picture as an image file that can be viewed, printed, sent to your acquaintances via e-mail, or saved to a CD or other removable...
... pictures can be copied to your computer using a Macintosh computer, the reference CD window will get you can be deleted to make way for the operating system to start up, place the reference CD in USB ports supported. Connections-Connecting to a Computer Connecting to a Computer Nikon View 5 Your COOLPIX digital camera saves each picture as an image file that can be viewed, printed, sent to your acquaintances via e-mail, or saved to a CD or other removable...

User Manual
Page 42
...-E5 USB cable. 1 Choose a USB protocol The COOLPIX 2000 supports two USB proto- ture Transfer Protocol (PTP). ond Edition (SE), or Mac OS 9 (9.0, 9.1, or 9.2) and have installed Nikon View 5, you can be sure that used by your computer. Before connecting the camera to the USB menu and select Mass Storage. Install Nikon View 5 Be sure to install Nikon View 5 before beginning transfer or use the optional EH-53 AC adapter. 32 Use a Reliable Power Source When transferring data between the camera...
...-E5 USB cable. 1 Choose a USB protocol The COOLPIX 2000 supports two USB proto- ture Transfer Protocol (PTP). ond Edition (SE), or Mac OS 9 (9.0, 9.1, or 9.2) and have installed Nikon View 5, you can be sure that used by your computer. Before connecting the camera to the USB menu and select Mass Storage. Install Nikon View 5 Be sure to install Nikon View 5 before beginning transfer or use the optional EH-53 AC adapter. 32 Use a Reliable Power Source When transferring data between the camera...
User Manual
Page 51
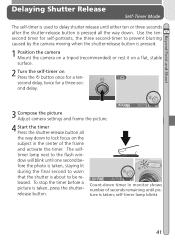
... flash window will blink until one second before a picture is taken, press the shutterrelease button. 10 1632 FINE AUTO 8 Count-down to delay shutter release until either ten or three seconds after the shutter-release button is pressed all the way down timer in the center of seconds remaining until pic- self-timer lamp blinks 41 Beyond Point-and-Shoot Delaying Shutter Release Self-Timer Mode The self-timer is used to lock focus...
... flash window will blink until one second before a picture is taken, press the shutterrelease button. 10 1632 FINE AUTO 8 Count-down to delay shutter release until either ten or three seconds after the shutter-release button is pressed all the way down timer in the center of seconds remaining until pic- self-timer lamp blinks 41 Beyond Point-and-Shoot Delaying Shutter Release Self-Timer Mode The self-timer is used to lock focus...
User Manual
Page 52
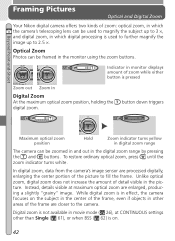
... frame. Indicator in monitor displays amount of zoom while either button is used to magnify the subject up to 3 ×, and digital zoom, in which digital processing is pressed Zoom out Zoom in the picture. In digital zoom, data from the camera's image sensor are closer to the camera. Beyond Point-and-Shoot Framing Pictures Optical and Digital Zoom Your Nikon digital camera offers two kinds of zoom: optical zoom, in which the camera's telescoping lens can be...
... frame. Indicator in monitor displays amount of zoom while either button is used to magnify the subject up to 3 ×, and digital zoom, in which digital processing is pressed Zoom out Zoom in the picture. In digital zoom, data from the camera's image sensor are closer to the camera. Beyond Point-and-Shoot Framing Pictures Optical and Digital Zoom Your Nikon digital camera offers two kinds of zoom: optical zoom, in which the camera's telescoping lens can be...
User Manual
Page 56
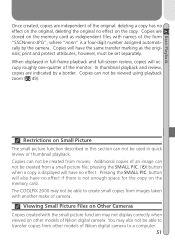
... () Erase 1 image Yes or No ? DELETE • Select No to , the camera enters playback mode with the most recent picture displayed in the order recorded, up to select. Keep multi selector pressed to scroll rapidly to the desired frame number. ( ) Press the ( ) button to display up or down to view pictures in the monitor. No Yes Set OFF deleting picture • Select Yes to nine pictures at a time as...
... () Erase 1 image Yes or No ? DELETE • Select No to , the camera enters playback mode with the most recent picture displayed in the order recorded, up to select. Keep multi selector pressed to scroll rapidly to the desired frame number. ( ) Press the ( ) button to display up or down to view pictures in the monitor. No Yes Set OFF deleting picture • Select Yes to nine pictures at a time as...
User Manual
Page 61
... PIC. button will occupy roughly one-quarter of camera. You may also not be created from movies. Copies are stored on the memory card as the originals; In thumbnail playback and review, copies are indicated by the camera. Viewing Small Picture Files on Other Cameras Copies created with the small picture function may not be set separately. Basic Playback Once created, copies are independent of Nikon digital camera. Copies can not be able to transfer copies from other models...
... PIC. button will occupy roughly one-quarter of camera. You may also not be created from movies. Copies are stored on the memory card as the originals; In thumbnail playback and review, copies are indicated by the camera. Viewing Small Picture Files on Other Cameras Copies created with the small picture function may not be set separately. Basic Playback Once created, copies are independent of Nikon digital camera. Copies can not be able to transfer copies from other models...
User Manual
Page 65
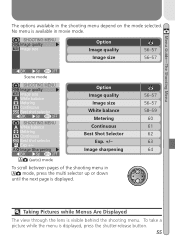
...-59 60 61 62 63 64 Taking Pictures while Menus Are Displayed The view through the lens is displayed, press the shutter-release button. 55 SHOOTING MENU FINE Image quality 1632 Image size Option Image quality Image size 56-57 56-57 BK Set OFF Scene mode SHOOTING MENU FINE Image quality 1632 Image size White balance Metering Continuous Best shot selector BK Set OFF SHOOTING MENU White balance Metering Continuous Best shot selector Exp. +/- Menu Guide-The Shooting Menu The options available in the shooting menu depend on the...
...-59 60 61 62 63 64 Taking Pictures while Menus Are Displayed The view through the lens is displayed, press the shutter-release button. 55 SHOOTING MENU FINE Image quality 1632 Image size Option Image quality Image size 56-57 56-57 BK Set OFF Scene mode SHOOTING MENU FINE Image quality 1632 Image size White balance Metering Continuous Best shot selector BK Set OFF SHOOTING MENU White balance Metering Continuous Best shot selector Exp. +/- Menu Guide-The Shooting Menu The options available in the shooting menu depend on the...
User Manual
Page 83
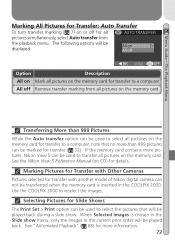
... transfer with another model of Nikon digital camera can be used to select the pictures that no more than 999 pictures can be marked for transfer ( 32). Use the COOLPIX 2000 to a computer. Selecting Pictures for Slide Shows The Print Set > Print option can not be transferred when the memory card is chosen in the Slide show . See "Automated Playback" ( 68) for more pictures, Nikon View 5 can be used to transfer all pictures on the memory card. Menu Guide-The Playback Menu...
... transfer with another model of Nikon digital camera can be used to select the pictures that no more than 999 pictures can be marked for transfer ( 32). Use the COOLPIX 2000 to a computer. Selecting Pictures for Slide Shows The Print Set > Print option can not be transferred when the memory card is chosen in the Slide show . See "Automated Playback" ( 68) for more pictures, Nikon View 5 can be used to transfer all pictures on the memory card. Menu Guide-The Playback Menu...
User Manual
Page 94
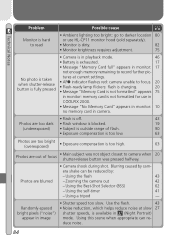
...; Message "Memory Card full" appears in monitor: 17 not enough memory remaining to focus. • Flash-ready lamp flickers: flash is charging. • Message "Memory Card is not formatted" appears 20 20 75 in monitor: memory card is not formatted for use in COOLPIX 2000. • Message "No Memory Card" appears in monitor: 10 no memory card in image mode. No photo is taken when shutter-release button is fully pressed tures at slow 27 bright pixels ("noise") shutter speeds...
...; Message "Memory Card full" appears in monitor: 17 not enough memory remaining to focus. • Flash-ready lamp flickers: flash is charging. • Message "Memory Card is not formatted" appears 20 20 75 in monitor: memory card is not formatted for use in COOLPIX 2000. • Message "No Memory Card" appears in monitor: 10 no memory card in image mode. No photo is taken when shutter-release button is fully pressed tures at slow 27 bright pixels ("noise") shutter speeds...
User Manual
Page 95
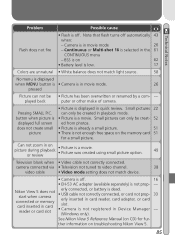
... review • Picture is a movie. • Picture was created using small picture option. 49 Television blank when • Video cable not correctly connected. played back puter or other make of camera. • Picture is displayed in the 61 CONTINUOUS menu - does not create small • Picture is already a small picture. 51 picture • There is not enough free space on troubleshooting Nikon View 5. 85 camera connected via • Television not tuned to video channel. 38 video cable • Video mode setting...
... review • Picture is a movie. • Picture was created using small picture option. 49 Television blank when • Video cable not correctly connected. played back puter or other make of camera. • Picture is displayed in the 61 CONTINUOUS menu - does not create small • Picture is already a small picture. 51 picture • There is not enough free space on troubleshooting Nikon View 5. 85 camera connected via • Television not tuned to video channel. 38 video cable • Video mode setting...
User Manual
Page 97
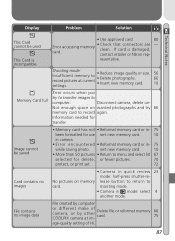
... button to return to record pictures at im- Image cannot be used This Card is damaged, contact retailer or Nikon rep- - information needed for delete, or fewer pictures. 70 protect, or print set. 72 Card contains no image data File created by other COOLPIX camera at current settings. • Reduce image quality or size. • Delete photographs. • Insert new memory card. 56 66 10 Memory Card full Error occurs when you try 66 memory card to record again. Shooting mode: Insufficient memory to card. shooting mode...
... button to return to record pictures at im- Image cannot be used This Card is damaged, contact retailer or Nikon rep- - information needed for delete, or fewer pictures. 70 protect, or print set. 72 Card contains no image data File created by other COOLPIX camera at current settings. • Reduce image quality or size. • Delete photographs. • Insert new memory card. 56 66 10 Memory Card full Error occurs when you try 66 memory card to record again. Shooting mode: Insufficient memory to card. shooting mode...
User Manual
Page 98
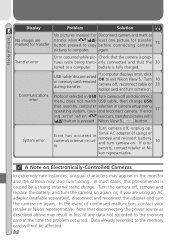
... in camera's internal circuitry. System error Turn camera off , remove and replace the battery, and turn camera on again, or, if you are marked for transfer No pictures marked for Disconnect camera and mark at transfer when ( ) least one picture for transfer button pressed to copy before connecting camera 73 pictures to the memory card at the time the problem occurred. Error has occurred in USB Turn camera off and disconnect menu does not match USB cable, then change USB that disconnecting the power source...
... in camera's internal circuitry. System error Turn camera off , remove and replace the battery, and turn camera on again, or, if you are marked for transfer No pictures marked for Disconnect camera and mark at transfer when ( ) least one picture for transfer button pressed to copy before connecting camera 73 pictures to the memory card at the time the problem occurred. Error has occurred in USB Turn camera off and disconnect menu does not match USB cable, then change USB that disconnecting the power source...


