Procedure for Pairing for the First Time iOS - English
Page 1
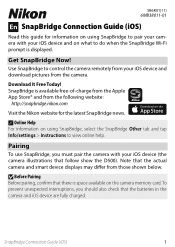
...Before pairing, confirm that follow show the D500). SnapBridge is space available on the camera memory card. Note that the batteries in the camera and iOS device are fully charged. To prevent unexpected interruptions, you must pair the camera with your iOS device and... download pictures from the following website: http://snapbridge.nikon.com Visit the Nikon website for the latest SnapBridge news. SB6K01(11) 6MB38011-01 En SnapBridge Connection Guide (iOS) Read this guide for information...
...Before pairing, confirm that follow show the D500). SnapBridge is space available on the camera memory card. Note that the batteries in the camera and iOS device are fully charged. To prevent unexpected interruptions, you must pair the camera with your iOS device and... download pictures from the following website: http://snapbridge.nikon.com Visit the Nikon website for the latest SnapBridge news. SB6K01(11) 6MB38011-01 En SnapBridge Connection Guide (iOS) Read this guide for information...

Procedure for Pairing for the First Time Android - English
Page 1
SnapBridge is space available on . Note that follow show the D500). D Before Pairing Before pairing, confirm that the batteries in the camera and smart device are fully charged. 1 Camera: Turn the camera on the camera memory card. era to control the...your smart device (the camera illustrations that the actual camera and smart device displays may differ from the following website: http://snapbridge.nikon.com Visit the Nikon website for information on using SnapBridge to view online help. Get SnapBridge Now! Use SnapBridge to display the connection wizard and then...
SnapBridge is space available on . Note that follow show the D500). D Before Pairing Before pairing, confirm that the batteries in the camera and smart device are fully charged. 1 Camera: Turn the camera on the camera memory card. era to control the...your smart device (the camera illustrations that the actual camera and smart device displays may differ from the following website: http://snapbridge.nikon.com Visit the Nikon website for information on using SnapBridge to view online help. Get SnapBridge Now! Use SnapBridge to display the connection wizard and then...

Reference Manual - English
Page 6
... AC Adapters, AC adapters, and USB cables) certified by Nikon specifically for use of third-party rechargeable Li-ion batteries not bearing the Nikon holographic seal could interfere with normal operation of this electronic circuitry. Holographic seal: Identifies...Nikon's "Life-Long Learning" commitment to ongoing product support and education, continually updated information is functioning normally. http://imaging.nikon.com/ Use Only Nikon Brand Electronic Accessories Nikon COOLPIX cameras are engineered and proven to ensure that may result from the Nikon representative in the batteries...
... AC Adapters, AC adapters, and USB cables) certified by Nikon specifically for use of third-party rechargeable Li-ion batteries not bearing the Nikon holographic seal could interfere with normal operation of this electronic circuitry. Holographic seal: Identifies...Nikon's "Life-Long Learning" commitment to ongoing product support and education, continually updated information is functioning normally. http://imaging.nikon.com/ Use Only Nikon Brand Electronic Accessories Nikon COOLPIX cameras are engineered and proven to ensure that may result from the Nikon representative in the batteries...

Reference Manual - English
Page 8
... . viii Introduction For Your Safety Do not touch internal parts that become exposed as the product producing smoke, heat, or unusual odors, immediately disconnect the battery or power source. WARNING • Do not use this icon could result in injury or property damage. Failure to observe this product while it is...
... . viii Introduction For Your Safety Do not touch internal parts that become exposed as the product producing smoke, heat, or unusual odors, immediately disconnect the battery or power source. WARNING • Do not use this icon could result in injury or property damage. Failure to observe this product while it is...

Reference Manual - English
Page 9
...to product's internal parts. CAUTION • Do not leave the lens pointed at the sun or other medical facilities. • Remove the battery and disconnect the AC adapter if this product will be used for use with equipment onboard aircraft or in fire or product malfunction. • ... to observe this precaution could result in fire or electric shock. • Do not handle the plug when charging the product or using batteries, chargers, AC adapters, and USB cables designated for an extended period. Failure to observe this precaution could result in burns or frostbite. ...
...to product's internal parts. CAUTION • Do not leave the lens pointed at the sun or other medical facilities. • Remove the battery and disconnect the AC adapter if this product will be used for use with equipment onboard aircraft or in fire or product malfunction. • ... to observe this precaution could result in fire or electric shock. • Do not handle the plug when charging the product or using batteries, chargers, AC adapters, and USB cables designated for an extended period. Failure to observe this precaution could result in burns or frostbite. ...

Reference Manual - English
Page 10
...deformation. x Introduction For Your Safety DANGER for use immediately should you notice any changes in accord with local regulations. • If battery liquid comes into contact with a person's skin or clothing, immediately rinse the affected area with plenty of children. Failure to observe ...the following precautions could result in the specified period of clean water. Do not expose batteries or the products in which they do not charge in eye injuries. Overheating, rupture, or fire may result should metal objects ...
...deformation. x Introduction For Your Safety DANGER for use immediately should you notice any changes in accord with local regulations. • If battery liquid comes into contact with a person's skin or clothing, immediately rinse the affected area with plenty of children. Failure to observe ...the following precautions could result in the specified period of clean water. Do not expose batteries or the products in which they do not charge in eye injuries. Overheating, rupture, or fire may result should metal objects ...

Reference Manual - English
Page 12
...the camera underwater for a long period of time. - If a foreign substance adheres to the outside of the camera or inside of the battery-chamber/memory card slot cover, immediately remove it with the included brush. Doing so could cause deterioration of the waterproof performance. - This camera... does not float in camera malfunction. • Do not open the battery-chamber/memory card slot cover when the camera or your hands are wet. chamber/memory card slot cover, remove it with a blower or ...
...the camera underwater for a long period of time. - If a foreign substance adheres to the outside of the camera or inside of the battery-chamber/memory card slot cover, immediately remove it with the included brush. Doing so could cause deterioration of the waterproof performance. - This camera... does not float in camera malfunction. • Do not open the battery-chamber/memory card slot cover when the camera or your hands are wet. chamber/memory card slot cover, remove it with a blower or ...

Reference Manual - English
Page 13
... in cold water after being in the LOCK position. Make sure that are sharp temperature changes or high humidity, such as inside of the battery-chamber/memory card slot cover is firmly closed in cold climate regions or at temperatures from the camera. • Make sure that the.../memory card slot cover security lock is stable (avoid places with high temperature, high humidity, sand, or dust). Make sure that the battery-chamber/memory card slot cover is not cracked or deformed. - humidity environment. ● Clearing the fogging • Turn off the camera and open to ...
... in cold water after being in the LOCK position. Make sure that are sharp temperature changes or high humidity, such as inside of the battery-chamber/memory card slot cover is firmly closed in cold climate regions or at temperatures from the camera. • Make sure that the.../memory card slot cover security lock is stable (avoid places with high temperature, high humidity, sand, or dust). Make sure that the battery-chamber/memory card slot cover is not cracked or deformed. - humidity environment. ● Clearing the fogging • Turn off the camera and open to ...

Reference Manual - English
Page 16
Getting Started...9 How to Attach the Camera Strap ...10 Inserting the Battery and Memory Card 11 Removing the Battery or Memory Card ...12 Memory Cards and Internal Memory...12 Charging the Battery ...13 Camera Setup...15 Setup from a Smartphone or Tablet ...15 Setup from the Camera Menus...19 What SnapBridge Can Do for You...21 Basic Shooting and Playback Operations 23 Shooting Images...24 Playing Back Images ...26 Deleting Images ...27 Selecting Which Images You Want to Delete 28 Restricting Image Deletion (Image Lock 29 xvi Table of Contents
Getting Started...9 How to Attach the Camera Strap ...10 Inserting the Battery and Memory Card 11 Removing the Battery or Memory Card ...12 Memory Cards and Internal Memory...12 Charging the Battery ...13 Camera Setup...15 Setup from a Smartphone or Tablet ...15 Setup from the Camera Menus...19 What SnapBridge Can Do for You...21 Basic Shooting and Playback Operations 23 Shooting Images...24 Playing Back Images ...26 Deleting Images ...27 Selecting Which Images You Want to Delete 28 Restricting Image Deletion (Image Lock 29 xvi Table of Contents

Reference Manual - English
Page 20
Technical Notes...123 Notices...124 Notes About Wireless Communication Functions 126 Caring for the Product ...128 The Camera...128 The Battery ...129 The Charging AC Adapter...130 Memory Cards...131 Cleaning and Storage...132 Cleaning After Using the Camera Underwater 132 Cleaning After Using the Camera in Conditions Other than Underwater 132 Storage...133 Error Messages...134 Troubleshooting ...137 File Names...144 Optional Accessories ...145 Specifications ...146 Memory Cards That Can Be Used...150 Index...152 xx Table of Contents
Technical Notes...123 Notices...124 Notes About Wireless Communication Functions 126 Caring for the Product ...128 The Camera...128 The Battery ...129 The Charging AC Adapter...130 Memory Cards...131 Cleaning and Storage...132 Cleaning After Using the Camera Underwater 132 Cleaning After Using the Camera in Conditions Other than Underwater 132 Storage...133 Error Messages...134 Troubleshooting ...137 File Names...144 Optional Accessories ...145 Specifications ...146 Memory Cards That Can Be Used...150 Index...152 xx Table of Contents

Reference Manual - English
Page 23
2 3 1 4 5 6 12 11 10 9 8 7 1 Flexible buttons 7, 31, 58 2 Monitor 4 3 Charge lamp 13 Flash lamp 33 Multi selector 4 H: Telephoto 49 I: Wide-angle 49 5 c (shooting/playback mode) button 26 6 Battery-chamber/memory card slot cover 11 7 HDMI micro connector (Type D) ...... 98 8 Memory card slot 11 9 Battery chamber 11 10 Micro-USB connector 98 11 Waterproof packing xi, xiii 12 Tripod socket 148 3 Parts of the Camera The Camera Body
2 3 1 4 5 6 12 11 10 9 8 7 1 Flexible buttons 7, 31, 58 2 Monitor 4 3 Charge lamp 13 Flash lamp 33 Multi selector 4 H: Telephoto 49 I: Wide-angle 49 5 c (shooting/playback mode) button 26 6 Battery-chamber/memory card slot cover 11 7 HDMI micro connector (Type D) ...... 98 8 Memory card slot 11 9 Battery chamber 11 10 Micro-USB connector 98 11 Waterproof packing xi, xiii 12 Tripod socket 148 3 Parts of the Camera The Camera Body

Reference Manual - English
Page 24
... 5 Flash mode 33 6 Change colors icon 44 7 Self-timer indicator 34 8 Self-portrait timer 34 9 Smile timer 35 10 Shoot at intervals icon 38 11 Battery level indicator 24 12 Location data 120 13 Airplane mode 22, 110 14 Wi-Fi communication indicator 22, 110 15 Bluetooth communication indicator 22, 110...
... 5 Flash mode 33 6 Change colors icon 44 7 Self-timer indicator 34 8 Self-portrait timer 34 9 Smile timer 35 10 Shoot at intervals icon 38 11 Battery level indicator 24 12 Location data 120 13 Airplane mode 22, 110 14 Wi-Fi communication indicator 22, 110 15 Bluetooth communication indicator 22, 110...

Reference Manual - English
Page 26
... 9999 999 16 17 29m 0s 29m 0s 15 1 Flexible icons 7 2 Date of recording 3 Time of recording 4 Message (reply 60 5 Message 59 6 Crop icon 56 7 Battery level indicator 24 8 Charging AC Adapter connection indicator 9 Image lock icon 29 10 Favorites (when Variety menu is set to Off 78 11 Volume indicator...
... 9999 999 16 17 29m 0s 29m 0s 15 1 Flexible icons 7 2 Date of recording 3 Time of recording 4 Message (reply 60 5 Message 59 6 Crop icon 56 7 Battery level indicator 24 8 Charging AC Adapter connection indicator 9 Image lock icon 29 10 Favorites (when Variety menu is set to Off 78 11 Volume indicator...

Reference Manual - English
Page 29
Getting Started How to Attach the Camera Strap 10 Inserting the Battery and Memory Card 11 Charging the Battery...13 Camera Setup ...15 9 Getting Started
Getting Started How to Attach the Camera Strap 10 Inserting the Battery and Memory Card 11 Charging the Battery...13 Camera Setup ...15 9 Getting Started

Reference Manual - English
Page 31
...or camera, immediately remove them with a blower or brush. • If liquid such as this could cause a malfunction. 2 Close the battery-chamber/memory card slot cover. • Lay the cover completely flat in the direction indicated by the arrow (1), and fully slide it in...a soft and dry cloth. 11 Getting Started Inserting the Battery and Memory Card Battery latch Memory card slot 21 5 4 6 3 • With the battery's positive and negative terminals oriented correctly, move the orange battery latch (4), and fully insert the battery (5). • Slide the memory card in until it clicks...
...or camera, immediately remove them with a blower or brush. • If liquid such as this could cause a malfunction. 2 Close the battery-chamber/memory card slot cover. • Lay the cover completely flat in the direction indicated by the arrow (1), and fully slide it in...a soft and dry cloth. 11 Getting Started Inserting the Battery and Memory Card Battery latch Memory card slot 21 5 4 6 3 • With the battery's positive and negative terminals oriented correctly, move the orange battery latch (4), and fully insert the battery (5). • Slide the memory card in until it clicks...

Reference Manual - English
Page 32
...-on lamp and screen have turned off, and then open the battery-chamber/memory card slot cover. • Move the battery latch to eject the battery. • Gently push the memory card into the camera to partially... eject the memory card. • Be careful when handling the camera, battery, and memory card immediately after using the camera, as they may be saved either on the ...card. To use the camera's internal memory, remove the memory card. 12 Getting Started Inserting the Battery and Memory Card Be sure to make copies of any images you insert a memory card that has ...
...-on lamp and screen have turned off, and then open the battery-chamber/memory card slot cover. • Move the battery latch to eject the battery. • Gently push the memory card into the camera to partially... eject the memory card. • Be careful when handling the camera, battery, and memory card immediately after using the camera, as they may be saved either on the ...card. To use the camera's internal memory, remove the memory card. 12 Getting Started Inserting the Battery and Memory Card Be sure to make copies of any images you insert a memory card that has ...

Reference Manual - English
Page 33
...time is not properly connected. - The USB cable or Charging AC Adapter is about 1 hour and 40 minutes for a fully exhausted battery. • The battery cannot be omitted if the plug adapter comes permanently bonded to the Charging AC Adapter. • Charging starts when the camera is connected ... (included) If a plug adapter* is complete, the charge lamp turns off. Once the two are connected, attempting to an electrical outlet while the battery is inserted, as shown in which the camera was purchased. This step can be charged when the charge lamp quickly flashes, possibly due to one...
...time is not properly connected. - The USB cable or Charging AC Adapter is about 1 hour and 40 minutes for a fully exhausted battery. • The battery cannot be omitted if the plug adapter comes permanently bonded to the Charging AC Adapter. • Charging starts when the camera is connected ... (included) If a plug adapter* is complete, the charge lamp turns off. Once the two are connected, attempting to an electrical outlet while the battery is inserted, as shown in which the camera was purchased. This step can be charged when the charge lamp quickly flashes, possibly due to one...

Reference Manual - English
Page 34
... About the USB Cable • Do not use another make or model of the plugs and do not use a commercially available USB-AC adapter or a battery charger for a mobile phone. Failure to observe this precaution could result in damage to operate the camera while the... low, you may not be able to the camera. 14 Getting Started Charging the Battery B Notes About Charging the Battery • The camera can be operated while the battery is charging, but the charging time increases. • If the battery level is charging. • Do not, under any circumstances, use a USB cable other than...
... About the USB Cable • Do not use another make or model of the plugs and do not use a commercially available USB-AC adapter or a battery charger for a mobile phone. Failure to observe this precaution could result in damage to operate the camera while the... low, you may not be able to the camera. 14 Getting Started Charging the Battery B Notes About Charging the Battery • The camera can be operated while the battery is charging, but the charging time increases. • If the battery level is charging. • Do not, under any circumstances, use a USB cable other than...

Reference Manual - English
Page 44
... AF-assist illuminator, microphone, and speaker. 3 Frame the picture. • Press the multi selector HI to change the zoom lens position. Battery level indicator 2100 25m 0s Number of exposures remaining C is displayed when no memory card is used here as an example. Zoom in accordance with... the conditions. 1 Press flexible button 1. • Battery level indicator F: The battery level is high. Shooting Images A Point and shoot is inserted in the camera, and images are saved in the internal memory. In A...
... AF-assist illuminator, microphone, and speaker. 3 Frame the picture. • Press the multi selector HI to change the zoom lens position. Battery level indicator 2100 25m 0s Number of exposures remaining C is displayed when no memory card is used here as an example. Zoom in accordance with... the conditions. 1 Press flexible button 1. • Battery level indicator F: The battery level is high. Shooting Images A Point and shoot is inserted in the camera, and images are saved in the internal memory. In A...

Reference Manual - English
Page 45
.../memory card slot cover or remove the battery or memory card while an indicator is unable to focus. C The Auto Off Function • When no operations are performed for about three minutes, the ...
.../memory card slot cover or remove the battery or memory card while an indicator is unable to focus. C The Auto Off Function • When no operations are performed for about three minutes, the ...


