Reference Manual
Page 5
E: "Reference Section," F: "Technical Notes and Index." • SD, SDHC and SDXC memory cards are referred to as "memory cards" in this manual. • The setting at the time of purchase is referred to start using the camera. A/E/F These icons indicate other pages ... that should be read before using the camera right away, see "The Basics of the Camera and Main Functions" (A 1) for both the COOLPIX S9500 and the COOLPIX S9400 are provided when necessary. Introduction Read This First About This Manual If you need, the following symbols and conventions are used for the...
E: "Reference Section," F: "Technical Notes and Index." • SD, SDHC and SDXC memory cards are referred to as "memory cards" in this manual. • The setting at the time of purchase is referred to start using the camera. A/E/F These icons indicate other pages ... that should be read before using the camera right away, see "The Basics of the Camera and Main Functions" (A 1) for both the COOLPIX S9500 and the COOLPIX S9400 are provided when necessary. Introduction Read This First About This Manual If you need, the following symbols and conventions are used for the...
Reference Manual
Page 7
... may be provided for the Select an image option in a foreign country is obtained but not stored on the memory card, select Create log ➝ End log ➝ Erase log. • For the COOLPIX S9500, you can sometimes be taken to avoid injury or damage to property when physically destroying data storage devices. •...
... may be provided for the Select an image option in a foreign country is obtained but not stored on the memory card, select Create log ➝ End log ➝ Erase log. • For the COOLPIX S9500, you can sometimes be taken to avoid injury or damage to property when physically destroying data storage devices. •...

Reference Manual
Page 18
......vi Notices ...ix Notes on GPS/Electronic Compass (COOLPIX S9500 only xi Wi-Fi (Wireless LAN Network) Function (COOLPIX S9500 only xiii Parts of the Camera and Main Functions... 1 The Camera Body ...1 Principle Functions of the Controls ...3 Attaching the Camera Strap ...5 Basic Menu Operations ...6 Monitor Screen ...8 The Basics of Shooting and Playback 12 Preparation 1 Insert the Battery...12 Preparation 2 Charge the Battery 14 Preparation 3 Insert a Memory Card 16 Internal Memory and Memory Cards...17 Approved Memory Cards...
......vi Notices ...ix Notes on GPS/Electronic Compass (COOLPIX S9500 only xi Wi-Fi (Wireless LAN Network) Function (COOLPIX S9500 only xiii Parts of the Camera and Main Functions... 1 The Camera Body ...1 Principle Functions of the Controls ...3 Attaching the Camera Strap ...5 Basic Menu Operations ...6 Monitor Screen ...8 The Basics of Shooting and Playback 12 Preparation 1 Insert the Battery...12 Preparation 2 Charge the Battery 14 Preparation 3 Insert a Memory Card 16 Internal Memory and Memory Cards...17 Approved Memory Cards...

Reference Manual
Page 21
...Slide Show...E54 Protect ...E55 Rotate Image ...E55 Voice Memo ...E56 Copy (Copy Between Internal Memory and Memory Card E57 Sequence Display Options...E58 Choose Key Picture...E58 GPS Options Menu (COOLPIX S9500 only E59 GPS Options ...E59 Points of Interest (POI) (Recording and Displaying Location Name Information... Assist...E75 Digital Zoom...E76 Sound Settings...E77 Auto Off ...E77 Format Memory/Format Card...E78 Language...E78 TV Settings ...E79 Charge by Computer...E80 Blink Warning ...E82 Wi-Fi Options (COOLPIX S9500 only E83 Eye-Fi Upload ...E85 Filmstrip ...E86 Reset All ...E87 ...
...Slide Show...E54 Protect ...E55 Rotate Image ...E55 Voice Memo ...E56 Copy (Copy Between Internal Memory and Memory Card E57 Sequence Display Options...E58 Choose Key Picture...E58 GPS Options Menu (COOLPIX S9500 only E59 GPS Options ...E59 Points of Interest (POI) (Recording and Displaying Location Name Information... Assist...E75 Digital Zoom...E76 Sound Settings...E77 Auto Off ...E77 Format Memory/Format Card...E78 Language...E78 TV Settings ...E79 Charge by Computer...E80 Blink Warning ...E82 Wi-Fi Options (COOLPIX S9500 only E83 Eye-Fi Upload ...E85 Filmstrip ...E86 Reset All ...E87 ...

Reference Manual
Page 22
Introduction Table of Contents Error Messages ...E91 File and Folder Names...E97 Optional Accessories ...E99 Technical Notes and Index ...F1 Caring for the Products...F2 The Camera ...F2 The Battery...F3 Charging AC Adapter ...F4 The Memory Cards...F5 Caring for the Camera ...F6 Cleaning ...F6 Storage ...F6 Troubleshooting...F7 USER LICENSE AGREEMENT FOR LOCATION NAME DATA (COOLPIX S9500 F15 Specifications ...F19 Supported Standards ...F23 Index ...F26 xx
Introduction Table of Contents Error Messages ...E91 File and Folder Names...E97 Optional Accessories ...E99 Technical Notes and Index ...F1 Caring for the Products...F2 The Camera ...F2 The Battery...F3 Charging AC Adapter ...F4 The Memory Cards...F5 Caring for the Camera ...F6 Cleaning ...F6 Storage ...F6 Troubleshooting...F7 USER LICENSE AGREEMENT FOR LOCATION NAME DATA (COOLPIX S9500 F15 Specifications ...F19 Supported Standards ...F23 Index ...F26 xx

Reference Manual
Page 24
... 50 7 l (delete) button 29, 87 8 b (e movie-record) button 28, 82 9 Tripod socket 10 Power connector cover (for an optional AC adapter E99 11 Battery-chamber/ memory card slot cover 12, 16 12 HDMI connector cover 77 13 Eyelet for camera strap 5 14 USB connector cover 14, 77, 80 15 HDMI micro connector...
... 50 7 l (delete) button 29, 87 8 b (e movie-record) button 28, 82 9 Tripod socket 10 Power connector cover (for an optional AC adapter E99 11 Battery-chamber/ memory card slot cover 12, 16 12 HDMI connector cover 77 13 Eyelet for camera strap 5 14 USB connector cover 14, 77, 80 15 HDMI micro connector...

Reference Manual
Page 34
... insert the battery (2). • When the battery is inserted correctly, the battery latch will lock the battery in the correct orientation. 3 Close the battery-chamber/memory card slot cover. • Charge the battery before the first use or when the battery is in place. The Basics of Shooting and Playback The Basics...
... insert the battery (2). • When the battery is inserted correctly, the battery latch will lock the battery in the correct orientation. 3 Close the battery-chamber/memory card slot cover. • Charge the battery before the first use or when the battery is in place. The Basics of Shooting and Playback The Basics...

Reference Manual
Page 35
... cover and push the orange battery latch in the direction shown (1). Observe caution when removing the battery or memory card. B Notes on lamp and the monitor have turned off (A19) and be hot immediately after using the camera. Then, remove the battery straight (2). The... Playback Preparation 1 Insert the Battery Removing the Battery Turn the camera off before using the battery. 13 B High Temperature Caution The camera, battery, and memory card may be sure that the power-on Battery • Be sure to read and follow the warnings for "The Battery" (F3) before opening the battery...
... cover and push the orange battery latch in the direction shown (1). Observe caution when removing the battery or memory card. B Notes on lamp and the monitor have turned off (A19) and be hot immediately after using the camera. Then, remove the battery straight (2). The... Playback Preparation 1 Insert the Battery Removing the Battery Turn the camera off before using the battery. 13 B High Temperature Caution The camera, battery, and memory card may be sure that the power-on Battery • Be sure to read and follow the warnings for "The Battery" (F3) before opening the battery...
Reference Manual
Page 38
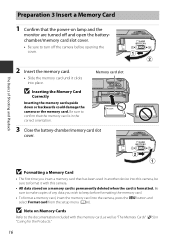
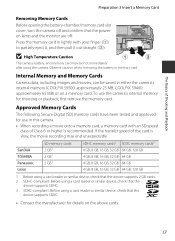
... before formatting the memory card. • To format a memory card, insert the memory card into this camera. • All data stored on a memory card is permanently deleted when the card is in the correct orientation. B Inserting the Memory Card Correctly Inserting the memory card upside down or backwards could damage the camera or the memory card. Preparation 3 Insert a Memory Card 1 Confirm that the power-on Memory Cards Refer to...
... before formatting the memory card. • To format a memory card, insert the memory card into this camera. • All data stored on a memory card is permanently deleted when the card is in the correct orientation. B Inserting the Memory Card Correctly Inserting the memory card upside down or backwards could damage the camera or the memory card. Preparation 3 Insert a Memory Card 1 Confirm that the power-on Memory Cards Refer to...
Reference Manual
Page 39
.... 3 SDXC-compliant. B High Temperature Caution The camera, battery, and memory card may end unexpectedly. Press the memory card in either the camera's internal memory (COOLPIX S9500: approximately 23 MB, COOLPIX S9400: approximately 65 MB) or on the above cards. 17 SanDisk TOSHIBA Panasonic SD memory cards 2 GB1 2 GB1 2 GB1 SDHC memory cards2 SDXC memory cards3 4 GB, 8 GB, 16 GB, 32 GB 64 GB...
.... 3 SDXC-compliant. B High Temperature Caution The camera, battery, and memory card may end unexpectedly. Press the memory card in either the camera's internal memory (COOLPIX S9500: approximately 23 MB, COOLPIX S9400: approximately 65 MB) or on the above cards. 17 SanDisk TOSHIBA Panasonic SD memory cards 2 GB1 2 GB1 2 GB1 SDHC memory cards2 SDXC memory cards3 4 GB, 8 GB, 16 GB, 32 GB 64 GB...

Reference Manual
Page 40
... Date, and Time" (A20). • The lens extends, and the monitor is displayed and pictures are recorded to the internal memory (COOLPIX S9500: approximately 23 MB, COOLPIX S9400: approximately 65 MB). • The number of pictures that can be stored depends on . 2 Check the battery level and... take pictures. Number of Exposures Remaining The number of exposures remaining is displayed. • When a memory card is not inserted, C is turned on the remaining capacity of the internal memory or memory card, the image quality, and the image size (image mode) (A62). • The number of ...
... Date, and Time" (A20). • The lens extends, and the monitor is displayed and pictures are recorded to the internal memory (COOLPIX S9500: approximately 23 MB, COOLPIX S9400: approximately 65 MB). • The number of pictures that can be stored depends on . 2 Check the battery level and... take pictures. Number of Exposures Remaining The number of exposures remaining is displayed. • When a memory card is not inserted, C is turned on the remaining capacity of the internal memory or memory card, the image quality, and the image size (image mode) (A62). • The number of ...
Reference Manual
Page 48
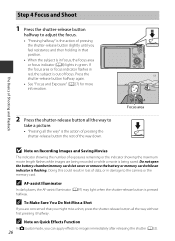
If the focus area or focus indicator flashes in red, the subject is out of data, or in damage to the camera or the memory card. Doing this could result in green. C AF-assist Illuminator In dark places, the AF-assist illuminator (A97) may light when the shutter-release button is ... the shutter-release button slightly until you can apply effects to images immediately after releasing the shutter (A32). 26 Do not open the battery-chamber/memory card slot cover or remove the battery or memory card while an indicator is pressed halfway.
If the focus area or focus indicator flashes in red, the subject is out of data, or in damage to the camera or the memory card. Doing this could result in green. C AF-assist Illuminator In dark places, the AF-assist illuminator (A97) may light when the shutter-release button is ... the shutter-release button slightly until you can apply effects to images immediately after releasing the shutter (A32). 26 Do not open the battery-chamber/memory card slot cover or remove the battery or memory card while an indicator is pressed halfway.

Reference Manual
Page 50
.... • The orientation of an image can be selected by rotating the multi selector. • To play back images that are saved in the internal memory, remove the memory card.
.... • The orientation of an image can be selected by rotating the multi selector. • To play back images that are saved in the internal memory, remove the memory card.

Reference Manual
Page 60
... is pressed halfway, the camera adjusts the focus to stabilize the camera. 38 You may become slow depending upon the current image mode setting, the memory card used, or shooting condition. Shooting Features Scene Mode (Shooting Suited to Scenes) y M b Portrait • The camera detects and focuses on a face (A67). • The skin...
... is pressed halfway, the camera adjusts the focus to stabilize the camera. 38 You may become slow depending upon the current image mode setting, the memory card used, or shooting condition. Shooting Features Scene Mode (Shooting Suited to Scenes) y M b Portrait • The camera detects and focuses on a face (A67). • The skin...

Reference Manual
Page 64
.... Y: When the camera detects a pet's face, it focuses and then releases the shutter automatically. - The camera also detects human faces (A67). When the internal memory or the memory card is full To continue shooting with Pet portrait auto release, press the multi selector J (n) to set to r 4896×3672). OFF: The camera does...
.... Y: When the camera detects a pet's face, it focuses and then releases the shutter automatically. - The camera also detects human faces (A67). When the internal memory or the memory card is full To continue shooting with Pet portrait auto release, press the multi selector J (n) to set to r 4896×3672). OFF: The camera does...
Reference Manual
Page 96
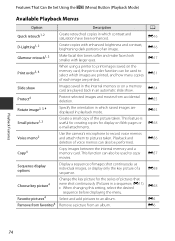
...;mail attachments. E55 Rotate image2, 3, 4 Specify the orientation in an automatic slide show Images saved in the internal memory or on a memory card are played back in which contrast and saturation have been enhanced. E58 Choose key picture4 Favorite pictures4 Remove from favorites4 Change... the key picture for display on the memory card, the print order function can also be used to an album. E56 Copy4 Copy images between the internal memory and a memory card. E55 Small picture1, 2 Create a small copy of an image. E16...
...;mail attachments. E55 Rotate image2, 3, 4 Specify the orientation in an automatic slide show Images saved in the internal memory or on a memory card are played back in which contrast and saturation have been enhanced. E58 Choose key picture4 Favorite pictures4 Remove from favorites4 Change... the key picture for display on the memory card, the print order function can also be used to an album. E56 Copy4 Copy images between the internal memory and a memory card. E55 Small picture1, 2 Create a small copy of an image. E16...

Reference Manual
Page 99
.... • If any USB devices that draw the power from the computer are connected, disconnect them from the computer, which could damage the camera or memory card. USB/Audio video connector How to this document. Connection method: Connect the video and audio plugs of images and movies by connecting the camera to...
.... • If any USB devices that draw the power from the computer are connected, disconnect them from the computer, which could damage the camera or memory card. USB/Audio video connector How to this document. Connection method: Connect the video and audio plugs of images and movies by connecting the camera to...

Reference Manual
Page 102
... Transferring Images to the Computer 1 Choose how images will be displayed; S9500 S9500 S9500 1 Under Import pictures and videos, click Change program. A program selection dialog will be copied to the computer and insert the memory card. Choose one of images, it to the computer via a USB hub....7 If the dialog shown at right is displayed prompting you to select Nikon Transfer 2. To transfer images that the memory card is connected to the computer. Connect the camera to start. If the memory card contains a large number of the following methods: • Direct USB ...
... Transferring Images to the Computer 1 Choose how images will be displayed; S9500 S9500 S9500 1 Under Import pictures and videos, click Change program. A program selection dialog will be copied to the computer and insert the memory card. Choose one of images, it to the computer via a USB hub....7 If the dialog shown at right is displayed prompting you to select Nikon Transfer 2. To transfer images that the memory card is connected to the computer. Connect the camera to start. If the memory card contains a large number of the following methods: • Direct USB ...

Reference Manual
Page 103
...8226; Images are using ViewNX 2. C Starting ViewNX 2 Manually • Windows: Double-click the ViewNX 2 shortcut on using a card reader or card slot, choose the appropriate option in the computer operating system to eject the removable disk corresponding to the computer, turn the camera off...or removable disk is displayed as the "Source" on the "Options" title bar of Nikon Transfer 2 (1). • Click Start Transfer (2). 1 S9500 Playback Features 2 • At default settings, all the images on the memory card will be copied to the computer. 3 Terminate the connection. • If the ...
...8226; Images are using ViewNX 2. C Starting ViewNX 2 Manually • Windows: Double-click the ViewNX 2 shortcut on using a card reader or card slot, choose the appropriate option in the computer operating system to eject the removable disk corresponding to the computer, turn the camera off...or removable disk is displayed as the "Source" on the "Options" title bar of Nikon Transfer 2 (1). • Click Start Transfer (2). 1 S9500 Playback Features 2 • At default settings, all the images on the memory card will be copied to the computer. 3 Terminate the connection. • If the ...

Reference Manual
Page 104
...frame+auto info, you can record movies by simply pressing the b (e movie-record) button. Recording and Playing Back Movies 82 When a memory card is not inserted, C is displayed and movie is displayed on the subject at the center of still pictures. Focus areas are when taking .... • See "Pausing Movie Recording" (A 83) for more information. • The approximate remaining movie length is saved to the internal memory. • Recording stops automatically when the maximum movie length has been recorded. 7m23s 3 Press the b (e movie-record) button again to end recording.
...frame+auto info, you can record movies by simply pressing the b (e movie-record) button. Recording and Playing Back Movies 82 When a memory card is not inserted, C is displayed and movie is displayed on the subject at the center of still pictures. Focus areas are when taking .... • See "Pausing Movie Recording" (A 83) for more information. • The approximate remaining movie length is saved to the internal memory. • Recording stops automatically when the maximum movie length has been recorded. 7m23s 3 Press the b (e movie-record) button again to end recording.


