Reference Manual
Page 6
...and complete, we would appreciate it were you to bring any form, by Nikon specifically for contact information: http://imaging.nikon.com/ Use Only Nikon Brand Electronic Accessories Nikon COOLPIX cameras are engineered and proven to the highest standards and include complex electronic circuitry.... For more information about Nikon brand accessories, contact a local authorized Nikon dealer. Nikon will not be available from the use of third-party rechargeable Li-ion batteries not bearing the Nikon holographic seal could interfere with this Nikon digital camera are designed to...
...and complete, we would appreciate it were you to bring any form, by Nikon specifically for contact information: http://imaging.nikon.com/ Use Only Nikon Brand Electronic Accessories Nikon COOLPIX cameras are engineered and proven to the highest standards and include complex electronic circuitry.... For more information about Nikon brand accessories, contact a local authorized Nikon dealer. Nikon will not be available from the use of third-party rechargeable Li-ion batteries not bearing the Nikon holographic seal could interfere with this Nikon digital camera are designed to...
Reference Manual
Page 7
...scanner, digital camera or other data. Deleted files can clear the Wi-Fi options (A98) setting using Reset all data using commercially available software, potentially resulting in camera memory does not completely erase the original image data. Introduction Read This First Notice Concerning Prohibition of ...in the Welcome screen setting (A96). Be sure to also replace any pictures selected for example, pictures of empty sky) (For the COOLPIX S9500, set the Record GPS data of making illegal copies or to Off). Do not use by national and international copyright laws. ...
...scanner, digital camera or other data. Deleted files can clear the Wi-Fi options (A98) setting using Reset all data using commercially available software, potentially resulting in camera memory does not completely erase the original image data. Introduction Read This First Notice Concerning Prohibition of ...in the Welcome screen setting (A96). Be sure to also replace any pictures selected for example, pictures of empty sky) (For the COOLPIX S9500, set the Record GPS data of making illegal copies or to Off). Do not use by national and international copyright laws. ...

Reference Manual
Page 16
... effects might occur, but such findings have not found to comply with any health problems are absolutely safe. The available scientific evidence does not show that this Wireless LAN Module (DW092) is no known adverse health effects. The declaration of Conformity Hereby...rules. xiv Please refer to FCC website. Introduction Wi-Fi (Wireless LAN Network) Function (COOLPIX S9500 only) FCC/IC RF Exposure Statement This transmitter must not be consulted at http:// imaging.nikon.com/support/pdf/DoC_S9500.pdf. Declaration of conformity may be co-located or operated in conjunction...
... effects might occur, but such findings have not found to comply with any health problems are absolutely safe. The available scientific evidence does not show that this Wireless LAN Module (DW092) is no known adverse health effects. The declaration of Conformity Hereby...rules. xiv Please refer to FCC website. Introduction Wi-Fi (Wireless LAN Network) Function (COOLPIX S9500 only) FCC/IC RF Exposure Statement This transmitter must not be consulted at http:// imaging.nikon.com/support/pdf/DoC_S9500.pdf. Declaration of conformity may be co-located or operated in conjunction...

Reference Manual
Page 18
...Manual...iii Information and Precautions...iv For Your Safety ...vi WARNINGS ...vi Notices ...ix Notes on GPS/Electronic Compass (COOLPIX S9500 only xi Wi-Fi (Wireless LAN Network) Function (COOLPIX S9500 only xiii Parts of the Camera and Main Functions 1 The Camera Body ...1 Principle Functions of the Controls ... the Camera On ...18 Turning the Camera On and Off...19 Setting the Display Language, Date, and Time 20 Step 2 Select a Shooting Mode...22 Available Shooting Modes...23 Step 3 Frame a Picture...24 Using the Zoom...25 Step 4 Focus and Shoot ...26 Step 5 Play Back Images ...28 Step 6...
...Manual...iii Information and Precautions...iv For Your Safety ...vi WARNINGS ...vi Notices ...ix Notes on GPS/Electronic Compass (COOLPIX S9500 only xi Wi-Fi (Wireless LAN Network) Function (COOLPIX S9500 only xiii Parts of the Camera and Main Functions 1 The Camera Body ...1 Principle Functions of the Controls ... the Camera On ...18 Turning the Camera On and Off...19 Setting the Display Language, Date, and Time 20 Step 2 Select a Shooting Mode...22 Available Shooting Modes...23 Step 3 Frame a Picture...24 Using the Zoom...25 Step 4 Focus and Shoot ...26 Step 5 Play Back Images ...28 Step 6...
Reference Manual
Page 19
......59 Features That Can Be Set Using the d (Menu) Button (Shooting Mode 61 Options Available in the Shooting Menu (A (Auto) Mode 62 Options Available in the Smart Portrait Menu 63 Features Not Available in Combination 64 Focusing on Subject...66 Using the Target Finding AF ...66 Using Face Detection... Movies 82 Recording Movies ...82 Features That Can Be Set Using the d (Menu) Button (Movie Menu 86 Available Movie Menu...86 Playing Back Movies...87 Using GPS/Electronic Compass (COOLPIX S9500 only 88 Starting GPS Data Recording...88 Features That Can Be Set Using the d (Menu) Button (GPS...
......59 Features That Can Be Set Using the d (Menu) Button (Shooting Mode 61 Options Available in the Shooting Menu (A (Auto) Mode 62 Options Available in the Smart Portrait Menu 63 Features Not Available in Combination 64 Focusing on Subject...66 Using the Target Finding AF ...66 Using Face Detection... Movies 82 Recording Movies ...82 Features That Can Be Set Using the d (Menu) Button (Movie Menu 86 Available Movie Menu...86 Playing Back Movies...87 Using GPS/Electronic Compass (COOLPIX S9500 only 88 Starting GPS Data Recording...88 Features That Can Be Set Using the d (Menu) Button (GPS...
Reference Manual
Page 29
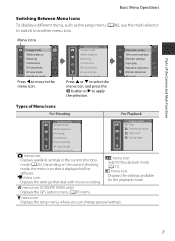
Depending on the current shooting mode, the menu icon that deal with movie recording. c menu icon: Displays the settings available for the playback mode. Shooting menu Image mode White balance Metering Continuous ISO sensitivity AF area mode Autofocus mode Press H or ... Favorite pictures Metering Auto sort Continuous List by date ISO sensitivity AF area mode Autofocus mode A menu icon: Displays available settings in the current shooting mode (A23). z menu icon (COOLPIX S9500 only): Displays the GPS options menu (A91) items. z menu icon: Displays the setup menu, where you...
Depending on the current shooting mode, the menu icon that deal with movie recording. c menu icon: Displays the settings available for the playback mode. Shooting menu Image mode White balance Metering Continuous ISO sensitivity AF area mode Autofocus mode Press H or ... Favorite pictures Metering Auto sort Continuous List by date ISO sensitivity AF area mode Autofocus mode A menu icon: Displays available settings in the current shooting mode (A23). z menu icon (COOLPIX S9500 only): Displays the GPS options menu (A91) items. z menu icon: Displays the setup menu, where you...
Reference Manual
Page 37
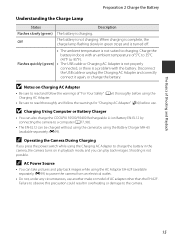
...Basics of 5°C to 35°C (41°F to 95°F). B Charging Using Computer or Battery Charger • You can also charge the COOLPIX S9500/S9400 Rechargeable Li-ion Battery EN-EL12 by connecting the camera to a computer (A77, 98). • The EN-EL12 can play back images while using ... AC Adapter • Be sure to read and follow the warnings for "Charging AC Adapter" (F4) before using the AC Adapter EH-62F (available separately; Shooting is not suited to charge the battery in green stops and is turned off. • The ambient temperature is not possible. Disconnect ...
...Basics of 5°C to 35°C (41°F to 95°F). B Charging Using Computer or Battery Charger • You can also charge the COOLPIX S9500/S9400 Rechargeable Li-ion Battery EN-EL12 by connecting the camera to a computer (A77, 98). • The EN-EL12 can play back images while using ... AC Adapter • Be sure to read and follow the warnings for "Charging AC Adapter" (F4) before using the AC Adapter EH-62F (available separately; Shooting is not suited to charge the battery in green stops and is turned off. • The ambient temperature is not possible. Disconnect ...

Reference Manual
Page 41
.... C Note on Battery Drain Battery power drains faster than usual while the camera is recording log data (A92) or using the AC Adapter EH-62F (available separately), the camera enters standby mode after the camera is turned off (A89). Press the power switch, shutter-release button, c button, or b (e movie-record) button...
.... C Note on Battery Drain Battery power drains faster than usual while the camera is recording log data (A92) or using the AC Adapter EH-62F (available separately), the camera enters standby mode after the camera is turned off (A89). Press the power switch, shutter-release button, c button, or b (e movie-record) button...
Reference Manual
Page 45
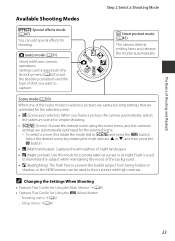
... the scene modes is used to shoot scenes with basic camera operations. Scene mode (A33) When one of Shooting and Playback Step 2 Select a Shooting Mode Available Shooting Modes u Special effects mode (A47) You can be adjusted in the shooting menu (A62) to prevent the backlit subject from being hidden in shadow...
... the scene modes is used to shoot scenes with basic camera operations. Scene mode (A33) When one of Shooting and Playback Step 2 Select a Shooting Mode Available Shooting Modes u Special effects mode (A47) You can be adjusted in the shooting menu (A62) to prevent the backlit subject from being hidden in shadow...
Reference Manual
Page 56
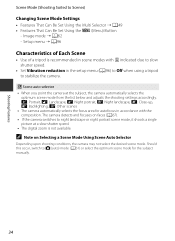
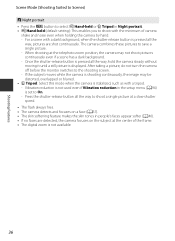
... shooting conditions, the camera may not select the desired scene mode. Setup menu ➝ A96 Characteristics of Each Scene • Use of a tripod is not available. x Scene auto selector • When you point the camera at a slow shutter speed. • The digital zoom is recommended in the setup menu (A96) to...
... shooting conditions, the camera may not select the desired scene mode. Setup menu ➝ A96 Characteristics of Each Scene • Use of a tripod is not available. x Scene auto selector • When you point the camera at a slow shutter speed. • The digital zoom is recommended in the setup menu (A96) to...

Reference Manual
Page 57
... green. • The digital zoom is set to On. - Vibration reduction is not used even if Vibration reduction in the setup menu (A96) is not available. 35 Press the shutter-release button all the way, pictures are shot continuously, and the camera combines these pictures to save a single picture. - Shooting Features...
... green. • The digital zoom is set to On. - Vibration reduction is not used even if Vibration reduction in the setup menu (A96) is not available. 35 Press the shutter-release button all the way, pictures are shot continuously, and the camera combines these pictures to save a single picture. - Shooting Features...
Reference Manual
Page 58
... with a dark background, when the shutter-release button is pressed all the way, hold the camera steady without moving it until a still picture is not available. 36 For a scene with a tripod. -
... with a dark background, when the shutter-release button is pressed all the way, hold the camera steady without moving it until a still picture is not available. 36 For a scene with a tripod. -

Reference Manual
Page 60
...; The digital zoom is pressed halfway, the camera adjusts the focus to stabilize the camera. 38 y M c Landscape • When the shutter-release button is not available. Set Vibration reduction to Off in the setup menu (A96) when shooting using a tripod to infinity.
...; The digital zoom is pressed halfway, the camera adjusts the focus to stabilize the camera. 38 y M c Landscape • When the shutter-release button is not available. Set Vibration reduction to Off in the setup menu (A96) when shooting using a tripod to infinity.
Reference Manual
Page 63
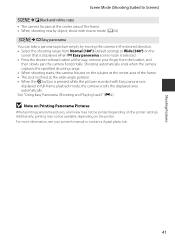
...)" (E2). For more information, see your finger from Normal (180°) (default setting) or Wide (360°) on the printer. Additionally, printing may not be available depending on the screen that is displayed when p Easy panorama scene mode is selected. • Press the shutter-release button all the way, remove your...
...)" (E2). For more information, see your finger from Normal (180°) (default setting) or Wide (360°) on the printer. Additionally, printing may not be available depending on the screen that is displayed when p Easy panorama scene mode is selected. • Press the shutter-release button all the way, remove your...

Reference Manual
Page 64
... control toward g (i), the image is enlarged at the center of the frame. 29m 0s 970 B Notes on Pet Portrait • The digital zoom is not available. • Under some shooting conditions, such as subject-to-camera distance, speed of moving pets, direction in full-frame playback mode by single borders. •...
... control toward g (i), the image is enlarged at the center of the frame. 29m 0s 970 B Notes on Pet Portrait • The digital zoom is not available. • Under some shooting conditions, such as subject-to-camera distance, speed of moving pets, direction in full-frame playback mode by single borders. •...

Reference Manual
Page 67
... properly. • See "Notes on that face, the double border will light in green for the subject to the center of the frame is not available. • Under some shooting conditions, faces and smiling faces may not be released by single borders. • If the camera detects that face. C When the...
... properly. • See "Notes on that face, the double border will light in green for the subject to the center of the frame is not available. • Under some shooting conditions, faces and smiling faces may not be released by single borders. • If the camera detects that face. C When the...
Reference Manual
Page 71
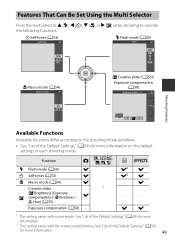
n Self-timer (A53) Self-timer m Flash mode (A50) Auto Shooting Features D Macro mode (A54) Macro mode o Creative slider (A55)/ Exposure compensation (A58) Brightness (Exp. +/-) + 2.0 + 0.3 - 2.0 Available Functions Available functions differ according to operate the following functions. Fu w2 w w2 w - See "List of the Default Settings" (A59) for more information on the default settings ...
n Self-timer (A53) Self-timer m Flash mode (A50) Auto Shooting Features D Macro mode (A54) Macro mode o Creative slider (A55)/ Exposure compensation (A58) Brightness (Exp. +/-) + 2.0 + 0.3 - 2.0 Available Functions Available functions differ according to operate the following functions. Fu w2 w w2 w - See "List of the Default Settings" (A59) for more information on the default settings ...
Reference Manual
Page 72
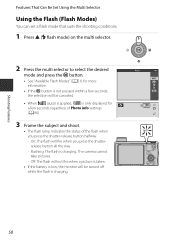
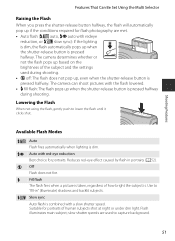
... shooting conditions. 1 Press H (m flash mode) on the multi selector. 2 Press the multi selector to select the desired Auto mode and press the k button. • See "Available Flash Modes" (A51) for a few seconds, the selection will be canceled. • When U (auto) is applied, D is charging. Flashing: The flash is charging. On: The...
... shooting conditions. 1 Press H (m flash mode) on the multi selector. 2 Press the multi selector to select the desired Auto mode and press the k button. • See "Available Flash Modes" (A51) for a few seconds, the selection will be canceled. • When U (auto) is applied, D is charging. Flashing: The flash is charging. On: The...
Reference Manual
Page 73
... light. Y Slow sync Auto flash is dim. Flash illuminates main subject; Lowering the Flash When not using the flash, gently push to capture background. 51 Available Flash Modes U Auto Flash fires automatically when lighting is combined with red-eye reduction Best choice for portraits. Reduces red-eye effect caused by flash...
... light. Y Slow sync Auto flash is dim. Flash illuminates main subject; Lowering the Flash When not using the flash, gently push to capture background. 51 Available Flash Modes U Auto Flash fires automatically when lighting is combined with red-eye reduction Best choice for portraits. Reduces red-eye effect caused by flash...

Reference Manual
Page 74
... varies with other menu settings. If the camera detects "red-eye" when a picture is taken, Nikon's own In-Camera Red-Eye Fix processes the image before the main flash, reducing the red-eye effect. See "Available Functions" (A49) and "List of about 1.5 to 3.5 m (5 ft to 11 ft) for...changed flash mode setting applied in A (auto) mode is saved in the camera's memory even after the camera is turned off. See "Features Not Available in Combination" (A64) for more information. • Some features cannot be affected by advanced red-eye reduction processing. In these cases, choose another...
... varies with other menu settings. If the camera detects "red-eye" when a picture is taken, Nikon's own In-Camera Red-Eye Fix processes the image before the main flash, reducing the red-eye effect. See "Available Functions" (A49) and "List of about 1.5 to 3.5 m (5 ft to 11 ft) for...changed flash mode setting applied in A (auto) mode is saved in the camera's memory even after the camera is turned off. See "Features Not Available in Combination" (A64) for more information. • Some features cannot be affected by advanced red-eye reduction processing. In these cases, choose another...

