
Reference Manual
Page 20
... LAN) Feature (COOLPIX S9500 only 93 Functions that Can Be Performed Using Wi-Fi 93 Installing the Software on the Smart Device 93 Connecting the Smart Device to the Camera 94 General Camera Setup...96 The Setup Menu ...96 Reference Section...E1 Using Easy Panorama (Shooting and Playing... back E2 Taking Pictures with Easy Panorama E2 Viewing Easy Panorama (Scroll) ...E4 Favorite Pictures Mode ...E5 Adding Images to Albums...E5 Playing Back Images in Albums...
... LAN) Feature (COOLPIX S9500 only 93 Functions that Can Be Performed Using Wi-Fi 93 Installing the Software on the Smart Device 93 Connecting the Smart Device to the Camera 94 General Camera Setup...96 The Setup Menu ...96 Reference Section...E1 Using Easy Panorama (Shooting and Playing... back E2 Taking Pictures with Easy Panorama E2 Viewing Easy Panorama (Scroll) ...E4 Favorite Pictures Mode ...E5 Adding Images to Albums...E5 Playing Back Images in Albums...

Reference Manual
Page 26
... is displayed: 69 Move the display position. • Display individual images of a sequence in full-frame. 28, E11 • Scroll an image recorded with Easy panorama. 41, E4 • Play back movies. 87 • Apply effects to pictures using quick effects. 28, E15 • Switch from image thumbnail or zoomed 70...
... is displayed: 69 Move the display position. • Display individual images of a sequence in full-frame. 28, E11 • Scroll an image recorded with Easy panorama. 41, E4 • Play back movies. 87 • Apply effects to pictures using quick effects. 28, E15 • Switch from image thumbnail or zoomed 70...
Reference Manual
Page 31
... 8 Battery level indicator 18 9 Vibration reduction icon 97 10 Wi-Fi communication indicator (COOLPIX S9500 only 93 Eye-Fi communication indicator 11 98, E85 12 GPS reception (COOLPIX S9500 only 90 13 Log display (COOLPIX S9500 only) ....92 14 Motion detection icon 97 15 Wind noise reduction 86 16 ... options (normal speed movies 86 20 Movie options (HS movies 86 21 Movie length 82, E47 22 Image mode 62, 63 23 Easy panorama 41 24 Number of exposures remaining (still pictures 18, E30 25 Internal memory indicator 18 26 Aperture value 27 Focus area (for manual, ...
... 8 Battery level indicator 18 9 Vibration reduction icon 97 10 Wi-Fi communication indicator (COOLPIX S9500 only 93 Eye-Fi communication indicator 11 98, E85 12 GPS reception (COOLPIX S9500 only 90 13 Log display (COOLPIX S9500 only) ....92 14 Motion detection icon 97 15 Wind noise reduction 86 16 ... options (normal speed movies 86 20 Movie options (HS movies 86 21 Movie length 82, E47 22 Image mode 62, 63 23 Easy panorama 41 24 Number of exposures remaining (still pictures 18, E30 25 Internal memory indicator 18 26 Aperture value 27 Focus area (for manual, ...

Reference Manual
Page 32
... only 90 Compass display (compass) 9 (COOLPIX S9500 only 92 10 Small picture 74, E18 11 Crop 69, E19 12 Print order icon 74 13 Image mode 62, 63 14 Movie options 86 15 Easy panorama indicator 41 (a) Current image number/total 16 number of images 28 (b) Movie length ...87 17 Internal memory indicator 28 Easy panorama playback guide 18 E4 Sequence playback guide E11 Movie playback guide 87 19 Quick effects 32 20 Volume indicator 74, 87 Location name information 21 (POI information) (COOLPIX S9500 only 91 22 D-Lighting icon 74 23 Quick retouch ...
... only 90 Compass display (compass) 9 (COOLPIX S9500 only 92 10 Small picture 74, E18 11 Crop 69, E19 12 Print order icon 74 13 Image mode 62, 63 14 Movie options 86 15 Easy panorama indicator 41 (a) Current image number/total 16 number of images 28 (b) Movie length ...87 17 Internal memory indicator 28 Easy panorama playback guide 18 E4 Sequence playback guide E11 Movie playback guide 87 19 Quick effects 32 20 Volume indicator 74, 87 Location name information 21 (POI information) (COOLPIX S9500 only 91 22 D-Lighting icon 74 23 Quick retouch ...

Reference Manual
Page 55
...) Z Beach (A39) z Snow (A39) h Sunset (A39) i Dusk/dawn (A39) k Close-up (A39) u Food (A40) l Museum (A40) m Fireworks show (A40) n Black and white copy (A41) V Easy panorama (A41) O Pet portrait (A42) s 3D photography (A43) Portrait Landscape Sports Party/indoor Beach Snow Sunset Viewing a Description (Help Information) of that are optimized for the...
...) Z Beach (A39) z Snow (A39) h Sunset (A39) i Dusk/dawn (A39) k Close-up (A39) u Food (A40) l Museum (A40) m Fireworks show (A40) n Black and white copy (A41) V Easy panorama (A41) O Pet portrait (A42) s 3D photography (A43) Portrait Landscape Sports Party/indoor Beach Snow Sunset Viewing a Description (Help Information) of that are optimized for the...
Reference Manual
Page 63
..., see your finger from Normal (180°) (default setting) or Wide (360°) on the screen that is displayed when p Easy panorama scene mode is selected. • Press the shutter-release button all the way, remove your printer's manual or contact a digital photo lab.... 41 B Note on Printing Panorama Pictures When printing panorama pictures, a full view may not be printed depending on the printer settings. Additionally, printing may not be available depending on the printer...
..., see your finger from Normal (180°) (default setting) or Wide (360°) on the screen that is displayed when p Easy panorama scene mode is selected. • Press the shutter-release button all the way, remove your printer's manual or contact a digital photo lab.... 41 B Note on Printing Panorama Pictures When printing panorama pictures, a full view may not be printed depending on the printer settings. Additionally, printing may not be available depending on the printer...

Reference Manual
Page 97
... the original file. See "Using the Screen for Selecting Images" (A 76) for more information about each function. 75 Note also that pictures taken using Easy panorama or 3D photography cannot be used to pictures taken in scene mode 3D photography. 4 Select an image in the image selection screen. Note, however, that...
... the original file. See "Using the Screen for Selecting Images" (A 76) for more information about each function. 75 Note also that pictures taken using Easy panorama or 3D photography cannot be used to pictures taken in scene mode 3D photography. 4 Select an image in the image selection screen. Note, however, that...

Reference Manual
Page 101
The following software is installed: • ViewNX 2 (consisting of a landscape, etc. Nikon Movie Editor: For basic editing of transferred movies • Panorama Maker (for creating a single panorama image of the three modules below) - ViewNX 2: For viewing, editing, and printing transferred images - from a series of images that each captured a separate portion of the ...
The following software is installed: • ViewNX 2 (consisting of a landscape, etc. Nikon Movie Editor: For basic editing of transferred movies • Panorama Maker (for creating a single panorama image of the three modules below) - ViewNX 2: For viewing, editing, and printing transferred images - from a series of images that each captured a separate portion of the ...

Reference Manual
Page 118
... or BSS is in the following settings. If you select Framing grid+auto info, a framing grid is displayed when shooting to On), Sports, Museum, Easy panorama, Pet portrait (using the date and time of shooting. Welcome screen Time zone and date Monitor settings Print date Vibration reduction Motion detection AF assist...
... or BSS is in the following settings. If you select Framing grid+auto info, a framing grid is displayed when shooting to On), Sports, Museum, Easy panorama, Pet portrait (using the date and time of shooting. Welcome screen Time zone and date Monitor settings Print date Vibration reduction Motion detection AF assist...

Reference Manual
Page 121
Shooting Using Easy Panorama (Shooting and Playing back E2 Playback Favorite Pictures Mode E5 Auto Sort Mode...E8 List by Date Mode ...E10 Playing Images in a Sequence E11 Editing ... Editing Movies ...E27 Menu The Shooting Menu (A (Auto) Mode E29 The Smart Portrait Menu E43 Movie Menu...E45 The Playback Menu E51 GPS Options Menu (COOLPIX S9500 only E59 The Setup Menu...E67 Additional Information Error Messages ...E91 File and Folder Names E97 Optional Accessories E99 E1 Reference Section The Reference...
Shooting Using Easy Panorama (Shooting and Playing back E2 Playback Favorite Pictures Mode E5 Auto Sort Mode...E8 List by Date Mode ...E10 Playing Images in a Sequence E11 Editing ... Editing Movies ...E27 Menu The Shooting Menu (A (Auto) Mode E29 The Smart Portrait Menu E43 Movie Menu...E45 The Playback Menu E51 GPS Options Menu (COOLPIX S9500 only E59 The Setup Menu...E67 Additional Information Error Messages ...E91 File and Folder Names E97 Optional Accessories E99 E1 Reference Section The Reference...

Reference Manual
Page 122
...of the moving direction and W × H are the opposites of the above. 2 Frame the first portion of the panorama scene, and press the shutter-release button halfway to y M d button M p Easy panorama 1 Select the shooting range from W Normal (180°) or X Wide (360°), and press the k Easy... when the camera is moved horizontally, 1536 × 4800 when the camera is moved vertically - Shooting Using Easy Panorama (Shooting and Playing back) Taking Pictures with Easy Panorama Rotate the mode dial to adjust the focus. • The zoom is fixed at the center of the 1840 frame...
...of the moving direction and W × H are the opposites of the above. 2 Frame the first portion of the panorama scene, and press the shutter-release button halfway to y M d button M p Easy panorama 1 Select the shooting range from W Normal (180°) or X Wide (360°), and press the k Easy... when the camera is moved horizontally, 1536 × 4800 when the camera is moved vertically - Shooting Using Easy Panorama (Shooting and Playing back) Taking Pictures with Easy Panorama Rotate the mode dial to adjust the focus. • The zoom is fixed at the center of the 1840 frame...

Reference Manual
Page 123
...Example of Moving the Camera • The user, without shifting position, moves the camera, from the start shooting. • When the camera detects the panorama direction, the shooting starts. • The guide showing the current shooting point is not shot will be recorded as wall or in the dark, the ... point, the range that is displayed. • When the guide showing the shooting point reaches the end, the shooting ends. B Notes on Easy Panorama Shooting • The image area seen in the saved image will be narrower than that seen on the monitor at the time of shooting. •...
...Example of Moving the Camera • The user, without shifting position, moves the camera, from the start shooting. • When the camera detects the panorama direction, the shooting starts. • The guide showing the current shooting point is not shot will be recorded as wall or in the dark, the ... point, the range that is displayed. • When the guide showing the shooting point reaches the end, the shooting ends. B Notes on Easy Panorama Shooting • The image area seen in the saved image will be narrower than that seen on the monitor at the time of shooting. •...

Reference Manual
Page 124
... k button, the following operations can be performed with the playback controls at the top of the COOLPIX S9500/S9400 may not be scrolled or zoomed on Viewing Pictures Recorded with Easy Panorama Panorama pictures recorded with 4/ 132 Easy panorama. • The picture is pressed.* F Restart the automatic scroll. Playback controls are displayed at the top...
... k button, the following operations can be performed with the playback controls at the top of the COOLPIX S9500/S9400 may not be scrolled or zoomed on Viewing Pictures Recorded with Easy Panorama Panorama pictures recorded with 4/ 132 Easy panorama. • The picture is pressed.* F Restart the automatic scroll. Playback controls are displayed at the top...
Reference Manual
Page 134
...when there is not enough free space in the internal memory or on the memory card. • For a sequence displayed using Easy panorama or 3D photography - Reference Section E14 Pictures taken using the key picture only setting (E11), perform one of the following operations before editing...images, and then select an image in the picture, glamour retouch function cannot be applied. • If a copy created using the COOLPIX S9500/S9400 is displayed individually, and then select an image. Glamour retouch Quick effects, Quick retouch, D-Lighting, Small picture or Crop can be ...
...when there is not enough free space in the internal memory or on the memory card. • For a sequence displayed using Easy panorama or 3D photography - Reference Section E14 Pictures taken using the key picture only setting (E11), perform one of the following operations before editing...images, and then select an image in the picture, glamour retouch function cannot be applied. • If a copy created using the COOLPIX S9500/S9400 is displayed individually, and then select an image. Glamour retouch Quick effects, Quick retouch, D-Lighting, Small picture or Crop can be ...
Reference Manual
Page 149
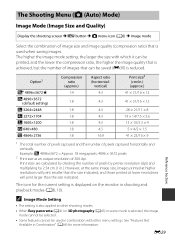
... lower resolutions will print smaller than the size indicated. C Image Mode Setting • The setting is also applied to other shooting modes. • When Easy panorama (A41) or 3D photography (A43) in scene mode is selected, the image mode cannot be selected. • Some features cannot be used when saving images...
... lower resolutions will print smaller than the size indicated. C Image Mode Setting • The setting is also applied to other shooting modes. • When Easy panorama (A41) or 3D photography (A43) in scene mode is selected, the image mode cannot be selected. • Some features cannot be used when saving images...

Reference Manual
Page 174
...; For sequences (E11) whose sequence display in options are set to Key picture only, only the key picture is displayed. • Images captured using Easy panorama are displayed in full-frame when played back in a slide show. They do not scroll. • Slide shows play the slide show begins. • Press...
...; For sequences (E11) whose sequence display in options are set to Key picture only, only the key picture is displayed. • Images captured using Easy panorama are displayed in full-frame when played back in a slide show. They do not scroll. • Slide shows play the slide show begins. • Press...

Reference Manual
Page 187
... image is stored in the camera, the image appears in the welcome screen even if the original image is turned on. Pictures taken with Easy panorama - Select an image Select a picture taken to display the welcome screen on the monitor when the camera is deleted. • The following pictures cannot be...) welcome screen. The Setup Menu Welcome Screen Press the d button M z menu icon (A6) M Welcome screen Select whether or not to display as the welcome screen. COOLPIX Display the welcome screen before displaying the shooting or playback screen.
... image is stored in the camera, the image appears in the welcome screen even if the original image is turned on. Pictures taken with Easy panorama - Select an image Select a picture taken to display the welcome screen on the monitor when the camera is deleted. • The following pictures cannot be...) welcome screen. The Setup Menu Welcome Screen Press the d button M z menu icon (A6) M Welcome screen Select whether or not to display as the welcome screen. COOLPIX Display the welcome screen before displaying the shooting or playback screen.

Reference Manual
Page 192
... imprinted in the Print order menu (E51). Set the image mode to q 1600×1200 or higher. • The date is On), Sports, Museum, Easy panorama, Pet portrait (when set to Continuous) or 3D photography - This information can be printed on pictures without the date and time being imprinted on pictures...
... imprinted in the Print order menu (E51). Set the image mode to q 1600×1200 or higher. • The date is On), Sports, Museum, Easy panorama, Pet portrait (when set to Continuous) or 3D photography - This information can be printed on pictures without the date and time being imprinted on pictures...

Reference Manual
Page 194
...; When the flash fires U Auto • In the following scene modes: X (Night landscape), S (Night (default setting) portrait), W (Backlighting), Sports, Dusk/dawn, Museum, Fireworks show, Easy panorama, Pet portrait, 3D photography • When Continuous (E34) is set to Pre-shooting cache, Continuous H: 120 fps, Continuous H: 60 fps or Multi-shot 16 •...
...; When the flash fires U Auto • In the following scene modes: X (Night landscape), S (Night (default setting) portrait), W (Backlighting), Sports, Dusk/dawn, Museum, Fireworks show, Easy panorama, Pet portrait, 3D photography • When Continuous (E34) is set to Pre-shooting cache, Continuous H: 120 fps, Continuous H: 60 fps or Multi-shot 16 •...

Reference Manual
Page 196
... is used in effect, Metering (E33) is set to be used , the focus will be at the center of the pictures to On, Portrait, Easy panorama, Pet portrait, 3D photography. - When the scene mode is s 4896×3672P, r 4896×3672, s 4864×2736. • This setting functions in to the...
... is used in effect, Metering (E33) is set to be used , the focus will be at the center of the pictures to On, Portrait, Easy panorama, Pet portrait, 3D photography. - When the scene mode is s 4896×3672P, r 4896×3672, s 4864×2736. • This setting functions in to the...

