User Manual
Page 12
... Printing Multiple Images...166 Basic Camera Setup ...169 Setup Menu...169 Welcome Screen ...171 Time Zone and Date...172 Monitor Settings...175 Print Date (Imprinting Date and Time 177 Vibration Reduction ...178 Motion Detection ...180 AF Assist...181 Digital Zoom...182 Sound Settings...183 Auto... Off ...184 Format Memory/Format Card ...185 Language...186 TV Settings ...186 Charge by Computer...187 Blink Warning ...188 Reset All ...190 Firmware Version ...193 Caring for the Camera...194 Maximizing Camera Life and Performance 194...
... Printing Multiple Images...166 Basic Camera Setup ...169 Setup Menu...169 Welcome Screen ...171 Time Zone and Date...172 Monitor Settings...175 Print Date (Imprinting Date and Time 177 Vibration Reduction ...178 Motion Detection ...180 AF Assist...181 Digital Zoom...182 Sound Settings...183 Auto... Off ...184 Format Memory/Format Card ...185 Language...186 TV Settings ...186 Charge by Computer...187 Blink Warning ...188 Reset All ...190 Firmware Version ...193 Caring for the Camera...194 Maximizing Camera Life and Performance 194...
User Manual
Page 13
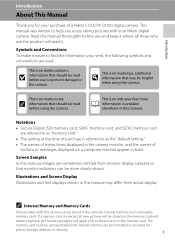
...of a Nikon COOLPIX S9100 digital camera. D This icon marks tips, additional information that more clearly shown. This icon marks notes, C information that should be read before the internal memory can be stored in this camera can be formatted or accessed for your Nikon digital camera. Illustrations and... Screen Display Illustrations and text displays shown in the camera's internal memory or on removable memory cards. This manual was...
...of a Nikon COOLPIX S9100 digital camera. D This icon marks tips, additional information that more clearly shown. This icon marks notes, C information that should be read before the internal memory can be stored in this camera can be formatted or accessed for your Nikon digital camera. Illustrations and... Screen Display Illustrations and text displays shown in the camera's internal memory or on removable memory cards. This manual was...
User Manual
Page 14
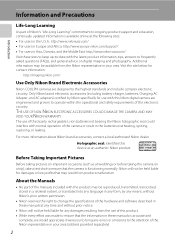
... these manuals at any damages resulting from the Nikon representative in your area (address provided separately). 2 Nikon will not be held liable for contact information: http://imaging.nikon.com/ Use Only Nikon Brand Electronic Accessories Nikon COOLPIX cameras are designed to the highest standards and include complex...the use of this device as at weddings or before taking the camera on digital imaging and photography. About the Manuals • No part of the manuals included with this Nikon digital camera are engineered and proven to operate within the operational and safety ...
... these manuals at any damages resulting from the Nikon representative in your area (address provided separately). 2 Nikon will not be held liable for contact information: http://imaging.nikon.com/ Use Only Nikon Brand Electronic Accessories Nikon COOLPIX cameras are designed to the highest standards and include complex...the use of this device as at weddings or before taking the camera on digital imaging and photography. About the Manuals • No part of the manuals included with this Nikon digital camera are engineered and proven to operate within the operational and safety ...

User Manual
Page 15
... copying or reproduction of paper money, coins, or securities which are stamped "Sample." Unless the prior permission of the government was digitally copied or reproduced by means of a scanner, digital camera or other device may be provided for business use by public agencies and private groups, ID cards and tickets, such as passes...
... copying or reproduction of paper money, coins, or securities which are stamped "Sample." Unless the prior permission of the government was digitally copied or reproduced by means of a scanner, digital camera or other device may be provided for business use by public agencies and private groups, ID cards and tickets, such as passes...

User Manual
Page 34
... card in the correct orientation. Be sure to check that the power-on removable Secure Digital (SD) memory cards (commercially available; Memory card slot 3 Close the battery-chamber/memory card slot cover. A 198). B Inserting Memory Cards Inserting the memory card upside down or backwards could damage the camera or the memory card.
... card in the correct orientation. Be sure to check that the power-on removable Secure Digital (SD) memory cards (commercially available; Memory card slot 3 Close the battery-chamber/memory card slot cover. A 198). B Inserting Memory Cards Inserting the memory card upside down or backwards could damage the camera or the memory card.
User Manual
Page 35
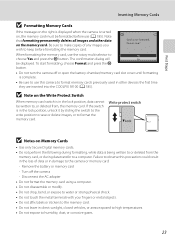
To start formatting, choose Format and press the k button. • Do not turn the camera off the camera - Write protect switch B Notes on Memory Cards • Use only Secure Digital memory cards. • Do not perform the following during formatting, while data is being written to format the ...on the right is displayed when the camera is turned on, the memory card must be formatted before formatting the memory card. Note that formatting permanently deletes all images and other devices the first time they are inserted into the COOLPIX S9100 (A 185). When formatting the memory card...
To start formatting, choose Format and press the k button. • Do not turn the camera off the camera - Write protect switch B Notes on Memory Cards • Use only Secure Digital memory cards. • Do not perform the following during formatting, while data is being written to format the ...on the right is displayed when the camera is turned on, the memory card must be formatted before formatting the memory card. Note that formatting permanently deletes all images and other devices the first time they are inserted into the COOLPIX S9100 (A 185). When formatting the memory card...
User Manual
Page 36
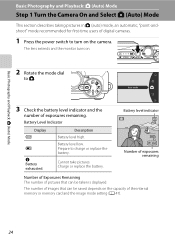
... and Select A (Auto) Mode This section describes taking pictures in A (auto) mode, an automatic, "point-andshoot" mode recommended for first-time users of digital cameras. 1 Press the power switch to turn on . 2 Rotate the mode dial to charge or replace the battery. Auto mode 3 Check the battery level indicator and ...
... and Select A (Auto) Mode This section describes taking pictures in A (auto) mode, an automatic, "point-andshoot" mode recommended for first-time users of digital cameras. 1 Press the power switch to turn on . 2 Rotate the mode dial to charge or replace the battery. Auto mode 3 Check the battery level indicator and ...
User Manual
Page 39
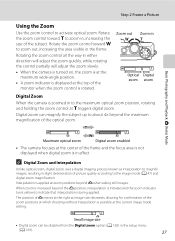
.... Basic Photography and Playback: A (Auto) Mode Maximum optical zoom Digital zoom enabled • The camera focuses at the top of V moves to the maximum optical zoom position, rotating and holding the zoom control at g triggers digital zoom. When zoom is increased beyond the V position, interpolation is in... Rotating the zoom control all the way in slight deterioration of the optical zoom. Zoom out Zoom in Optical Digital zoom zoom Digital Zoom When the camera is zoomed in to the right as interpolation to magnify images, resulting in either direction will adjust the zoom ...
.... Basic Photography and Playback: A (Auto) Mode Maximum optical zoom Digital zoom enabled • The camera focuses at the top of V moves to the maximum optical zoom position, rotating and holding the zoom control at g triggers digital zoom. When zoom is increased beyond the V position, interpolation is in... Rotating the zoom control all the way in slight deterioration of the optical zoom. Zoom out Zoom in Optical Digital zoom zoom Digital Zoom When the camera is zoomed in to the right as interpolation to magnify images, resulting in either direction will adjust the zoom ...

User Manual
Page 40
...a face is released and the image will be saved to nine areas) glow green. When the subject is in focus, the focus areas that the camera is pressed halfway, the focus area or focus indicator may blink red. This indicates that are in focus, the double border glows green. 1 / 2...release button halfway again. 2 Press the shutter-release button the rest of the frame and the focus area is not displayed when digital zoom is not detected: • The camera has nine focus areas, and automatically selects the focus areas containing the subject closest to focus. Shutter speed Aperture 1 / 2 ...
...a face is released and the image will be saved to nine areas) glow green. When the subject is in focus, the focus areas that the camera is pressed halfway, the focus area or focus indicator may blink red. This indicates that are in focus, the double border glows green. 1 / 2...release button halfway again. 2 Press the shutter-release button the rest of the frame and the focus area is not displayed when digital zoom is not detected: • The camera has nine focus areas, and automatically selects the focus areas containing the subject closest to focus. Shutter speed Aperture 1 / 2 ...

User Manual
Page 50
...8226; This function cannot be used simultaneously with the Smile Timer B Notes on the Smile Timer • Digital zoom is not available. • Under some shooting conditions, the camera may be taken by pressing the shutter-release button. Basic Photography and Playback: A (Auto) Mode Taking Pictures... • See "Notes on the subject at the center of the situations indicated below persists and no other operations are not detected. The camera focuses on Face Detection" (A 57) for more information. C Self-timer Lamp Blinking When using the smile timer function, the auto off...
...8226; This function cannot be used simultaneously with the Smile Timer B Notes on the Smile Timer • Digital zoom is not available. • Under some shooting conditions, the camera may be taken by pressing the shutter-release button. Basic Photography and Playback: A (Auto) Mode Taking Pictures... • See "Notes on the subject at the center of the situations indicated below persists and no other operations are not detected. The camera focuses on Face Detection" (A 57) for more information. C Self-timer Lamp Blinking When using the smile timer function, the auto off...
User Manual
Page 57
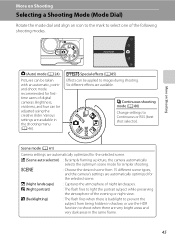
...optimum scene mode for the selected scene. u Special effects (A 85) Effects can be adjusted using the creative slider. Scene mode (A 61) Camera settings are automatically optimized for firsttime users of the following shooting modes. S (Night portrait) : The flash fires to light the portrait subject ...Auto mode More on Shooting Selecting a Shooting Mode (Mode Dial) Rotate the mode dial and align an icon to the mark to select one of digital cameras. Six different effects are very bright areas and very dark areas in the shooting menu (A 46). More on Shooting A (Auto) mode (A ...
...optimum scene mode for the selected scene. u Special effects (A 85) Effects can be adjusted using the creative slider. Scene mode (A 61) Camera settings are automatically optimized for firsttime users of the following shooting modes. S (Night portrait) : The flash fires to light the portrait subject ...Auto mode More on Shooting Selecting a Shooting Mode (Mode Dial) Rotate the mode dial and align an icon to the mark to select one of digital cameras. Six different effects are very bright areas and very dark areas in the shooting menu (A 46). More on Shooting A (Auto) mode (A ...

User Manual
Page 61
...of the light source. c Daylight White balance adjusted for the current setting is automatically adjusted to achieve more accurate results. Digital cameras can mimic this feature cannot be set by processing images according to the color of lighting, the white balance setting suited ... under unusual lighting. C White Balance Settings This setting can be set . • This function cannot be used under most situations. See "Camera Settings that Cannot Be Applied Simultaneously" (A 87) for more information. • At white-balance settings other than Auto or Flash, turn the...
...of the light source. c Daylight White balance adjusted for the current setting is automatically adjusted to achieve more accurate results. Digital cameras can mimic this feature cannot be set by processing images according to the color of lighting, the white balance setting suited ... under unusual lighting. C White Balance Settings This setting can be set . • This function cannot be used under most situations. See "Camera Settings that Cannot Be Applied Simultaneously" (A 87) for more information. • At white-balance settings other than Auto or Flash, turn the...

User Manual
Page 89
... k button to scroll forward quickly. B Hold down the k button to scroll backward quickly. Pause End The following operations. B Note on Easy Panorama Scroll Playback The COOLPIX S9100 may not be performed while playback is paused using the entire monitor and automatically move (scroll) the displayed area. 4/ 4 The image scrolls in the direction... the k button to display the 15/05/2011 15:30 0004.JPG short edge of the image using the controls displayed at the top of digital camera. 77
... k button to scroll forward quickly. B Hold down the k button to scroll backward quickly. Pause End The following operations. B Note on Easy Panorama Scroll Playback The COOLPIX S9100 may not be performed while playback is paused using the entire monitor and automatically move (scroll) the displayed area. 4/ 4 The image scrolls in the direction... the k button to display the 15/05/2011 15:30 0004.JPG short edge of the image using the controls displayed at the top of digital camera. 77
User Manual
Page 138
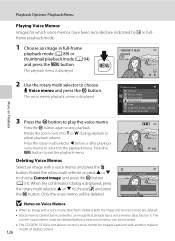
... choose E Voice memo and press the k button. Press the rotary multi selector J before a new voice memo can be recorded. • The COOLPIX S9100 is not able to choose w and press the k button. Rotate the rotary multi selector or press H or I to record a voice memo for... adjust playback volume. Erase 1 image? Playback Options: Playback Menu Playing Voice Memos Images for images captured with another make or model of digital camera. 126 Playback menu Protect Rotate image Small picture Voice memo Copy Sequence display options Choose key picture More on it. Press the 6s d...
... choose E Voice memo and press the k button. Press the rotary multi selector J before a new voice memo can be recorded. • The COOLPIX S9100 is not able to choose w and press the k button. Rotate the rotary multi selector or press H or I to record a voice memo for... adjust playback volume. Erase 1 image? Playback Options: Playback Menu Playing Voice Memos Images for images captured with another make or model of digital camera. 126 Playback menu Protect Rotate image Small picture Voice memo Copy Sequence display options Choose key picture More on it. Press the 6s d...
User Manual
Page 142
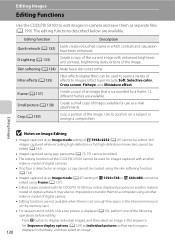
... each image is surrounded by a frame. 12 different frames are available. Editing Images Editing Functions Use the COOLPIX S9100 to edit images in-camera and save them to a computer using another make or model of digital camera. Still images captured while recording high-definition or full high-definition movies also cannot be edited (A 142). •...
... each image is surrounded by a frame. 12 different frames are available. Editing Images Editing Functions Use the COOLPIX S9100 to edit images in-camera and save them to a computer using another make or model of digital camera. Still images captured while recording high-definition or full high-definition movies also cannot be edited (A 142). •...
User Manual
Page 164
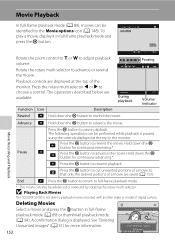
... to g or f to adjust playback volume. 10s Pausing Rotate the rotary multi selector to choose a control. B Playing Back Movies The COOLPIX S9100 is not able to playback movies recorded with another make or model of a movie are saved (A 153). See "Deleting Unwanted Images" (A...to return to rewind the movie. Press the k button to cut unwanted portions of a movie so that only the desired portions of digital camera. Playback controls are available. The following operations can also be performed while playback is displayed. A confirmation dialog is paused using the ...
... to g or f to adjust playback volume. 10s Pausing Rotate the rotary multi selector to choose a control. B Playing Back Movies The COOLPIX S9100 is not able to playback movies recorded with another make or model of a movie are saved (A 153). See "Deleting Unwanted Images" (A...to return to rewind the movie. Press the k button to cut unwanted portions of a movie so that only the desired portions of digital camera. Playback controls are available. The following operations can also be performed while playback is displayed. A confirmation dialog is paused using the ...
User Manual
Page 221
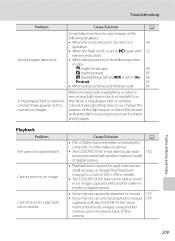
...) (when HDR is not able to a size of 320 × 240 or smaller. • The COOLPIX S9100 may not be played back on image. Change the monitor or images. position of digital camera. • Voice memos cannot be attached to movies. • Voice memos can only be attached to images...renamed by computer or other make or model of digital camera. • Playback zoom cannot be played back. j (night landscape) 64 - Portrait 67 • When using another make of camera. • The COOLPIX S9100 is set to zoom in on this camera. Voice memos attached to save images in A ...
...) (when HDR is not able to a size of 320 × 240 or smaller. • The COOLPIX S9100 may not be played back on image. Change the monitor or images. position of digital camera. • Voice memos cannot be attached to movies. • Voice memos can only be attached to images...renamed by computer or other make or model of digital camera. • Playback zoom cannot be played back. j (night landscape) 64 - Portrait 67 • When using another make of camera. • The COOLPIX S9100 is set to zoom in on this camera. Voice memos attached to save images in A ...
User Manual
Page 222
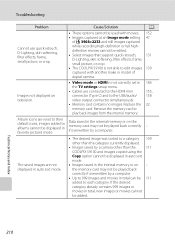
...mode. • The desired image was sorted to a category 109 other than the category currently displayed. • Images saved by a camera other than the 111 COOLPIX S9100 and images copied using the Copy option cannot be displayed in favorite pictures mode. The saved images are reset to their default icons...mini 155, connector (Type C) and to edit images 130 captured with movies. 152 • Images captured at an Image mode setting 47 of digital camera. Replace the 22 memory card. Data saved in the internal memory or on television. • Video mode or HDMI is not able to the...
...mode. • The desired image was sorted to a category 109 other than the category currently displayed. • Images saved by a camera other than the 111 COOLPIX S9100 and images copied using the Copy option cannot be displayed in favorite pictures mode. The saved images are reset to their default icons...mini 155, connector (Type C) and to edit images 130 captured with movies. 152 • Images captured at an Image mode setting 47 of digital camera. Replace the 22 memory card. Data saved in the internal memory or on television. • Video mode or HDMI is not able to the...
User Manual
Page 224
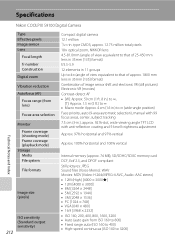
Specifications Nikon COOLPIX S9100 Digital Camera Technical Notes and Index Type Effective pixels Image sensor Lens Focal length f/-number Construction Digital zoom Vibration reduction Autofocus (AF) Focus range (from lens) Focus-area selection Monitor Frame coverage (shooting mode)... Frame coverage (playback mode) Storage Media File system File formats Image size (pixels) ISO sensitivity (Standard output sensitivity) 212 Compact digital camera 12.1 million 1/2.3-in .), approx. 921k-dot, wide viewing angle TFT LCD with anti-reflection coating and 5-level brightness adjustment Approx. 97...
Specifications Nikon COOLPIX S9100 Digital Camera Technical Notes and Index Type Effective pixels Image sensor Lens Focal length f/-number Construction Digital zoom Vibration reduction Autofocus (AF) Focus range (from lens) Focus-area selection Monitor Frame coverage (shooting mode)... Frame coverage (playback mode) Storage Media File system File formats Image size (pixels) ISO sensitivity (Standard output sensitivity) 212 Compact digital camera 12.1 million 1/2.3-in .), approx. 921k-dot, wide viewing angle TFT LCD with anti-reflection coating and 5-level brightness adjustment Approx. 97...

User Manual
Page 227
Specifications Supported Standards • DCF: Design Rule for Camera File System is a standard widely used in the digital camera industry to ensure compatibility among different makes of camera. • DPOF: Digital Print Order Format is an industry-wide standard that allows images to be printed from print orders saved on memory cards. • Exif version 2.3: This...
Specifications Supported Standards • DCF: Design Rule for Camera File System is a standard widely used in the digital camera industry to ensure compatibility among different makes of camera. • DPOF: Digital Print Order Format is an industry-wide standard that allows images to be printed from print orders saved on memory cards. • Exif version 2.3: This...


