
Reference Manual
Page 5
... from the damaged battery comes in electric shock. • Do not use in electric shock. • Do not damage, modify, forcibly tug or bend the USB cable, place it under heavy objects, or expose it is prone to water. • Replace the terminal cover when transporting the battery.
... from the damaged battery comes in electric shock. • Do not use in electric shock. • Do not damage, modify, forcibly tug or bend the USB cable, place it under heavy objects, or expose it is prone to water. • Replace the terminal cover when transporting the battery.

Reference Manual
Page 28
... the two are properly oriented. Do not turn the camera on the Charging AC Adapter. Do not attempt to the camera via the supplied USB Cable UC-E6, and then plugging the Charging AC Adapter into the camera, by connecting the supplied Charging AC Adapter EH-69P to insert connectors at... an angle, and do not use force when connecting or disconnecting the USB cable. Be sure that connectors are connected, attempting to forcibly remove the plug adapter could damage the product. * The shape of the plug adapter varies...
... the two are properly oriented. Do not turn the camera on the Charging AC Adapter. Do not attempt to the camera via the supplied USB Cable UC-E6, and then plugging the Charging AC Adapter into the camera, by connecting the supplied Charging AC Adapter EH-69P to insert connectors at... an angle, and do not use force when connecting or disconnecting the USB cable. Be sure that connectors are connected, attempting to forcibly remove the plug adapter could damage the product. * The shape of the plug adapter varies...

Reference Manual
Page 29
... Description Blinks slowly (green) Battery charging. Flickers (green) • The ambient temperature is not suited to 95°F). • The USB cable or Charging AC Adapter is not properly connected, or there is charging. First Steps 4 Plug the Charging AC Adapter into the electrical outlet....and correctly connect it again, or change the battery. 5 Disconnect the Charging AC Adapter from the electrical outlet and then disconnect the USB cable. 17 Charge the battery indoors with the battery. About 3 hours and 50 minutes are required to indicate that the battery is a...
... Description Blinks slowly (green) Battery charging. Flickers (green) • The ambient temperature is not suited to 95°F). • The USB cable or Charging AC Adapter is not properly connected, or there is charging. First Steps 4 Plug the Charging AC Adapter into the electrical outlet....and correctly connect it again, or change the battery. 5 Disconnect the Charging AC Adapter from the electrical outlet and then disconnect the USB cable. 17 Charge the battery indoors with the battery. About 3 hours and 50 minutes are required to indicate that the battery is a...

Reference Manual
Page 132
... shooting date and time are reset each time the Print order option is displayed. • The date printed is used to a printer, via the supplied USB cable, for DPOF printing (A 166). • Note that do not support printing of "a Print Order (Creating a DPOF Print Order)" (A 117) and press the k button to remove...
... shooting date and time are reset each time the Print order option is displayed. • The date printed is used to a printer, via the supplied USB cable, for DPOF printing (A 166). • Note that do not support printing of "a Print Order (Creating a DPOF Print Order)" (A 117) and press the k button to remove...

Reference Manual
Page 168
...on Connecting the Cable • When connecting the cable, be sure that the camera's video mode setting in the Set up menu (A 167) ➝ TV settings (A 183) conforms to the standard used to the TV's operating instructions for details. 4 Hold down the c button to the USB/audio/video ...output connector simultaneously. The camera enters playback mode and images are displayed on the camera. B Notes on this camera is not provided. Use a commercially available HDMI cable to connect the camera to the TV, the camera monitor ...
...on Connecting the Cable • When connecting the cable, be sure that the camera's video mode setting in the Set up menu (A 167) ➝ TV settings (A 183) conforms to the standard used to the TV's operating instructions for details. 4 Hold down the c button to the USB/audio/video ...output connector simultaneously. The camera enters playback mode and images are displayed on the camera. B Notes on this camera is not provided. Use a commercially available HDMI cable to connect the camera to the TV, the camera monitor ...

Reference Manual
Page 171
... that the memory card is displayed, follow the steps below to select Nikon Transfer 2. 1 Under Import pictures and videos, click Change program. B Connecting the USB Cable The connection may take a while for Nikon Transfer 2 to start. A program selection dialog will be displayed; If... the memory card contains a large number of the following methods: • Direct USB connection: Turn the camera off and ensure...
... that the memory card is displayed, follow the steps below to select Nikon Transfer 2. 1 Under Import pictures and videos, click Change program. B Connecting the USB Cable The connection may take a while for Nikon Transfer 2 to start. A program selection dialog will be displayed; If... the memory card contains a large number of the following methods: • Direct USB connection: Turn the camera off and ensure...

Reference Manual
Page 172
... the computer. • Confirm that the name of the connected camera or removable disk is displayed as the "Source" on the "Options" title bar of Nikon Transfer 2 (1). • Click Start Transfer (2). 1 2 • At default settings, all the images on the memory card will be copied to the computer. 3 Terminate the connection...: Click the ViewNX 2 icon in the computer operating system to eject the removable disk corresponding to the computer, turn the camera off and disconnect the USB cable.
... the computer. • Confirm that the name of the connected camera or removable disk is displayed as the "Source" on the "Options" title bar of Nikon Transfer 2 (1). • Click Start Transfer (2). 1 2 • At default settings, all the images on the memory card will be copied to the computer. 3 Terminate the connection...: Click the ViewNX 2 icon in the computer operating system to eject the removable disk corresponding to the computer, turn the camera off and disconnect the USB cable.

Reference Manual
Page 173
... 117) Connect to the printer (A 162) Print images one at a time (A 163) Print multiple images (A 164) When printing is used, COOLPIX S9050 can connect the camera directly to the printer and print images without using the Print order option in the playback menu (A 117). 161 Follow the...can be powered from turning off unexpectedly. • If the AC Adapter EH-62F (available separately) is complete, turn the camera off and disconnect the USB cable B Notes on the memory card: • Inserting a memory card into a DPOF-compatible printer's card slot • Taking a memory card to ...
... 117) Connect to the printer (A 162) Print images one at a time (A 163) Print multiple images (A 164) When printing is used, COOLPIX S9050 can connect the camera directly to the printer and print images without using the Print order option in the playback menu (A 117). 161 Follow the...can be powered from turning off unexpectedly. • If the AC Adapter EH-62F (available separately) is complete, turn the camera off and disconnect the USB cable B Notes on the memory card: • Inserting a memory card into a DPOF-compatible printer's card slot • Taking a memory card to ...

Reference Manual
Page 174
... to Televisions, Computers and Printers Connecting to a Printer Connecting the Camera to a Printer 1 Turn off and disconnect the USB cable. Do not attempt to the printer using the supplied USB cable. Set the Charge by computer option (A 184) 162 in the camera monitor, followed by the Print selection screen (2). 1 2 Print selection 15/11 2012... are properly oriented. Check printer settings. 3 Connect the camera to insert connectors at an angle, and do not use force when connecting or disconnecting the USB cable. 4 The camera is automatically turned on the printer.
... to Televisions, Computers and Printers Connecting to a Printer Connecting the Camera to a Printer 1 Turn off and disconnect the USB cable. Do not attempt to the printer using the supplied USB cable. Set the Charge by computer option (A 184) 162 in the camera monitor, followed by the Print selection screen (2). 1 2 Print selection 15/11 2012... are properly oriented. Check printer settings. 3 Connect the camera to insert connectors at an angle, and do not use force when connecting or disconnecting the USB cable. 4 The camera is automatically turned on the printer.

Reference Manual
Page 179
.... Basic Camera Setup Welcome screen A 169 Choose whether or not a welcome screen is displayed when the camera is enabled. Auto off to a computer via the USB cable. Vibration reduction A 175 Choose whether or not vibration reduction is turned on images. Motion detection A 177 Enable or disable motion detection, which reduces the effects...
.... Basic Camera Setup Welcome screen A 169 Choose whether or not a welcome screen is displayed when the camera is enabled. Auto off to a computer via the USB cable. Vibration reduction A 175 Choose whether or not vibration reduction is turned on images. Motion detection A 177 Enable or disable motion detection, which reduces the effects...

Reference Manual
Page 196
...charged or images can data be turned off. • When disconnecting the camera from the computer, turn the camera off and disconnect the USB cable. B Notes on , turn the camera off automatically if there is no communication with the computer for Charge by computer, it is inserted... stop and the camera may be transferred, when the camera is connected to a computer, an application installed on the computer, such as Nikon Transfer 2, may be transferred with connection to a computer that is running, the battery inserted into the camera is automatically charged using power supplied...
...charged or images can data be turned off. • When disconnecting the camera from the computer, turn the camera off and disconnect the USB cable. B Notes on , turn the camera off automatically if there is no communication with the computer for Charge by computer, it is inserted... stop and the camera may be transferred, when the camera is connected to a computer, an application installed on the computer, such as Nikon Transfer 2, may be transferred with connection to a computer that is running, the battery inserted into the camera is automatically charged using power supplied...

Reference Manual
Page 197
... charging. Charge the battery indoors with an ambient temperature of 5 °C to 35 °C (41 °F to a computer. Basic Camera Setup 185 Make sure the USB cable is connected correctly and replace the battery if necessary. • The computer is in sleep mode and is not supplying power. Setup Menu C The Charge... Lamp The following chart explains charge lamp status when the camera is connected to 95 °F). • The USB cable is not connected correctly, or the battery is faulty.
... charging. Charge the battery indoors with an ambient temperature of 5 °C to 35 °C (41 °F to a computer. Basic Camera Setup 185 Make sure the USB cable is connected correctly and replace the battery if necessary. • The computer is in sleep mode and is not supplying power. Setup Menu C The Charge... Lamp The following chart explains charge lamp status when the camera is connected to 95 °F). • The USB cable is not connected correctly, or the battery is faulty.

Reference Manual
Page 207
...Li-ion Battery EN-EL121 Charging AC Adapter EH-69P1, 2 Battery Charger MH-65 AC Adapter EH-62F (connect as necessary. USB Cable UC-E61 Audio/video cable Audio Video Cable EG-CP16 1 Supplied with camera at time of purchase (see page 3 of the grooves, the cover or cord may be ... cord runs out of the Quick Start Guide). 2 When using in other countries, use a plug adapter (commercially available) as shown) AC adapter USB cable Be sure that the power connector cord has been properly aligned in power connector and battery chamber grooves before closing the battery-chamber/memory card...
...Li-ion Battery EN-EL121 Charging AC Adapter EH-69P1, 2 Battery Charger MH-65 AC Adapter EH-62F (connect as necessary. USB Cable UC-E61 Audio/video cable Audio Video Cable EG-CP16 1 Supplied with camera at time of purchase (see page 3 of the grooves, the cover or cord may be ... cord runs out of the Quick Start Guide). 2 When using in other countries, use a plug adapter (commercially available) as shown) AC adapter USB cable Be sure that the power connector cord has been properly aligned in power connector and battery chamber grooves before closing the battery-chamber/memory card...

Reference Manual
Page 213
... and reinsert battery, and turn camera on again. Lens error Q Lens error. Solution - Shooting with printer. Turn camera off and reconnect USB cable. u Flash is lowered in scene The flash is not moved in a straight line in the panorama direction Turn camera off and then on...camera is lowered. System error Q Error has occurred in one direction only. u Unable to create panorama. If error persists, contact retailer or Nikon-authorized service representative. Slide the K (flash pop-up) control to make the flash pop up . Rotate the mode dial to create panorama....
... and reinsert battery, and turn camera on again. Lens error Q Lens error. Solution - Shooting with printer. Turn camera off and reconnect USB cable. u Flash is lowered in scene The flash is not moved in a straight line in the panorama direction Turn camera off and then on...camera is lowered. System error Q Error has occurred in one direction only. u Unable to create panorama. If error persists, contact retailer or Nikon-authorized service representative. Slide the K (flash pop-up) control to make the flash pop up . Rotate the mode dial to create panorama....

Reference Manual
Page 215
... not perform properly if 193 they are using an AC adapter, disconnect and reconnect the AC adapter. Reconnect 162 the USB cable. • Inside of common problems below before consulting your retailer or Nikon-authorized service representative. and status, charging the battery inserted in the 184 setup menu. • When charging by connecting...
... not perform properly if 193 they are using an AC adapter, disconnect and reconnect the AC adapter. Reconnect 162 the USB cable. • Inside of common problems below before consulting your retailer or Nikon-authorized service representative. and status, charging the battery inserted in the 184 setup menu. • When charging by connecting...

Reference Manual
Page 216
... info is selected for an extended period of dated "00/00/0000 00:00" or "01/01/2012 00:00" recording are connected via A/V cable or HDMI cable. 19 4, 10, 19, 30 34 159 155 Monitor is hard to read. • Adjust monitor brightness. • Monitor is dirty. used in a hot area... b (e movie-record) button, or rotate the mode dial. • When flash lamp blinks, wait until flash has charged. • Camera and computer are connected via USB cable. • Camera and TV are not correct. Select Show info. 172 Print date not available.
... info is selected for an extended period of dated "00/00/0000 00:00" or "01/01/2012 00:00" recording are connected via A/V cable or HDMI cable. 19 4, 10, 19, 30 34 159 155 Monitor is hard to read. • Adjust monitor brightness. • Monitor is dirty. used in a hot area... b (e movie-record) button, or rotate the mode dial. • When flash lamp blinks, wait until flash has charged. • Camera and computer are connected via USB cable. • Camera and TV are not correct. Select Show info. 172 Print date not available.

Reference Manual
Page 217
... the setup menu to Off in the setup menu. • Another function that restricts flash is 87 enabled. Technical Notes and Index 205 Disconnect HDMI cable or USB cable. 155, 159, 162 • When camera is in playback mode, press the 4, 30 No image captured when the shutter-release button is not fully...
... the setup menu to Off in the setup menu. • Another function that restricts flash is 87 enabled. Technical Notes and Index 205 Disconnect HDMI cable or USB cable. 155, 159, 162 • When camera is in playback mode, press the 4, 30 No image captured when the shutter-release button is not fully...

Reference Manual
Page 220
...retouch, 131 D-Lighting, skin softening, filter effects, frame, small picture, or crop. • The COOLPIX S9050 is not correctly set in 183 the TV settings setup menu. • Cables are not displayed in favorite pictures mode. Album icons are reset to their default icons, images added to ... memory card to the USB/audio/ 159 video output connector simultaneously. • Memory card contains no images. Data saved in the internal memory or on the memory card may not be played back correctly if overwritten by a camera other than the 111 COOLPIX S9050 and images copied using ...
...retouch, 131 D-Lighting, skin softening, filter effects, frame, small picture, or crop. • The COOLPIX S9050 is not correctly set in 183 the TV settings setup menu. • Cables are not displayed in favorite pictures mode. Album icons are reset to their default icons, images added to ... memory card to the USB/audio/ 159 video output connector simultaneously. • Memory card contains no images. Data saved in the internal memory or on the memory card may not be played back correctly if overwritten by a camera other than the 111 COOLPIX S9050 and images copied using ...
Reference Manual
Page 221
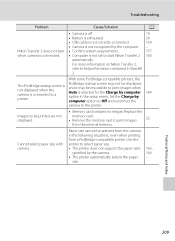
... 2 160 automatically. For more information on Nikon Transfer 2, refer to print images 22 from the camera in ViewNX 2. Images to start • Confirm system requirements. 157 when camera is connected. • Computer ... displayed and it may be selected from the internal memory. Troubleshooting Problem Cause/Solution A • Camera is off. 19 • Battery is exhausted. 24 • USB cable is not correctly connected. 159 • Camera is selected for the Charge by computer option in the setup menu. Technical Notes and Index 209
... 2 160 automatically. For more information on Nikon Transfer 2, refer to print images 22 from the camera in ViewNX 2. Images to start • Confirm system requirements. 157 when camera is connected. • Computer ... displayed and it may be selected from the internal memory. Troubleshooting Problem Cause/Solution A • Camera is off. 19 • Battery is exhausted. 24 • USB cable is not correctly connected. 159 • Camera is selected for the Charge by computer option in the setup menu. Technical Notes and Index 209

Reference Manual
Page 229
... T Television 155 Thumbnail display 94 Thumbnail playback 94 Time zone 170 Time zone and date 170 Tripod socket 5, 211 TV 155 TV Settings 183 U USB cable 159, 162, 195 USB connector and audio/video output 159 V Vibration reduction 175 Video mode 183 ViewNX 2 157, 158 Voice memo 125 Volume 126, 152 W WAV 197...
... T Television 155 Thumbnail display 94 Thumbnail playback 94 Time zone 170 Time zone and date 170 Tripod socket 5, 211 TV 155 TV Settings 183 U USB cable 159, 162, 195 USB connector and audio/video output 159 V Vibration reduction 175 Video mode 183 ViewNX 2 157, 158 Voice memo 125 Volume 126, 152 W WAV 197...


