
Reference Manual
Page 8
... Touching the internal parts of children Particular care should be performed only by qualified technicians. Repairs should be read before using this Nikon product, to prevent possible injury. Should the camera or Charging AC Adapter break open as this equipment. Handle the camera strap ...this could result in use the product will read them. Leaving the devices in low-temperature burns. After removing or disconnecting the power source, take the product to a Nikonauthorized service representative for extended periods may result in direct contact with care Never place the ...
... Touching the internal parts of children Particular care should be performed only by qualified technicians. Repairs should be read before using this Nikon product, to prevent possible injury. Should the camera or Charging AC Adapter break open as this equipment. Handle the camera strap ...this could result in use the product will read them. Leaving the devices in low-temperature burns. After removing or disconnecting the power source, take the product to a Nikonauthorized service representative for extended periods may result in direct contact with care Never place the ...

Reference Manual
Page 10
... hospital. Do not operate the flash with product regulations. Follow the instructions of the hospital. Turn the power off when using inside an airplane or the hospital Turn the power off while inside the airplane during take off or landing. Introduction For Your Safety Use appropriate cables When... connecting cables to the input and output jacks, use only the cables provided or sold by Nikon for the purpose, to maintain ...
... hospital. Do not operate the flash with product regulations. Follow the instructions of the hospital. Turn the power off when using inside an airplane or the hospital Turn the power off while inside the airplane during take off or landing. Introduction For Your Safety Use appropriate cables When... connecting cables to the input and output jacks, use only the cables provided or sold by Nikon for the purpose, to maintain ...
Reference Manual
Page 11
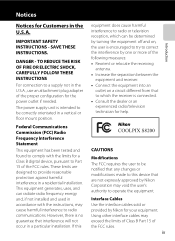
... 15 of the FCC rules. The power supply unit is no guarantee that interference will not occur in the U.S.A., use an attachment plug adapter of the proper configuration for help. These limits are not expressly approved by Nikon for a Class B digital device, ...pursuant to radio communications. However, there is intended to operate the equipment. Interface Cables Use the interface cables sold or provided by Nikon Corporation may void the user's authority to be correctly orientated in a residential installation. Federal Communications Commission (FCC) Radio Frequency Interference ...
... 15 of the FCC rules. The power supply unit is no guarantee that interference will not occur in the U.S.A., use an attachment plug adapter of the proper configuration for help. These limits are not expressly approved by Nikon for a Class B digital device, ...pursuant to radio communications. However, there is intended to operate the equipment. Interface Cables Use the interface cables sold or provided by Nikon Corporation may void the user's authority to be correctly orientated in a residential installation. Federal Communications Commission (FCC) Radio Frequency Interference ...

Reference Manual
Page 18
Parts of the Camera and Basic Operations Parts of the Camera and Basic Operations Parts of the Camera The Camera Body 1 2 34 5 6 7 8 10 Flash raised 9 Lens cover closed Zoom control 4, 5, 27 f : wide 4, 27 1 g : tele 4, 27 h : thumbnail playback 5, 31 i : playback zoom 5, 31 j : help 39 2 Speaker 80, 92 3 Power switch/power-on lamp 20 4 Shutter-release button 4, 5, 28 5 Self-timer lamp 59 AF-assist illuminator 95 6 Mode dial 4, 5, 9, 24 7 Microphone (stereo 80, 88 8 Flash 56 9 Lens 10 Lens cover 2
Parts of the Camera and Basic Operations Parts of the Camera and Basic Operations Parts of the Camera The Camera Body 1 2 34 5 6 7 8 10 Flash raised 9 Lens cover closed Zoom control 4, 5, 27 f : wide 4, 27 1 g : tele 4, 27 h : thumbnail playback 5, 31 i : playback zoom 5, 31 j : help 39 2 Speaker 80, 92 3 Power switch/power-on lamp 20 4 Shutter-release button 4, 5, 28 5 Self-timer lamp 59 AF-assist illuminator 95 6 Mode dial 4, 5, 9, 24 7 Microphone (stereo 80, 88 8 Flash 56 9 Lens 10 Lens cover 2

Reference Manual
Page 31
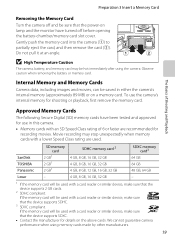
B High Temperature Caution The camera, battery, and memory card may be sure that the power-on page vii and in the direction indicated by hand (2). Observe caution when removing the battery or memory card. The Basics of Shooting and Playback B ...
B High Temperature Caution The camera, battery, and memory card may be sure that the power-on page vii and in the direction indicated by hand (2). Observe caution when removing the battery or memory card. The Basics of Shooting and Playback B ...

Reference Manual
Page 33
... or Charging AC Adapter is not properly connected, or there is not charging. Flickers (green) • The ambient temperature is not suited to power the camera from an electrical outlet. • Do not, under any circumstances, use . C Charging Using Computer or Battery Charger • You...Li-ion Battery EN-EL12 by using the Battery Charger MH-65 (available separately; E85). E85) to charging. C Notes About an AC Power Source • You can be charged without using the AC Adapter EH-62F (available separately; When charging is charging. Charge the battery indoors...
... or Charging AC Adapter is not properly connected, or there is not charging. Flickers (green) • The ambient temperature is not suited to power the camera from an electrical outlet. • Do not, under any circumstances, use . C Charging Using Computer or Battery Charger • You...Li-ion Battery EN-EL12 by using the Battery Charger MH-65 (available separately; E85). E85) to charging. C Notes About an AC Power Source • You can be charged without using the AC Adapter EH-62F (available separately; When charging is charging. Charge the battery indoors...

Reference Manual
Page 34
... card. • Slide the memory card in until it with your memory card for more 18 information. Preparation 3 Insert a Memory Card 1 Be sure that the power-on a memory card is permanently deleted when the card is in the correct orientation.
... card. • Slide the memory card in until it with your memory card for more 18 information. Preparation 3 Insert a Memory Card 1 Be sure that the power-on a memory card is permanently deleted when the card is in the correct orientation.
Reference Manual
Page 35
... B High Temperature Caution The camera, battery, and memory card may stop unexpectedly when memory cards with a card reader or similar device, make sure that the power-on lamp and the monitor have been tested and approved for use the camera's internal memory for details on a memory card. Gently push the memory...
... B High Temperature Caution The camera, battery, and memory card may stop unexpectedly when memory cards with a card reader or similar device, make sure that the power-on lamp and the monitor have been tested and approved for use the camera's internal memory for details on a memory card. Gently push the memory...

Reference Manual
Page 36
Recharge or replace with a fully charged battery. The Basics of Shooting and Playback Step 1 Turn the Camera On 1 Press the power switch to charge or replace the battery. The battery is fully charged. A 72). • The number of remaining exposures shown in the illustrations in the ...
Recharge or replace with a fully charged battery. The Basics of Shooting and Playback Step 1 Turn the Camera On 1 Press the power switch to charge or replace the battery. The battery is fully charged. A 72). • The number of remaining exposures shown in the illustrations in the ...

Reference Manual
Page 37
...extend. Blinks No operations performed No operations performed 29m 0s 3 min 840 Camera enters standby mode. The Basics of the following: ➝ Press the power switch, shutter-release button, c (playback) button, or b (e movie-record) button. ➝ Rotate the mode dial. The lens will turn off ...the setup menu (A 94). • By default, the camera enters standby mode in standby mode by performing any of Shooting and Playback C Power Saving Function (Auto Off) If no operations are performed for another three minutes, the camera will turn off , the camera will enter standby ...
...extend. Blinks No operations performed No operations performed 29m 0s 3 min 840 Camera enters standby mode. The Basics of the following: ➝ Press the power switch, shutter-release button, c (playback) button, or b (e movie-record) button. ➝ Rotate the mode dial. The lens will turn off ...the setup menu (A 94). • By default, the camera enters standby mode in standby mode by performing any of Shooting and Playback C Power Saving Function (Auto Off) If no operations are performed for another three minutes, the camera will turn off , the camera will enter standby ...

Reference Manual
Page 39
...Back The Basics of Shooting and Playback C Changing the Language Setting and the Date and Time Setting • You can provide several days of backup power after about ten hours of charging. • If the camera's backup battery becomes exhausted, the date and time setting screen is displayed when the...Time zone and date setting in the setup menu to disable the daylight saving time function. C The Clock Battery • The camera's clock is powered by selecting Time zone and date and then Time zone in Printed Images • Set the date and time before shooting. • You can ...
...Back The Basics of Shooting and Playback C Changing the Language Setting and the Date and Time Setting • You can provide several days of backup power after about ten hours of charging. • If the camera's backup battery becomes exhausted, the date and time setting screen is displayed when the...Time zone and date setting in the setup menu to disable the daylight saving time function. C The Clock Battery • The camera's clock is powered by selecting Time zone and date and then Time zone in Printed Images • Set the date and time before shooting. • You can ...

Reference Manual
Page 72
.... Off: The flash will not fire when a picture is taken. • If the battery is low, the monitor will turn off in order to save power while the flash is charging. C Effective Range of the Flash When ISO sensitivity is not applied by pressing the k button within a few seconds, regardless of...
.... Off: The flash will not fire when a picture is taken. • If the battery is low, the monitor will turn off in order to save power while the flash is charging. C Effective Range of the Flash When ISO sensitivity is not applied by pressing the k button within a few seconds, regardless of...

Reference Manual
Page 79
... turns off function (A 95) is released. C More Information See "Autofocus" (A 29) for more information. • This function cannot be used simultaneously with certain functions. C Auto Power Off When Using Smile Timer, Smile Timer Continuous The auto off when either of the frame when faces are performed. • The camera does not...
... turns off function (A 95) is released. C More Information See "Autofocus" (A 29) for more information. • This function cannot be used simultaneously with certain functions. C Auto Power Off When Using Smile Timer, Smile Timer Continuous The auto off when either of the frame when faces are performed. • The camera does not...

Reference Manual
Page 97
... using the ViewNX 2 Installer CD-ROM and transferring images to a computer, see page 82. • If any USB devices that draw the power from the computer are connected, disconnect them from the computer before you connect the camera to it. • Connecting the camera and other USB...-powered devices to the same computer simultaneously may cause a camera malfunction or excessive power supply from the computer, which could damage the camera or memory card. Connecting the Camera to a TV,...
... using the ViewNX 2 Installer CD-ROM and transferring images to a computer, see page 82. • If any USB devices that draw the power from the computer are connected, disconnect them from the computer before you connect the camera to it. • Connecting the camera and other USB...-powered devices to the same computer simultaneously may cause a camera malfunction or excessive power supply from the computer, which could damage the camera or memory card. Connecting the Camera to a TV,...

Reference Manual
Page 111
... On (default setting), the digital zoom feature can select the video output mode (NTSC or PAL) and adjust HDMI output settings. Be sure to save power. Option Motion detection AF assist Digital zoom Sound settings Auto off Format memory/ Format card Language TV settings The Setup Menu Description A When set to...
... On (default setting), the digital zoom feature can select the video output mode (NTSC or PAL) and adjust HDMI output settings. Be sure to save power. Option Motion detection AF assist Digital zoom Sound settings Auto off Format memory/ Format card Language TV settings The Setup Menu Description A When set to...

Reference Manual
Page 112
... set to Auto (default setting), you can charge the camera's battery by connecting the camera to a computer (provided that the computer is able to supply power). • When charging by computer and transferring images to the computer, it takes more time to charge the battery. E77 When On is selected, thumbnails...
... set to Auto (default setting), you can charge the camera's battery by connecting the camera to a computer (provided that the computer is able to supply power). • When charging by computer and transferring images to the computer, it takes more time to charge the battery. E77 When On is selected, thumbnails...

Reference Manual
Page 135
... charged battery to prevent the camera from turning off unexpectedly. • If the AC Adapter EH-62F (available separately) is used, COOLPIX S8200 can connect the camera directly to the printer and print images without using the Print order option in the playback menu (E43). Follow ...the procedures below to heat up or malfunction. Connecting the Camera to a Printer (Direct Print) Users of PictBridge-compatible (F19) printers can be powered from an electrical outlet. Take pictures Select images for printing images saved on the memory card: • Inserting a memory card into a DPOF-...
... charged battery to prevent the camera from turning off unexpectedly. • If the AC Adapter EH-62F (available separately) is used, COOLPIX S8200 can connect the camera directly to the printer and print images without using the Print order option in the playback menu (E43). Follow ...the procedures below to heat up or malfunction. Connecting the Camera to a Printer (Direct Print) Users of PictBridge-compatible (F19) printers can be powered from an electrical outlet. Take pictures Select images for printing images saved on the memory card: • Inserting a memory card into a DPOF-...

Reference Manual
Page 184
... 30 s or 1 min) • During slide show playback: Up to elapse before the camera enters standby mode is fixed in standby mode, the power-on lamp blinks. • If no operations are performed for about three minutes, the camera will turn off automatically. • When the... power-on lamp is connected: 30 minutes E72 Reference Section C When the Monitor Has Turned Off to Save Power • When the camera is in the following operations will turn the monitor back on. -...
... 30 s or 1 min) • During slide show playback: Up to elapse before the camera enters standby mode is fixed in standby mode, the power-on lamp blinks. • If no operations are performed for about three minutes, the camera will turn off automatically. • When the... power-on lamp is connected: 30 minutes E72 Reference Section C When the Monitor Has Turned Off to Save Power • When the camera is in the following operations will turn the monitor back on. -...

Reference Manual
Page 187
... The battery cannot be charged, nor can be transferred, when the camera is connected to a printer and turned on the computer, such as Nikon Transfer 2, may take longer to charge the battery with direct connection of the camera to a computer. In this case, use the Charging AC ... PictBridge startup screen is not displayed in the monitor after the battery has finished charging. • Depending upon computer specifications, settings, and power supply and allocation, it is inserted into the camera. The battery inserted into the camera is not charged when the camera is connected to...
... The battery cannot be charged, nor can be transferred, when the camera is connected to a printer and turned on the computer, such as Nikon Transfer 2, may take longer to charge the battery with direct connection of the camera to a computer. In this case, use the Charging AC ... PictBridge startup screen is not displayed in the monitor after the battery has finished charging. • Depending upon computer specifications, settings, and power supply and allocation, it is inserted into the camera. The battery inserted into the camera is not charged when the camera is connected to...

Reference Manual
Page 188
Wake up the computer. • The battery cannot be charged because the computer cannot supply power to the camera, due to 95 °F). • The USB cable is not connected correctly, or the battery is faulty. Make sure the USB cable ... charging. Charge lamp Blinks slowly (green) Off Flickers (green) Description Battery charging. If the charge lamp changes from slow blinking (green) to off while the power-on lamp is lit, charging is complete. • The ambient temperature is not supplying...
Wake up the computer. • The battery cannot be charged because the computer cannot supply power to the camera, due to 95 °F). • The USB cable is not connected correctly, or the battery is faulty. Make sure the USB cable ... charging. Charge lamp Blinks slowly (green) Off Flickers (green) Description Battery charging. If the charge lamp changes from slow blinking (green) to off while the power-on lamp is lit, charging is complete. • The ambient temperature is not supplying...


