
User Manual
Page 4
... who use electronic equipment in the presence of a fall or other small parts into their entirety before using this Nikon product, to a Nikon-authorized service representative for inspection. Do not use the camera or Charging AC Adapter in explosion or fire. After removing or disconnecting the power source, take the product to prevent...
... who use electronic equipment in the presence of a fall or other small parts into their entirety before using this Nikon product, to a Nikon-authorized service representative for inspection. Do not use the camera or Charging AC Adapter in explosion or fire. After removing or disconnecting the power source, take the product to prevent...
User Manual
Page 5
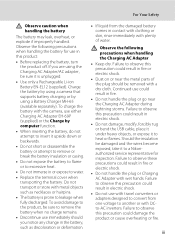
... Nikonauthorized service representative for use in this precaution could result in fire or electric shock. • Dust on or near the Charging AC Adapter during lightning storms. Failure to observe this precaution could result in electric shock. • Do not use immediately should ... when handling the battery The battery may leak, overheat, or explode if improperly handled. Observe the following precautions when handling the Charging AC Adapter • Keep dry. Observe the following precautions when handling the battery for inspection. Failure to observe this precaution could...
... Nikonauthorized service representative for use in this precaution could result in fire or electric shock. • Dust on or near the Charging AC Adapter during lightning storms. Failure to observe this precaution could result in electric shock. • Do not use immediately should ... when handling the battery The battery may leak, overheat, or explode if improperly handled. Observe the following precautions when handling the Charging AC Adapter • Keep dry. Observe the following precautions when handling the battery for inspection. Failure to observe this precaution could...

User Manual
Page 8
...lead, a chemical known to the State of California to users in European countries: • All batteries, whether marked with Canadian ICES-003. Nikon Inc., 1300 Walt Whitman Road Melville, New York 11747-3064 USA Tel: 631-547-4200 Notice for customers in Canada CAUTION This Class B digital...be collected separately. Do not dispose of as household waste. • For more information, contact the retailer or the local authorities in charge of waste management. Notices Notice for customers in the State of California WARNING Handling the cord on the battery indicates that this product is...
...lead, a chemical known to the State of California to users in European countries: • All batteries, whether marked with Canadian ICES-003. Nikon Inc., 1300 Walt Whitman Road Melville, New York 11747-3064 USA Tel: 631-547-4200 Notice for customers in Canada CAUTION This Class B digital...be collected separately. Do not dispose of as household waste. • For more information, contact the retailer or the local authorities in charge of waste management. Notices Notice for customers in the State of California WARNING Handling the cord on the battery indicates that this product is...
User Manual
Page 9
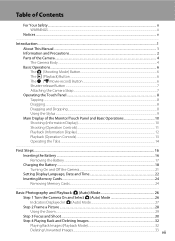
... Controls)...11 Playback (Information Display)...12 Playback (Operation Controls)...13 Operating the Tabs...14 First Steps ...16 Inserting the Battery ...16 Removing the Battery ...17 Charging the Battery ...18 Turning On and Off the Camera...21 Setting Display Language, Date and Time 22 Inserting Memory Cards ...24 Removing Memory Cards...24...
... Controls)...11 Playback (Information Display)...12 Playback (Operation Controls)...13 Operating the Tabs...14 First Steps ...16 Inserting the Battery ...16 Removing the Battery ...17 Charging the Battery ...18 Turning On and Off the Camera...21 Setting Display Language, Date and Time 22 Inserting Memory Cards ...24 Removing Memory Cards...24...

User Manual
Page 11
... Televisions, Computers and Printers 134 Connecting to a TV ...134 Connecting to a Computer...137 Before Connecting the Camera...137 Transferring Images from a Camera to a Computer 138 Charging While Connecting to a Computer 142 ix
... Televisions, Computers and Printers 134 Connecting to a TV ...134 Connecting to a Computer...137 Before Connecting the Camera...137 Transferring Images from a Camera to a Computer 138 Charging While Connecting to a Computer 142 ix

User Manual
Page 12
... U Motion Detection...159 h AF Assist...160 u Digital Zoom ...160 i Sound Settings...161 k Auto Off ...162 l/m Format Memory/Format Card 163 n Language...164 H TV Settings ...164 V Charge by Computer ...165 d Blink Warning...166 p Reset All ...168 h Copy (Copy Between Internal Memory and Memory Card 171 r Firmware Version ...172 Caring for the Camera...
... U Motion Detection...159 h AF Assist...160 u Digital Zoom ...160 i Sound Settings...161 k Auto Off ...162 l/m Format Memory/Format Card 163 n Language...164 H TV Settings ...164 V Charge by Computer ...165 d Blink Warning...166 p Reset All ...168 h Copy (Copy Between Internal Memory and Memory Card 171 r Firmware Version ...172 Caring for the Camera...
User Manual
Page 14
... on digital imaging and photography. Visit the site below for contact information: http://imaging.nikon.com/ Use Only Nikon Brand Electronic Accessories Nikon COOLPIX cameras are engineered and proven to operate within the operational and safety requirements of this electronic... an authentic Nikon product. Additional information may be available from product malfunction. Only Nikon brand electronic accessories (including battery charger, batteries, Charging AC Adapter, and AC adapters) certified by any means, without Nikon's prior written permission. • Nikon reserves the ...
... on digital imaging and photography. Visit the site below for contact information: http://imaging.nikon.com/ Use Only Nikon Brand Electronic Accessories Nikon COOLPIX cameras are engineered and proven to operate within the operational and safety requirements of this electronic... an authentic Nikon product. Additional information may be available from product malfunction. Only Nikon brand electronic accessories (including battery charger, batteries, Charging AC Adapter, and AC adapters) certified by any means, without Nikon's prior written permission. • Nikon reserves the ...

User Manual
Page 17
Introduction Parts of the Camera 11 1 10 2 3 4 9 5 1 b (e movie-record) button....... 6, 128 2 Charge lamp 19, 165 Flash lamp 35 3 A (shooting mode) button 6, 41 4 c (playback) button 6, 32, 87 5 Battery-chamber/ memory card slot cover 16, 24 8 76 6 Battery latch 16, 17 7 Battery chamber 16 8 Memory card slot 24 9 Tripod socket 10 Monitor/touch panel 10 11 Speaker 112, 133 5
Introduction Parts of the Camera 11 1 10 2 3 4 9 5 1 b (e movie-record) button....... 6, 128 2 Charge lamp 19, 165 Flash lamp 35 3 A (shooting mode) button 6, 41 4 c (playback) button 6, 32, 87 5 Battery-chamber/ memory card slot cover 16, 24 8 76 6 Battery latch 16, 17 7 Battery chamber 16 8 Memory card slot 24 9 Tripod socket 10 Monitor/touch panel 10 11 Speaker 112, 133 5

User Manual
Page 28
... arrow (1) and fully insert the battery (2). First Steps First Steps Inserting the Battery Insert a Rechargeable Li-ion Battery EN-EL12 (supplied) into the camera. • Charge the battery before the first use or when the battery is fully inserted, the battery latch will lock it in place.
... arrow (1) and fully insert the battery (2). First Steps First Steps Inserting the Battery Insert a Rechargeable Li-ion Battery EN-EL12 (supplied) into the camera. • Charge the battery before the first use or when the battery is fully inserted, the battery latch will lock it in place.
User Manual
Page 30
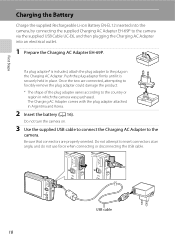
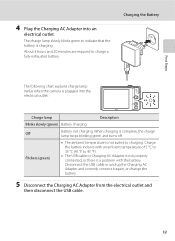
... supplied Rechargeable Li-ion Battery EN-EL12 inserted into an electrical outlet. 1 Prepare the Charging AC Adapter EH-69P. Do not turn the camera on the Charging AC Adapter. USB cable 18 Push the plug adapter firmly until it is included, attach the plug adapter to insert connectors at an... Adapter to the camera via the supplied USB Cable UC-E6, and then plugging the Charging AC Adapter into the camera, by connecting the supplied Charging AC Adapter EH-69P to the camera. The Charging AC Adapter comes with the plug adapter attached in place. If a plug adapter* is securely ...
... supplied Rechargeable Li-ion Battery EN-EL12 inserted into an electrical outlet. 1 Prepare the Charging AC Adapter EH-69P. Do not turn the camera on the Charging AC Adapter. USB cable 18 Push the plug adapter firmly until it is included, attach the plug adapter to insert connectors at an... Adapter to the camera via the supplied USB Cable UC-E6, and then plugging the Charging AC Adapter into the camera, by connecting the supplied Charging AC Adapter EH-69P to the camera. The Charging AC Adapter comes with the plug adapter attached in place. If a plug adapter* is securely ...
User Manual
Page 31
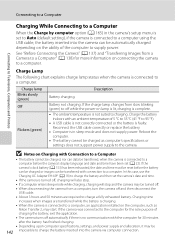
... electrical outlet and then disconnect the USB cable. 19 Charge lamp Description Blinks slowly (green) Battery charging. When charging is plugged into an electrical outlet. Flickers (green) • The ambient temperature is charging. Charging the Battery The following chart explains charge lamp status when the camera is complete, the charge lamp stops blinking green and turns off.
... electrical outlet and then disconnect the USB cable. 19 Charge lamp Description Blinks slowly (green) Battery charging. When charging is plugged into an electrical outlet. Flickers (green) • The ambient temperature is charging. Charging the Battery The following chart explains charge lamp status when the camera is complete, the charge lamp stops blinking green and turns off.
User Manual
Page 32
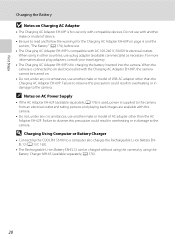
... cannot be turned on. • Do not, under any circumstances, use a plug adapter (available commercially) as necessary. D Charging Using Computer or Battery Charger • Connecting the COOLPIX S6100 to read and follow the warnings for charging the battery inserted into the camera. C Notes on page iii and the section, "The Battery" (A 174), before use...
... cannot be turned on. • Do not, under any circumstances, use a plug adapter (available commercially) as necessary. D Charging Using Computer or Battery Charger • Connecting the COOLPIX S6100 to read and follow the warnings for charging the battery inserted into the camera. C Notes on page iii and the section, "The Battery" (A 174), before use...
User Manual
Page 33
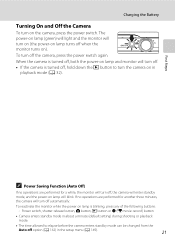
..., hold down the c button to elapse before the camera enters standby mode can be changed from the Auto off option (A 162) in playback mode (A 32). Charging the Battery Turning On and Off the Camera To turn off the camera, press the power switch again.
..., hold down the c button to elapse before the camera enters standby mode can be changed from the Auto off option (A 162) in playback mode (A 32). Charging the Battery Turning On and Off the Camera To turn off the camera, press the power switch again.
User Manual
Page 38
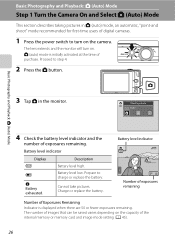
...Remaining Indicator is initially activated at the time of purchase. A (auto) mode is displayed when there are 50 or fewer exposures remaining. Proceed to charge or replace the battery. Basic Photography and Playback: A (Auto) Mode 3 Tap A in A (auto) mode, an automatic, "point-and ...shoot" mode recommended for first-time users of digital cameras. 1 Press the power switch to turn on. Charge or replace the battery. The lens extends and the monitor will turn on the camera. Battery level indicator Display b B N Battery exhausted. The number...
...Remaining Indicator is initially activated at the time of purchase. A (auto) mode is displayed when there are 50 or fewer exposures remaining. Proceed to charge or replace the battery. Basic Photography and Playback: A (Auto) Mode 3 Tap A in A (auto) mode, an automatic, "point-and ...shoot" mode recommended for first-time users of digital cameras. 1 Press the power switch to turn on. Charge or replace the battery. The lens extends and the monitor will turn on the camera. Battery level indicator Display b B N Battery exhausted. The number...

User Manual
Page 47
... varies with shooting mode (A 41). • A (auto) mode: a (auto) • Scene: varies with which noise reduction is fully charged. To reduce these reflections, set the flash to stabilize the camera during shooting. • The noise reduction function may appear as dim lighting. Wait...are functions with the selected scene mode (A 60) • F (smart portrait): fixed at a (auto) when Off is taken. • Blinks: Flash charging. See "Camera Settings That Cannot Be Applied Simultaneously" (A 80) for Blink proof; Set Vibration reduction (A 158) to Off in the setup menu (A 149)...
... varies with shooting mode (A 41). • A (auto) mode: a (auto) • Scene: varies with which noise reduction is fully charged. To reduce these reflections, set the flash to stabilize the camera during shooting. • The noise reduction function may appear as dim lighting. Wait...are functions with the selected scene mode (A 60) • F (smart portrait): fixed at a (auto) when Off is taken. • Blinks: Flash charging. See "Camera Settings That Cannot Be Applied Simultaneously" (A 80) for Blink proof; Set Vibration reduction (A 158) to Off in the setup menu (A 149)...
User Manual
Page 150
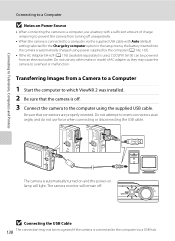
... computer option in the setup menu, the battery inserted into the camera is automatically charged using power supplied by the computer (A 142, 165). • If the AC Adapter EH-62F (A 176) (available separately) is used, COOLPIX S6100 can be recognized if the camera is off. 3 Connect the camera to the computer using the.... Transferring Images from a Camera to a Computer 1 Start the computer to insert connectors at an angle, and do not use any other make or model of charge remaining to prevent the camera from an electrical outlet.
... computer option in the setup menu, the battery inserted into the camera is automatically charged using power supplied by the computer (A 142, 165). • If the AC Adapter EH-62F (A 176) (available separately) is used, COOLPIX S6100 can be recognized if the camera is off. 3 Connect the camera to the computer using the.... Transferring Images from a Camera to a Computer 1 Start the computer to insert connectors at an angle, and do not use any other make or model of charge remaining to prevent the camera from an electrical outlet.
User Manual
Page 151
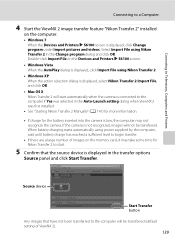
... transferred. Select Import File using power supplied by the computer, wait until battery charge has reached a sufficient level to a Computer 4 Start the ViewNX 2 image transfer feature "Nikon Transfer 2" installed on the computer. • Windows 7 When the Devices and Printers K S6100 screen is displayed, click Change program under Import pictures and videos. Connecting to...
... transferred. Select Import File using power supplied by the computer, wait until battery charge has reached a sufficient level to a Computer 4 Start the ViewNX 2 image transfer feature "Nikon Transfer 2" installed on the computer. • Windows 7 When the Devices and Printers K S6100 screen is displayed, click Change program under Import pictures and videos. Connecting to...
User Manual
Page 152
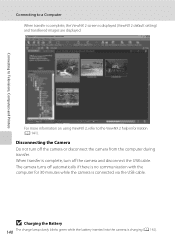
Connecting to Televisions, Computers and Printers Connecting to the ViewNX 2 help information (A 141). B Charging the Battery 140 The charge lamp slowly blinks green while the battery inserted into the camera is displayed (ViewNX 2 default setting) and transferred images are displayed. The camera turns off ... disconnect the camera from the computer during transfer. For more information on using ViewNX 2, refer to a Computer When transfer is complete, the ViewNX 2 screen is charging (A 142).
Connecting to Televisions, Computers and Printers Connecting to the ViewNX 2 help information (A 141). B Charging the Battery 140 The charge lamp slowly blinks green while the battery inserted into the camera is displayed (ViewNX 2 default setting) and transferred images are displayed. The camera turns off ... disconnect the camera from the computer during transfer. For more information on using ViewNX 2, refer to a Computer When transfer is complete, the ViewNX 2 screen is charging (A 142).
User Manual
Page 154
... with connection to a computer. If the camera's clock battery (A 153) has been exhausted, the date and time must be charged as Nikon Transfer 2, may start. In this case, use the Charging AC Adapter EH-69P (A 18) to charge the battery and then set the camera's date and time. • If the camera is faulty...
... with connection to a computer. If the camera's clock battery (A 153) has been exhausted, the date and time must be charged as Nikon Transfer 2, may start. In this case, use the Charging AC Adapter EH-69P (A 18) to charge the battery and then set the camera's date and time. • If the camera is faulty...
User Manual
Page 155
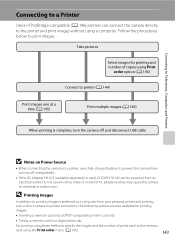
... to the memory card using the Print order menu (A 106). 143 Do not use a fully charged battery to prevent the camera from turning off unexpectedly. • If the AC Adapter EH-62F (available separately) is used, COOLPIX S6100 can connect the camera directly to the printer and print images without using a computer. Follow...
... to the memory card using the Print order menu (A 106). 143 Do not use a fully charged battery to prevent the camera from turning off unexpectedly. • If the AC Adapter EH-62F (available separately) is used, COOLPIX S6100 can connect the camera directly to the printer and print images without using a computer. Follow...


