
Reference Manual
Page 13
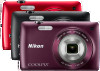
...6 Shooting Mode (Operation Controls)...7 Playback Mode (Information Display)...8 Playback Mode (Operation Controls) ...9 Switching Between Shooting Mode and Playback Mode 10 Using Menus (d Tab) ...11 Pressing the Shutter-release Button ...13 Attaching the Camera Strap ...13 Basic Steps for Shooting and Playback 15 Preparation 1 Insert the Battery...16 Preparation 2 Charge the Battery 18 Preparation 3 Insert a Memory Card 20 Internal Memory and Memory Cards ...21 Approved Memory Cards ...21 Step 1 Turn the Camera On ...22 Turning the Camera On and Off...23 Setting the Display Language, Date...
...6 Shooting Mode (Operation Controls)...7 Playback Mode (Information Display)...8 Playback Mode (Operation Controls) ...9 Switching Between Shooting Mode and Playback Mode 10 Using Menus (d Tab) ...11 Pressing the Shutter-release Button ...13 Attaching the Camera Strap ...13 Basic Steps for Shooting and Playback 15 Preparation 1 Insert the Battery...16 Preparation 2 Charge the Battery 18 Preparation 3 Insert a Memory Card 20 Internal Memory and Memory Cards ...21 Approved Memory Cards ...21 Step 1 Turn the Camera On ...22 Turning the Camera On and Off...23 Setting the Display Language, Date...

Reference Manual
Page 14
...Shooting Mode 54 Using the Flash (Flash Modes)...55 Using the Self-timer ...57 Using Macro Mode ...59 Adjusting Brightness (Exposure Compensation 61 Default Settings ...62 A Changing the Image Size (Image Mode 64 Image Mode Settings (Image Size and Quality 64 Functions that Cannot Be Applied Simultaneously 66 Face Detection ...68 Skin Softening ...70 Playback Features...71 Selecting Certain Types of Images for Playback 72 Available Playback Modes...72 Switching Between Playback Modes ...73 Setting the Picture Rating ...74 Functions Available in Playback Mode (Playback Menu 75 Connecting...
...Shooting Mode 54 Using the Flash (Flash Modes)...55 Using the Self-timer ...57 Using Macro Mode ...59 Adjusting Brightness (Exposure Compensation 61 Default Settings ...62 A Changing the Image Size (Image Mode 64 Image Mode Settings (Image Size and Quality 64 Functions that Cannot Be Applied Simultaneously 66 Face Detection ...68 Skin Softening ...70 Playback Features...71 Selecting Certain Types of Images for Playback 72 Available Playback Modes...72 Switching Between Playback Modes ...73 Setting the Picture Rating ...74 Functions Available in Playback Mode (Playback Menu 75 Connecting...
Reference Manual
Page 15
... Control: Adjusting a Sense of Perspective E20 i Filter Effects: Applying Digital Filter Effects E21 j Glamour Retouch: Softening Skin and Making Faces Looking Smaller with Larger Eyes...E23 g Small Picture: Reducing Image Size E24 o Crop: Creating a Cropped Copy E25 Connecting the Camera to a TV (Playback on a TV E27 Connecting the Camera to a Printer (Direct Print E29 Connecting the Camera to a Printer E30 Printing Images One by One...E31 Printing Multiple Images...E32 The Shooting Menu (for A (Auto) Mode E35 q/s/r Touch Shooting ...E35 X ISO...
... Control: Adjusting a Sense of Perspective E20 i Filter Effects: Applying Digital Filter Effects E21 j Glamour Retouch: Softening Skin and Making Faces Looking Smaller with Larger Eyes...E23 g Small Picture: Reducing Image Size E24 o Crop: Creating a Cropped Copy E25 Connecting the Camera to a TV (Playback on a TV E27 Connecting the Camera to a Printer (Direct Print E29 Connecting the Camera to a Printer E30 Printing Images One by One...E31 Printing Multiple Images...E32 The Shooting Menu (for A (Auto) Mode E35 q/s/r Touch Shooting ...E35 X ISO...

Reference Manual
Page 21
Parts of the Camera Parts of the Camera and Basic Operations 1 2 3 4 5 Under the connector cover 6 7 8 9 10 11 12 13 1 Monitor/touch panel 6 2 b (e movie-record) button 82 3 Charge lamp 19, E79 Flash lamp 55 4 A (shooting mode) button.......... 10, 26 5 c (playback) button 10, 32, 73 6 USB/audio/video output connector 18, 76, E27, E30 7 Tripod socket 8 Speaker 86, E59 9 Connector cover 18, 76, E27, E30 10 Battery-chamber/ memory card slot cover 16, 20 11 Memory card slot 20 12 Battery chamber 16 13 Battery latch 16, 17 3
Parts of the Camera Parts of the Camera and Basic Operations 1 2 3 4 5 Under the connector cover 6 7 8 9 10 11 12 13 1 Monitor/touch panel 6 2 b (e movie-record) button 82 3 Charge lamp 19, E79 Flash lamp 55 4 A (shooting mode) button.......... 10, 26 5 c (playback) button 10, 32, 73 6 USB/audio/video output connector 18, 76, E27, E30 7 Tripod socket 8 Speaker 86, E59 9 Connector cover 18, 76, E27, E30 10 Battery-chamber/ memory card slot cover 16, 20 11 Memory card slot 20 12 Battery chamber 16 13 Battery latch 16, 17 3

Reference Manual
Page 26
... icon 70, E23 6 Internal memory indicator 32 a Current frame number/ 7 total number of frames 32 b Movie length 86 8 Image mode2 64 Movie options2 85, E62 9 File number and type E86 10 Date/time of the Camera and Basic Operations 9999. JPG 9 15/05/2012 15:30 11 10 1 Playback mode1 32, 72, E5, E9, E11 2 Protect icon 75, E51 Album icon in 3 favorite pictures mode3 72, E5 Category icon in playback mode is displayed...
... icon 70, E23 6 Internal memory indicator 32 a Current frame number/ 7 total number of frames 32 b Movie length 86 8 Image mode2 64 Movie options2 85, E62 9 File number and type E86 10 Date/time of the Camera and Basic Operations 9999. JPG 9 15/05/2012 15:30 11 10 1 Playback mode1 32, 72, E5, E9, E11 2 Protect icon 75, E51 Album icon in 3 favorite pictures mode3 72, E5 Category icon in playback mode is displayed...

Reference Manual
Page 45
... for Shooting and Playback C Features That Are Available in Each Shooting Mode • You can be used to display the menu options for general shooting. Settings can take a picture automatically without pressing the shutter-release button (smile timer). See "Basic Shooting Settings" (A54) for more information. • When using shooting mode, tap the d tab (A11) to make skin tones of shot you can be adjusted in the shooting mode selection menu. Step 2 Select a Shooting Mode Available Shooting Modes A Auto mode A38 Used...
... for Shooting and Playback C Features That Are Available in Each Shooting Mode • You can be used to display the menu options for general shooting. Settings can take a picture automatically without pressing the shutter-release button (smile timer). See "Basic Shooting Settings" (A54) for more information. • When using shooting mode, tap the d tab (A11) to make skin tones of shot you can be adjusted in the shooting mode selection menu. Step 2 Select a Shooting Mode Available Shooting Modes A Auto mode A38 Used...

Reference Manual
Page 49
... way without pressing the shutter-release button. Doing this could result in loss of data, or in the following situations. Basic Steps for Shooting and Playback Step 4 Focus and Shoot B Note on Recording Images and Saving Movies The indicator showing the number of exposures remaining or the indicator showing the maximum movie length flashes while images are concerned that you are being recorded or while a movie is standing in the...
... way without pressing the shutter-release button. Doing this could result in loss of data, or in the following situations. Basic Steps for Shooting and Playback Step 4 Focus and Shoot B Note on Recording Images and Saving Movies The indicator showing the number of exposures remaining or the indicator showing the maximum movie length flashes while images are concerned that you are being recorded or while a movie is standing in the...

Reference Manual
Page 56
... flash mode, self-timer, macro mode, and exposure compensation. The Touch shutter option can be changed to the Touch AF/AE option, which allows the camera to set the focus and exposure on the subject that is in focus, the focus area (active focus 1/ 250 F3.5 area) lights in green (maximum of the nine focus areas containing the subject closest to the camera. Shooting Features 38 See "Basic Shooting Settings" (A54) for general shooting...
... flash mode, self-timer, macro mode, and exposure compensation. The Touch shutter option can be changed to the Touch AF/AE option, which allows the camera to set the focus and exposure on the subject that is in focus, the focus area (active focus 1/ 250 F3.5 area) lights in green (maximum of the nine focus areas containing the subject closest to the camera. Shooting Features 38 See "Basic Shooting Settings" (A54) for general shooting...

Reference Manual
Page 57
... the eye. E42 Allows you to select from continuous settings of lighting, white balance can make colors appear as they do to track the registered subject. Although Auto (default setting) can be used when saving images (A64). Set the flash mode (A55) to c (Off) when white balance is set the focus area by camera shake and subject movement can be changed. E43 Allows you to adjust the colors in the image. Using A (Auto) Mode Options Available in the Auto Shooting Menu In A (auto) mode...
... the eye. E42 Allows you to select from continuous settings of lighting, white balance can make colors appear as they do to track the registered subject. Although Auto (default setting) can be used when saving images (A64). Set the flash mode (A55) to c (Off) when white balance is set the focus area by camera shake and subject movement can be changed. E43 Allows you to adjust the colors in the image. Using A (Auto) Mode Options Available in the Auto Shooting Menu In A (auto) mode...

Reference Manual
Page 83
... JPEG compression). Print sizes are 10,000 or more pictures saved in the camera, "9999" is displayed on the shooting screen when 50 or fewer remain (A22). 2 If there are calculated by dividing the number of images that can be stored in internal memory and on a 4 GB memory card. Shooting Features 65 A Changing the Image Size (Image Mode) C Image Mode • The setting can also be changed in shooting modes other than the size indicated. C Number of Exposures Remaining The...
... JPEG compression). Print sizes are 10,000 or more pictures saved in the camera, "9999" is displayed on the shooting screen when 50 or fewer remain (A22). 2 If there are calculated by dividing the number of images that can be stored in internal memory and on a 4 GB memory card. Shooting Features 65 A Changing the Image Size (Image Mode) C Image Mode • The setting can also be changed in shooting modes other than the size indicated. C Number of Exposures Remaining The...

Reference Manual
Page 92
... image to thumbnail display by using the zoom control (f (h)/g (i)). 4/ 4 0004. Selecting Certain Types of Images for Playback Setting the Picture Rating If images have been assigned a rating of one to five, they can be played back in groups defined by rating. • To set a rating, tap the rating tab in full-frame playback or thumbnail playback (A33) mode and drag and drop the desired rating icon...
... image to thumbnail display by using the zoom control (f (h)/g (i)). 4/ 4 0004. Selecting Certain Types of Images for Playback Setting the Picture Rating If images have been assigned a rating of one to five, they can be played back in groups defined by rating. • To set a rating, tap the rating tab in full-frame playback or thumbnail playback (A33) mode and drag and drop the desired rating icon...

Reference Manual
Page 93
... pictures, auto sort, or list by date mode, this function can be performed only on the images sorted to the selected folder, category or date. 2 The selected image is edited, and the copy is available to set the orientation of images when they are played back on the memory card, you can use the Print order function to display the menu for that option (A12). Delete images or movies. E51 a Print order1 When using a printer to print images saved...
... pictures, auto sort, or list by date mode, this function can be performed only on the images sorted to the selected folder, category or date. 2 The selected image is edited, and the copy is available to set the orientation of images when they are played back on the memory card, you can use the Print order function to display the menu for that option (A12). Delete images or movies. E51 a Print order1 When using a printer to print images saved...

Reference Manual
Page 101
... the camera or the memory card. Recording Movies B Note on Recording Images and Saving Movies The indicator showing the number of exposures remaining or the indicator showing the maximum movie length flashes while images are being saved. Movie recording may stop unexpectedly when memory cards with a lower Speed Class ratings are recommended when recording movies (A21). When recording ends, digital zoom is smaller than when taking still pictures. • You cannot change the optical zoom ratio once movie recording has started. • While recording movies, you...
... the camera or the memory card. Recording Movies B Note on Recording Images and Saving Movies The indicator showing the number of exposures remaining or the indicator showing the maximum movie length flashes while images are being saved. Movie recording may stop unexpectedly when memory cards with a lower Speed Class ratings are recommended when recording movies (A21). When recording ends, digital zoom is smaller than when taking still pictures. • You cannot change the optical zoom ratio once movie recording has started. • While recording movies, you...

Reference Manual
Page 152
...unusual lighting. The Shooting Menu (for A (Auto) Mode) W White Balance (Adjusting Hue) On the A (auto) mode shooting screen M Tap the d tab M W White balance The color of light reflected from an object varies with the color of the light source, with the flash. Although the default setting, Auto, can be specified manually to the color of the light source. Use under overcast skies. Reference Section B Note About White Balance At white-balance settings other than Auto or Flash, turn the flash off (c) (A55). Use when taking pictures under fluorescent lighting. Digital cameras...
...unusual lighting. The Shooting Menu (for A (Auto) Mode) W White Balance (Adjusting Hue) On the A (auto) mode shooting screen M Tap the d tab M W White balance The color of light reflected from an object varies with the color of the light source, with the flash. Although the default setting, Auto, can be specified manually to the color of the light source. Use under overcast skies. Reference Section B Note About White Balance At white-balance settings other than Auto or Flash, turn the flash off (c) (A55). Use when taking pictures under fluorescent lighting. Digital cameras...
Reference Manual
Page 186
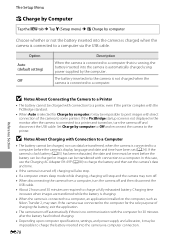
... charging. • When the camera is connected to a computer, an application installed on the computer, such as Nikon Transfer 2, may be transferred, when the camera is connected to a computer before the battery can be charged or images can be impossible to print images with Connection to a Computer • The battery cannot be charged, nor can data be impossible to charge the battery inserted into the camera via the USB cable. Set Charge by the computer. Charging time...
... charging. • When the camera is connected to a computer, an application installed on the computer, such as Nikon Transfer 2, may be transferred, when the camera is connected to a computer before the battery can be charged or images can be impossible to print images with Connection to a Computer • The battery cannot be charged, nor can data be impossible to charge the battery inserted into the camera via the USB cable. Set Charge by the computer. Charging time...

Reference Manual
Page 187
.... Reboot the computer. • The battery cannot be charged as computer's specifications or settings do not support power supply to a computer. Reconnect the USB cable correctly or replace the battery. • Computer is connected to the camera. Reference Section E79 Charge lamp Flashes slowly (green) Off Flashes quickly (green) Description Battery charging. Battery not charging. The Setup Menu C Charge Lamp The following chart explains charge lamp status when the camera is in sleep mode and does not supply...
.... Reboot the computer. • The battery cannot be charged as computer's specifications or settings do not support power supply to a computer. Reconnect the USB cable correctly or replace the battery. • Computer is connected to the camera. Reference Section E79 Charge lamp Flashes slowly (green) Off Flashes quickly (green) Description Battery charging. Battery not charging. The Setup Menu C Charge Lamp The following chart explains charge lamp status when the camera is in sleep mode and does not supply...

Reference Manual
Page 197
Yes No COOLPIX S4300. Out of file numbers. Insert new memory card, or format internal memory or memory card. 22, E76, E86 Image cannot be registered as welcome screen. • Pictures taken at an Image mode setting of any images, make sure to tap No and save a copy. No further pictures can be added. 200 images have blinked when in the picture just the picture was detected One or more portrait subjects may have already been added...
Yes No COOLPIX S4300. Out of file numbers. Insert new memory card, or format internal memory or memory card. 22, E76, E86 Image cannot be registered as welcome screen. • Pictures taken at an Image mode setting of any images, make sure to tap No and save a copy. No further pictures can be added. 200 images have blinked when in the picture just the picture was detected One or more portrait subjects may have already been added...
Reference Manual
Page 206
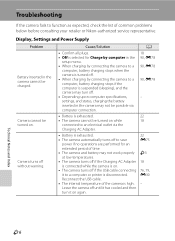
... or Nikon-authorized service representative. Display, Settings and Power Supply Problem Cause/Solution A Battery inserted in the setup menu. • When charging by connecting the camera to a computer, battery charging stops when the camera is turned off. • When charging by connecting the camera to a computer, battery charging stops if the computer is suspended (sleeping), and the camera may not work properly at low temperatures. • The camera turns off if the Charging AC Adapter is connected while the camera...
... or Nikon-authorized service representative. Display, Settings and Power Supply Problem Cause/Solution A Battery inserted in the setup menu. • When charging by connecting the camera to a computer, battery charging stops when the camera is turned off. • When charging by connecting the camera to a computer, battery charging stops if the computer is suspended (sleeping), and the camera may not work properly at low temperatures. • The camera turns off if the Charging AC Adapter is connected while the camera...

Reference Manual
Page 207
... movies. Troubleshooting Problem Monitor is dirty. Cause/Solution A • Camera is off. • Standby mode for saving power: press the power switch, the shutter-release button, A button, c button, or b (e movie-record) button. • When flash lamp flashes, wait until flash has charged. • Camera and computer are connected via USB cable. • Camera and TV are connected via audio/video cable. • Adjust monitor brightness. • Monitor is blank. Technical Notes and Index F7 Date and time of a more accurate timepiece and reset...
... movies. Troubleshooting Problem Monitor is dirty. Cause/Solution A • Camera is off. • Standby mode for saving power: press the power switch, the shutter-release button, A button, c button, or b (e movie-record) button. • When flash lamp flashes, wait until flash has charged. • Camera and computer are connected via USB cable. • Camera and TV are connected via audio/video cable. • Adjust monitor brightness. • Monitor is blank. Technical Notes and Index F7 Date and time of a more accurate timepiece and reset...
Reference Manual
Page 211
... or other make of camera. • The COOLPIX S4300 is unable to a size of digital camera. small pictures, or images that support editing functions. • Camera is not able to images taken with other cameras. 86 64, 75 75, E12 75, E12 Images not displayed on television. • Choose correct Video mode. • Memory card contains no images. Troubleshooting Playback Problem Cause/Solution A File cannot be used with movies. • These options cannot be played back. • File or folder was...
... or other make of camera. • The COOLPIX S4300 is unable to a size of digital camera. small pictures, or images that support editing functions. • Camera is not able to images taken with other cameras. 86 64, 75 75, E12 75, E12 Images not displayed on television. • Choose correct Video mode. • Memory card contains no images. Troubleshooting Playback Problem Cause/Solution A File cannot be used with movies. • These options cannot be played back. • File or folder was...


