

User Manual
Page 3
Introduction First Steps Basic Photography and Playback: A (Auto) Mode More on Shooting More on Playback Editing Pictures Movie Recording and Playback Connecting to Televisions, Computers and Printers Basic Camera Setup Caring for the Camera Technical Notes and Index i
Introduction First Steps Basic Photography and Playback: A (Auto) Mode More on Shooting More on Playback Editing Pictures Movie Recording and Playback Connecting to Televisions, Computers and Printers Basic Camera Setup Caring for the Camera Technical Notes and Index i
User Manual
Page 4
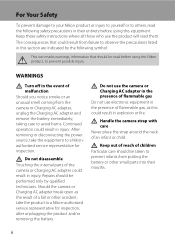
... electronic equipment in the presence of flammable gas, as the result of the camera or Charging AC adapter could result in injury. After removing or disconnecting the power source, take the product to a Nikon-authorized service representative for inspection. Keep out of reach of malfunction Should you... should be taken to avoid burns. Continued operation could result in injury. Should the camera or Charging AC adapter break open as this equipment. For Your Safety To prevent damage to your Nikon product or injury to yourself or to others, read the following symbol: This icon ...
... electronic equipment in the presence of flammable gas, as the result of the camera or Charging AC adapter could result in injury. After removing or disconnecting the power source, take the product to a Nikon-authorized service representative for inspection. Keep out of reach of malfunction Should you... should be taken to avoid burns. Continued operation could result in injury. Should the camera or Charging AC adapter break open as this equipment. For Your Safety To prevent damage to your Nikon product or injury to yourself or to others, read the following symbol: This icon ...

User Manual
Page 5
... fire. For Your Safety Observe caution when handling the battery The battery may leak or explode if improperly handled. Charge the battery inserted into the camera by connecting the Charging AC Adapter EH-69P (supplied). • When inserting the battery, do not attempt to insert it to leakage when fully discharged...
... fire. For Your Safety Observe caution when handling the battery The battery may leak or explode if improperly handled. Charge the battery inserted into the camera by connecting the Charging AC Adapter EH-69P (supplied). • When inserting the battery, do not attempt to insert it to leakage when fully discharged...

User Manual
Page 6
...subject. For Your Safety Use appropriate cables When connecting cables to the input and output jacks, use only the cables provided or sold by Nikon for the purpose, to maintain compliance with care Be careful that your subject's eyes could cause hearing loss or damage the equipment. Avoid ...contact with this precaution could result in burns or fire. Turn the power off or landing. The electromagnetic waves given out by this camera may disrupt the electronic systems of the airplane or the instruments of the hospital when using while in .) from the monitor touching the skin ...
...subject. For Your Safety Use appropriate cables When connecting cables to the input and output jacks, use only the cables provided or sold by Nikon for the purpose, to maintain compliance with care Be careful that your subject's eyes could cause hearing loss or damage the equipment. Avoid ...contact with this precaution could result in burns or fire. Turn the power off or landing. The electromagnetic waves given out by this camera may disrupt the electronic systems of the airplane or the instruments of the hospital when using while in .) from the monitor touching the skin ...

User Manual
Page 9
...Operating the Tabs...14 First Steps ...16 Inserting the Battery ...16 Removing the Battery ...17 Charging the Battery ...18 Turning On and Off the Camera...21 Setting Display Language, Date and Time 22 Inserting Memory Cards ...24 Removing Memory Cards...24 Basic Photography and Playback: A (Auto) Mode... 26 Step 1 Turn the Camera On and Select A (Auto) Mode 26 Indicators Displayed in A (Auto) Mode 27 Step 2 Frame a Picture ...28 Using the Zoom...29 Step 3 ...
...Operating the Tabs...14 First Steps ...16 Inserting the Battery ...16 Removing the Battery ...17 Charging the Battery ...18 Turning On and Off the Camera...21 Setting Display Language, Date and Time 22 Inserting Memory Cards ...24 Removing Memory Cards...24 Basic Photography and Playback: A (Auto) Mode... 26 Step 1 Turn the Camera On and Select A (Auto) Mode 26 Indicators Displayed in A (Auto) Mode 27 Step 2 Frame a Picture ...28 Using the Zoom...29 Step 3 ...
User Manual
Page 10
... Balance (Adjusting Hue)...55 Shooting Suited to Scenes (Scene Mode 58 Selecting a Scene Mode...58 Shooting in the Scene Mode Selected by the Camera (Scene Auto Selector)...61 Selecting a Scene Mode to Take Pictures (Features 63 Using the Draw Option...71 Shooting for a Panorama...72 Shooting... Smiling Faces (Smart Portrait Mode 74 Changing the Smart Portrait Mode Settings 76 Camera Settings that Cannot Be Applied Simultaneously 78 More on Playback...80 Operations in Full-frame Playback Mode 80 Viewing Multiple Pictures: Thumbnail ...
... Balance (Adjusting Hue)...55 Shooting Suited to Scenes (Scene Mode 58 Selecting a Scene Mode...58 Shooting in the Scene Mode Selected by the Camera (Scene Auto Selector)...61 Selecting a Scene Mode to Take Pictures (Features 63 Using the Draw Option...71 Shooting for a Panorama...72 Shooting... Smiling Faces (Smart Portrait Mode 74 Changing the Smart Portrait Mode Settings 76 Camera Settings that Cannot Be Applied Simultaneously 78 More on Playback...80 Operations in Full-frame Playback Mode 80 Viewing Multiple Pictures: Thumbnail ...

User Manual
Page 11
... Y Wind Noise Reduction ...130 Movie Playback ...131 Connecting to Televisions, Computers and Printers 132 Connecting to a TV...132 Connecting to a Computer...134 Before Connecting the Camera...134 Transferring Images from a Camera to a Computer 135 Charging While Connecting to a Computer 139 ix
... Y Wind Noise Reduction ...130 Movie Playback ...131 Connecting to Televisions, Computers and Printers 132 Connecting to a TV...132 Connecting to a Computer...134 Before Connecting the Camera...134 Transferring Images from a Camera to a Computer 135 Charging While Connecting to a Computer 139 ix
User Manual
Page 12
... a Printer...141 Printing Pictures One at a Time ...142 Printing Multiple Pictures ...143 Basic Camera Setup ...146 Setup Menu...146 Operating the Setup Menu ...147 c Welcome Screen...148 d Time Zone and Date...149 e Monitor Settings ...152 f Print Date (... ...161 d Blink Warning...162 p Reset All ...164 h Copy (Copy Between Internal Memory and Memory Card 167 r Firmware Version ...168 Caring for the Camera...169 Maximizing Camera Life and Performance 169 Cleaning ...171 Storage ...171 Technical Notes and Index...172 Optional Accessories ...172 Approved Memory Cards ...173 Image/Sound File and...
... a Printer...141 Printing Pictures One at a Time ...142 Printing Multiple Pictures ...143 Basic Camera Setup ...146 Setup Menu...146 Operating the Setup Menu ...147 c Welcome Screen...148 d Time Zone and Date...149 e Monitor Settings ...152 f Print Date (... ...161 d Blink Warning...162 p Reset All ...164 h Copy (Copy Between Internal Memory and Memory Card 167 r Firmware Version ...168 Caring for the Camera...169 Maximizing Camera Life and Performance 169 Cleaning ...171 Storage ...171 Technical Notes and Index...172 Optional Accessories ...172 Approved Memory Cards ...173 Image/Sound File and...
User Manual
Page 13
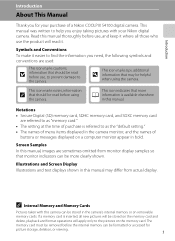
... may differ from monitor display samples so that should be read it where all new pictures will be helpful when using the camera. Illustrations and Screen Display Illustrations and text displays shown in this manual. Introduction Introduction About This Manual Thank you for picture storage...use , to prevent damage to as the "default setting." • The names of menu items displayed in the camera monitor, and the names of a Nikon COOLPIX S4100 digital camera. This manual was written to help you need, the following symbols and conventions are referred to as "memory card."...
... may differ from monitor display samples so that should be read it where all new pictures will be helpful when using the camera. Illustrations and Screen Display Illustrations and text displays shown in this manual. Introduction Introduction About This Manual Thank you for picture storage...use , to prevent damage to as the "default setting." • The names of menu items displayed in the camera monitor, and the names of a Nikon COOLPIX S4100 digital camera. This manual was written to help you need, the following symbols and conventions are referred to as "memory card."...
User Manual
Page 14
... Manuals • No part of the manuals included with this device as at any time and without prior notice. • Nikon will not be held liable for contact information: http://imaging.nikon.com/ Use Only Nikon Brand Electronic Accessories Nikon COOLPIX cameras are engineered and proven to operate within the operational and safety requirements of the...
... Manuals • No part of the manuals included with this device as at any time and without prior notice. • Nikon will not be held liable for contact information: http://imaging.nikon.com/ Use Only Nikon Brand Electronic Accessories Nikon COOLPIX cameras are engineered and proven to operate within the operational and safety requirements of the...
User Manual
Page 15
Also, do not copy or reproduce passports issued by the government, licenses issued by means of a scanner, digital camera or other device may be provided for the purpose of making illegal copies or to infringe copyright laws. Disposing of Data Storage ... commuter passes or coupon tickets, except when a minimum of material that deleting images or formatting data storage devices such as memory cards or builtin camera memory does not completely erase the original image data. Before discarding a data storage device or transferring ownership to also replace any pictures selected for ...
Also, do not copy or reproduce passports issued by the government, licenses issued by means of a scanner, digital camera or other device may be provided for the purpose of making illegal copies or to infringe copyright laws. Disposing of Data Storage ... commuter passes or coupon tickets, except when a minimum of material that deleting images or formatting data storage devices such as memory cards or builtin camera memory does not completely erase the original image data. Before discarding a data storage device or transferring ownership to also replace any pictures selected for ...
User Manual
Page 16
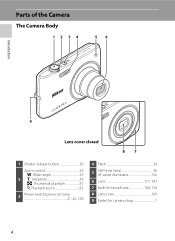
Parts of the Camera The Camera Body 12 34 56 Introduction 9 Lens cover closed 87 1 Shutter-release button 30 Zoom control 29 f: Wide-angle 29 2 g: Telephoto 29 h: Thumbnail playback 81 i: Playback zoom 83 3 Power switch/power-on lamp 21, 26, 158 4 Flash 34 5 Self-timer lamp 36 AF-assist illuminator 156 6 Lens 171, 187 7 Built-in microphone 108, 126 8 Lens cover 169 9 Eyelet for camera strap 7 4
Parts of the Camera The Camera Body 12 34 56 Introduction 9 Lens cover closed 87 1 Shutter-release button 30 Zoom control 29 f: Wide-angle 29 2 g: Telephoto 29 h: Thumbnail playback 81 i: Playback zoom 83 3 Power switch/power-on lamp 21, 26, 158 4 Flash 34 5 Self-timer lamp 36 AF-assist illuminator 156 6 Lens 171, 187 7 Built-in microphone 108, 126 8 Lens cover 169 9 Eyelet for camera strap 7 4

User Manual
Page 17
Parts of the Camera Introduction 1 2 3 4 5 Under the connector cover 6 78 9 10 11 12 13 1 Monitor/touch panel 10, 27 2 b (e movie-record) button....... 6, 126 3 Charge lamp 19, 139 Flash lamp 35 4 A (shooting mode) button 6, 40 5 c (playback) button 6, 32, 85 6 USB/audio/video output connector 132, 135, 141 7 Tripod socket 8 Speaker 109, 131 9 Connector cover 132, 135, 141 10 Battery-chamber/ memory card slot cover 16, 24 11 Memory card slot 24 12 Battery chamber 16 13 Battery latch 16, 17 5
Parts of the Camera Introduction 1 2 3 4 5 Under the connector cover 6 78 9 10 11 12 13 1 Monitor/touch panel 10, 27 2 b (e movie-record) button....... 6, 126 3 Charge lamp 19, 139 Flash lamp 35 4 A (shooting mode) button 6, 40 5 c (playback) button 6, 32, 85 6 USB/audio/video output connector 132, 135, 141 7 Tripod socket 8 Speaker 109, 131 9 Connector cover 132, 135, 141 10 Battery-chamber/ memory card slot cover 16, 24 11 Memory card slot 24 12 Battery chamber 16 13 Battery latch 16, 17 5

User Manual
Page 18
... the c button in playback mode to display the playback-mode selection menu and switch playback modes (A 85). • If the camera is turned off, hold down the c button to turn the camera on in shooting mode to display the shooting-mode selection menu and switch shooting modes (A 40). The b (e Movie-record) Button...
... the c button in playback mode to display the playback-mode selection menu and switch playback modes (A 85). • If the camera is turned off, hold down the c button to turn the camera on in shooting mode to display the shooting-mode selection menu and switch shooting modes (A 40). The b (e Movie-record) Button...

User Manual
Page 19
... shutter-release button halfway to set focus and exposure Press the shutter-release button the rest of the way down to take picture Attaching the Camera Strap 7 To set . When the shutter-release button is pressed halfway. Do not use force when pressing the shutter-release button, as this may result... aperture value) are set focus and exposure, press the shutter-release button halfway, stopping when you feel resistance. Introduction Basic Operations Shutter-release Button The camera features a two-stage shutter-release button.
... shutter-release button halfway to set focus and exposure Press the shutter-release button the rest of the way down to take picture Attaching the Camera Strap 7 To set . When the shutter-release button is pressed halfway. Do not use force when pressing the shutter-release button, as this may result... aperture value) are set focus and exposure, press the shutter-release button halfway, stopping when you feel resistance. Introduction Basic Operations Shutter-release Button The camera features a two-stage shutter-release button.

User Manual
Page 21
... Notes on the Touch Panel • Keep the stylus out of reach of small children. • Do not carry the camera by the stylus. Move your finger off the strap and the camera may slip off the display - Operating the Touch Panel B Notes on the Touch Panel • Do not press on the... fall. 9 Introduction Using the Stylus Use the stylus for operations, such as shown. Bounce your finger too quickly • The camera may not respond if the followings are made. - B Notes on Tapping/Dragging • The camera may not respond if your finger is left in one place too long. • The...
... Notes on the Touch Panel • Keep the stylus out of reach of small children. • Do not carry the camera by the stylus. Move your finger off the strap and the camera may slip off the display - Operating the Touch Panel B Notes on the Touch Panel • Do not press on the... fall. 9 Introduction Using the Stylus Use the stylus for operations, such as shown. Bounce your finger too quickly • The camera may not respond if the followings are made. - B Notes on Tapping/Dragging • The camera may not respond if your finger is left in one place too long. • The...

User Manual
Page 22
Introduction Main Display of the Monitor/Touch Panel and Basic Operations Shooting (Information Display) Displayed information on the monitor varies depending on the camera settings or status. 4 5 123 6 789 19 18 17 16 10 15 3 3 50 a 14 1/ 250 F3.2 11 1 00 1 00 b 13 12 1 Shooting mode1 26, 58, 74 2 ...
Introduction Main Display of the Monitor/Touch Panel and Basic Operations Shooting (Information Display) Displayed information on the monitor varies depending on the camera settings or status. 4 5 123 6 789 19 18 17 16 10 15 3 3 50 a 14 1/ 250 F3.2 11 1 00 1 00 b 13 12 1 Shooting mode1 26, 58, 74 2 ...

User Manual
Page 23
Introduction Main Display of the Monitor/Touch Panel and Basic Operations Shooting (Operation Controls) Tap the following controls to change settings. • Tap the tab to display the setting controls and shooting settings can be changed (A 14). • The controls available and indicators displayed vary with shooting mode and the current camera settings. 1 4 2 AUTO AUTO OFF 3 1 Tab 14 2 Scene effect adjustment slider 60 3 Setting controls 15 4 Touch AF/AE cancellation 50 11
Introduction Main Display of the Monitor/Touch Panel and Basic Operations Shooting (Operation Controls) Tap the following controls to change settings. • Tap the tab to display the setting controls and shooting settings can be changed (A 14). • The controls available and indicators displayed vary with shooting mode and the current camera settings. 1 4 2 AUTO AUTO OFF 3 1 Tab 14 2 Scene effect adjustment slider 60 3 Setting controls 15 4 Touch AF/AE cancellation 50 11

User Manual
Page 24
...Operations Playback (Information Display) The following monitor display shows information for the picture currently displayed and camera status. • The displayed information vary depending on the picture played back and the current camera status. • Indicators below are displayed when turning on the setting for shooting. 3 ...99 12 Battery level indicator 26 1 Indicators displayed vary with current playback mode. 2 Indicators displayed vary depending on the camera or operating the camera, and turn off after a few seconds elapse (A 152). 12 3 4567 15 05 2011 15 : 30 12 0003.
...Operations Playback (Information Display) The following monitor display shows information for the picture currently displayed and camera status. • The displayed information vary depending on the picture played back and the current camera status. • Indicators below are displayed when turning on the setting for shooting. 3 ...99 12 Battery level indicator 26 1 Indicators displayed vary with current playback mode. 2 Indicators displayed vary depending on the camera or operating the camera, and turn off after a few seconds elapse (A 152). 12 3 4567 15 05 2011 15 : 30 12 0003.

User Manual
Page 25
Introduction Main Display of the Monitor/Touch Panel and Basic Operations Playback (Operation Controls) Tap the following controls to change settings. • Tap the tab to display the setting controls and deleting or editing will be available (A 14). • The controls available and indicators displayed vary with the picture played back and the current camera settings. 1 2 3 1 Movie playback 131 2 Tab 14 3 Setting controls 15 13
Introduction Main Display of the Monitor/Touch Panel and Basic Operations Playback (Operation Controls) Tap the following controls to change settings. • Tap the tab to display the setting controls and deleting or editing will be available (A 14). • The controls available and indicators displayed vary with the picture played back and the current camera settings. 1 2 3 1 Movie playback 131 2 Tab 14 3 Setting controls 15 13


