User Manual
Page 7
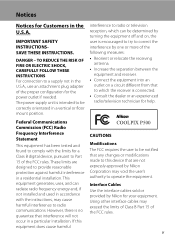
... configuration for the power outlet if needed. These limits are not expressly approved by Nikon for your equipment. If this device that any changes or modifications made to this equipment does cause harmful COOLPIX P500 CAUTIONS Modifications The FCC requires the user to provide reasonable protection against harmful interference...digital device, pursuant to operate the equipment. The power supply unit is connected. • Consult the dealer or an experienced radio/television technician for help. Notices Notices for Customers in a vertical or floor mount position. DANGER -
... configuration for the power outlet if needed. These limits are not expressly approved by Nikon for your equipment. If this device that any changes or modifications made to this equipment does cause harmful COOLPIX P500 CAUTIONS Modifications The FCC requires the user to provide reasonable protection against harmful interference...digital device, pursuant to operate the equipment. The power supply unit is connected. • Consult the dealer or an experienced radio/television technician for help. Notices Notices for Customers in a vertical or floor mount position. DANGER -
User Manual
Page 15
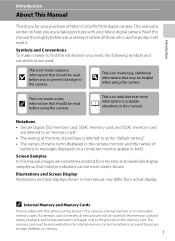
...prevent damage to as the "default setting." • The names of menu items displayed in the camera monitor, and the names of Nikon COOLPIX P500 digital camera. If a memory card is referred to the camera. This icon indicates that monitor indicators can be stored in this ...camera can be more A information is written to help you need, the following symbols and conventions are used: This icon marks cautions, B information that should be helpful when using the camera. Illustrations and Screen Display Illustrations and text displays shown in...
...prevent damage to as the "default setting." • The names of menu items displayed in the camera monitor, and the names of Nikon COOLPIX P500 digital camera. If a memory card is referred to the camera. This icon indicates that monitor indicators can be stored in this ...camera can be more A information is written to help you need, the following symbols and conventions are used: This icon marks cautions, B information that should be helpful when using the camera. Illustrations and Screen Display Illustrations and text displays shown in...
User Manual
Page 18
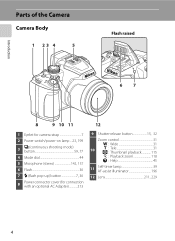
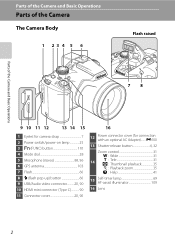
... an optional AC Adapter 213 12 9 Shutter-release button 15, 32 Zoom control 31 f : Wide 31 10 g : Tele 31 h: Thumbnail playback 115 i : Playback zoom 118 j : Help 45 11 Self-timer lamp 39 AF-assist illuminator 196 12 Lens 211, 229 4
... an optional AC Adapter 213 12 9 Shutter-release button 15, 32 Zoom control 31 f : Wide 31 10 g : Tele 31 h: Thumbnail playback 115 i : Playback zoom 118 j : Help 45 11 Self-timer lamp 39 AF-assist illuminator 196 12 Lens 211, 229 4

User Manual
Page 59
To return to the original screen, rotate the zoom control toward g (j) to view a description (help) of the following shooting scenes. Shooting Suited to Scenes (Scene Mode) When one of the following scenes is selected using the mode dial or the ...
To return to the original screen, rotate the zoom control toward g (j) to view a description (help) of the following shooting scenes. Shooting Suited to Scenes (Scene Mode) When one of the following scenes is selected using the mode dial or the ...

User Manual
Page 187
...B Note on installing the software, refer to the Quick Start Guide. • ViewNX 2: Use the image transfer feature "Nikon Transfer 2" to the Nikon website for more information. 173 Simultaneous connection of power to the camera, causing damage to the computer could result in the ViewNX... 2 help information (A177). For more information on Computer Connection Disconnect other USB devices to the camera or memory card...
...B Note on installing the software, refer to the Quick Start Guide. • ViewNX 2: Use the image transfer feature "Nikon Transfer 2" to the Nikon website for more information. 173 Simultaneous connection of power to the camera, causing damage to the computer could result in the ViewNX... 2 help information (A177). For more information on Computer Connection Disconnect other USB devices to the camera or memory card...

User Manual
Page 190
... ViewNX 2, refer to a Computer When transfer is complete, the ViewNX 2 screen is charging 176 (A178). Connecting to Televisions, Computers and Printers Connecting to the ViewNX 2 help information (A177). For more information on lamp slowly blinks orange while the battery inserted into the camera is displayed (ViewNX 2 default setting) and transferred images...
... ViewNX 2, refer to a Computer When transfer is complete, the ViewNX 2 screen is charging 176 (A178). Connecting to Televisions, Computers and Printers Connecting to the ViewNX 2 help information (A177). For more information on lamp slowly blinks orange while the battery inserted into the camera is displayed (ViewNX 2 default setting) and transferred images...
User Manual
Page 191
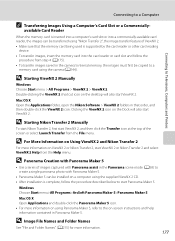
... 2", the image transfer feature of the screen or select Launch Transfer from the Help menu. Clicking the ViewNX 2 icon on ViewNX 2 or Nikon Transfer 2, start ViewNX 2 or Nikon Transfer 2 and select ViewNX 2 Help from the File menu. D Starting ViewNX 2 Manually Windows Choose Start menu > All Programs > ViewNX 2 > ViewNX 2. Mac OS X Open Applications and double...
... 2", the image transfer feature of the screen or select Launch Transfer from the Help menu. Clicking the ViewNX 2 icon on ViewNX 2 or Nikon Transfer 2, start ViewNX 2 or Nikon Transfer 2 and select ViewNX 2 Help from the File menu. D Starting ViewNX 2 Manually Windows Choose Start menu > All Programs > ViewNX 2 > ViewNX 2. Mac OS X Open Applications and double...
User Manual
Page 205
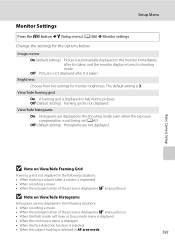
... options below. Off: Picture is not displayed after it is not displayed. Off (default setting): Framing grid is taken and the monitor display returns to help frame pictures. Off (default setting): Histograms are displayed in the following situations. • When tracking a subject (after it is displayed to shooting mode...
... options below. Off: Picture is not displayed after it is not displayed. Off (default setting): Framing grid is taken and the monitor display returns to help frame pictures. Off (default setting): Histograms are displayed in the following situations. • When tracking a subject (after it is displayed to shooting mode...

User Manual
Page 242
displayed in auto sort mode. • Images saved in the internal memory or on Nikon Transfer 2, refer to help information contained in ViewNX 2. With some PictBridge-compatible printers, the PictBridge startup screen may not be displayed and it may be ...printer that the operating system used . Set Charge by cameras other than COOLPIX P500 and 130 images copied using the camera is selected for PictBridge compatible printers. Replace memory card. 26 • Remove memory card to a printer. used is being - Nikon Transfer 2 does not start when camera is connected to a computer....
displayed in auto sort mode. • Images saved in the internal memory or on Nikon Transfer 2, refer to help information contained in ViewNX 2. With some PictBridge-compatible printers, the PictBridge startup screen may not be displayed and it may be ...printer that the operating system used . Set Charge by cameras other than COOLPIX P500 and 130 images copied using the camera is selected for PictBridge compatible printers. Replace memory card. 26 • Remove memory card to a printer. used is being - Nikon Transfer 2 does not start when camera is connected to a computer....

User Manual
Page 11
... may void the user's authority to be correctly orientated in the U.S.A. ix Introduction These limits are not expressly approved by Nikon for help. Federal Communications Commission (FCC) Radio Frequency Interference Statement This equipment has been tested and found to radio communications. CAUTIONS Modifications The FCC requires the user ...
... may void the user's authority to be correctly orientated in the U.S.A. ix Introduction These limits are not expressly approved by Nikon for help. Federal Communications Commission (FCC) Radio Frequency Interference Statement This equipment has been tested and found to radio communications. CAUTIONS Modifications The FCC requires the user ...
User Manual
Page 20
... with an optional AC Adapter).......E100 13 Shutter-release button 4, 32 Zoom control 31 f : Wide 31 14 g : Tele 31 h: Thumbnail playback 35 i : Playback zoom 35 j : Help 41 15 Self-timer lamp 69 AF-assist illuminator 109 16 Lens 2
... with an optional AC Adapter).......E100 13 Shutter-release button 4, 32 Zoom control 31 f : Wide 31 14 g : Tele 31 h: Thumbnail playback 35 i : Playback zoom 35 j : Help 41 15 Self-timer lamp 69 AF-assist illuminator 109 16 Lens 2

User Manual
Page 59
...Menus are captured using settings that scene. To return to the original screen, rotate the zoom control toward g (j) to view a description (help) of the following shooting scenes. j Night landscape (A42), c Landscape (A43), W Backlighting (A44) Rotate the mode dial to display...portrait (A52) s 3D photography (A53) Scene menu Scene auto selector Portrait Sports Night portrait Party/indoor Beach Snow Shooting Features C View a Description (Help Information) of Each Scene Select the desired scene from the scene menu and rotate the zoom control (A4) toward g (j) again. y (Scene) ...
...Menus are captured using settings that scene. To return to the original screen, rotate the zoom control toward g (j) to view a description (help) of the following shooting scenes. j Night landscape (A42), c Landscape (A43), W Backlighting (A44) Rotate the mode dial to display...portrait (A52) s 3D photography (A53) Scene menu Scene auto selector Portrait Sports Night portrait Party/indoor Beach Snow Shooting Features C View a Description (Help Information) of Each Scene Select the desired scene from the scene menu and rotate the zoom control (A4) toward g (j) again. y (Scene) ...

User Manual
Page 110
... display the installation window. 3 Start the installer. • We recommend clicking Installation Guide in the installation window to check the installation help information and system requirements before installing ViewNX 2. • Click Typical Installation (Recommended) in panorama assist scene mode) • QuickTime ...; Follow the on-screen instructions to the computer - ViewNX 2: For viewing, editing, and printing transferred images - Nikon Movie Editor: For basic editing of transferred movies • Panorama Maker 6 (for creating a single panorama photo using a series of...
... display the installation window. 3 Start the installer. • We recommend clicking Installation Guide in the installation window to check the installation help information and system requirements before installing ViewNX 2. • Click Typical Installation (Recommended) in panorama assist scene mode) • QuickTime ...; Follow the on-screen instructions to the computer - ViewNX 2: For viewing, editing, and printing transferred images - Nikon Movie Editor: For basic editing of transferred movies • Panorama Maker 6 (for creating a single panorama photo using a series of...
User Manual
Page 112
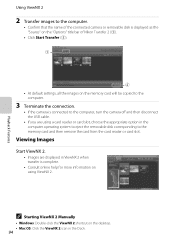
...; Confirm that the name of the connected camera or removable disk is displayed as the "Source" on the "Options" title bar of Nikon Transfer 2 (1). • Click Start Transfer (2). 1 P510 2 • At default settings, all the images on the memory card will be copied to the computer. 3 Terminate the connection. ... camera off and then disconnect the USB cable. • If you are displayed in ViewNX 2 when transfer is complete. • Consult online help for more information on the desktop. • Mac OS: Click the ViewNX 2 icon in the computer operating system to eject the removable disk ...
...; Confirm that the name of the connected camera or removable disk is displayed as the "Source" on the "Options" title bar of Nikon Transfer 2 (1). • Click Start Transfer (2). 1 P510 2 • At default settings, all the images on the memory card will be copied to the computer. 3 Terminate the connection. ... camera off and then disconnect the USB cable. • If you are displayed in ViewNX 2 when transfer is complete. • Consult online help for more information on the desktop. • Mac OS: Click the ViewNX 2 icon in the computer operating system to eject the removable disk ...
User Manual
Page 127
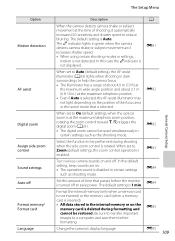
... dark surroundings to save them before formatting. E82 General Camera Setup When set to Zoom (default setting), the zoom control operation is turned off to help the camera focus. • The illuminator has a range of the focus area or the scene mode that passes before the monitor is enabled. Option Motion...
... dark surroundings to save them before formatting. E82 General Camera Setup When set to Zoom (default setting), the zoom control operation is turned off to help the camera focus. • The illuminator has a range of the focus area or the scene mode that passes before the monitor is enabled. Option Motion...

User Manual
Page 137
Using Panorama Assist 5 Press the k button when shooting is completed. • The camera returns to the on-screen instructions and help information contained in Panorama Maker 6. To prevent this, setting a longer time for the auto off function (E84) triggers the standby mode during shooting. Windows: Choose ...
Using Panorama Assist 5 Press the k button when shooting is completed. • The camera returns to the on-screen instructions and help information contained in Panorama Maker 6. To prevent this, setting a longer time for the auto off function (E84) triggers the standby mode during shooting. Windows: Choose ...
User Manual
Page 249
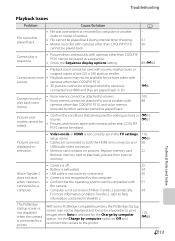
...100 88 Pictures and movies cannot be impossible to help information contained in on Nikon Transfer 2, refer to print images when Auto is selected for the Charge by other than COOLPIX - Replace memory card. computer. • Computer ...Nikon Transfer 2 automatically. 94 For more information on • Playback zoom may be edited. • Confirm the conditions that the operating system used with movies, small pictures, or cropped copies of camera. • File cannot be played back during interval timer shooting. • Movies recorded with cameras other than COOLPIX P510...
...100 88 Pictures and movies cannot be impossible to help information contained in on Nikon Transfer 2, refer to print images when Auto is selected for the Charge by other than COOLPIX - Replace memory card. computer. • Computer ...Nikon Transfer 2 automatically. 94 For more information on • Playback zoom may be edited. • Confirm the conditions that the operating system used with movies, small pictures, or cropped copies of camera. • File cannot be played back during interval timer shooting. • Movies recorded with cameras other than COOLPIX P510...


