
User Manual
Page 3
Introduction First Steps Basic Photography and Playback: A (Auto) Mode More on Shooting More on Playback Editing Pictures Movie Recording and Playback Connecting to Televisions, Computers and Printers Basic Camera Setup Caring for the Camera Technical Notes and Index i
Introduction First Steps Basic Photography and Playback: A (Auto) Mode More on Shooting More on Playback Editing Pictures Movie Recording and Playback Connecting to Televisions, Computers and Printers Basic Camera Setup Caring for the Camera Technical Notes and Index i
User Manual
Page 10
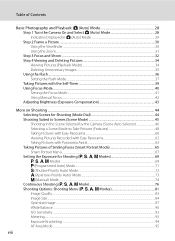
...Mode 28 Indicators Displayed in A (Auto) Mode 29 Step 2 Frame a Picture...30 Using the Viewfinder ...30 Using the Zoom...31 Step 3 Focus and Shoot ...32 Step 4 Viewing and Deleting Pictures 34 Viewing Pictures (Playback Mode) ...34 Deleting Unnecessary Images...35 Using the Flash...36 Setting ... Camera (Scene Auto Selector 46 Selecting a Scene Mode to Take Pictures (Features 48 Taking Pictures with Easy Panorama...60 Viewing Pictures Recorded with Easy Panorama 62 Taking Pictures with Panorama Assist...63 Taking Pictures of Smiling Faces (Smart Portrait Mode 65 Smart Portrait Menu...67 ...
...Mode 28 Indicators Displayed in A (Auto) Mode 29 Step 2 Frame a Picture...30 Using the Viewfinder ...30 Using the Zoom...31 Step 3 Focus and Shoot ...32 Step 4 Viewing and Deleting Pictures 34 Viewing Pictures (Playback Mode) ...34 Deleting Unnecessary Images...35 Using the Flash...36 Setting ... Camera (Scene Auto Selector 46 Selecting a Scene Mode to Take Pictures (Features 48 Taking Pictures with Easy Panorama...60 Viewing Pictures Recorded with Easy Panorama 62 Taking Pictures with Panorama Assist...63 Taking Pictures of Smiling Faces (Smart Portrait Mode 65 Smart Portrait Menu...67 ...

User Manual
Page 11
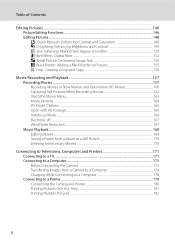
... Image...141 E Voice Memo...142 h Copy: Copying Between Internal Memory and Memory Card 144 C Sequence Display Options...145 C Choose Key Picture ...145 ix Comp...101 Long Exposure NR...102 Active D-Lighting...103 Functions that Cannot be Applied Simultaneously 104 Using M (User Setting Mode)...108... Playback 111 Playing Images Captured Using Continuous Shooting Mode (Sequence 113 Deleting Images in a Sequence...114 Viewing Multiple Pictures: Thumbnail Playback 115 Calendar Display...117 Taking a Closer Look: Playback Zoom 118 Playing Back Images by Category 120 Sorting Favorite Images ...
... Image...141 E Voice Memo...142 h Copy: Copying Between Internal Memory and Memory Card 144 C Sequence Display Options...145 C Choose Key Picture ...145 ix Comp...101 Long Exposure NR...102 Active D-Lighting...103 Functions that Cannot be Applied Simultaneously 104 Using M (User Setting Mode)...108... Playback 111 Playing Images Captured Using Continuous Shooting Mode (Sequence 113 Deleting Images in a Sequence...114 Viewing Multiple Pictures: Thumbnail Playback 115 Calendar Display...117 Taking a Closer Look: Playback Zoom 118 Playing Back Images by Category 120 Sorting Favorite Images ...
User Manual
Page 12
... Movie Recording and Playback 157 Recording Movies ...157 Recording Movies in Slow Motion and Fast Motion (HS Movie 160 Capturing Still Pictures While Recording Movies 162 Using the Movie Menu...163 Movie Options ...164 HS Movie Options...165 Open with HS Footage...165 Autofocus...Mode...166 Electronic VR ...167 Wind Noise Reduction...167 Movie Playback ...168 Editing Movies ...169 Saving a Frame from a Movie as a Still Picture 170 Deleting Unnecessary Movies ...170 Connecting to Televisions, Computers and Printers 171 Connecting to a TV...171 Connecting to a Computer...173 Before Connecting...
... Movie Recording and Playback 157 Recording Movies ...157 Recording Movies in Slow Motion and Fast Motion (HS Movie 160 Capturing Still Pictures While Recording Movies 162 Using the Movie Menu...163 Movie Options ...164 HS Movie Options...165 Open with HS Footage...165 Autofocus...Mode...166 Electronic VR ...167 Wind Noise Reduction...167 Movie Playback ...168 Editing Movies ...169 Saving a Frame from a Movie as a Still Picture 170 Deleting Unnecessary Movies ...170 Connecting to Televisions, Computers and Printers 171 Connecting to a TV...171 Connecting to a Computer...173 Before Connecting...
User Manual
Page 15
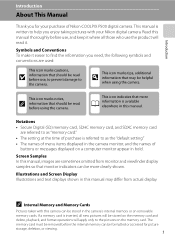
... can be more A information is inserted, all those who use , to prevent damage to help you for picture storage, deletion, or viewing. 1 C Internal Memory and Memory Cards Pictures taken with your purchase of purchase is written to the camera. This icon marks notes, C information that should...• The setting at the time of Nikon COOLPIX P500 digital camera. If a memory card is available elsewhere in the camera monitor, and the names of menu items displayed in this manual thoroughly before use, and keep it where all new pictures will read before using the camera. The ...
... can be more A information is inserted, all those who use , to prevent damage to help you for picture storage, deletion, or viewing. 1 C Internal Memory and Memory Cards Pictures taken with your purchase of purchase is written to the camera. This icon marks notes, C information that should...• The setting at the time of Nikon COOLPIX P500 digital camera. If a memory card is available elsewhere in the camera monitor, and the names of menu items displayed in this manual thoroughly before use, and keep it where all new pictures will read before using the camera. The ...
User Manual
Page 16
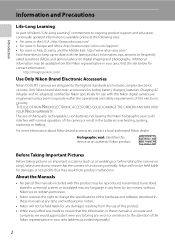
... may be held liable for contact information: http://imaging.nikon.com/ Use Only Nikon Brand Electronic Accessories Nikon COOLPIX cameras are engineered and proven to operate within the operational and safety requirements of the hardware and software described in these manuals at weddings or before taking pictures on digital imaging and photography. About the Manuals...
... may be held liable for contact information: http://imaging.nikon.com/ Use Only Nikon Brand Electronic Accessories Nikon COOLPIX cameras are engineered and proven to operate within the operational and safety requirements of the hardware and software described in these manuals at weddings or before taking pictures on digital imaging and photography. About the Manuals...

User Manual
Page 17
... bonds, even if such copies or reproductions are stamped "Sample". Ensuring the privacy of a scanner, digital camera or other device may be provided for example, pictures of necessary copies are circulated in camera memory does not completely erase the original image data. Also, do not copy or reproduce passports issued by... photographs is governed by the government is the user's responsibility. Deleted files can sometimes be taken to avoid injury or damage to also replace any pictures selected for the purpose of personal image data.
... bonds, even if such copies or reproductions are stamped "Sample". Ensuring the privacy of a scanner, digital camera or other device may be provided for example, pictures of necessary copies are circulated in camera memory does not completely erase the original image data. Also, do not copy or reproduce passports issued by... photographs is governed by the government is the user's responsibility. Deleted files can sometimes be taken to avoid injury or damage to also replace any pictures selected for the purpose of personal image data.
User Manual
Page 20
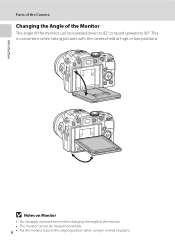
B Notes on Monitor • Do not apply excessive force when changing the angle of the monitor can be moved horizontally. 6 • Put the monitor back in the original position when using in normal situations. Introduction Parts of the Camera Changing the Angle of the Monitor The angle of the monitor. • The monitor cannot be lowered down to 82° or raised upward to 90°. This is convenient when taking pictures with the camera held at high or low positions.
B Notes on Monitor • Do not apply excessive force when changing the angle of the monitor can be moved horizontally. 6 • Put the monitor back in the original position when using in normal situations. Introduction Parts of the Camera Changing the Angle of the Monitor The angle of the monitor. • The monitor cannot be lowered down to 82° or raised upward to 90°. This is convenient when taking pictures with the camera held at high or low positions.

User Manual
Page 21
... Flash Press the m (flash pop-up) button to protect the lens. 7 B Lens Cap • Remove the lens cap before you shoot a picture. • At times when you are not shooting pictures such as when the power is off, or while you are carrying the camera, attach the lens cap to the camera...
... Flash Press the m (flash pop-up) button to protect the lens. 7 B Lens Cap • Remove the lens cap before you shoot a picture. • At times when you are not shooting pictures such as when the power is off, or while you are carrying the camera, attach the lens cap to the camera...

User Manual
Page 23
...exposure compensation ..........101 9 Battery level indicator 28 10 Long exposure noise reduction........102 11 Motion detection icon 195 Vibration reduction icon 12 (still pictures 193 13 Electronic VR icon (movies 167 14 Active D-Lighting 103 15 View/hide histograms 191 16 Print date 192 17 Travel destination indicator... 21 HS movie type 165 22 Image quality 83 23 Image size 84 24 Easy panorama 60 (a) Number of exposures remaining 25 (still pictures 28 (b) Movie length 157 * The icons vary with the shooting mode. 26 Internal memory indicator 29 27 Aperture value 70 28 Focus ...
...exposure compensation ..........101 9 Battery level indicator 28 10 Long exposure noise reduction........102 11 Motion detection icon 195 Vibration reduction icon 12 (still pictures 193 13 Electronic VR icon (movies 167 14 Active D-Lighting 103 15 View/hide histograms 191 16 Print date 192 17 Travel destination indicator... 21 HS movie type 165 22 Image quality 83 23 Image size 84 24 Easy panorama 60 (a) Number of exposures remaining 25 (still pictures 28 (b) Movie length 157 * The icons vary with the shooting mode. 26 Internal memory indicator 29 27 Aperture value 70 28 Focus ...

User Manual
Page 24
...1m00s b 1 Date of recording 24 2 Time of recording 24 3 Protect icon 139 4 Sequence display 113, 145 5 Volume indicator 142, 168 Album icon in favorite pictures mode1 6 124 Category icon in auto sort mode1 129 7 Battery level indicator 28 8 Movie options2 164 9 Image quality2 83 10 Image size2 84 11 Easy... Movie playback guide 168 15 Black border 155 16 Filter effects icon 152 17 Skin softening icon 150 18 Print order icon 135 19 Small picture 154, 156 20 D-Lighting icon 149 21 Quick retouch icon 148 22 Voice memo indicator 142 23 File number and type 215 1 The...
...1m00s b 1 Date of recording 24 2 Time of recording 24 3 Protect icon 139 4 Sequence display 113, 145 5 Volume indicator 142, 168 Album icon in favorite pictures mode1 6 124 Category icon in auto sort mode1 129 7 Battery level indicator 28 8 Movie options2 164 9 Image quality2 83 10 Image size2 84 11 Easy... Movie playback guide 168 15 Black border 155 16 Filter effects icon 152 17 Skin softening icon 150 18 Print order icon 135 19 Small picture 154, 156 20 D-Lighting icon 149 21 Quick retouch icon 148 22 Voice memo indicator 142 23 File number and type 215 1 The...
User Manual
Page 25
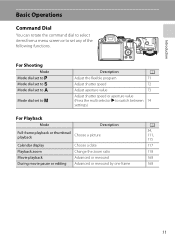
... command dial to select items from a menu screen or to switch between 74 settings.) For Playback Mode Description Full-frame playback or thumbnail playback Choose a picture Calendar display Playback zoom Movie playback During movie pause or editing Choose a date Change the zoom ratio Advanced or rewound Advanced or rewound by one...
... command dial to select items from a menu screen or to switch between 74 settings.) For Playback Mode Description Full-frame playback or thumbnail playback Choose a picture Calendar display Playback zoom Movie playback During movie pause or editing Choose a date Change the zoom ratio Advanced or rewound Advanced or rewound by one...

User Manual
Page 26
.../ choose the option above Choose the option on the left (J), right (K) section, or the k (apply selection) button. For Playback Choose the previous picture 15/05/2011 15:30 0004.JPG For the Menu Screen Choose the option above Display n (Self-timer) (A39) menu Display o (exposure compensation)...menu/ choose the option below * In shooting mode m (manual), select whether to the previous screen Choose the option below Choose the next picture 4 132 Choose the option on the right/ Display sub-menu or apply selection Apply selection or display sub-menu Shooting menu Image quality Image...
.../ choose the option above Choose the option on the left (J), right (K) section, or the k (apply selection) button. For Playback Choose the previous picture 15/05/2011 15:30 0004.JPG For the Menu Screen Choose the option above Display n (Self-timer) (A39) menu Display o (exposure compensation)...menu/ choose the option below * In shooting mode m (manual), select whether to the previous screen Choose the option below Choose the next picture 4 132 Choose the option on the right/ Display sub-menu or apply selection Apply selection or display sub-menu Shooting menu Image quality Image...
User Manual
Page 29
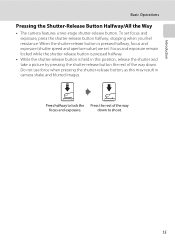
... result in camera shake and blurred images. Do not use force when pressing the shutter-release button, as this position, release the shutter and take a picture by pressing the shutter-release button the rest of the way focus and exposure. To set . down . Focus and exposure remain locked while the shutter...
... result in camera shake and blurred images. Do not use force when pressing the shutter-release button, as this position, release the shutter and take a picture by pressing the shutter-release button the rest of the way focus and exposure. To set . down . Focus and exposure remain locked while the shutter...
User Manual
Page 31
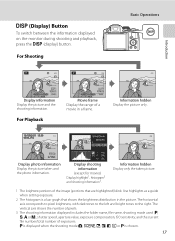
...information. +1.0 ISO 200 4 132 Display shooting information (except for movies) Display highlight1, histogram2 and shooting information3. Information hidden Display only the taken picture. 1 The brightest portions of the image (portions that shows the brightness distribution in a frame. j is displayed when the shooting mode A, ... and bright tones to the right. For Shooting Basic Operations Introduction 1/250 F5.6 1342 Display information Display the picture and the shooting information. The vertical axis shows the number of pixels. 3 The shooting information displayed includes the...
...information. +1.0 ISO 200 4 132 Display shooting information (except for movies) Display highlight1, histogram2 and shooting information3. Information hidden Display only the taken picture. 1 The brightest portions of the image (portions that shows the brightness distribution in a frame. j is displayed when the shooting mode A, ... and bright tones to the right. For Shooting Basic Operations Introduction 1/250 F5.6 1342 Display information Display the picture and the shooting information. The vertical axis shows the number of pixels. 3 The shooting information displayed includes the...

User Manual
Page 36
...50/60 Hz electrical outlets. When the camera is for use only with compatible devices. D Charging Using Computer or Battery Charger • Connecting the COOLPIX P500 to a computer also charges the Rechargeable Li-ion Battery EN-EL5 (A178, 202). • The EN-EL5 can be turned on page iii ..."The Battery" (A210), before use. • The EH-69P is supplied to the camera from an electrical outlet, enabling taking and playing back pictures. • Do not, under any circumstances, use another make or model of USB-AC adapter other than EH-62A. Failure to observe this precaution...
...50/60 Hz electrical outlets. When the camera is for use only with compatible devices. D Charging Using Computer or Battery Charger • Connecting the COOLPIX P500 to a computer also charges the Rechargeable Li-ion Battery EN-EL5 (A178, 202). • The EN-EL5 can be turned on page iii ..."The Battery" (A210), before use. • The EH-69P is supplied to the camera from an electrical outlet, enabling taking and playing back pictures. • Do not, under any circumstances, use another make or model of USB-AC adapter other than EH-62A. Failure to observe this precaution...

User Manual
Page 39
... choose the date display order and press the k button or K. D Imprinting the Date and Changing the Date and Time • To imprint the date on pictures when shooting, first set the date and time, and then set Print date (A192) in the setup menu (A185). 25 First Steps Setting the Display...
... choose the date display order and press the k button or K. D Imprinting the Date and Changing the Date and Time • To imprint the date on pictures when shooting, first set the date and time, and then set Print date (A192) in the setup menu (A185). 25 First Steps Setting the Display...
User Manual
Page 41
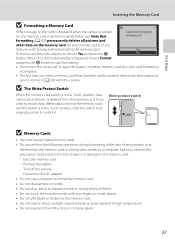
... during formatting, while data is not formatted. Failure to choose Yes and press the k No button. on the memory card. formatting (A200) permanently deletes all pictures and other data on , the memory card must be written to humidity, dust, or corrosive gases. 27 Yes To format, use . Remove the battery - Disconnect...
... during formatting, while data is not formatted. Failure to choose Yes and press the k No button. on the memory card. formatting (A200) permanently deletes all pictures and other data on , the memory card must be written to humidity, dust, or corrosive gases. 27 Yes To format, use . Remove the battery - Disconnect...
User Manual
Page 42
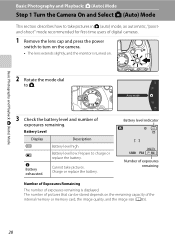
... A (auto) mode, an automatic, "pointand-shoot" mode recommended for first-time users of exposures remaining. Charge or replace the battery. The number of pictures that can be stored depends on the remaining capacity of exposures remaining is turned on the camera. • The lens extends slightly, and the monitor ... and Playback: A (Auto) Mode Basic Photography and Playback: A (Auto) Mode Step 1 Turn the Camera On and Select A (Auto) Mode This section describes how to take pictures. Prepare to A.
... A (auto) mode, an automatic, "pointand-shoot" mode recommended for first-time users of exposures remaining. Charge or replace the battery. The number of pictures that can be stored depends on the remaining capacity of exposures remaining is turned on the camera. • The lens extends slightly, and the monitor ... and Playback: A (Auto) Mode Basic Photography and Playback: A (Auto) Mode Step 1 Turn the Camera On and Select A (Auto) Mode This section describes how to take pictures. Prepare to A.

User Manual
Page 43
...) Mode Step 1 Turn the Camera On and Select A (Auto) Mode Indicators Displayed in A (Auto) Mode Shooting mode A is not displayed and pictures are recorded to the memory card. Press the power switch, the shutter-release button, the c button or the b (e movie- C Functions Available in... compensation (A43) can be sure to raise the flash (A37). Shutter speed (A70) 1/250 F5.6 Aperture value (A70) Internal memory indicator Pictures are displayed. In situations where a flash is needed, such as in standby mode to internal memory (approx. 102 MB). record) button. -...
...) Mode Step 1 Turn the Camera On and Select A (Auto) Mode Indicators Displayed in A (Auto) Mode Shooting mode A is not displayed and pictures are recorded to the memory card. Press the power switch, the shutter-release button, the c button or the b (e movie- C Functions Available in... compensation (A43) can be sure to raise the flash (A37). Shutter speed (A70) 1/250 F5.6 Aperture value (A70) Internal memory indicator Pictures are displayed. In situations where a flash is needed, such as in standby mode to internal memory (approx. 102 MB). record) button. -...


