
User Manual
Page 13
Table of Contents Basic Camera Setup ...185 Setup Menu...185 Welcome Screen ...187 Time Zone and Date...188 Monitor Settings...191 Print Date ...192 Vibration Reduction ...193 Motion Detection...195 AF Assist...196 Red-eye Reduction ...196 Digital Zoom...197 Assign Side Zoom Control ...198 Sound Settings...199 Auto Off ...199 Format Memory/Format Card...200 Language...201 TV Settings ...201 Charge by Computer...202 Reset File Numbering...202 Blink Warning ...203 Reset All ...205 Firmware Version...208 Caring for the Camera...209 Caring for the Camera ...209 Cleaning ...211 Storage ...212 xi
Table of Contents Basic Camera Setup ...185 Setup Menu...185 Welcome Screen ...187 Time Zone and Date...188 Monitor Settings...191 Print Date ...192 Vibration Reduction ...193 Motion Detection...195 AF Assist...196 Red-eye Reduction ...196 Digital Zoom...197 Assign Side Zoom Control ...198 Sound Settings...199 Auto Off ...199 Format Memory/Format Card...200 Language...201 TV Settings ...201 Charge by Computer...202 Reset File Numbering...202 Blink Warning ...203 Reset All ...205 Firmware Version...208 Caring for the Camera...209 Caring for the Camera ...209 Cleaning ...211 Storage ...212 xi
User Manual
Page 46
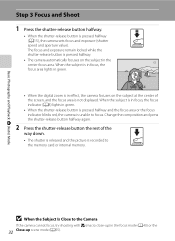
... the focus area lights in green. 1/250 F5.6 • When the digital zoom is in green. • When the shutter-release button is pressed halfway and the focus area or the focus indicator blinks red, the camera is recorded to the memory card or internal memory. When the subject is ...pressed halfway (A15), the camera sets focus and exposure (shutter speed and aperture value). Basic Photography and Playback: A (...
... the focus area lights in green. 1/250 F5.6 • When the digital zoom is in green. • When the shutter-release button is pressed halfway and the focus area or the focus indicator blinks red, the camera is recorded to the memory card or internal memory. When the subject is ...pressed halfway (A15), the camera sets focus and exposure (shutter speed and aperture value). Basic Photography and Playback: A (...
User Manual
Page 61
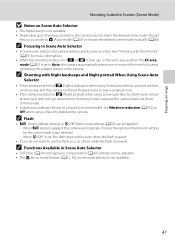
... chooses the optimum flash mode setting for more of a tripod is fixed at slow sync with red-eye reduction for shooting human subjects (the camera does not shoot continuously). • In dark surroundings, the use the flash, you do not want to A (Auto) mode (A28) or...) when using a tripod to Scenes (Scene Mode) B Notes on Scene Auto Selector • The digital zoom is not available. 47 C Functions Available in Scene Auto Selector • In Scene auto selector, the camera detects and focuses on the multi selector is not available. • Depending upon shooting conditions, the...
... chooses the optimum flash mode setting for more of a tripod is fixed at slow sync with red-eye reduction for shooting human subjects (the camera does not shoot continuously). • In dark surroundings, the use the flash, you do not want to A (Auto) mode (A28) or...) when using a tripod to Scenes (Scene Mode) B Notes on Scene Auto Selector • The digital zoom is not available. 47 C Functions Available in Scene Auto Selector • In Scene auto selector, the camera detects and focuses on the multi selector is not available. • Depending upon shooting conditions, the...
User Manual
Page 63
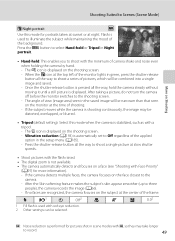
... monitor at slow shutter speeds. • Shoot pictures with the flash raised. • The digital zoom is not available. • The camera automatically detects and focuses on a face (see "Shooting with red-eye reduction. 2 Other settings can be selected. Once the shutter-release button is pressed all... the way to three people), the camera records the image (A66). - If no faces are recognized, the camera focuses on the subject at night. Press the...
... monitor at slow shutter speeds. • Shoot pictures with the flash raised. • The digital zoom is not available. • The camera automatically detects and focuses on a face (see "Shooting with red-eye reduction. 2 Other settings can be selected. Once the shutter-release button is pressed all... the way to three people), the camera records the image (A66). - If no faces are recognized, the camera focuses on the subject at night. Press the...

User Manual
Page 104
... most types of fluorescent lighting. g Flash* Use with certain features. The "+" direction increases the blue hue and the "-" direction increases the red hue. See "Functions that Cannot be Applied Simultaneously" (A104) for more information. For natural coloration, choose a white balance setting that matches ... the default setting, Auto, can apply the white balance setting suited to a particular light source to suit the lighting conditions. Digital cameras can mimic this adjustment of the human eye by processing images according to the color of lighting, you can be used simultaneously ...
... most types of fluorescent lighting. g Flash* Use with certain features. The "+" direction increases the blue hue and the "-" direction increases the red hue. See "Functions that Cannot be Applied Simultaneously" (A104) for more information. For natural coloration, choose a white balance setting that matches ... the default setting, Auto, can apply the white balance setting suited to a particular light source to suit the lighting conditions. Digital cameras can mimic this adjustment of the human eye by processing images according to the color of lighting, you can be used simultaneously ...

User Manual
Page 199
... is turned on pictures. Assign side zoom control A198 Choose the function to display the Welcome screen on the monitor when the camera is auto with red-eye reduction. Language A201 Choose the language used for taking still pictures. Charge by computer A202 Choose whether or not to charge... the internal memory or memory card. TV settings A201 Adjust the settings for connecting to a computer via the USB cable. 185 Basic Camera Setup Setup Menu Basic Camera Setup The setup menu contains the following options. Digital zoom A197 Enable or disable the...
... is turned on pictures. Assign side zoom control A198 Choose the function to display the Welcome screen on the monitor when the camera is auto with red-eye reduction. Language A201 Choose the language used for taking still pictures. Charge by computer A202 Choose whether or not to charge... the internal memory or memory card. TV settings A201 Adjust the settings for connecting to a computer via the USB cable. 185 Basic Camera Setup Setup Menu Basic Camera Setup The setup menu contains the following options. Digital zoom A197 Enable or disable the...

User Manual
Page 221
...) Brightness (A191) View/hide framing grid (A191) View/hide histograms (A191) Print date (A192) Vibration reduction (A193) Motion detection (A195) AF assist (A196) Red-eye reduction (A196) Digital zoom (A197) Assign side zoom control (A198) Button sound (A199) Shutter sound (A199) Auto off (A199) HDMI (A201) HDMI device control (A201) Charge by... Off Default value None On 3 Off Off Off On Off Auto Pre-flash on On Zoom On On 1 min Auto On Auto Off 207 Basic Camera Setup
...) Brightness (A191) View/hide framing grid (A191) View/hide histograms (A191) Print date (A192) Vibration reduction (A193) Motion detection (A195) AF assist (A196) Red-eye reduction (A196) Digital zoom (A197) Assign side zoom control (A198) Button sound (A199) Shutter sound (A199) Auto off (A199) HDMI (A201) HDMI device control (A201) Charge by... Off Default value None On 3 Off Off Off On Off Auto Pre-flash on On Zoom On On 1 min Auto On Auto Off 207 Basic Camera Setup


