User Manual
Page 4
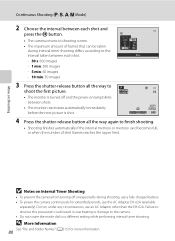
... care Never place the strap around the neck of malfunction Should you notice smoke or an unusual smell coming from putting the battery or other small parts into their entirety before using this equipment. Do not use the camera or Charging AC Adapter in the... the sun or other accident, take the equipment to a Nikon-authorized service representative for inspection, after unplugging the product and/or removing the battery. ii After removing or disconnecting the power source, take the product to a Nikon-authorized service representative for inspection. Keep these safety instructions where ...
... care Never place the strap around the neck of malfunction Should you notice smoke or an unusual smell coming from putting the battery or other small parts into their entirety before using this equipment. Do not use the camera or Charging AC Adapter in the... the sun or other accident, take the equipment to a Nikon-authorized service representative for inspection, after unplugging the product and/or removing the battery. ii After removing or disconnecting the power source, take the product to a Nikon-authorized service representative for inspection. Keep these safety instructions where ...
User Manual
Page 5
...notice any change in the battery, one voltage to a Nikon- Should the insulation be ...or to observe this precaution could result in or expose to exposed, take it upside down or backwards. authorized service representative for use could result in electric shock. Failure to observe these precautions could damage the product or cause overheating or fire. battery...as necklaces or hairpins. • Do not handle the plug or Charging • The battery is unplugged. Failure to observe this precaution could the product, be sure to remove the ...
...notice any change in the battery, one voltage to a Nikon- Should the insulation be ...or to observe this precaution could result in or expose to exposed, take it upside down or backwards. authorized service representative for use could result in electric shock. Failure to observe these precautions could damage the product or cause overheating or fire. battery...as necklaces or hairpins. • Do not handle the plug or Charging • The battery is unplugged. Failure to observe this precaution could the product, be sure to remove the ...
User Manual
Page 8
... waste. • For more information, contact the retailer or the local authorities in charge of waste management. This symbol indicates that the battery is to cause birth defects or other reproductive harm. Do not dispose of as household waste. • For more information, contact the ...vi The following apply only to the State of California WARNING Handling the cord on the battery indicates that this symbol or not, are designated for separate collection at an appropriate collection point. Nikon Inc., 1300 Walt Whitman Road, Melville, New York 11747-3064 USA Tel: 631-547...
... waste. • For more information, contact the retailer or the local authorities in charge of waste management. This symbol indicates that the battery is to cause birth defects or other reproductive harm. Do not dispose of as household waste. • For more information, contact the ...vi The following apply only to the State of California WARNING Handling the cord on the battery indicates that this symbol or not, are designated for separate collection at an appropriate collection point. Nikon Inc., 1300 Walt Whitman Road, Melville, New York 11747-3064 USA Tel: 631-547...

User Manual
Page 9
......14 Pressing the Shutter-Release Button Halfway/All the Way 15 x (Monitor) Button ...16 s (Display) Button ...17 First Steps ...18 Inserting the Battery...18 Removing the Battery...19 Charging the Battery ...20 Turning On and Off the Camera...23 Setting the Display Language, Date and Time 24 Inserting the Memory Card ...26 Removing...
......14 Pressing the Shutter-Release Button Halfway/All the Way 15 x (Monitor) Button ...16 s (Display) Button ...17 First Steps ...18 Inserting the Battery...18 Removing the Battery...19 Charging the Battery ...20 Turning On and Off the Camera...23 Setting the Display Language, Date and Time 24 Inserting the Memory Card ...26 Removing...
User Manual
Page 16
...occasions (such as an authentic Nikon product. Only Nikon brand electronic accessories (including battery chargers, batteries, Charging AC Adapter and AC adapters) certified by Nikon specifically for use of third-party rechargeable Li-ion batteries not bearing the Nikon holographic seal could interfere with normal...liable for damages or lost profits that may be held liable for contact information: http://imaging.nikon.com/ Use Only Nikon Brand Electronic Accessories Nikon COOLPIX cameras are engineered and proven to operate within the operational and safety requirements of this device ...
...occasions (such as an authentic Nikon product. Only Nikon brand electronic accessories (including battery chargers, batteries, Charging AC Adapter and AC adapters) certified by Nikon specifically for use of third-party rechargeable Li-ion batteries not bearing the Nikon holographic seal could interfere with normal...liable for damages or lost profits that may be held liable for contact information: http://imaging.nikon.com/ Use Only Nikon Brand Electronic Accessories Nikon COOLPIX cameras are engineered and proven to operate within the operational and safety requirements of this device ...
User Manual
Page 19
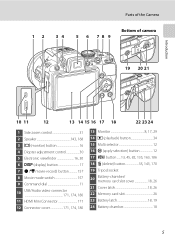
... selector 12 16 k (apply selection) button 12 17 d button......13, 45, 82, 135, 163, 186 18 l (delete) button 35, 143, 170 19 Tripod socket 20 Battery-chamber/ memory card slot cover 18, 26 21 Cover latch 18, 26 22 Memory card slot 26 23...
... selector 12 16 k (apply selection) button 12 17 d button......13, 45, 82, 135, 163, 186 18 l (delete) button 35, 143, 170 19 Tripod socket 20 Battery-chamber/ memory card slot cover 18, 26 21 Cover latch 18, 26 22 Memory card slot 26 23...

User Manual
Page 23
..., 69, 108 2 Focus mode 40 3 Zoom indicator 31 4 Focus indicator 32 5 AE/AF-L indicator 64 6 Flash indicator 38 7 Flash mode 36 8 Flash exposure compensation ..........101 9 Battery level indicator 28 10 Long exposure noise reduction........102 11 Motion detection icon 195 Vibration reduction icon 12 (still pictures 193 13 Electronic VR icon...
..., 69, 108 2 Focus mode 40 3 Zoom indicator 31 4 Focus indicator 32 5 AE/AF-L indicator 64 6 Flash indicator 38 7 Flash mode 36 8 Flash exposure compensation ..........101 9 Battery level indicator 28 10 Long exposure noise reduction........102 11 Motion detection icon 195 Vibration reduction icon 12 (still pictures 193 13 Electronic VR icon...

User Manual
Page 24
... 3 Protect icon 139 4 Sequence display 113, 145 5 Volume indicator 142, 168 Album icon in favorite pictures mode1 6 124 Category icon in auto sort mode1 129 7 Battery level indicator 28 8 Movie options2 164 9 Image quality2 83 10 Image size2 84 11 Easy panorama indicator 62 (a) Current frame number/total 12 number of...
... 3 Protect icon 139 4 Sequence display 113, 145 5 Volume indicator 142, 168 Album icon in favorite pictures mode1 6 124 Category icon in auto sort mode1 129 7 Battery level indicator 28 8 Movie options2 164 9 Image quality2 83 10 Image size2 84 11 Easy panorama indicator 62 (a) Current frame number/total 12 number of...

User Manual
Page 32
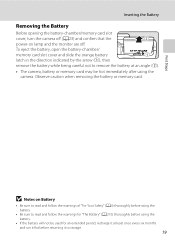
...confirm that the battery is in place. Battery chamber B Inserting the Battery Correctly Inserting the battery upside down in the direction shown (1), and fully insert the battery (2). • When the battery is fully inserted, the battery latch locks it in the correct orientation. 3 Close the battery-chamber/memory card... latch to the Z position (2). 18 First Steps First Steps Inserting the Battery Insert a Rechargeable Li-ion Battery EN-EL5 (supplied) into the camera. • Charge the battery before first use or when the battery is running low (A20). 1 Slide the cover latch to the Y ...
...confirm that the battery is in place. Battery chamber B Inserting the Battery Correctly Inserting the battery upside down in the direction shown (1), and fully insert the battery (2). • When the battery is fully inserted, the battery latch locks it in the correct orientation. 3 Close the battery-chamber/memory card... latch to the Z position (2). 18 First Steps First Steps Inserting the Battery Insert a Rechargeable Li-ion Battery EN-EL5 (supplied) into the camera. • Charge the battery before first use or when the battery is running low (A20). 1 Slide the cover latch to the Y ...
User Manual
Page 33
... indicated by the arrow (1), then remove the battery while being careful not to remove the battery at an angle (2). • The camera, battery or memory card may be used for "The Battery" (A210) thoroughly before using the battery. • If the battery will not be hot immediately after using the battery. • Be sure to read and...
... indicated by the arrow (1), then remove the battery while being careful not to remove the battery at an angle (2). • The camera, battery or memory card may be used for "The Battery" (A210) thoroughly before using the battery. • If the battery will not be hot immediately after using the battery. • Be sure to read and...
User Manual
Page 34
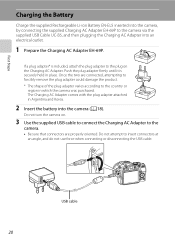
...in which the camera was purchased. USB cable 20 The Charging AC Adapter comes with the plug adapter attached in Argentina and Korea. 2 Insert the battery into an electrical outlet. 1 Prepare the Charging AC Adapter EH-69P. Do not attempt to the country or region in place. Push the plug... do not use force when connecting or disconnecting the USB cable. Once the two are properly oriented. First Steps Charging the Battery Charge the supplied Rechargeable Li-ion Battery EN-EL5 inserted into the camera, by connecting the supplied Charging AC Adapter EH-69P to the camera via the supplied USB...
...in which the camera was purchased. USB cable 20 The Charging AC Adapter comes with the plug adapter attached in Argentina and Korea. 2 Insert the battery into an electrical outlet. 1 Prepare the Charging AC Adapter EH-69P. Do not attempt to the country or region in place. Push the plug... do not use force when connecting or disconnecting the USB cable. Once the two are properly oriented. First Steps Charging the Battery Charge the supplied Rechargeable Li-ion Battery EN-EL5 inserted into the camera, by connecting the supplied Charging AC Adapter EH-69P to the camera via the supplied USB...

User Manual
Page 35
...outlet. When charging is complete, the poweron lamp stops blinking orange and turns off. • The ambient temperature is a problem with the battery. Charge the battery indoors with an ambient temperature of 5 °C to 35 °C (41 °F to 95 °F). • The USB ...into the electrical outlet. The power-on lamp Blinks slowly (orange) Off Flickers (orange) Description Battery charging. Power-on lamp slowly blinks orange to charge a fully exhausted battery. Battery not charging. Disconnect the USB cable or unplug the Charging AC Adapter and correctly connect it again...
...outlet. When charging is complete, the poweron lamp stops blinking orange and turns off. • The ambient temperature is a problem with the battery. Charge the battery indoors with an ambient temperature of 5 °C to 35 °C (41 °F to 95 °F). • The USB ...into the electrical outlet. The power-on lamp Blinks slowly (orange) Off Flickers (orange) Description Battery charging. Power-on lamp slowly blinks orange to charge a fully exhausted battery. Battery not charging. Disconnect the USB cable or unplug the Charging AC Adapter and correctly connect it again...

User Manual
Page 36
... Charging AC Adapter, the camera cannot be charged without using the camera by using in damage to the camera. D Charging Using Computer or Battery Charger • Connecting the COOLPIX P500 to the camera from an electrical outlet, enabling taking and playing back pictures. • Do not, under any circumstances, use another make or...
... Charging AC Adapter, the camera cannot be charged without using the camera by using in damage to the camera. D Charging Using Computer or Battery Charger • Connecting the COOLPIX P500 to the camera from an electrical outlet, enabling taking and playing back pictures. • Do not, under any circumstances, use another make or...
User Manual
Page 37
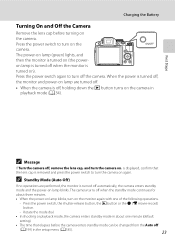
... standby mode and the power-on lamp blinks. Press the power switch, the shutter-release button, the c button or the b (e movie-record) button. - Charging the Battery Turning On and Off the Camera Remove the lens cap before the camera enters standby mode can be changed from the Auto off the camera.
... standby mode and the power-on lamp blinks. Press the power switch, the shutter-release button, the c button or the b (e movie-record) button. - Charging the Battery Turning On and Off the Camera Remove the lens cap before the camera enters standby mode can be changed from the Auto off the camera.
User Manual
Page 40
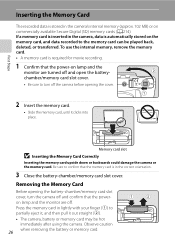
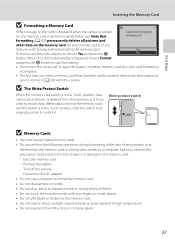
... turn the camera off and confirm that the memory card is in the correct orientation. 3 Close the battery-chamber/memory card slot cover. Removing the Memory Card Before opening the battery-chamber/memory card slot cover, turn off . First Steps Inserting the Memory Card The recorded data is ... the memory card. • Slide the memory card, until it out straight (2). • The camera, battery or memory card may be played back, deleted, or transferred. Observe caution when removing the battery or memory card. 26 Be sure to partially eject it, and then pull it clicks into place. If...
... turn the camera off and confirm that the memory card is in the correct orientation. 3 Close the battery-chamber/memory card slot cover. Removing the Memory Card Before opening the battery-chamber/memory card slot cover, turn off . First Steps Inserting the Memory Card The recorded data is ... the memory card. • Slide the memory card, until it out straight (2). • The camera, battery or memory card may be played back, deleted, or transferred. Observe caution when removing the battery or memory card. 26 Be sure to partially eject it, and then pull it clicks into place. If...
User Manual
Page 41
... Cards • Use only Secure Digital memory cards. • Do not perform the following operations during data transfer to a computer. Turn off , or open the battery-chamber/memory card slot cover until formatting is complete. • The first time you wish to keep before use. Remove the... battery - Disconnect the AC adapter • Do not use the multi selector to choose Yes and press the k No button. When the confirmation dialog is displayed, ...
... Cards • Use only Secure Digital memory cards. • Do not perform the following operations during data transfer to a computer. Turn off , or open the battery-chamber/memory card slot cover until formatting is complete. • The first time you wish to keep before use. Remove the... battery - Disconnect the AC adapter • Do not use the multi selector to choose Yes and press the k No button. When the confirmation dialog is displayed, ...
User Manual
Page 42
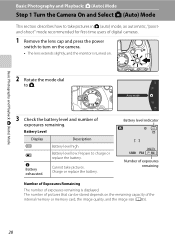
Prepare to charge or replace the battery. Charge or replace the battery. Battery level indicator 1/250 F5.6 32 Number of exposures remaining Number of Exposures Remaining The number of exposures remaining is turned on the remaining capacity of... users of the internal memory or memory card, the image quality, and the image size (A85). 28 The number of exposures remaining. B Battery level low. N Battery exhausted. Auto mode 3 Check the battery level and number of pictures that can be stored depends on . 2 Rotate the mode dial to A. Basic Photography and Playback: A (Auto...
Prepare to charge or replace the battery. Charge or replace the battery. Battery level indicator 1/250 F5.6 32 Number of exposures remaining Number of Exposures Remaining The number of exposures remaining is turned on the remaining capacity of... users of the internal memory or memory card, the image quality, and the image size (A85). 28 The number of exposures remaining. B Battery level low. N Battery exhausted. Auto mode 3 Check the battery level and number of pictures that can be stored depends on . 2 Rotate the mode dial to A. Basic Photography and Playback: A (Auto...

User Manual
Page 47
...; Subject is moving rapidly In the situations noted above, try pressing the shutter-release button halfway to the camera or card. Do not open the battery-chamber/memory card slot cover. picture. The camera can also be focused using focus lock, be in focus despite the fact that repeat the same...
...; Subject is moving rapidly In the situations noted above, try pressing the shutter-release button halfway to the camera or card. Do not open the battery-chamber/memory card slot cover. picture. The camera can also be focused using focus lock, be in focus despite the fact that repeat the same...
User Manual
Page 94
... automatically if the internal memory or memory card becomes full, or when the number of frames that can be taken during shooting, use a fully charged battery. • To power the camera continuously for more information. 80 Failure to observe this precaution could result in overheating or damage to the camera. •...
... automatically if the internal memory or memory card becomes full, or when the number of frames that can be taken during shooting, use a fully charged battery. • To power the camera continuously for more information. 80 Failure to observe this precaution could result in overheating or damage to the camera. •...

User Manual
Page 122
... settings can be saved in M. This is convenient when you want to shoot with these settings or you only want to Manual. More on Clock Battery If the internal clock battery (A189) is exhausted, the settings saved in M will also be reset. Shooting is recommended. 108
... settings can be saved in M. This is convenient when you want to shoot with these settings or you only want to Manual. More on Clock Battery If the internal clock battery (A189) is exhausted, the settings saved in M will also be reset. Shooting is recommended. 108


