User Manual
Page 4
... taking care to avoid burns. Continued operation could result in injury. After removing or disconnecting the power source, take the product to a Nikon-authorized service representative for inspection. Handle the camera strap with care Never place the strap around the neck of a fall or other strong ..., after unplugging the product and/or removing the battery. WARNINGS Turn off in explosion or fire. Do not disassemble Touching the internal parts of flammable gas, as the result of an infant or child. ii Repairs should be performed only by qualified technicians. Do not ...
... taking care to avoid burns. Continued operation could result in injury. After removing or disconnecting the power source, take the product to a Nikon-authorized service representative for inspection. Handle the camera strap with care Never place the strap around the neck of a fall or other strong ..., after unplugging the product and/or removing the battery. WARNINGS Turn off in explosion or fire. Do not disassemble Touching the internal parts of flammable gas, as the result of an infant or child. ii Repairs should be performed only by qualified technicians. Do not ...
User Manual
Page 5
...any change in fire or transport or store with DC- Charge the battery by inserting it is prone to leakage when fully discharged. to a Nikon- electric shock. • Use only a Rechargeable Li-ion • Dust on or near the Charging AC Adapter during lightning storms. Failure...Adapter EH-69P (supplied). • When inserting the battery, do not • Do not handle the plug or go near the metal parts of improperly handled. this product: Observe the following precautions when handling the battery for • Replace the terminal cover when transporting the battery. ...
...any change in fire or transport or store with DC- Charge the battery by inserting it is prone to leakage when fully discharged. to a Nikon- electric shock. • Use only a Rechargeable Li-ion • Dust on or near the Charging AC Adapter during lightning storms. Failure...Adapter EH-69P (supplied). • When inserting the battery, do not • Do not handle the plug or go near the metal parts of improperly handled. this product: Observe the following precautions when handling the battery for • Replace the terminal cover when transporting the battery. ...

User Manual
Page 6
... For Your Safety Use appropriate cables When connecting cables to the input and output jacks, use only the cables provided or sold by Nikon for the purpose, to maintain compliance with the flash window touching a person or object Failure to observe this precaution could result in burns... ft. 4 in a hospital. Avoid contact with care Be careful that your subject's eyes could cause hearing loss or damage the equipment. iv Handle moving parts. CD-ROMs The CD-ROMs supplied with this camera may disrupt the electronic systems of the airplane or the instruments of the hospital when using...
... For Your Safety Use appropriate cables When connecting cables to the input and output jacks, use only the cables provided or sold by Nikon for the purpose, to maintain compliance with the flash window touching a person or object Failure to observe this precaution could result in burns... ft. 4 in a hospital. Avoid contact with care Be careful that your subject's eyes could cause hearing loss or damage the equipment. iv Handle moving parts. CD-ROMs The CD-ROMs supplied with this camera may disrupt the electronic systems of the airplane or the instruments of the hospital when using...

User Manual
Page 7
... to try to correct the interference by Nikon for a Class B digital device, pursuant to operate the equipment. This equipment generates, uses, and can be notified that any changes or modifications made to this equipment does cause harmful COOLPIX P500 CAUTIONS Modifications The FCC requires the user ...vertical or floor mount position. If this device that are designed to comply with the instructions, may exceed the limits of Class B Part 15 of the FCC rules. TO REDUCE THE RISK OF FIRE OR ELECTRIC SHOCK, CAREFULLY FOLLOW THESE INSTRUCTIONS For connection to radio communications....
... to try to correct the interference by Nikon for a Class B digital device, pursuant to operate the equipment. This equipment generates, uses, and can be notified that any changes or modifications made to this equipment does cause harmful COOLPIX P500 CAUTIONS Modifications The FCC requires the user ...vertical or floor mount position. If this device that are designed to comply with the instructions, may exceed the limits of Class B Part 15 of the FCC rules. TO REDUCE THE RISK OF FIRE OR ELECTRIC SHOCK, CAREFULLY FOLLOW THESE INSTRUCTIONS For connection to radio communications....

User Manual
Page 9
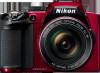
Table of Contents For Your Safety ...ii WARNINGS ...ii Notices ...v Introduction ...1 About This Manual ...1 Information and Precautions ...2 Parts of the Camera ...4 Camera Body ...4 Changing the Angle of the Monitor ...6 Raising and Lowering the Flash...7 Attaching the Camera Strap and Lens Cap 7 Monitor ...8 Basic ...
Table of Contents For Your Safety ...ii WARNINGS ...ii Notices ...v Introduction ...1 About This Manual ...1 Information and Precautions ...2 Parts of the Camera ...4 Camera Body ...4 Changing the Angle of the Monitor ...6 Raising and Lowering the Flash...7 Attaching the Camera Strap and Lens Cap 7 Monitor ...8 Basic ...
User Manual
Page 16
..., or translated into any language in any form, by Nikon specifically for contact information: http://imaging.nikon.com/ Use Only Nikon Brand Electronic Accessories Nikon COOLPIX cameras are designed to the highest standards and include complex electronic circuitry. Introduction Information and Precautions Life-Long Learning As part of Nikon's "Life-Long Learning" commitment to ongoing product support...
..., or translated into any language in any form, by Nikon specifically for contact information: http://imaging.nikon.com/ Use Only Nikon Brand Electronic Accessories Nikon COOLPIX cameras are designed to the highest standards and include complex electronic circuitry. Introduction Information and Precautions Life-Long Learning As part of Nikon's "Life-Long Learning" commitment to ongoing product support...

User Manual
Page 18
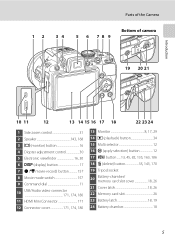
Introduction Parts of the Camera Camera Body 1 23 4 5 Flash raised 67 8 9 10 11 1 Eyelet for camera strap 7 2 Power switch/power-on lamp... 23, 199 3 C (continuous shooting mode) ...
Introduction Parts of the Camera Camera Body 1 23 4 5 Flash raised 67 8 9 10 11 1 Eyelet for camera strap 7 2 Power switch/power-on lamp... 23, 199 3 C (continuous shooting mode) ...
User Manual
Page 19
Introduction Parts of the Camera Bottom of camera 1 2 3 4 5 6 78 9 19 20 21 10 11 12 13 14 15 16 17 18 22 23 24 1 Side zoom control ...
Introduction Parts of the Camera Bottom of camera 1 2 3 4 5 6 78 9 19 20 21 10 11 12 13 14 15 16 17 18 22 23 24 1 Side zoom control ...
User Manual
Page 20
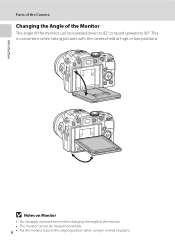
Introduction Parts of the Camera Changing the Angle of the Monitor The angle of the monitor. • The monitor cannot be lowered down to 82° or raised upward to 90°. This is convenient when taking pictures with the camera held at high or low positions. B Notes on Monitor • Do not apply excessive force when changing the angle of the monitor can be moved horizontally. 6 • Put the monitor back in the original position when using in normal situations.
Introduction Parts of the Camera Changing the Angle of the Monitor The angle of the monitor. • The monitor cannot be lowered down to 82° or raised upward to 90°. This is convenient when taking pictures with the camera held at high or low positions. B Notes on Monitor • Do not apply excessive force when changing the angle of the monitor can be moved horizontally. 6 • Put the monitor back in the original position when using in normal situations.

User Manual
Page 21
..." (A36) for more information on setting the flash. • When not using the flash, lower it by gently pushing it down until it clicks. Introduction Parts of the Camera Raising and Lowering the Flash Press the m (flash pop-up) button to protect the lens. 7 Attaching the Camera Strap and Lens Cap...
..." (A36) for more information on setting the flash. • When not using the flash, lower it by gently pushing it down until it clicks. Introduction Parts of the Camera Raising and Lowering the Flash Press the m (flash pop-up) button to protect the lens. 7 Attaching the Camera Strap and Lens Cap...

User Manual
Page 22
Introduction Parts of the Camera Monitor The following indicators may appear in the monitor during shooting and playback (actual display varies with current camera settings). Shooting 48 47 46 45 44 43 42 41 40 45 2 6 13 8 7 9 12 13 10 11 14 15 38, 39 37 35 1/250 F5.6 999 32 27 26 17 18 19 16 20 21 34 33 25 36 999 9999 1m00s 31 30 29 28 a b 22 23 24 49 50 1/250 F5.6 1342 8 See page 17 for how to switch the monitor display.
Introduction Parts of the Camera Monitor The following indicators may appear in the monitor during shooting and playback (actual display varies with current camera settings). Shooting 48 47 46 45 44 43 42 41 40 45 2 6 13 8 7 9 12 13 10 11 14 15 38, 39 37 35 1/250 F5.6 999 32 27 26 17 18 19 16 20 21 34 33 25 36 999 9999 1m00s 31 30 29 28 a b 22 23 24 49 50 1/250 F5.6 1342 8 See page 17 for how to switch the monitor display.

User Manual
Page 23
Parts of the Camera Introduction Shooting mode* 1 28, 44, 45, 65, 69, 108 2 Focus mode 40 3 Zoom indicator 31 4 Focus indicator 32 5 AE/AF-L indicator 64 6 ...
Parts of the Camera Introduction Shooting mode* 1 28, 44, 45, 65, 69, 108 2 Focus mode 40 3 Zoom indicator 31 4 Focus indicator 32 5 AE/AF-L indicator 64 6 ...

User Manual
Page 24
Parts of the Camera Introduction Playback 21 20 4 1 23 5 15/05/2011 12:00 23 9999.JPG 22 6 7 18 17 16 19 15 8 9 10 999/999 ...
Parts of the Camera Introduction Playback 21 20 4 1 23 5 15/05/2011 12:00 23 9999.JPG 22 6 7 18 17 16 19 15 8 9 10 999/999 ...

User Manual
Page 169
... created. • To cancel, choose No and press the k button. • Copies created by editing with a black border? Yes No B Notes on Black Border • A part of a picture. Playback menu Rotate image Hide image Small picture Voice memo Copy Black border Sequence display options Black border Thin Medium Broad Editing Pictures...
... created. • To cancel, choose No and press the k button. • Copies created by editing with a black border? Yes No B Notes on Black Border • A part of a picture. Playback menu Rotate image Hide image Small picture Voice memo Copy Black border Sequence display options Black border Thin Medium Broad Editing Pictures...

User Manual
Page 182
... Description A Rewind the movie while the k button is pressed down the k button to advance continuously.* I Extract and save only the required parts of the monitor. C Rewind the movie by one frame by one frame. F Resume playback. Rotate the command dial to adjust the volume.... a playback control, then press the k button to full-frame playback mode. * The movie can also be performed with cameras other than COOLPIX P500 cannot be recognized by one frame. Movie Recording and Playback B Note on Movie Playback 168 Movies recorded with the playback controls at the top...
... Description A Rewind the movie while the k button is pressed down the k button to advance continuously.* I Extract and save only the required parts of the monitor. C Rewind the movie by one frame by one frame. F Resume playback. Rotate the command dial to adjust the volume.... a playback control, then press the k button to full-frame playback mode. * The movie can also be performed with cameras other than COOLPIX P500 cannot be recognized by one frame. Movie Recording and Playback B Note on Movie Playback 168 Movies recorded with the playback controls at the top...

User Manual
Page 223
... on, or while images are easily damaged. B Avoid sudden changes in temperature Sudden changes in temperature. B Handle the lens and all moving parts with the monitor, damage data stored on a cold day, can cause condensation to prevent the liquid crystal from strong magnetic fields Do not use... or store this Nikon product, observe the following precautions when using or storing the camera. B Do not point the lens at strong light sources for extended periods...
... on, or while images are easily damaged. B Avoid sudden changes in temperature Sudden changes in temperature. B Handle the lens and all moving parts with the monitor, damage data stored on a cold day, can cause condensation to prevent the liquid crystal from strong magnetic fields Do not use... or store this Nikon product, observe the following precautions when using or storing the camera. B Do not point the lens at strong light sources for extended periods...

User Manual
Page 225
... thoroughly. Do not use alcohol, thinner, or other stains, clean the monitor with your fingers. Caring for the Camera Cleaning Lens/ viewfinder Avoid touching glass parts with a soft, dry cloth, being careful not to remove dust, dirt or sand, then wipe gently with commercial lens cleaner. To remove fingerprints and other...
... thoroughly. Do not use alcohol, thinner, or other stains, clean the monitor with your fingers. Caring for the Camera Cleaning Lens/ viewfinder Avoid touching glass parts with a soft, dry cloth, being careful not to remove dust, dirt or sand, then wipe gently with commercial lens cleaner. To remove fingerprints and other...

User Manual
Page 227
For more information about plug adapters, consult your travel agency. If part of the cord runs out of the Quick Start Guide). 2 When using in other countries, use a commercially available plug adapter as shown) 1 2 3 AC adapter USB ...
For more information about plug adapters, consult your travel agency. If part of the cord runs out of the Quick Start Guide). 2 When using in other countries, use a commercially available plug adapter as shown) 1 2 3 AC adapter USB ...

User Manual
Page 252
No reproduction in any form of this manual, in whole or in part (except for brief quotation in critical articles or reviews), may be made without written authorization from NIKON CORPORATION. © 2011 Nikon Corporation FX1B03(11) 6MM00111-03
No reproduction in any form of this manual, in whole or in part (except for brief quotation in critical articles or reviews), may be made without written authorization from NIKON CORPORATION. © 2011 Nikon Corporation FX1B03(11) 6MM00111-03


