P100 User's Manual
Page 16
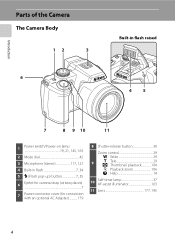
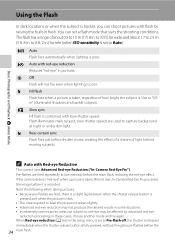
Introduction Parts of the Camera The Camera Body 12 3 6 Built-in flash raised 45 7 8 9 10 11 1 Power switch/Power-on lamp 19, 21, 145, 165 2 Mode dial 42 3 Microphone (stereo 117, 127 4 Built-in flash 7, 34 5 m (Flash pop-up) button 7, 35 6 Eyelet for camera strap (at two places 7 7 Power connector cover (for connection with an optional AC Adapter 179 8 Shutter-release button 30 Zoom control 29 f : Wide 29 9 g : Tele 29 h : Thumbnail playback 104 i : Playback zoom 106 j : Help 14 10 Self-timer lamp 37 AF-assist illuminator 163 11 Lens 177, 195 4
Introduction Parts of the Camera The Camera Body 12 3 6 Built-in flash raised 45 7 8 9 10 11 1 Power switch/Power-on lamp 19, 21, 145, 165 2 Mode dial 42 3 Microphone (stereo 117, 127 4 Built-in flash 7, 34 5 m (Flash pop-up) button 7, 35 6 Eyelet for camera strap (at two places 7 7 Power connector cover (for connection with an optional AC Adapter 179 8 Shutter-release button 30 Zoom control 29 f : Wide 29 9 g : Tele 29 h : Thumbnail playback 104 i : Playback zoom 106 j : Help 14 10 Self-timer lamp 37 AF-assist illuminator 163 11 Lens 177, 195 4

P100 User's Manual
Page 17
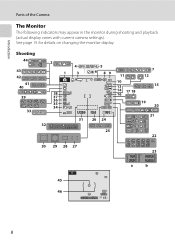
Introduction Parts of the Camera 1 23 4 5 678 9 18 19 20 PUSH TO EJECT 10 11 12 13 14 15 16 17 21 22 23 1 Speaker 117, 137 2 x (monitor) button 14 3 Diopter adjustment control 14 4 Electronic viewfinder 14 5 s (display) button... 15 6 b (movie-record) button 127 7 Movie mode switch 127 8 Command dial 11 9 k (apply selection) button 12 10 HDMI Mini Connector 138 11 USB/Audio video connector 138, 141, 147 12 Connector cover 138, 141, 147 13 Monitor 8, 15, 27 14 c (playback) button...
Introduction Parts of the Camera 1 23 4 5 678 9 18 19 20 PUSH TO EJECT 10 11 12 13 14 15 16 17 21 22 23 1 Speaker 117, 137 2 x (monitor) button 14 3 Diopter adjustment control 14 4 Electronic viewfinder 14 5 s (display) button... 15 6 b (movie-record) button 127 7 Movie mode switch 127 8 Command dial 11 9 k (apply selection) button 12 10 HDMI Mini Connector 138 11 USB/Audio video connector 138, 141, 147 12 Connector cover 138, 141, 147 13 Monitor 8, 15, 27 14 c (playback) button...
P100 User's Manual
Page 20
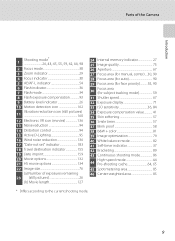
Shooting 44 43 42 41 40 39 33 2 1 38 37 36 35 34 32 4 3 1/250 31 5 6 89 F5.6 999 26 24 11 10 13 14 17 18 16 7 12 15 19 20 21 25 22 30 29 28 27 23 999 1m00s 9999 1m00s a b 45 46 1/250 F5.6 17 8 See page 15 for details on changing the monitor display. Introduction Parts of the Camera The Monitor The following indicators may appear in the monitor during shooting and playback (actual display varies with current camera settings).
Shooting 44 43 42 41 40 39 33 2 1 38 37 36 35 34 32 4 3 1/250 31 5 6 89 F5.6 999 26 24 11 10 13 14 17 18 16 7 12 15 19 20 21 25 22 30 29 28 27 23 999 1m00s 9999 1m00s a b 45 46 1/250 F5.6 17 8 See page 15 for details on changing the monitor display. Introduction Parts of the Camera The Monitor The following indicators may appear in the monitor during shooting and playback (actual display varies with current camera settings).
P100 User's Manual
Page 21
... 38 3 Zoom indicator 29 4 Focus indicator 30 5 AE/AF-L indicator 54 6 Flash indicator 36 7 Flash mode 34 8 Flash exposure compensation 93 9 Battery level indicator 26 10 Motion detection icon 162 Vibration reduction icon (still pictures) 11 160 12 Electronic VR icon (movies 136 13 Noise reduction 94 14 Distortion control 94...
... 38 3 Zoom indicator 29 4 Focus indicator 30 5 AE/AF-L indicator 54 6 Flash indicator 36 7 Flash mode 34 8 Flash exposure compensation 93 9 Battery level indicator 26 10 Motion detection icon 162 Vibration reduction icon (still pictures) 11 160 12 Electronic VR icon (movies 136 13 Noise reduction 94 14 Distortion control 94...
P100 User's Manual
Page 22
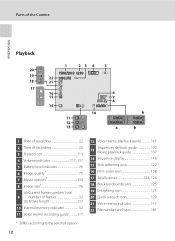
...Camera Introduction Playback 20 19 18 17 1 23 4 5 15/05/2010 12:00 22 9999.JPG 21 16 15 14 11 12 13 6 7 8 999/999 10 999/999 9999/9999 a 9 1m00s 1m00s b 1 Date of recording 22 2 Time of recording 22 3 Protect icon 113 4 Volume indicator 117, 137 5 Battery level... 133 8 Image size 76 (a) Current frame number/ total 9 number of frames 32 (b) Movie length 137 10 Internal memory indicator 32 11 Voice memo recording guide 117 * Differs according to the selected option. 10 12 Voice memo playback guide 117 13 Sequence playback guide 102 Movie playback guide 137 14 Sequence...
...Camera Introduction Playback 20 19 18 17 1 23 4 5 15/05/2010 12:00 22 9999.JPG 21 16 15 14 11 12 13 6 7 8 999/999 10 999/999 9999/9999 a 9 1m00s 1m00s b 1 Date of recording 22 2 Time of recording 22 3 Protect icon 113 4 Volume indicator 117, 137 5 Battery level... 133 8 Image size 76 (a) Current frame number/ total 9 number of frames 32 (b) Movie length 137 10 Internal memory indicator 32 11 Voice memo recording guide 117 * Differs according to the selected option. 10 12 Voice memo playback guide 117 13 Sequence playback guide 102 Movie playback guide 137 14 Sequence...

P100 User's Manual
Page 35
Date D M Y 01 01 2010 00 00 Edit Date D M Y 15 05 2010 15 10 Edit 7 Make sure that the lens cap is removed, and then press the k button or K. • The settings are displayed. D Changing the Date and Time ...
Date D M Y 01 01 2010 00 00 Edit Date D M Y 15 05 2010 15 10 Edit 7 Make sure that the lens cap is removed, and then press the k button or K. • The settings are displayed. D Changing the Date and Time ...
P100 User's Manual
Page 46
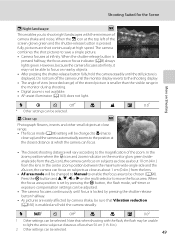
...• In extremely rare instances, areas not subject to Pre-flash off, the shutter is released immediately when the shutter-release button is taken, Nikon's own In-Camera Red-Eye Fix processes the image before shutter closes, creating the effect of a stream of light behind moving subjects. You can ..., reducing the red-eye effect. slow shutter speeds are fired repeatedly at night or under dim light. to 32 ft.) for wide, and about 0.5 to 10 m (1 ft. 8 in .) for tele (when ISO sensitivity is set to 8 ft. 2 in . Y Slow sync Fill flash is recorded. Flash illuminates main subject;...
...• In extremely rare instances, areas not subject to Pre-flash off, the shutter is released immediately when the shutter-release button is taken, Nikon's own In-Camera Red-Eye Fix processes the image before shutter closes, creating the effect of a stream of light behind moving subjects. You can ..., reducing the red-eye effect. slow shutter speeds are fired repeatedly at night or under dim light. to 32 ft.) for wide, and about 0.5 to 10 m (1 ft. 8 in .) for tele (when ISO sensitivity is set to 8 ft. 2 in . Y Slow sync Fill flash is recorded. Flash illuminates main subject;...

P100 User's Manual
Page 49
...set Vibration reduction (A160) to Off in the setup menu (A152). 1 Press n (self-timer) on the multi selector to choose 10s or 2s and press the k button. • 10s (ten seconds): suitable for memorial portraits. • 2s (two seconds): suitable for preventing camera shake. • The mode selected for.... • If a setting is useful for taking pictures of yourself, such as in the monitor. Taking Pictures with a tripod, set . 10s 2s Self-timer 10 4 Press the shutter-release button the rest of the way down. • The self-timer starts, and the number of seconds remaining until ...
...set Vibration reduction (A160) to Off in the setup menu (A152). 1 Press n (self-timer) on the multi selector to choose 10s or 2s and press the k button. • 10s (ten seconds): suitable for memorial portraits. • 2s (two seconds): suitable for preventing camera shake. • The mode selected for.... • If a setting is useful for taking pictures of yourself, such as in the monitor. Taking Pictures with a tripod, set . 10s 2s Self-timer 10 4 Press the shutter-release button the rest of the way down. • The self-timer starts, and the number of seconds remaining until ...

P100 User's Manual
Page 50
Use when the distance from subject to focus on subjects as close as about 10 cm (4 in the camera's memory even after the camera is turned off ). However, the camera may not be able to lens is 50 cm (1 ft. 8 ...
Use when the distance from subject to focus on subjects as close as about 10 cm (4 in the camera's memory even after the camera is turned off ). However, the camera may not be able to lens is 50 cm (1 ft. 8 ...
P100 User's Manual
Page 61
... to the magnification of less than the visible range in .) from the lens. • AF area mode will be changed to D (macro close as about 10 cm (4 in.) from the K icon), the camera can be selected. o 0.0* • The closest shooting distance will be selected. Do not turn off the camera until...
... to the magnification of less than the visible range in .) from the lens. • AF area mode will be changed to D (macro close as about 10 cm (4 in.) from the K icon), the camera can be selected. o 0.0* • The closest shooting distance will be selected. Do not turn off the camera until...

P100 User's Manual
Page 62
... as about 1 cm (0.4 in.) from the K icon), the camera can be selected. o 0.0* X W n Off1 p A2 o 0.01 1 Other settings can be selected. 50 2 D (macro close as about 10 cm (4 in which the camera can focus. • The closest shooting distance will vary according to be chosen (A90). Press the k button and H, I increases the...
... as about 1 cm (0.4 in.) from the K icon), the camera can be selected. o 0.0* X W n Off1 p A2 o 0.01 1 Other settings can be selected. 50 2 D (macro close as about 10 cm (4 in which the camera can focus. • The closest shooting distance will vary according to be chosen (A90). Press the k button and H, I increases the...

P100 User's Manual
Page 87
... setting) Normal image quality (compression ratio of Exposures Remaining" (A77) for more information. 75 Lower compression ratios result in shooting and playback modes (A8 to 10). D More Information • See "Number of 1: 8), suitable for more information. • See "Functions that Cannot be Applied Simultaneously" (A96) for most applications...
... setting) Normal image quality (compression ratio of Exposures Remaining" (A77) for more information. 75 Lower compression ratios result in shooting and playback modes (A8 to 10). D More Information • See "Number of 1: 8), suitable for more information. • See "Functions that Cannot be Applied Simultaneously" (A96) for most applications...
P100 User's Manual
Page 88
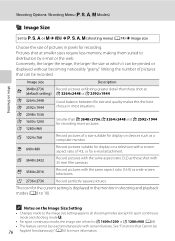
... continuous mode and shooting mode M). • For sport continuous mode, the image size is displayed in the monitor in shooting and playback modes (A8 to 10). C 2048×1536 B 1600×1200 A 1280×960 Smaller than those shot with certain features. More on Shooting Shooting Options: Shooting Menu (A, B, C, D Modes) r Image...
... continuous mode and shooting mode M). • For sport continuous mode, the image size is displayed in the monitor in shooting and playback modes (A8 to 10). C 2048×1536 B 1600×1200 A 1280×960 Smaller than those shot with certain features. More on Shooting Shooting Options: Shooting Menu (A, B, C, D Modes) r Image...

P100 User's Manual
Page 89
... Fine Normal Basic 27 2410 52 4640 17×13/7×5 98 8620 B 1600×1200 Fine Normal Basic 43 3770 83 7100 14×10/5×4 144 12000 A 1280×960 Fine Normal Basic 65 5745 119 10000 11×8/4×3 196 17000 J 1024×768 Fine Normal Basic 98... 15000 9×7/3.5×2.5 275 24000 f 640×480 Fine Normal Basic 196 17000 305 24000 5×4/2×1.5 458 40000 I 3648×2432 Fine Normal Basic 10 870 19 1720 31×21/12×8 38 3350 G 3584×2016 Fine Normal Basic 12 1065 24 2115 30×17/12×...
... Fine Normal Basic 27 2410 52 4640 17×13/7×5 98 8620 B 1600×1200 Fine Normal Basic 43 3770 83 7100 14×10/5×4 144 12000 A 1280×960 Fine Normal Basic 65 5745 119 10000 11×8/4×3 196 17000 J 1024×768 Fine Normal Basic 98... 15000 9×7/3.5×2.5 275 24000 f 640×480 Fine Normal Basic 196 17000 305 24000 5×4/2×1.5 458 40000 I 3648×2432 Fine Normal Basic 10 870 19 1720 31×21/12×8 38 3350 G 3584×2016 Fine Normal Basic 12 1065 24 2115 30×17/12×...

P100 User's Manual
Page 90
... printer resolution (dpi) and multiplying by 2.54 cm (1 in 1:1 ratio depending on Shooting Shooting Options: Shooting Menu (A, B, C, D Modes) 1 If the number of exposures remaining is 10,000 or more, the number of exposures remaining display shows "9999". 2 Print size at lower resolutions will print larger than the size indicated, and those...
... printer resolution (dpi) and multiplying by 2.54 cm (1 in 1:1 ratio depending on Shooting Shooting Options: Shooting Menu (A, B, C, D Modes) 1 If the number of exposures remaining is 10,000 or more, the number of exposures remaining display shows "9999". 2 Print size at lower resolutions will print larger than the size indicated, and those...

P100 User's Manual
Page 99
... fluorescent, mercury-vapor or sodiumvapor lamps, banding on the picture or variations in monitor brightness and hue may occur. Choose from 30 s, 1 min, 5 min, or 10 min. 1 Display the shooting menu (A74), use the multi selector to 1/30 second. Focus, exposure and white balance are fixed at the values for the...
... fluorescent, mercury-vapor or sodiumvapor lamps, banding on the picture or variations in monitor brightness and hue may occur. Choose from 30 s, 1 min, 5 min, or 10 min. 1 Display the shooting menu (A74), use the multi selector to 1/30 second. Focus, exposure and white balance are fixed at the values for the...

P100 User's Manual
Page 100
... to the interval taken between each shot. - 30 s: 600 images - 1 min: 300 images - 5 min: 60 images - 10 min: 30 images Intvl timer shooting 30 s 1 min 5 min 10 min 3 Press the d button. • The camera returns to shooting mode. 4 Press the shutter-release button all the way down... turning off and the power-on lamp blinks between shots. • The monitor turns back on Interval Timer Shooting • To prevent the camera from Nikon). Shooting Options: Shooting Menu (A, B, C, D Modes) 2 Choose the interval taken between each shot and press the k button. • The maximum ...
... to the interval taken between each shot. - 30 s: 600 images - 1 min: 300 images - 5 min: 60 images - 10 min: 30 images Intvl timer shooting 30 s 1 min 5 min 10 min 3 Press the d button. • The camera returns to shooting mode. 4 Press the shutter-release button all the way down... turning off and the power-on lamp blinks between shots. • The monitor turns back on Interval Timer Shooting • To prevent the camera from Nikon). Shooting Options: Shooting Menu (A, B, C, D Modes) 2 Choose the interval taken between each shot and press the k button. • The maximum ...

P100 User's Manual
Page 113
.... Press the k button to return to Choose pictures display. More on Playback Operations in the 16-picture thumbnail display 104 to change back to about 10×. frame playback mode according to the orientation of a sequence is displayed. 102 Play back movies Play back the displayed movies. 137 Delete pictures Display...
.... Press the k button to return to Choose pictures display. More on Playback Operations in the 16-picture thumbnail display 104 to change back to about 10×. frame playback mode according to the orientation of a sequence is displayed. 102 Play back movies Play back the displayed movies. 137 Delete pictures Display...

P100 User's Manual
Page 116
To Use Description A Choose pictures Press H, I, J or K on Playback Viewing Multiple Pictures: Thumbnail Playback Rotate the zoom control to f (h) in full-frame 1/ 10 playback mode (A32, 101) to display pictures as thumbnail images in thumbnail playback. Rotate towards g (i) again during 4 thumbnails display to return to full-frame playback. ...
To Use Description A Choose pictures Press H, I, J or K on Playback Viewing Multiple Pictures: Thumbnail Playback Rotate the zoom control to f (h) in full-frame 1/ 10 playback mode (A32, 101) to display pictures as thumbnail images in thumbnail playback. Rotate towards g (i) again during 4 thumbnails display to return to full-frame playback. ...

P100 User's Manual
Page 117
... taken on the chosen date. 101 Rotate the zoom control to full-frame playback display of the 32, first photo taken on "01.01.10". • d and l buttons are disabled while the Calendar is displayed. To Use Description A Select date Return to full-frame playback Return.... Dates will be underlined in thumbnail playback mode, the icons shown on the Thumbnails When pictures marked using Print set icon Sequence display 1/ 10 Protect icon Film frames Calendar display Rotate the zoom control towards f (h) during playback mode when 16 thumbnails are displayed (A104) to change ...
... taken on the chosen date. 101 Rotate the zoom control to full-frame playback display of the 32, first photo taken on "01.01.10". • d and l buttons are disabled while the Calendar is displayed. To Use Description A Select date Return to full-frame playback Return.... Dates will be underlined in thumbnail playback mode, the icons shown on the Thumbnails When pictures marked using Print set icon Sequence display 1/ 10 Protect icon Film frames Calendar display Rotate the zoom control towards f (h) during playback mode when 16 thumbnails are displayed (A104) to change ...


