
User Manual
Page 4
... Parts of a fall or other small parts into their entirety before using this equipment. Handle the camera strap with the camera, battery charger, or AC adapter for extended periods may result in the event of children Particular care should be performed only by the following...camera or AC adapter could result from putting the battery or other accident, take the equipment to a Nikonauthorized service representative for inspection, after unplugging the product and/or removing the battery. For Your Safety To prevent damage to your Nikon product or injury to yourself or to others,...
... Parts of a fall or other small parts into their entirety before using this equipment. Handle the camera strap with the camera, battery charger, or AC adapter for extended periods may result in the event of children Particular care should be performed only by the following...camera or AC adapter could result from putting the battery or other accident, take the equipment to a Nikonauthorized service representative for inspection, after unplugging the product and/or removing the battery. For Your Safety To prevent damage to your Nikon product or injury to yourself or to others,...
User Manual
Page 5
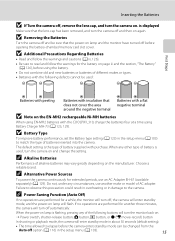
Do not combine old and new batteries or batteries of four batteries). • The EN-MH2 rechargeable batteries are for use with Nikon digital cameras only, and are compatible with COOLPIX L310. • Insert batteries in the correct orientation. • Do not short or disassemble the battery or attempt to remove or break the battery insulation or casing. Failure to flame...
Do not combine old and new batteries or batteries of four batteries). • The EN-MH2 rechargeable batteries are for use with Nikon digital cameras only, and are compatible with COOLPIX L310. • Insert batteries in the correct orientation. • Do not short or disassemble the battery or attempt to remove or break the battery insulation or casing. Failure to flame...

User Manual
Page 8
... to be collected separately. Symbol for Separate Collection in European Countries This symbol indicates that the battery is designated for separate collection at an appropriate collection point. This symbol on the battery indicates that this symbol or not, are designated for separate collection at an appropriate collection point.... apparatus complies with this product is to users in European countries: • This product is to users in European countries: • All batteries, whether marked with Canadian ICES-003. The following apply only to be collected separately.
... to be collected separately. Symbol for Separate Collection in European Countries This symbol indicates that the battery is designated for separate collection at an appropriate collection point. This symbol on the battery indicates that this symbol or not, are designated for separate collection at an appropriate collection point.... apparatus complies with this product is to users in European countries: • This product is to users in European countries: • All batteries, whether marked with Canadian ICES-003. The following apply only to be collected separately.
User Manual
Page 9
... Selector...11 Using Camera Menus...12 Switching Between Tabs of Menu Screen 13 About the Shutter-release Button...13 First Steps ...14 Inserting the Batteries ...14 Applicable Batteries ...14 Turning On and Off the Camera...14 Setting Display Language, Date and Time 16 Inserting Memory Cards ...18 Removing Memory Cards...18 vii
... Selector...11 Using Camera Menus...12 Switching Between Tabs of Menu Screen 13 About the Shutter-release Button...13 First Steps ...14 Inserting the Batteries ...14 Applicable Batteries ...14 Turning On and Off the Camera...14 Setting Display Language, Date and Time 16 Inserting Memory Cards ...18 Removing Memory Cards...18 vii
User Manual
Page 12
... Motion Detection ...114 Sound Settings...115 Auto Off ...116 Format Memory/Format Card ...117 Language...118 TV Settings ...119 Blink Warning ...119 Reset All ...121 Battery Type ...123 Firmware Version ...124 Notes on Camera Care and General Usage 125 Caring for the Camera ...125 Cleaning ...127 Storage ...128 Technical Notes...129...
... Motion Detection ...114 Sound Settings...115 Auto Off ...116 Format Memory/Format Card ...117 Language...118 TV Settings ...119 Blink Warning ...119 Reset All ...121 Battery Type ...123 Firmware Version ...124 Notes on Camera Care and General Usage 125 Caring for the Camera ...125 Cleaning ...127 Storage ...128 Technical Notes...129...
User Manual
Page 14
...Additional information may result from product malfunction. Nikon will not be held liable for any form, by Nikon specifically for contact information: http://imaging.nikon.com/ Use Only Nikon Brand Electronic Accessories Nikon COOLPIX cameras are engineered and proven to operate within... No part of the manuals included with this electronic circuitry. Only Nikon brand electronic accessories (including battery chargers, batteries and AC adapters) certified by any means, without prior notice. • Nikon will not be reproduced, transmitted, transcribed, stored in a retrieval system...
...Additional information may result from product malfunction. Nikon will not be held liable for any form, by Nikon specifically for contact information: http://imaging.nikon.com/ Use Only Nikon Brand Electronic Accessories Nikon COOLPIX cameras are engineered and proven to operate within... No part of the manuals included with this electronic circuitry. Only Nikon brand electronic accessories (including battery chargers, batteries and AC adapters) certified by any means, without prior notice. • Nikon will not be reproduced, transmitted, transcribed, stored in a retrieval system...

User Manual
Page 17
Introduction Parts of the Camera 1 23 4 5 6 7 8 11 10 9 12 13 14 1 Monitor 8 2 A (shooting mode) button 10 3 Flash lamp 28 4 b (e movie-record) button 10 5 c (playback) button 10, 26 6 Eyelet for camera strap 6 7 Multi selector 11 8 k (apply selection) button 11 9 Battery-chamber/ memory card slot cover 14, 18 10 l (delete) button 27, 88 11 d button 12, 53, 67, 83, 104 12 Tripod socket 142 13 Battery-chamber 14 14 Memory card slot 18 5
Introduction Parts of the Camera 1 23 4 5 6 7 8 11 10 9 12 13 14 1 Monitor 8 2 A (shooting mode) button 10 3 Flash lamp 28 4 b (e movie-record) button 10 5 c (playback) button 10, 26 6 Eyelet for camera strap 6 7 Multi selector 11 8 k (apply selection) button 11 9 Battery-chamber/ memory card slot cover 14, 18 10 l (delete) button 27, 88 11 d button 12, 53, 67, 83, 104 12 Tripod socket 142 13 Battery-chamber 14 14 Memory card slot 18 5

User Manual
Page 20
... 1 Shooting mode*....20, 33, 46, 48, 50, 80 2 Macro mode 51 3 Zoom indicator 23, 51 4 AE/AF-L indicator 45 5 Focus indicator 24 6 Flash mode 28 7 Battery level indicator 20 8 Vibration reduction icon (still images 21, 113 9 Electronic VR (movies 86 10 Motion detection icon 21, 114 11 "Date not set" indicator...
... 1 Shooting mode*....20, 33, 46, 48, 50, 80 2 Macro mode 51 3 Zoom indicator 23, 51 4 AE/AF-L indicator 45 5 Focus indicator 24 6 Flash mode 28 7 Battery level indicator 20 8 Vibration reduction icon (still images 21, 113 9 Electronic VR (movies 86 10 Motion detection icon 21, 114 11 "Date not set" indicator...

User Manual
Page 21
.../2012 12:00 9999.JPG 10 5 6 999/ 999 98 7 999/ 999 a 9999/9999 1m00s b 1m00s 1 Date of recording 16 2 Time of recording 16 3 Volume 88 4 Battery level indicator 20 5 Movie options 85 6 Image mode 54 a Current frame number/ 7 total number of frames 26 b Movie length 88 8 Internal memory indicator 26 9 Movie...
.../2012 12:00 9999.JPG 10 5 6 999/ 999 98 7 999/ 999 a 9999/9999 1m00s b 1m00s 1 Date of recording 16 2 Time of recording 16 3 Volume 88 4 Battery level indicator 20 5 Movie options 85 6 Image mode 54 a Current frame number/ 7 total number of frames 26 b Movie length 88 8 Internal memory indicator 26 9 Movie...
User Manual
Page 26
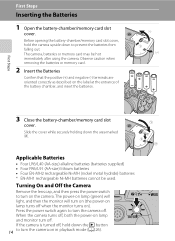
...lens cap, and then press the power switch to turn on the label at the entrance of the battery chamber, and insert the batteries. 3 1 2 First Steps 3 Close the battery-chamber/memory card slot cover. The power-on lamp (green) will light, and then the monitor ...down the area marked 2. 1 2 3 Applicable Batteries • Four LR6/L40 (AA-size) alkaline batteries (batteries supplied) • Four FR6/L91 (AA-size) lithium batteries • Four EN-MH2 rechargeable Ni-MH (nickel metal hydride) batteries * EN-MH1 rechargeable Ni-MH batteries cannot be hot immediately after using the camera. ...
...lens cap, and then press the power switch to turn on the label at the entrance of the battery chamber, and insert the batteries. 3 1 2 First Steps 3 Close the battery-chamber/memory card slot cover. The power-on lamp (green) will light, and then the monitor ...down the area marked 2. 1 2 3 Applicable Batteries • Four LR6/L40 (AA-size) alkaline batteries (batteries supplied) • Four FR6/L91 (AA-size) lithium batteries • Four EN-MH2 rechargeable Ni-MH (nickel metal hydride) batteries * EN-MH1 rechargeable Ni-MH batteries cannot be hot immediately after using the camera. ...
User Manual
Page 27
... standby mode can be sure that the power-on the EN-MH2 rechargeable Ni-MH batteries When using EN-MH2 batteries with the COOLPIX L310, charge the batteries four at a time using the battery. • Do not combine old and new batteries or batteries of AC adapter. When the power-on lamp is displayed Make sure that does...
... standby mode can be sure that the power-on the EN-MH2 rechargeable Ni-MH batteries When using EN-MH2 batteries with the COOLPIX L310, charge the batteries four at a time using the battery. • Do not combine old and new batteries or batteries of AC adapter. When the power-on lamp is displayed Make sure that does...
User Manual
Page 30
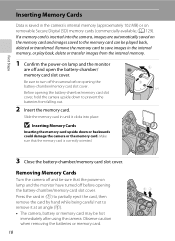
...Cards Turn the camera off and be hot immediately after using the camera. B Inserting Memory Cards Inserting the memory card upside down to prevent the batteries from the internal memory. 1 Confirm the power-on the memory card and images saved to the memory card can be played back, deleted or ... Cards Data is saved in the camera's internal memory (approximately 102 MB) or on lamp and the monitor have turned off before opening the battery-chamber/memory card slot cover, hold the camera upside down or backwards could damage the camera or the memory card. Be sure to turn off...
...Cards Turn the camera off and be hot immediately after using the camera. B Inserting Memory Cards Inserting the memory card upside down to prevent the batteries from the internal memory. 1 Confirm the power-on the memory card and images saved to the memory card can be played back, deleted or ... Cards Data is saved in the camera's internal memory (approximately 102 MB) or on lamp and the monitor have turned off before opening the battery-chamber/memory card slot cover, hold the camera upside down or backwards could damage the camera or the memory card. Be sure to turn off...
User Manual
Page 31
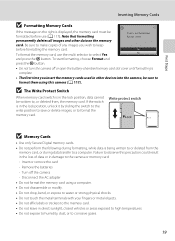
...turn the camera off the camera - To format the memory card, use (A 117). Failure to observe this camera (A 117). Turn off or open the battery-chamber/memory card slot cover until formatting is in the lock position, unlock it by sliding the switch to the write position to save or... deletes all images and other devices into the camera, be formatted before use the multi selector to keep before formatting the memory card. Remove the batteries - Be sure to make copies of data or in direct sunlight, closed vehicles or areas exposed to high temperatures. • Do not expose to...
...turn the camera off the camera - To format the memory card, use (A 117). Failure to observe this camera (A 117). Turn off or open the battery-chamber/memory card slot cover until formatting is in the lock position, unlock it by sliding the switch to the write position to save or... deletes all images and other devices into the camera, be formatted before use the multi selector to keep before formatting the memory card. Remove the batteries - Be sure to make copies of data or in direct sunlight, closed vehicles or areas exposed to high temperatures. • Do not expose to...

User Manual
Page 32
...2 Press the A button. Basic Photography and Playback: G Easy Auto Mode 3 Press the multi selector H or I to replace the batteries. Easy auto mode 4 Check the battery level and number of the 20 internal memory or memory card and image mode setting (A 54). Prepare to choose G Easy auto mode ... shooting mode that suits the scene (A 34). 1 Remove the lens cap and press the power switch to turn on . Battery level low. Replace the batteries. 30 Number of exposures remaining Number of Exposures Remaining The number of pictures that can be saved varies depending on the capacity ...
...2 Press the A button. Basic Photography and Playback: G Easy Auto Mode 3 Press the multi selector H or I to replace the batteries. Easy auto mode 4 Check the battery level and number of the 20 internal memory or memory card and image mode setting (A 54). Prepare to choose G Easy auto mode ... shooting mode that suits the scene (A 34). 1 Remove the lens cap and press the power switch to turn on . Battery level low. Replace the batteries. 30 Number of exposures remaining Number of Exposures Remaining The number of pictures that can be saved varies depending on the capacity ...

User Manual
Page 37
... included in deep shadow) • No contrast between the subject and surroundings (e.g. Removing the memory card or the battery during saving may not perform as the desired subject. Do not open the battery-chamber/memory card slot cover. the sun is behind the subject and the subject is pressed all the way...
... included in deep shadow) • No contrast between the subject and surroundings (e.g. Removing the memory card or the battery during saving may not perform as the desired subject. Do not open the battery-chamber/memory card slot cover. the sun is behind the subject and the subject is pressed all the way...
User Manual
Page 42
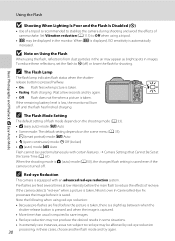
... • d (sport continuous) mode: W Off (locked) • A (auto) mode: U Auto Flash cannot be used simultaneously with an advanced red-eye reduction system. If the remaining battery level is low, the monitor will turn off ) or lower the flash for shooting. If the camera detects "red-eye" when a picture is taken..., Nikon's own In-Camera Red-Eye Fix processes the image before the picture is taken, there is a slight lag between when the shutter-release button is ...
... • d (sport continuous) mode: W Off (locked) • A (auto) mode: U Auto Flash cannot be used simultaneously with an advanced red-eye reduction system. If the remaining battery level is low, the monitor will turn off ) or lower the flash for shooting. If the camera detects "red-eye" when a picture is taken..., Nikon's own In-Camera Red-Eye Fix processes the image before the picture is taken, there is a slight lag between when the shutter-release button is ...

User Manual
Page 93
... changes may be recorded. • Smear (A 128) visible in the saved image data. This is not a malfunction. • The camera, battery or memory card may be visible in the monitor when recording will automatically stop unexpectedly. • There may stop recording after using a memory card ...with a low speed class, recording may be some degradation in a hot area. • If the inside of a building). Do not open the battery-chamber / memory card slot cover. B Recording Movies • When recording movies, we recommend using the camera. To reduce smear effects, avoid bright ...
... changes may be recorded. • Smear (A 128) visible in the saved image data. This is not a malfunction. • The camera, battery or memory card may be visible in the monitor when recording will automatically stop unexpectedly. • There may stop recording after using a memory card ...with a low speed class, recording may be some degradation in a hot area. • If the inside of a building). Do not open the battery-chamber / memory card slot cover. B Recording Movies • When recording movies, we recommend using the camera. To reduce smear effects, avoid bright ...

User Manual
Page 109
... to printing images transferred to a computer from turning off and disconnect USB cable B Notes on Power Source • When connecting the camera to a printer, use batteries with adequate charge remaining to power the camera to prevent the camera from your personal printer and printing over a direct camera-to-printer connection, the...
... to printing images transferred to a computer from turning off and disconnect USB cable B Notes on Power Source • When connecting the camera to a printer, use batteries with adequate charge remaining to power the camera to prevent the camera from your personal printer and printing over a direct camera-to-printer connection, the...
User Manual
Page 115
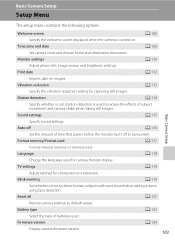
... photo info, image review, and brightness settings. Sound settings A 115 Basic Camera Setup Specify sound settings. Auto off A 116 Set the amount of batteries used for camera monitor display. Blink warning A 119 Set whether or not to default values. Reset all A 121 Restore camera settings to detect human ...setup menu contains the following options. Format memory/Format card A 117 Format internal memory or memory card. Language A 118 Choose the language used . Battery type A 123 Select the type of time that passes before the monitor turns off to a television.
... photo info, image review, and brightness settings. Sound settings A 115 Basic Camera Setup Specify sound settings. Auto off A 116 Set the amount of batteries used for camera monitor display. Blink warning A 119 Set whether or not to default values. Reset all A 121 Restore camera settings to detect human ...setup menu contains the following options. Format memory/Format card A 117 Format internal memory or memory card. Language A 118 Choose the language used . Battery type A 123 Select the type of time that passes before the monitor turns off to a television.

User Manual
Page 120
... step 2 and perform steps 3 and 4, to set , the shooting date and time can provide several days of backup power after about 10 hours of the batteries that power the camera. C Daylight Saving Time When the daylight saving time begins or ends, turn the daylight saving time option on Images After setting... selection screen in the setup menu. Once Print date is connected, and can be imprinted on the image data when taking pictures. 108 The clock battery charges when the main batteries are installed or an AC adapter is set the home time zone. Basic Camera Setup Setup Menu C The Clock...
... step 2 and perform steps 3 and 4, to set , the shooting date and time can provide several days of backup power after about 10 hours of the batteries that power the camera. C Daylight Saving Time When the daylight saving time begins or ends, turn the daylight saving time option on Images After setting... selection screen in the setup menu. Once Print date is connected, and can be imprinted on the image data when taking pictures. 108 The clock battery charges when the main batteries are installed or an AC adapter is set the home time zone. Basic Camera Setup Setup Menu C The Clock...


