
Reference Manual
Page 20
... the Battery...18 Preparation 3 Insert a Memory Card 20 Internal Memory and Memory Cards...21 Approved Memory Cards ...21 Step 1 Turn the Camera On ...22 Turning the Camera On and Off...23 Setting the Display Language, Date, and Time 24 Step 2 Select a Shooting Mode...26 Available Shooting Modes...27 Step 3 Frame a Picture...28 Using the Zoom...29 Step 4 Focus and Shoot ...30 Step 5 Play Back Images ...32 Changing How Images Are Displayed 33 Step 6 Delete Unwanted Images 34 Shooting Features ...37 G (Easy Auto) Mode...38 Changing G (Easy Auto) Mode Settings 38 Scene Mode (Shooting Suited...
... the Battery...18 Preparation 3 Insert a Memory Card 20 Internal Memory and Memory Cards...21 Approved Memory Cards ...21 Step 1 Turn the Camera On ...22 Turning the Camera On and Off...23 Setting the Display Language, Date, and Time 24 Step 2 Select a Shooting Mode...26 Available Shooting Modes...27 Step 3 Frame a Picture...28 Using the Zoom...29 Step 4 Focus and Shoot ...30 Step 5 Play Back Images ...32 Changing How Images Are Displayed 33 Step 6 Delete Unwanted Images 34 Shooting Features ...37 G (Easy Auto) Mode...38 Changing G (Easy Auto) Mode Settings 38 Scene Mode (Shooting Suited...

Reference Manual
Page 26
... 1 Eyelet for camera strap 14 2 Shutter-release button 4, 30 3 Power switch/power-on lamp 23 4 Flash 54 5 GPS antenna 86 Self-timer lamp 56 6 AF-assist illuminator 95 Movie illuminator 83 7 Lens 8 Memory card slot 20 9 Battery latch 18, 19 10 Battery chamber 18 11 HDMI mini connector (Type C 73 12 Hinge xii 13 Waterproofing packing xiii 14 USB/Audio video connector 73 15 Battery-chamber/memory card slot cover latch...
... 1 Eyelet for camera strap 14 2 Shutter-release button 4, 30 3 Power switch/power-on lamp 23 4 Flash 54 5 GPS antenna 86 Self-timer lamp 56 6 AF-assist illuminator 95 Movie illuminator 83 7 Lens 8 Memory card slot 20 9 Battery latch 18, 19 10 Battery chamber 18 11 HDMI mini connector (Type C 73 12 Hinge xii 13 Waterproofing packing xiii 14 USB/Audio video connector 73 15 Battery-chamber/memory card slot cover latch...

Reference Manual
Page 29
... Delete button Delete images. 34 A (shooting mode) button Shutter- b (e movierecord) button Action button Display the location of a picture taken on in playback mode. • Return to shooting mode. • Magnify the image with easy 10 panorama. • Play back movies. 84 • Switch from image thumbnail or 10 zoomed image display to full-frame playback mode. display image thumbnails or the calendar with f (h). • Adjust the volume for voice memo and movie playback. 23 9 33 71, 84 Parts of the Camera and Basic Operations Multi selector See "Using...
... Delete button Delete images. 34 A (shooting mode) button Shutter- b (e movierecord) button Action button Display the location of a picture taken on in playback mode. • Return to shooting mode. • Magnify the image with easy 10 panorama. • Play back movies. 84 • Switch from image thumbnail or 10 zoomed image display to full-frame playback mode. display image thumbnails or the calendar with f (h). • Adjust the volume for voice memo and movie playback. 23 9 33 71, 84 Parts of the Camera and Basic Operations Multi selector See "Using...

Reference Manual
Page 45
... card is recommended. Internal Memory and Memory Cards Camera data, including images and movies, can be hot immediately after using a card reader or similar device, check that the device supports SDHC. 3 SDXC-compliant. If the transfer speed of Shooting and Playback Preparation 3 Insert a Memory Card Removing Memory Cards Before opening the battery-chamber/memory card slot cover, turn the camera off and confirm that the device supports SDXC. • Contact the manufacturer for shooting or playback, first remove the memory card. Press the memory card...
... card is recommended. Internal Memory and Memory Cards Camera data, including images and movies, can be hot immediately after using a card reader or similar device, check that the device supports SDHC. 3 SDXC-compliant. If the transfer speed of Shooting and Playback Preparation 3 Insert a Memory Card Removing Memory Cards Before opening the battery-chamber/memory card slot cover, turn the camera off and confirm that the device supports SDXC. • Contact the manufacturer for shooting or playback, first remove the memory card. Press the memory card...

Reference Manual
Page 55
... you might miss a shot, press the shutter-release button all the way. Cutting the power or removing the memory card in these situations, try pressing the shutter-release button halfway again to refocus, several times if necessary. If the subject is still not in focus, select auto mode and use focus lock (A67) to take the picture by first focusing on the settings or shooting conditions, the image recording time may take longer than usual...
... you might miss a shot, press the shutter-release button all the way. Cutting the power or removing the memory card in these situations, try pressing the shutter-release button halfway again to refocus, several times if necessary. If the subject is still not in focus, select auto mode and use focus lock (A67) to take the picture by first focusing on the settings or shooting conditions, the image recording time may take longer than usual...

Reference Manual
Page 56
....JPG around "current image number/ total number of Shooting and Playback C Viewing Pictures • Pictures taken using action control (A13) and shaking the camera. • To return to playback mode, the last image saved will be displayed at low resolution immediately after switching to the orientation of the face (except for pictures taken when Continuous in the shooting menu (A51) was set). • When pictures taken with the continuous shooting feature are saved in the internal memory, remove the memory card.
....JPG around "current image number/ total number of Shooting and Playback C Viewing Pictures • Pictures taken using action control (A13) and shaking the camera. • To return to playback mode, the last image saved will be displayed at low resolution immediately after switching to the orientation of the face (except for pictures taken when Continuous in the shooting menu (A51) was set). • When pictures taken with the continuous shooting feature are saved in the internal memory, remove the memory card.

Reference Manual
Page 68
... image processed by D-Lighting is the only image saved. - Set Vibration reduction in the setup menu (A94) to Off when using a tripod to the shooting screen. - The digital zoom is an HDR composite image. The camera focuses on the shooting screen. The P icon is displayed on the subject at the center area of the frame. - After taking a picture, do not turn the camera off before the monitor switches to stabilize the camera. - The second image saved is...
... image processed by D-Lighting is the only image saved. - Set Vibration reduction in the setup menu (A94) to Off when using a tripod to the shooting screen. - The digital zoom is an HDR composite image. The camera focuses on the shooting screen. The P icon is displayed on the subject at the center area of the frame. - After taking a picture, do not turn the camera off before the monitor switches to stabilize the camera. - The second image saved is...
Reference Manual
Page 127
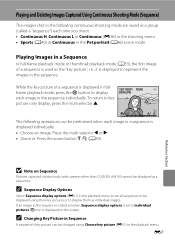
... Individual pictures, F icon is displayed individually. • Choose an image: Press the multi selector J or K. • Zoom in: Press the zoom button g (i) (A33). C Sequence Display Options Select Sequence display options (E51) in the playback menu to set to represent the images in the sequence. Playing and Deleting Images Captured Using Continuous Shooting Mode (Sequence) The images shot in the following operations can be displayed as a sequence. E7 C Changing Key Picture in Sequence A sequence's key picture can be displayed using...
... Individual pictures, F icon is displayed individually. • Choose an image: Press the multi selector J or K. • Zoom in: Press the zoom button g (i) (A33). C Sequence Display Options Select Sequence display options (E51) in the playback menu to set to represent the images in the sequence. Playing and Deleting Images Captured Using Continuous Shooting Mode (Sequence) The images shot in the following operations can be displayed as a sequence. E7 C Changing Key Picture in Sequence A sequence's key picture can be displayed using...

Reference Manual
Page 132
... A (auto) mode with macro mode (A57) Images captured in Close-up* scene mode (A39) O Pet portrait Images captured in Pet portrait scene mode (A39) D Movie Movies (A80) X Retouched copies Copy created using the procedure described in the selected category. l (delete) button: Delete all images in the selected category. • When viewing images in full-frame playback mode or thumbnail playback mode, if you press the d button to play back images in "Switching Between Playback Modes" (A70), the category selection screen...
... A (auto) mode with macro mode (A57) Images captured in Close-up* scene mode (A39) O Pet portrait Images captured in Pet portrait scene mode (A39) D Movie Movies (A80) X Retouched copies Copy created using the procedure described in the selected category. l (delete) button: Delete all images in the selected category. • When viewing images in full-frame playback mode or thumbnail playback mode, if you press the d button to play back images in "Switching Between Playback Modes" (A70), the category selection screen...
Reference Manual
Page 154
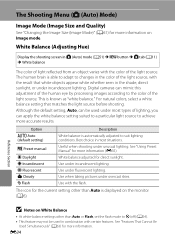
... Shooting Menu (A (Auto) Mode) Image Mode (Image Size and Quality) See "Changing the Image Size (Image Mode)" (A61) for more information (E35). White Balance (Adjusting Hue) Display the shooting screen in A (Auto) mode (A51) M d button M A tab (A11) M White balance The color of light reflected from an object varies with the color of the light source, with the result that matches the light source before shooting. See "Using Preset Manual" for more accurate results. White balance adjusted for the current setting other than Auto is able to adapt to changes...
... Shooting Menu (A (Auto) Mode) Image Mode (Image Size and Quality) See "Changing the Image Size (Image Mode)" (A61) for more information (E35). White Balance (Adjusting Hue) Display the shooting screen in A (Auto) mode (A51) M d button M A tab (A11) M White balance The color of light reflected from an object varies with the color of the light source, with the result that matches the light source before shooting. See "Using Preset Manual" for more accurate results. White balance adjusted for the current setting other than Auto is able to adapt to changes...

Reference Manual
Page 156
... A (Auto) mode (A51) M d button M A tab (A11) M Continuous Change the settings for more information. The camera takes up to blur pictures. W Multi-shot 16 Each time the shutter-release button is pressed all the way, images are fixed at telephoto zoom position, or in the series is displayed on Best Shot Selector BSS is released, or three pictures have been taken continuously. B Note on the monitor (A6). B Notes on Continuous Shooting • Focus, exposure and white balance...
... A (Auto) mode (A51) M d button M A tab (A11) M Continuous Change the settings for more information. The camera takes up to blur pictures. W Multi-shot 16 Each time the shutter-release button is pressed all the way, images are fixed at telephoto zoom position, or in the series is displayed on Best Shot Selector BSS is released, or three pictures have been taken continuously. B Note on the monitor (A6). B Notes on Continuous Shooting • Focus, exposure and white balance...

Reference Manual
Page 171
... select the desired sequence using full-frame playback mode or thumbnail playback mode. • When the key picture selection screen is displayed. C Sequence Display Options Press the c button (Playback mode) M d button (A11) M C Sequence display options Choose the method used to the (default setting) key picture only display. See "The Image Selection Screen" (E47) for more information. Settings are applied to the memory card. The Playback Menu C Message: "Memory contains no images., is displayed. C More Information See "File and Folder Names" (E85) for...
... select the desired sequence using full-frame playback mode or thumbnail playback mode. • When the key picture selection screen is displayed. C Sequence Display Options Press the c button (Playback mode) M d button (A11) M C Sequence display options Choose the method used to the (default setting) key picture only display. See "The Image Selection Screen" (E47) for more information. Settings are applied to the memory card. The Playback Menu C Message: "Memory contains no images., is displayed. C More Information See "File and Folder Names" (E85) for...
Reference Manual
Page 203
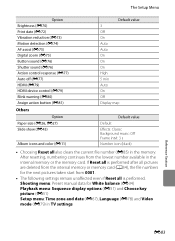
... icons and color (E11) Default value Default Effects: Classic Background music: Off Frame intvl: 3 s Number icon (black) • Choosing Reset all is performed after all pictures are deleted from the internal memory or memory card (A34), the file numbers for White balance (E34) Playback menu: Sequence display options (E51) and Choose key picture (E51) Setup menu: Time zone and date (E67), Language (E78) and Video mode (E79) in the memory. After resetting, numbering continues from 0001. • The following settings remain unaffected even if Reset...
... icons and color (E11) Default value Default Effects: Classic Background music: Off Frame intvl: 3 s Number icon (black) • Choosing Reset all is performed after all pictures are deleted from the internal memory or memory card (A34), the file numbers for White balance (E34) Playback menu: Sequence display options (E51) and Choose key picture (E51) Setup menu: Time zone and date (E67), Language (E78) and Video mode (E79) in the memory. After resetting, numbering continues from 0001. • The following settings remain unaffected even if Reset...

Reference Manual
Page 209
... function that you want to keep, select No, and backup the data to save a copy. N Out of Replace the memory card, or format 20, file numbers. Memory card is full. • Choose smaller image mode. • Delete pictures and movies. • Replace memory card. • Remove memory card and use in this camera. E10 Album is not formatted. All data stored on the card that are 320 × 240 E21 or smaller • Pictures recorded with easy E2 panorama There is deleted when formatted. memory card. Delete images...
... function that you want to keep, select No, and backup the data to save a copy. N Out of Replace the memory card, or format 20, file numbers. Memory card is full. • Choose smaller image mode. • Delete pictures and movies. • Replace memory card. • Remove memory card and use in this camera. E10 Album is not formatted. All data stored on the card that are 320 × 240 E21 or smaller • Pictures recorded with easy E2 panorama There is deleted when formatted. memory card. Delete images...

Reference Manual
Page 227
... such as watches. pictures even • Another function that does not support print date is exhausted. 22 • Standby mode for more information. • See "Error Messages" (E88) for saving power: press the power switch, 23 the shutter-release button, A button, c button, or b (e movie-record) button. • Camera and computer are connected via USB cable. 73 • Camera and TV are dated "01/ 01/2011 00:00." Leave the camera - Power, Display and Settings Issues Problem Camera turns off until the inside...
... such as watches. pictures even • Another function that does not support print date is exhausted. 22 • Standby mode for more information. • See "Error Messages" (E88) for saving power: press the power switch, 23 the shutter-release button, A button, c button, or b (e movie-record) button. • Camera and computer are connected via USB cable. 73 • Camera and TV are dated "01/ 01/2011 00:00." Leave the camera - Power, Display and Settings Issues Problem Camera turns off until the inside...

Reference Manual
Page 228
... HDMI cable or USB cable. 73 • When camera is turned battery to cool down before resuming use with the self- 56 timer for three minutes, the camera turns off , and the power- Troubleshooting Problem Cause/Solution A Battery temperature is pressed. Pictures are displayed, press the d button. 11 • Battery is exhausted. 22 • When flash lamp blinks, flash is charging. 54 • Subject is used in playback mode, press the A button, 32 the shutter-release button, or the b (e movie-record) button. •...
... HDMI cable or USB cable. 73 • When camera is turned battery to cool down before resuming use with the self- 56 timer for three minutes, the camera turns off , and the power- Troubleshooting Problem Cause/Solution A Battery temperature is pressed. Pictures are displayed, press the d button. 11 • Battery is exhausted. 22 • When flash lamp blinks, flash is charging. 54 • Subject is used in playback mode, press the A button, 32 the shutter-release button, or the b (e movie-record) button. •...

Reference Manual
Page 231
... used with cameras other than COOLPIX AW100 cannot be played as a sequence. • Check the Sequence display options setting. - 71 • Playback zoom cannot be edited. • Confirm the conditions that are reset to their default icons, or images added to both the HDMI mini connector 73 and USB/audio/video output connector. • Memory card contains no pictures. displayed in the internal memory or on picture. • pictures, or cropped copies of camera. • Movies recorded...
... used with cameras other than COOLPIX AW100 cannot be played as a sequence. • Check the Sequence display options setting. - 71 • Playback zoom cannot be edited. • Confirm the conditions that are reset to their default icons, or images added to both the HDMI mini connector 73 and USB/audio/video output connector. • Memory card contains no pictures. displayed in the internal memory or on picture. • pictures, or cropped copies of camera. • Movies recorded...

Reference Manual
Page 232
...; Battery is exhausted. 22 Nikon Transfer 2 does not start when camera is connected to a computer. • USB cable is not correctly connected. • Camera is not recognized by a computer. • Up to 999 images and movies in auto sort mode. • The desired image was sorted to each category. Replace memory card. 20 • Remove memory card to help information contained in ViewNX 2. Technical Notes and Index F18 Pictures to be printed are not displayed...
...; Battery is exhausted. 22 Nikon Transfer 2 does not start when camera is connected to a computer. • USB cable is not correctly connected. • Camera is not recognized by a computer. • Up to 999 images and movies in auto sort mode. • The desired image was sorted to each category. Replace memory card. 20 • Remove memory card to help information contained in ViewNX 2. Technical Notes and Index F18 Pictures to be printed are not displayed...

Reference Manual
Page 239
Dusk/dawn i 42 E Easy auto shooting menu 38 Easy panorama 45, E2 Editing Images E15 Editing movies E30 Exposure compensation 58 Extension E85 Extracting parts of the movie 84 Eyelet for camera strap 14 F Face detection 65 Face priority 52, E38 Favorite pictures 72, E9 Favorite pictures mode 70, E9 Features that cannot be used simultaneously 63 File name E85 Fill flash 55 Filter adapter 14 Filter effects 71, E19...
Dusk/dawn i 42 E Easy auto shooting menu 38 Easy panorama 45, E2 Editing Images E15 Editing movies E30 Exposure compensation 58 Extension E85 Extracting parts of the movie 84 Eyelet for camera strap 14 F Face detection 65 Face priority 52, E38 Favorite pictures 72, E9 Favorite pictures mode 70, E9 Features that cannot be used simultaneously 63 File name E85 Fill flash 55 Filter adapter 14 Filter effects 71, E19...

Reference Manual
Page 240
... Print Order Date Option E43 Printer 73, E24 Protect 71, E46 Q Quick retouch 71, E17 R Rechargeable battery 16, E87 Recording slow motion movies E54 Red-eye reduction 55 Remove from favorites 72, E10 Reset all 96, E81 Rotate image 71, E48 RSCN E85 S Scene mode 39, 40 Selecting pictures E47 Self-timer 56 Self-timer lamp 56 Sequence E7 Sequence display options 72, E51 Setup menu 94 Shooting 26 Shooting menu 51 Shutter sound 95, E76 Shutter-release button...
... Print Order Date Option E43 Printer 73, E24 Protect 71, E46 Q Quick retouch 71, E17 R Rechargeable battery 16, E87 Recording slow motion movies E54 Red-eye reduction 55 Remove from favorites 72, E10 Reset all 96, E81 Rotate image 71, E48 RSCN E85 S Scene mode 39, 40 Selecting pictures E47 Self-timer 56 Self-timer lamp 56 Sequence E7 Sequence display options 72, E51 Setup menu 94 Shooting 26 Shooting menu 51 Shutter sound 95, E76 Shutter-release button...


