
Reference Manual
Page 17
... Printing Pictures One at a Time 161 Printing Multiple Pictures 163 Creating a DPOF Print Order: Print Set 166 Viewing Photographs on TV 169 HDMI Options 171 Camera Menus 172 D The Playback Menu: Managing Images 172 Playback Folder 173 Playback Display Options 173 Image...
... Printing Pictures One at a Time 161 Printing Multiple Pictures 163 Creating a DPOF Print Order: Print Set 166 Viewing Photographs on TV 169 HDMI Options 171 Camera Menus 172 D The Playback Menu: Managing Images 172 Playback Folder 173 Playback Display Options 173 Image...
Reference Manual
Page 18
... Folder 177 Color Space 178 Long Exposure NR 179 High ISO NR 179 Built-in Flash 181 Auto Bracketing Set 181 B The Setup Menu: Camera Setup 182 Format Memory Card 183 Monitor Brightness 183 Photo Info 184 Flicker Reduction 184 Time Zone and Date 185 Language 186 Image Comment 186... Auto Image Rotation 187 Self-Timer 188 Auto off Timer 189 Image Review Time 189 Remote on Duration (ML-L3 189 Beep 190 Shutter Sound 190 File Number Sequence 191 MF Distance Indicator Units 192 Reverse Indicators 192...
... Folder 177 Color Space 178 Long Exposure NR 179 High ISO NR 179 Built-in Flash 181 Auto Bracketing Set 181 B The Setup Menu: Camera Setup 182 Format Memory Card 183 Monitor Brightness 183 Photo Info 184 Flicker Reduction 184 Time Zone and Date 185 Language 186 Image Comment 186... Auto Image Rotation 187 Self-Timer 188 Auto off Timer 189 Image Review Time 189 Remote on Duration (ML-L3 189 Beep 190 Shutter Sound 190 File Number Sequence 191 MF Distance Indicator Units 192 Reverse Indicators 192...
Reference Manual
Page 38
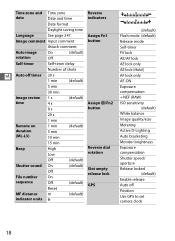
... comment Auto image On (default) rotation Off Self-timer Self-timer delay Number of shots X Auto off timer 20 s 1 min (default) 5 min 30 min Image review 1 s time 4 s 8 s (default) Assign J/Fn2 button 20 s 1 min Remote on duration (ML-L3) 1 min 5 min 10 min (default) Beep 15 min High Low Reverse dial rotation.../size Metering Active D-Lighting Auto bracketing Monitor brightness Exposure compensation Shutter speed/ aperture Release locked (default) Enable release Auto off Position Use GPS to set camera clock 18
... comment Auto image On (default) rotation Off Self-timer Self-timer delay Number of shots X Auto off timer 20 s 1 min (default) 5 min 30 min Image review 1 s time 4 s 8 s (default) Assign J/Fn2 button 20 s 1 min Remote on duration (ML-L3) 1 min 5 min 10 min (default) Beep 15 min High Low Reverse dial rotation.../size Metering Active D-Lighting Auto bracketing Monitor brightness Exposure compensation Shutter speed/ aperture Release locked (default) Enable release Auto off Position Use GPS to set camera clock 18

Reference Manual
Page 153
...also Retouch be displayed. Press O again to show that it is a movie, pressing J starts movie playback (0 45). A Image Review When On is already in the current series. 133 If current picture is movie marked with the first photograph in the correct orientation, ...for about 1 s I after shooting (because the camera is selected for more information. photo info View thumbnails W (Q) See page 140 for Image review in the playback menu (0 173), photographs are not rotated automatically during image review). In continuous release mode, pictures are displayed when shooting...
...also Retouch be displayed. Press O again to show that it is a movie, pressing J starts movie playback (0 45). A Image Review When On is already in the current series. 133 If current picture is movie marked with the first photograph in the correct orientation, ...for about 1 s I after shooting (because the camera is selected for more information. photo info View thumbnails W (Q) See page 140 for Image review in the playback menu (0 173), photographs are not rotated automatically during image review). In continuous release mode, pictures are displayed when shooting...

Reference Manual
Page 194
...selected for display in the current playback folder (0 173). Option Description Start Start slide show of the pictures in the camera monitor. U 174 Option On Off Description "Tall" (portrait-orientation) pictures are automatically rotated for Auto image rotation (0 ...D playback menu Choose whether to rotate "tall" (portraitorientation) pictures for display during image review. Frame interval Choose how long each picture will be displayed. Note that because the camera itself is already in the appropriate orientation during shooting, images are displayed in "wide" ...
...selected for display in the current playback folder (0 173). Option Description Start Start slide show of the pictures in the camera monitor. U 174 Option On Off Description "Tall" (portrait-orientation) pictures are automatically rotated for Auto image rotation (0 ...D playback menu Choose whether to rotate "tall" (portraitorientation) pictures for display during image review. Frame interval Choose how long each picture will be displayed. Note that because the camera itself is already in the appropriate orientation during shooting, images are displayed in "wide" ...
Reference Manual
Page 202
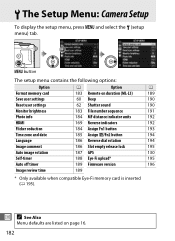
... Auto image rotation 187 GPS 130 Self-timer 188 Eye-Fi upload* 195 Auto off timer 189 Firmware version 196 Image review time 189 * Only available when compatible Eye-Fi memory card is inserted (0 195). B The Setup Menu: Camera Setup To display the setup menu, press G and select the B (setup menu) tab.
... Auto image rotation 187 GPS 130 Self-timer 188 Eye-Fi upload* 195 Auto off timer 189 Firmware version 196 Image review time 189 * Only available when compatible Eye-Fi memory card is inserted (0 195). B The Setup Menu: Camera Setup To display the setup menu, press G and select the B (setup menu) tab.

Reference Manual
Page 209
U 189 Image Review Time G button ➜ B setup menu Choose how long pictures are displayed in the monitor after the monitor has turned off. Choose shorter times for a signal ... are performed; Note that regardless of the option selected, the monitor will remain on Duration (ML-L3) G button ➜ B setup menu Choose how long the camera will turn off automatically if no operations are being transmitted using an Eye-Fi card. the...
U 189 Image Review Time G button ➜ B setup menu Choose how long pictures are displayed in the monitor after the monitor has turned off. Choose shorter times for a signal ... are performed; Note that regardless of the option selected, the monitor will remain on Duration (ML-L3) G button ➜ B setup menu Choose how long the camera will turn off automatically if no operations are being transmitted using an Eye-Fi card. the...

Reference Manual
Page 260
For consistent results over a series of camera may not be selected as source for image quality (0 71). Exposure compensation can not be changed: ... Control settings (0 99). Playback NEF (RAW) image is too dark or too bright (0 96). Colors are displayed in image review (0 173). • Camera was pointed up or down when photo was not created with other artifacts) appears in use. Metering can not be displayed correctly...Playback folder (0 173). Effects of NEF (RAW)+JPEG (0 69). Can not view pictures recorded with other cameras: Pictures recorded with COOLPIX A (0 97).
For consistent results over a series of camera may not be selected as source for image quality (0 71). Exposure compensation can not be changed: ... Control settings (0 99). Playback NEF (RAW) image is too dark or too bright (0 96). Colors are displayed in image review (0 173). • Camera was pointed up or down when photo was not created with other artifacts) appears in use. Metering can not be displayed correctly...Playback folder (0 173). Effects of NEF (RAW)+JPEG (0 69). Can not view pictures recorded with other cameras: Pictures recorded with COOLPIX A (0 97).


