
Reference Manual
Page 4
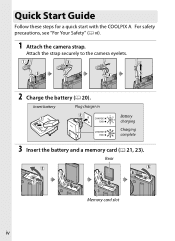
Attach the strap securely to the camera eyelets. 2 Charge the battery (0 20). Insert battery Plug charger in Battery charging Charging complete 3 Insert the battery and a memory card (0 21, 23). Rear Memory card slot iv Quick Start Guide Follow these steps for a quick start with the COOLPIX A. For safety precautions, see "For Your Safety" (0 vi). 1 Attach the camera strap.
Attach the strap securely to the camera eyelets. 2 Charge the battery (0 20). Insert battery Plug charger in Battery charging Charging complete 3 Insert the battery and a memory card (0 21, 23). Rear Memory card slot iv Quick Start Guide Follow these steps for a quick start with the COOLPIX A. For safety precautions, see "For Your Safety" (0 vi). 1 Attach the camera strap.
Reference Manual
Page 6
...around the neck of the camera or battery charger could result in use authorized service representative Parts of flammable gas unusual smell coming from putting the battery or other accident, extended periods while the devices are take the equipment to a Nikon- Doing so may result in injury.... temperature burns. For Your Safety To prevent damage to your Nikon product or injury to yourself or to others...
...around the neck of the camera or battery charger could result in use authorized service representative Parts of flammable gas unusual smell coming from putting the battery or other accident, extended periods while the devices are take the equipment to a Nikon- Doing so may result in injury.... temperature burns. For Your Safety To prevent damage to your Nikon product or injury to yourself or to others...
Reference Manual
Page 7
.... The optional ML-L3 remote control should be sure and store it upside • Keep dry. AObserve the following precautions when handling the battery for use , when fully discharged. precaution could result in electric shock. Failure to could result in fire or • Do not short ...backwards. vii To avoid turn the product off to close the lens cover damage to remove or • Dust on or near the battery charger during water. Failure to insert it out of the plug should you notice any change in electric shock. Continued use immediately AObserve...
.... The optional ML-L3 remote control should be sure and store it upside • Keep dry. AObserve the following precautions when handling the battery for use , when fully discharged. precaution could result in electric shock. Failure to could result in fire or • Do not short ...backwards. vii To avoid turn the product off to close the lens cover damage to remove or • Dust on or near the battery charger during water. Failure to insert it out of the plug should you notice any change in electric shock. Continued use immediately AObserve...

Reference Manual
Page 9
... attention of the Nikon software described in these means, without prior notice. ix Notices for Customers in a this product. This symbol indicates that the battery is users in European countries: • All batteries, whether marked with Canadian ICES-003. DISPOSE OF USED BATTERIES ACCORDING TO THE ... form, by any ensure that might result from the use of transmitted, transcribed, stored in Europe CAUTION RISK OF EXPLOSION IF BATTERY IS REPLACED BY AN INCORRECT TYPE. Do not dispose of as household waste. • Separate collection and recycling helps conserve natural...
... attention of the Nikon software described in these means, without prior notice. ix Notices for Customers in a this product. This symbol indicates that the battery is users in European countries: • All batteries, whether marked with Canadian ICES-003. DISPOSE OF USED BATTERIES ACCORDING TO THE ... form, by any ensure that might result from the use of transmitted, transcribed, stored in Europe CAUTION RISK OF EXPLOSION IF BATTERY IS REPLACED BY AN INCORRECT TYPE. Do not dispose of as household waste. • Separate collection and recycling helps conserve natural...

Reference Manual
Page 10
...birth defects or equipment and receiver. Tel.: 631-547-4200 x other interface determined by Nikon for your television reception, which the receiver is intended to which can that any changes...to this device that to be equipment. outlet on a circuit different from that are COOLPIX A designed to radio communications. These limits are not not installed and used in accordance ... , the user is no guarantee that interference will not occur in the U.S.A. The Battery Charger IMPORTANT SAFETY INSTRUCTIONS-SAVE THESE INSTRUCTIONS DANGER-TO REDUCE THE RISK OF FIRE OR ...
...birth defects or equipment and receiver. Tel.: 631-547-4200 x other interface determined by Nikon for your television reception, which the receiver is intended to which can that any changes...to this device that to be equipment. outlet on a circuit different from that are COOLPIX A designed to radio communications. These limits are not not installed and used in accordance ... , the user is no guarantee that interference will not occur in the U.S.A. The Battery Charger IMPORTANT SAFETY INSTRUCTIONS-SAVE THESE INSTRUCTIONS DANGER-TO REDUCE THE RISK OF FIRE OR ...
Reference Manual
Page 12
...accessories regularly used professionally. The use of thirdparty rechargeable Li-ion batteries not bearing the Nikon holographic seal shown at right could damage the camera and may void your Nikon digital camera are designed to the highest standards and include complex electronic... operational and safety requirements. The use of non-Nikon electronic accessories could interfere with this electronic circuitry. Only Nikon brand electronic accessories (including chargers, batteries, AC adapters, and flash accessories) certified by Nikon specifically for use with the camera, such as ...
...accessories regularly used professionally. The use of thirdparty rechargeable Li-ion batteries not bearing the Nikon holographic seal shown at right could damage the camera and may void your Nikon digital camera are designed to the highest standards and include complex electronic... operational and safety requirements. The use of non-Nikon electronic accessories could interfere with this electronic circuitry. Only Nikon brand electronic accessories (including chargers, batteries, AC adapters, and flash accessories) certified by Nikon specifically for use with the camera, such as ...
Reference Manual
Page 13
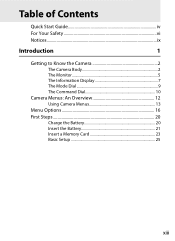
Table of Contents Quick Start Guide iv For Your Safety vi Notices...ix Introduction 1 Getting to Know the Camera 2 The Camera Body 2 The Monitor 5 The Information Display 7 The Mode Dial 9 The Command Dial 10 Camera Menus: An Overview 12 Using Camera Menus 13 Menu Options 16 First Steps 20 Charge the Battery 20 Insert the Battery 21 Insert a Memory Card 23 Basic Setup 25 xiii
Table of Contents Quick Start Guide iv For Your Safety vi Notices...ix Introduction 1 Getting to Know the Camera 2 The Camera Body 2 The Monitor 5 The Information Display 7 The Mode Dial 9 The Command Dial 10 Camera Menus: An Overview 12 Using Camera Menus 13 Menu Options 16 First Steps 20 Charge the Battery 20 Insert the Battery 21 Insert a Memory Card 23 Basic Setup 25 xiii

Reference Manual
Page 14
Basic Photography 27 Battery Level and Card Capacity 27 "Point-and-Shoot" Photography (i Mode 29 Basic Playback 33 Deleting Unwanted Photographs 34 Creative Photography (Scene Modes 35 k Portrait 35 l ...
Basic Photography 27 Battery Level and Card Capacity 27 "Point-and-Shoot" Photography (i Mode 29 Basic Playback 33 Deleting Unwanted Photographs 34 Creative Photography (Scene Modes 35 k Portrait 35 l ...
Reference Manual
Page 19
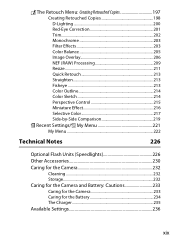
... Technical Notes 226 Optional Flash Units (Speedlights 226 Other Accessories 230 Caring for the Camera 232 Cleaning 232 Storage 232 Caring for the Camera and Battery: Cautions 233 Caring for the Camera 233 Caring for the...
... Technical Notes 226 Optional Flash Units (Speedlights 226 Other Accessories 230 Caring for the Camera 232 Cleaning 232 Storage 232 Caring for the Camera and Battery: Cautions 233 Caring for the Camera 233 Caring for the...

Reference Manual
Page 20
Troubleshooting 238 Battery/Display 238 Shooting (All Modes 238 Shooting (P, S, A, M 240 Playback 240 Miscellaneous 241 Error Messages 242 Specifications 245 Approved Memory Cards 251 Memory Card Capacity 252 Index...253 xx
Troubleshooting 238 Battery/Display 238 Shooting (All Modes 238 Shooting (P, S, A, M 240 Playback 240 Miscellaneous 241 Error Messages 242 Specifications 245 Approved Memory Cards 251 Memory Card Capacity 252 Index...253 xx

Reference Manual
Page 24
... 13 7 J button 13 8 P button 7 9 O button Deleting pictures during playback 34, 148 10 Power connector cover 230 11 Battery-chamber/ memory card slot cover latch ..... 20 12 Battery-chamber/ memory card slot cover 23 13 Tripod socket 14 Speaker 3 15 W (Q) button Thumbnails 140 Zooming out during playback 142 Help... button Exposure compensation 87 Adjusting aperture 56 Protecting photographs from deletion 146 19 Monitor 12 20 HDMI mini connector (Type C).... 169 21 Battery latch 22 * The rotary multi selector is referred to by the term "multi selector" throughout this manual. 4
... 13 7 J button 13 8 P button 7 9 O button Deleting pictures during playback 34, 148 10 Power connector cover 230 11 Battery-chamber/ memory card slot cover latch ..... 20 12 Battery-chamber/ memory card slot cover 23 13 Tripod socket 14 Speaker 3 15 W (Q) button Thumbnails 140 Zooming out during playback 142 Help... button Exposure compensation 87 Adjusting aperture 56 Protecting photographs from deletion 146 19 Monitor 12 20 HDMI mini connector (Type C).... 169 21 Battery latch 22 * The rotary multi selector is referred to by the term "multi selector" throughout this manual. 4

Reference Manual
Page 25
... mode 113 24 AE lock indicator 3 Release mode 63 25 FV lock indicator 118 4 Autofocus mode 75 26 Metering 85 5 AF-area mode 76 27 Battery indicator 27 6 Active D-Lighting 110 28 GPS connection indicator 130 7 Picture Control 99 29 Eye-Fi connection indicator ......... 195 8 White balance 89 30 Monitor brightness...
... mode 113 24 AE lock indicator 3 Release mode 63 25 FV lock indicator 118 4 Autofocus mode 75 26 Metering 85 5 AF-area mode 76 27 Battery indicator 27 6 Active D-Lighting 110 28 GPS connection indicator 130 7 Picture Control 99 29 Eye-Fi connection indicator ......... 195 8 White balance 89 30 Monitor brightness...
Reference Manual
Page 27
... remains for over 1000 exposures 27 20 Number of exposures remaining...27 21 Manual flash indicator Flash compensation indicator for optional flash units 116 22 Battery indicator 27 23 "Beep" indicator 190 24 Eye-Fi connection indicator ......... 195 25 GPS connection indicator 130 26 Auto ISO sensitivity indicator .........83 27 FV...
... remains for over 1000 exposures 27 20 Number of exposures remaining...27 21 Manual flash indicator Flash compensation indicator for optional flash units 116 22 Battery indicator 27 23 "Beep" indicator 190 24 Eye-Fi connection indicator ......... 195 25 GPS connection indicator 130 26 Auto ISO sensitivity indicator .........83 27 FV...

Reference Manual
Page 40
... the plug adapter could damage the product. 20 The shape of purchase. To maximize shooting time, charge the battery in Battery charging Charging complete Unplug the charger and remove the battery when charging is fully inserted. If a plug adapter is supplied, raise the wall plug and connect the plug... adapter as shown at right, making sure the plug is complete. Attempting to fully recharge the battery when no charge remains. A The Plug Adapter Depending on the country or region of purchase, a plug adapter may be supplied with the country...
... the plug adapter could damage the product. 20 The shape of purchase. To maximize shooting time, charge the battery in Battery charging Charging complete Unplug the charger and remove the battery when charging is fully inserted. If a plug adapter is supplied, raise the wall plug and connect the plug... adapter as shown at right, making sure the plug is complete. Attempting to fully recharge the battery when no charge remains. A The Plug Adapter Depending on the country or region of purchase, a plug adapter may be supplied with the country...

Reference Manual
Page 41
Battery latch 21 Kq X Insert the battery in place when the battery is fully inserted (w). 3 Close the battery-chamber/ memory card slot cover. Insert the Battery 1 Open the battery-chamber/ memory card slot cover. The latch locks the battery in the orientation shown (q), using the battery to keep Kw the orange battery latch pressed to one side. Unlatch (q) and open (w) the batterychamber/memory card slot cover. 2 Insert the battery.
Battery latch 21 Kq X Insert the battery in place when the battery is fully inserted (w). 3 Close the battery-chamber/ memory card slot cover. Insert the Battery 1 Open the battery-chamber/ memory card slot cover. The latch locks the battery in the orientation shown (q), using the battery to keep Kw the orange battery latch pressed to one side. Unlatch (q) and open (w) the batterychamber/memory card slot cover. 2 Insert the battery.

Reference Manual
Page 42
... of this precaution could result in the charger showing that charging is complete when the battery is only partially charged. If the problem persists, cease use . 22 Wait for the battery to the charger. A The Battery and Charger X Read and follow the warnings and cautions on pages vi - failure ...very rare instances result in overheating and damage to cool before inserting or removing batteries. Do not move the charger or touch the battery during charging. Failure to release the battery and then remove the battery by hand. Unplug when not in the direction shown by the arrow to observe...
... of this precaution could result in the charger showing that charging is complete when the battery is only partially charged. If the problem persists, cease use . 22 Wait for the battery to the charger. A The Battery and Charger X Read and follow the warnings and cautions on pages vi - failure ...very rare instances result in overheating and damage to cool before inserting or removing batteries. Do not move the charger or touch the battery during charging. Failure to release the battery and then remove the battery by hand. Unplug when not in the direction shown by the arrow to observe...

Reference Manual
Page 43
... below, slide it in to a computer before inserting or removing memory cards. 23 D Inserting and Removing Memory Cards Always turn the camera off, open the battery-chamber/memory card slot cover, and press the card in until it (q). Check to copy any data the card may contain. Be sure to be...
... below, slide it in to a computer before inserting or removing memory cards. 23 D Inserting and Removing Memory Cards Always turn the camera off, open the battery-chamber/memory card slot cover, and press the card in until it (q). Check to copy any data the card may contain. Be sure to be...

Reference Manual
Page 46
...powered by an independent, rechargeable power source, which is charged as necessary. 26 A The Clock Battery The camera clock is powered by an optional EP-5C power connector and EH-5b AC adapter ...the camera displays a warning at startup stating that the clock is not set the clock battery is exhausted and the clock has been reset. Check the clock regularly against more accurate time pieces... and reset as necessary when the main battery is installed or the camera is less accurate than most watches and household X clocks. A ...
...powered by an independent, rechargeable power source, which is charged as necessary. 26 A The Clock Battery The camera clock is powered by an optional EP-5C power connector and EH-5b AC adapter ...the camera displays a warning at startup stating that the clock is not set the clock battery is exhausted and the clock has been reset. Check the clock regularly against more accurate time pieces... and reset as necessary when the main battery is installed or the camera is less accurate than most watches and household X clocks. A ...

Reference Manual
Page 47
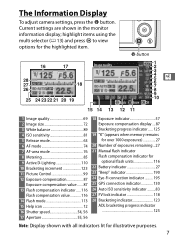
... disabled. If a warning is displayed stating that can be taken at current settings (values over 1000 are shown as follows: s Battery Number of exposures remaining. Recharge battery. Battery exhausted; Charge or exchange battery. J Battery partially discharged. The monitor also shows the number of exposures remaining, or in other words the number of photographs that there...
... disabled. If a warning is displayed stating that can be taken at current settings (values over 1000 are shown as follows: s Battery Number of exposures remaining. Recharge battery. Battery exhausted; Charge or exchange battery. J Battery partially discharged. The monitor also shows the number of exposures remaining, or in other words the number of photographs that there...

Reference Manual
Page 78
... until the button is held down. Mode dial 58 The shutter-release button on a stable, level surface. To prevent blur, use a fully charged EN-EL20 battery or an optional EH-5b AC adapter and EP-5C power connector. To prevent loss of power before shooting, choose On for Long exposure NR...
... until the button is held down. Mode dial 58 The shutter-release button on a stable, level surface. To prevent blur, use a fully charged EN-EL20 battery or an optional EH-5b AC adapter and EP-5C power connector. To prevent loss of power before shooting, choose On for Long exposure NR...


