User Manual
Page 2
... Your Pictures Delete multiple pictures Using the PLAY BACK Menu STEP 4-Install camera software Install software Quick Start Guide (provided) Get to know Nikon View 5 Nikon View 5 Reference Manual (provided on CD) STEP 5-Enjoy your pictures Transfer... pictures View pictures on a television screen Connecting to a Computer View pictures on a TV / VCR 13 120 22 47 31 83 67 31 83 145 - - 38 46 A Flowchart Guide STEP 1-Ready the camera Getting ready Camera setup First Steps Using the SET...
... Your Pictures Delete multiple pictures Using the PLAY BACK Menu STEP 4-Install camera software Install software Quick Start Guide (provided) Get to know Nikon View 5 Nikon View 5 Reference Manual (provided on CD) STEP 5-Enjoy your pictures Transfer... pictures View pictures on a television screen Connecting to a Computer View pictures on a TV / VCR 13 120 22 47 31 83 67 31 83 145 - - 38 46 A Flowchart Guide STEP 1-Ready the camera Getting ready Camera setup First Steps Using the SET...

User Manual
Page 3
... Basic Picture Taking Reviewing Your Pictures Connecting to your computer. Quick-Start Guide The Quick-Start Guide takes you through the process of unpacking and setting up your Nikon digital camera, taking your first photographs, and transferring them to a Computer Viewing Pictures on the reference CD provided with your...
... Basic Picture Taking Reviewing Your Pictures Connecting to your computer. Quick-Start Guide The Quick-Start Guide takes you through the process of unpacking and setting up your Nikon digital camera, taking your first photographs, and transferring them to a Computer Viewing Pictures on the reference CD provided with your...
User Manual
Page 9
... 2-Select User Set A 25 Step 3-Adjust Camera Settings (Optional 25 Step 4-Frame the Shot 26 Step 5-Focus and Shoot 28 Step 6-Put the Camera Away 30 Reviewing Your Pictures 31 Quick Review 32 Full-Screen Review 33 Thumbnail Review 35 Doing More with Your Digital Camera 37 Connecting to a Computer 38 Before You Begin: Installing Nikon View...
... 2-Select User Set A 25 Step 3-Adjust Camera Settings (Optional 25 Step 4-Frame the Shot 26 Step 5-Focus and Shoot 28 Step 6-Put the Camera Away 30 Reviewing Your Pictures 31 Quick Review 32 Full-Screen Review 33 Thumbnail Review 35 Doing More with Your Digital Camera 37 Connecting to a Computer 38 Before You Begin: Installing Nikon View...
User Manual
Page 10
Taking Pictures: The Details 47 Using the Camera Controls (All User Sets 48 Making Effective Use of Memory: Image Quality and Size 48 Focus Mode: The Button 53 Delaying Shutter Release: Self-Timer Mode 58 Optical and Digital Zoom: The Button 60 Flash Mode: The Button 62... Exposure Compensation: The Button 66 Keep or Delete: Picture Review 67 Choosing a User Set 68 Using the Camera Controls (User Sets 1,2,3 70 Controlling Shutter Speed and Aperture: Exposure Mode...
Taking Pictures: The Details 47 Using the Camera Controls (All User Sets 48 Making Effective Use of Memory: Image Quality and Size 48 Focus Mode: The Button 53 Delaying Shutter Release: Self-Timer Mode 58 Optical and Digital Zoom: The Button 60 Flash Mode: The Button 62... Exposure Compensation: The Button 66 Keep or Delete: Picture Review 67 Choosing a User Set 68 Using the Camera Controls (User Sets 1,2,3 70 Controlling Shutter Speed and Aperture: Exposure Mode...

User Manual
Page 11
... Menu 120 Organizing Your Pictures: Folders 121 Adjusting Monitor Settings: Monitor Options 126 Customizing Camera Controls: Controls 129 Controlling Zoom: Zoom Options 131 Conserving Battery Power: Auto Off 133 File Numbering: Seq. Numbers 134 Formatting...Protect 151 Hiding Images During Playback: Hide Image 152 Ordering Prints: Print Set 153 Selecting Images for Transfer: Auto Transfer 155 Technical Notes: Camera Care, Options, and Resources 157 Optional Accessories 158 Caring for the Camera and Battery 160 Web Resources 163 Troubleshooting 164 Specifications 171 Index ...175 ...
... Menu 120 Organizing Your Pictures: Folders 121 Adjusting Monitor Settings: Monitor Options 126 Customizing Camera Controls: Controls 129 Controlling Zoom: Zoom Options 131 Conserving Battery Power: Auto Off 133 File Numbering: Seq. Numbers 134 Formatting...Protect 151 Hiding Images During Playback: Hide Image 152 Ordering Prints: Print Set 153 Selecting Images for Transfer: Auto Transfer 155 Technical Notes: Camera Care, Options, and Resources 157 Optional Accessories 158 Caring for the Camera and Battery 160 Web Resources 163 Troubleshooting 164 Specifications 171 Index ...175 ...
User Manual
Page 13
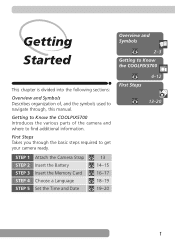
... Steps Takes you through the basic steps required to navigate through, this manual. STEP 1 STEP 2 STEP 3 STEP 4 STEP 5 Attach the Camera Strap Insert the Battery Insert the Memory Card Choose a Language Set the Time and Date 13 14-15 16-17 18-19 19-20 First Steps 4-12 13-20 1 Getting Started... Overview and Symbols 2-3 Getting to Know the COOLPIX5700 This chapter is divided into the following sections: Overview and Symbols Describes organization of the camera and where to ...
... Steps Takes you through the basic steps required to navigate through, this manual. STEP 1 STEP 2 STEP 3 STEP 4 STEP 5 Attach the Camera Strap Insert the Battery Insert the Memory Card Choose a Language Set the Time and Date 13 14-15 16-17 18-19 19-20 First Steps 4-12 13-20 1 Getting Started... Overview and Symbols 2-3 Getting to Know the COOLPIX5700 This chapter is divided into the following sections: Overview and Symbols Describes organization of the camera and where to ...

User Manual
Page 14
... lists your pictures on the image information displayed in the monitor or viewfinder in your local authorized Nikon dealer. 2 Technical Notes: Describes how to use the camera's controls and User Sets. Use Only Nikon Brand Electronic Accessories Your Nikon COOLPIX digital camera is designed to operate within the operational and safety requirements of all the menus in fullscreen...
... lists your pictures on the image information displayed in the monitor or viewfinder in your local authorized Nikon dealer. 2 Technical Notes: Describes how to use the camera's controls and User Sets. Use Only Nikon Brand Electronic Accessories Your Nikon COOLPIX digital camera is designed to operate within the operational and safety requirements of all the menus in fullscreen...

User Manual
Page 18
... Monitor or Viewfinder (Shooting Mode) In (shooting mode), the icons in the monitor or viewfinder indicate the status of the following camera settings: 1 2 8 4 Self-timer indicator 58 3 9 5 Shutter speed 73 10 11 6 Exposure mode 70 4 12 7 Metering mode 103 5 13 8 Flash-ready ...indicator 28 6 7 14 15 9 Flash mode 62 10 Battery level indicator1........... 23 16 17 18 11 "Date not set" icon 2 20 User Set A 12 Focus indicator 3 28 1 Digital zoom 60 2 Zoom indicator 60, 105 3 Current folder 125 1 Appears when battery is running low. 2 Appears when clock...
... Monitor or Viewfinder (Shooting Mode) In (shooting mode), the icons in the monitor or viewfinder indicate the status of the following camera settings: 1 2 8 4 Self-timer indicator 58 3 9 5 Shutter speed 73 10 11 6 Exposure mode 70 4 12 7 Metering mode 103 5 13 8 Flash-ready ...indicator 28 6 7 14 15 9 Flash mode 62 10 Battery level indicator1........... 23 16 17 18 11 "Date not set" icon 2 20 User Set A 12 Focus indicator 3 28 1 Digital zoom 60 2 Zoom indicator 60, 105 3 Current folder 125 1 Appears when battery is running low. 2 Appears when clock...
User Manual
Page 19
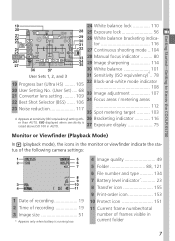
... Exposure display 75 Monitor or Viewfinder (Playback Mode) In (playback mode), the icons in the monitor or viewfinder indicate the status of the following camera settings: 1 Date of recording 19 2 Time of recording 19 3 Image size 51 * Appears only when battery is running low. 4 Image quality ... (ISO equivalency) .. 78 19 Progress bar (Ultra HS) ........ 105 32 Black-and-white mode indicator 108 20 User Setting No. (User Set) .... 68 21 Converter lens setting ......... 109 33 Image adjustment 107 22 Best Shot Selector (BSS) ...... 106 34 Focus areas / metering areas 23 Noise ...
... Exposure display 75 Monitor or Viewfinder (Playback Mode) In (playback mode), the icons in the monitor or viewfinder indicate the status of the following camera settings: 1 Date of recording 19 2 Time of recording 19 3 Image size 51 * Appears only when battery is running low. 4 Image quality ... (ISO equivalency) .. 78 19 Progress bar (Ultra HS) ........ 105 32 Black-and-white mode indicator 108 20 User Setting No. (User Set) .... 68 21 Converter lens setting ......... 109 33 Image adjustment 107 22 Best Shot Selector (BSS) ...... 106 34 Focus areas / metering areas 23 Noise ...

User Manual
Page 20
... Image quality 49 5 Exposure mode 70 6 Shutter-speed 73 Aperture 74 Image size 51 Exposure compensation value ... 66 Sensitivity 78 White balance setting 130 Image transfer status 42 7 Manual focus 80 8 Continuous shooting mode .. 104 9 Exposure compensation indicator 66 10 Flash mode 62 11 ...panel can be illuminated for up to Know the COOLPIX5700 Control Panel The indicators in the control panel show the status of the following camera settings. Getting Started-Getting to 8 seconds by pressing the LCD illuminator button ( 4). 8 To aid explanation, the control panel graphic below...
... Image quality 49 5 Exposure mode 70 6 Shutter-speed 73 Aperture 74 Image size 51 Exposure compensation value ... 66 Sensitivity 78 White balance setting 130 Image transfer status 42 7 Manual focus 80 8 Continuous shooting mode .. 104 9 Exposure compensation indicator 66 10 Flash mode 62 11 ...panel can be illuminated for up to Know the COOLPIX5700 Control Panel The indicators in the control panel show the status of the following camera settings. Getting Started-Getting to 8 seconds by pressing the LCD illuminator button ( 4). 8 To aid explanation, the control panel graphic below...

User Manual
Page 22
... difficult to see. The monitor is also used to review the pictures that you can fold it onto the camera body as shown to protect it can take self-portraits by rotating the monitor to point in the same direction...it from dust or fingerprints. 10 You can be folded back onto the camera body for shooting or playback. D The Monitor The monitor shows the view through the camera lens together with icons indicating the status of the final picture. When folded... forward 180°, and backward 90°. the monitor will show a mirror image of various camera settings during shooting ( 6).
... difficult to see. The monitor is also used to review the pictures that you can fold it onto the camera body as shown to protect it can take self-portraits by rotating the monitor to point in the same direction...it from dust or fingerprints. 10 You can be folded back onto the camera body for shooting or playback. D The Monitor The monitor shows the view through the camera lens together with icons indicating the status of the final picture. When folded... forward 180°, and backward 90°. the monitor will show a mirror image of various camera settings during shooting ( 6).

User Manual
Page 23
...assigned to the button, making it possible to select the User Set or adjust white balance and metering without accessing the camera menus, or to adjust flash and focus mode without accessing the camera menus. It will appear in the control panel shutter-speed/ aperture... while the button is set to button User Set (default setting) 68 (Focus Mode) 53 (Speedlight Mode) 62 White Balance 101 Metering 103 11 Setting assigned to the automatic "point-and-shoot" mode, User Set A. By default, the camera is pressed. You can create combinations of settings for User Sets 1, 2, and 3...
...assigned to the button, making it possible to select the User Set or adjust white balance and metering without accessing the camera menus, or to adjust flash and focus mode without accessing the camera menus. It will appear in the control panel shutter-speed/ aperture... while the button is set to button User Set (default setting) 68 (Focus Mode) 53 (Speedlight Mode) 62 White Balance 101 Metering 103 11 Setting assigned to the automatic "point-and-shoot" mode, User Set A. By default, the camera is pressed. You can create combinations of settings for User Sets 1, 2, and 3...

User Manual
Page 30
Getting Started-First Steps Step 4-Choose a Language Menus and messages can be displayed in German, English, French, Japanese, and Spanish. 4.1 4.2 Set mode selector to display PLAY BACK 4.6 Highlight page tab Highlight SET-UP menu page tab (S) Position cursor in monitor; If no images exist on and turn cam- Open the monitor. ignore it and proceed to next step 4.3 4.4 Press menu 4.5 button to era on memory card, "CARD CONTAINS NO IMAGES" message will appear in SET-UP menu 18
Getting Started-First Steps Step 4-Choose a Language Menus and messages can be displayed in German, English, French, Japanese, and Spanish. 4.1 4.2 Set mode selector to display PLAY BACK 4.6 Highlight page tab Highlight SET-UP menu page tab (S) Position cursor in monitor; If no images exist on and turn cam- Open the monitor. ignore it and proceed to next step 4.3 4.4 Press menu 4.5 button to era on memory card, "CARD CONTAINS NO IMAGES" message will appear in SET-UP menu 18

User Manual
Page 31
...) Make selection and return to 4.6 in the previous section, then follow steps 4.1 to SET-UP menu Step 5-Set the Time and Date The time and date of shooting is recorded with all pictures and movies you take. To set the camera's internal clock to the correct time and date, follow the steps below: 5.1 5.2 Highlight...
...) Make selection and return to 4.6 in the previous section, then follow steps 4.1 to SET-UP menu Step 5-Set the Time and Date The time and date of shooting is recorded with all pictures and movies you take. To set the camera's internal clock to the correct time and date, follow the steps below: 5.1 5.2 Highlight...

User Manual
Page 32
... have a time stamp of the monitor or viewfinder when the camera is in (shooting) mode. Flashing Clock Icon If the time and date have been set , a flashing clock icon ( ) will be displayed Save changes to settings and return to SET-UP menu To return to (playback) mode, press the button. Repeat ...steps 5.3 and 5.4 until all items have not been set 5.5 5.6 Highlight Y M D 5.7 Choose order in which year, month, and day will appear in red) Edit selected item. 5.3 5.4 Getting Started-First Steps Highlight Year, ...
... have a time stamp of the monitor or viewfinder when the camera is in (shooting) mode. Flashing Clock Icon If the time and date have been set , a flashing clock icon ( ) will be displayed Save changes to settings and return to SET-UP menu To return to (playback) mode, press the button. Repeat ...steps 5.3 and 5.4 until all items have not been set 5.5 5.6 Highlight Y M D 5.7 Choose order in which year, month, and day will appear in red) Edit selected item. 5.3 5.4 Getting Started-First Steps Highlight Year, ...

User Manual
Page 33
Taking and Reviewing Pictures Basic Picture Taking 22-30 Reviewing Your Pictures 31-35 This chapter is divided into the following sections : Basic Picture Taking Outlines the basic steps necessary to review your first digital picture. STEP 1 STEP 2 STEP 3 STEP 4 STEP 5 STEP 6 Ready the Camera Select User Set A Adjust Camera Settings Frame the Shot Focus and Shoot Put the Camera Away 22-24 25 25 26-27 28-29 30 Reviewing Your Pictures Illustrates how to take your pictures in the monitor or viewfinder. 21
Taking and Reviewing Pictures Basic Picture Taking 22-30 Reviewing Your Pictures 31-35 This chapter is divided into the following sections : Basic Picture Taking Outlines the basic steps necessary to review your first digital picture. STEP 1 STEP 2 STEP 3 STEP 4 STEP 5 STEP 6 Ready the Camera Select User Set A Adjust Camera Settings Frame the Shot Focus and Shoot Put the Camera Away 22-24 25 25 26-27 28-29 30 Reviewing Your Pictures Illustrates how to take your pictures in the monitor or viewfinder. 21

User Manual
Page 34
... viewfinder; Step 1-Ready the Camera Before using your camera, complete the following steps: 1.1 Remove the lens cap Remove the lens cap by default. the monitor or viewfinder will be displayed in the automatic "point and shoot" mode, User Set A. When you first use the camera, it will show the view... through (5) 1.3 Slide the mode selector to (shooting mode) 1.4 Turn the camera on A beep will sound and the lens will be set to User Set A by pressing the tabs on either side of...
... viewfinder; Step 1-Ready the Camera Before using your camera, complete the following steps: 1.1 Remove the lens cap Remove the lens cap by default. the monitor or viewfinder will be displayed in the automatic "point and shoot" mode, User Set A. When you first use the camera, it will show the view... through (5) 1.3 Slide the mode selector to (shooting mode) 1.4 Turn the camera on A beep will sound and the lens will be set to User Set A by pressing the tabs on either side of...

User Manual
Page 37
... + 51 Continuous mode Single Camera records one picture each time shutter-release button is in the following steps assume the camera is pressed. 104 25 When you can use the camera, it will be set to User Set A by default. The default settings, suitable for 49 snapshots.... Refer to control the settings listed in the automatic "point and shoot" mode, User Set A. Step 3-Adjust Camera Settings (Optional) In User Set A, you first use the , ...
... + 51 Continuous mode Single Camera records one picture each time shutter-release button is in the following steps assume the camera is pressed. 104 25 When you can use the camera, it will be set to User Set A by default. The default settings, suitable for 49 snapshots.... Refer to control the settings listed in the automatic "point and shoot" mode, User Set A. Step 3-Adjust Camera Settings (Optional) In User Set A, you first use the , ...

User Manual
Page 38
...redeye reduction lamp, keep fingers below ridges on the camera grip also keep your fingers from the lens, flash, and photocell. Taking and Reviewing Pictures-Basic Picture Taking Step 4-Frame the Shot After adjusting camera settings, you are ready to frame your shooting conditions, by... pressing the / SEL button. Switch between the monitor or viewfinder, whichever best suits your shot. 4.1 Ready the camera To prevent camera shake, hold the camera steadily in both hands.
...redeye reduction lamp, keep fingers below ridges on the camera grip also keep your fingers from the lens, flash, and photocell. Taking and Reviewing Pictures-Basic Picture Taking Step 4-Frame the Shot After adjusting camera settings, you are ready to frame your shooting conditions, by... pressing the / SEL button. Switch between the monitor or viewfinder, whichever best suits your shot. 4.1 Ready the camera To prevent camera shake, hold the camera steadily in both hands.

User Manual
Page 39
...in another object obstructs the Speedlight, preventing it clicks back into place. 27 Zoom out Zoom in Degree of digital zoom is shown in the monitor or viewfinder. When set to the optical zoom indicator. Press (telephoto) to zoom in the monitor or viewfinder using the zoom button ... when the shutter-release button is zoomed all the way in, holding down for two seconds activates digital zoom and "zooms" in Speedlight • In User Set A, if the flash mode is set to adjust the camera's 8× optical zoom lens. If your finger or another 4× ( 60) for correct ...
...in another object obstructs the Speedlight, preventing it clicks back into place. 27 Zoom out Zoom in Degree of digital zoom is shown in the monitor or viewfinder. When set to the optical zoom indicator. Press (telephoto) to zoom in the monitor or viewfinder using the zoom button ... when the shutter-release button is zoomed all the way in, holding down for two seconds activates digital zoom and "zooms" in Speedlight • In User Set A, if the flash mode is set to adjust the camera's 8× optical zoom lens. If your finger or another 4× ( 60) for correct ...


