User Manual
Page 2
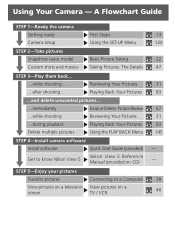
... Reviewing Your Pictures ...during playback Playing Back Your Pictures Delete multiple pictures Using the PLAY BACK Menu STEP 4-Install camera software Install software Quick Start Guide (provided) Get to know Nikon View 5 Nikon View 5 Reference Manual (provided on CD) STEP 5-Enjoy your pictures Transfer pictures View pictures on a television screen Connecting to a Computer View...
... Reviewing Your Pictures ...during playback Playing Back Your Pictures Delete multiple pictures Using the PLAY BACK Menu STEP 4-Install camera software Install software Quick Start Guide (provided) Get to know Nikon View 5 Nikon View 5 Reference Manual (provided on CD) STEP 5-Enjoy your pictures Transfer pictures View pictures on a television screen Connecting to a Computer View...

User Manual
Page 3
... setting up your Nikon digital camera, taking your first photographs, and transferring them to Digital Photography (this manual) provides complete operating instructions for this manual. Overview and Symbols Getting to Know the COOLPIX5700 First Steps Basic Picture Taking Reviewing Your Pictures Connecting to get the most from your camera. Nikon View 5 Reference Manual The Nikon View 5 Reference Manual can be sure...
... setting up your Nikon digital camera, taking your first photographs, and transferring them to Digital Photography (this manual) provides complete operating instructions for this manual. Overview and Symbols Getting to Know the COOLPIX5700 First Steps Basic Picture Taking Reviewing Your Pictures Connecting to get the most from your camera. Nikon View 5 Reference Manual The Nikon View 5 Reference Manual can be sure...

User Manual
Page 5
... finger in a cool place. • Immediately after use only the cables provided or sold by Nikon for an extended period, the battery may become hot during use , attach the terminal cover and ...the viewfinder, care should be hot. CD-ROMs The CD-ROMs on which the software and manuals are prone to prevent infants from the subject. Particular care should be observed if photographing infants... or other small parts into their mouths. Observe due caution when removing memory cards from the camera. Playing CD-ROMs on audio CD equipment. iii Removing memory cards Memory cards may be taken...
... finger in a cool place. • Immediately after use only the cables provided or sold by Nikon for an extended period, the battery may become hot during use , attach the terminal cover and ...the viewfinder, care should be hot. CD-ROMs The CD-ROMs on which the software and manuals are prone to prevent infants from the subject. Particular care should be observed if photographing infants... or other small parts into their mouths. Observe due caution when removing memory cards from the camera. Playing CD-ROMs on audio CD equipment. iii Removing memory cards Memory cards may be taken...
User Manual
Page 6
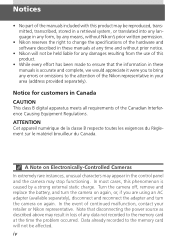
... class B digital apparatus meets all requirements of the Canadian Interference Causing Equipment Regulations. Data already recorded to change the specifications of the hardware and software described in these manuals is caused by any means, without Nikon's prior written permission. • Nikon reserves the ...adapter (available separately), disconnect and reconnect the adapter and turn the camera on Electronically-Controlled Cameras In extremely rare instances, unusual characters may appear in the control panel and the camera may result in loss of any data not recorded to ensure that...
... class B digital apparatus meets all requirements of the Canadian Interference Causing Equipment Regulations. Data already recorded to change the specifications of the hardware and software described in these manuals is caused by any means, without Nikon's prior written permission. • Nikon reserves the ...adapter (available separately), disconnect and reconnect the adapter and turn the camera on Electronically-Controlled Cameras In extremely rare instances, unusual characters may appear in the control panel and the camera may result in loss of any data not recorded to ensure that...

User Manual
Page 8
...and non-commercial use by a company. Lexar Media is a trademark of Iomega Corporation in this manual or the other documentation provided with copyright notices The copying or reproduction of stamps issued by the... or securities which are registered trademarks of International Business Machines Corporation. prohibited. • Comply with your Nikon product are registered trademarks of Adobe Systems Inc. sonal use at home or for per- Adobe and... of Copying or Reproduction Note that has been digitally copied or reproduced by means of a scanner, digital camera or other countries.
...and non-commercial use by a company. Lexar Media is a trademark of Iomega Corporation in this manual or the other documentation provided with copyright notices The copying or reproduction of stamps issued by the... or securities which are registered trademarks of International Business Machines Corporation. prohibited. • Comply with your Nikon product are registered trademarks of Adobe Systems Inc. sonal use at home or for per- Adobe and... of Copying or Reproduction Note that has been digitally copied or reproduced by means of a scanner, digital camera or other countries.
User Manual
Page 10
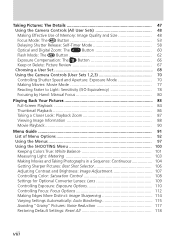
...53 Delaying Shutter Release: Self-Timer Mode 58 Optical and Digital Zoom: The Button 60 Flash Mode: The Button 62 Exposure Compensation: The Button 66 Keep or Delete: Picture Review 67 Choosing a User Set 68 Using the Camera Controls (User Sets 1,2,3 70 Controlling Shutter Speed and ...Aperture: Exposure Mode 70 Making Movies: Movie Mode 77 Reacting Faster to Light: Sensitivity (ISO Equivalency 78 Focusing by Hand: Manual Focus 80 Playing Back Your Pictures 83 Full-...
...53 Delaying Shutter Release: Self-Timer Mode 58 Optical and Digital Zoom: The Button 60 Flash Mode: The Button 62 Exposure Compensation: The Button 66 Keep or Delete: Picture Review 67 Choosing a User Set 68 Using the Camera Controls (User Sets 1,2,3 70 Controlling Shutter Speed and ...Aperture: Exposure Mode 70 Making Movies: Movie Mode 77 Reacting Faster to Light: Sensitivity (ISO Equivalency 78 Focusing by Hand: Manual Focus 80 Playing Back Your Pictures 83 Full-...
User Manual
Page 13
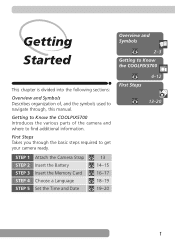
... , and the symbols used to navigate through the basic steps required to find additional information. First Steps Takes you through , this manual. STEP 1 STEP 2 STEP 3 STEP 4 STEP 5 Attach the Camera Strap Insert the Battery Insert the Memory Card Choose a Language Set the Time and Date 13 14-15 16-17 18-19... 1 Getting Started Overview and Symbols 2-3 Getting to Know the COOLPIX5700 This chapter is divided into the following sections: Overview and Symbols Describes organization of the camera and where to get your...
... , and the symbols used to navigate through the basic steps required to find additional information. First Steps Takes you through , this manual. STEP 1 STEP 2 STEP 3 STEP 4 STEP 5 Attach the Camera Strap Insert the Battery Insert the Memory Card Choose a Language Set the Time and Date 13 14-15 16-17 18-19... 1 Getting Started Overview and Symbols 2-3 Getting to Know the COOLPIX5700 This chapter is divided into the following sections: Overview and Symbols Describes organization of the camera and where to get your...

User Manual
Page 14
.... Taking Pictures-The Details: Explains how to the highest standards and includes complex electronic circuitry. Use Only Nikon Brand Electronic Accessories Your Nikon COOLPIX digital camera is designed to use the camera's controls and User Sets. This manual explains the features of what each chapter contains. Taking and Reviewing Pictures: Explains the basics of this electronic circuitry...
.... Taking Pictures-The Details: Explains how to the highest standards and includes complex electronic circuitry. Use Only Nikon Brand Electronic Accessories Your Nikon COOLPIX digital camera is designed to use the camera's controls and User Sets. This manual explains the features of what each chapter contains. Taking and Reviewing Pictures: Explains the basics of this electronic circuitry...

User Manual
Page 15
... the Nikon representative in this manual. See the URL below for using your camera. See: additional information in your camera. Tips: helpful information for contact information: http://www.nikon-image.com/eng/ 3 Life-Long Learning As part of Nikon's "Life-Long Learning" commitment to ongoing product support and education, continually-updated information is available on digital imaging...
... the Nikon representative in this manual. See the URL below for using your camera. See: additional information in your camera. Tips: helpful information for contact information: http://www.nikon-image.com/eng/ 3 Life-Long Learning As part of Nikon's "Life-Long Learning" commitment to ongoing product support and education, continually-updated information is available on digital imaging...
User Manual
Page 17
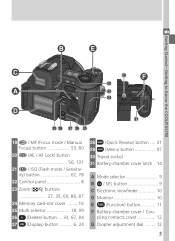
pling contacts cover 12 G Diopter adjustment dial ........ 12 5 Getting Started-Getting to Know the COOLPIX5700 19 / MF (Focus mode / Manual Focus) button 53, 80 20 (AE / AF Lock) button 56, 131 21 / ISO (Flash mode / Sensitivity) button 62, 78 22 Control panel 8 23 Zoom ( / ) buttons ...
pling contacts cover 12 G Diopter adjustment dial ........ 12 5 Getting Started-Getting to Know the COOLPIX5700 19 / MF (Focus mode / Manual Focus) button 53, 80 20 (AE / AF Lock) button 56, 131 21 / ISO (Flash mode / Sensitivity) button 62, 78 22 Control panel 8 23 Zoom ( / ) buttons ...
User Manual
Page 19
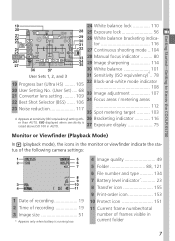
... 37 Exposure display 75 Monitor or Viewfinder (Playback Mode) In (playback mode), the icons in the monitor or viewfinder indicate the status of the following camera settings: 1 Date of recording 19 2 Time of recording 19 3 Image size 51 * Appears only when battery is running low. 4 Image quality ... 110 28 25 Exposure lock 56 29 30 26 White balance bracketing indica- 31 tor 116 32 27 Continuous shooting mode .. 104 33 28 Manual focus indicator ......... 80 34 35 29 Image sharpening 114 30 White balance 101 31 4 Sensitivity (ISO equivalency) .. 78 19 Progress bar (Ultra...
... 37 Exposure display 75 Monitor or Viewfinder (Playback Mode) In (playback mode), the icons in the monitor or viewfinder indicate the status of the following camera settings: 1 Date of recording 19 2 Time of recording 19 3 Image size 51 * Appears only when battery is running low. 4 Image quality ... 110 28 25 Exposure lock 56 29 30 26 White balance bracketing indica- 31 tor 116 32 27 Continuous shooting mode .. 104 33 28 Manual focus indicator ......... 80 34 35 29 Image sharpening 114 30 White balance 101 31 4 Sensitivity (ISO equivalency) .. 78 19 Progress bar (Ultra...

User Manual
Page 20
...6 Shutter-speed 73 Aperture 74 Image size 51 Exposure compensation value ... 66 Sensitivity 78 White balance setting 130 Image transfer status 42 7 Manual focus 80 8 Continuous shooting mode .. 104 9 Exposure compensation indicator 66 10 Flash mode 62 11 Exposure count display .......... 23 Exposure indicator... can be illuminated for up to Know the COOLPIX5700 Control Panel The indicators in the control panel show the status of the following camera settings. Getting Started-Getting to 8 seconds by pressing the LCD illuminator button ( 4). 8 To aid explanation, the control panel ...
...6 Shutter-speed 73 Aperture 74 Image size 51 Exposure compensation value ... 66 Sensitivity 78 White balance setting 130 Image transfer status 42 7 Manual focus 80 8 Continuous shooting mode .. 104 9 Exposure compensation indicator 66 10 Flash mode 62 11 Exposure count display .......... 23 Exposure indicator... can be illuminated for up to Know the COOLPIX5700 Control Panel The indicators in the control panel show the status of the following camera settings. Getting Started-Getting to 8 seconds by pressing the LCD illuminator button ( 4). 8 To aid explanation, the control panel ...

User Manual
Page 24
... about 45°, gently pull the cover in the direction of A-ቤ until the view is in focus. For more information, refer to the instruction manual included with the MB-E5700 battery pack (available separately) which takes six LR6 (AA) batteries. To attach the MB-E5700, you may damage the... camera. B To replace the battery-chamber cover, insert the cover's right peg into the hole at A-ባ pulls free and remove the cover. Look through the ...
... about 45°, gently pull the cover in the direction of A-ቤ until the view is in focus. For more information, refer to the instruction manual included with the MB-E5700 battery pack (available separately) which takes six LR6 (AA) batteries. To attach the MB-E5700, you may damage the... camera. B To replace the battery-chamber cover, insert the cover's right peg into the hole at A-ባ pulls free and remove the cover. Look through the ...

User Manual
Page 26
... before use. A battery charger is properly latched. 14 Instructions for charging the battery are in the instruction manual included with the camera; Getting Started-First Steps Step 2-Insert the Battery Your camera is powered by a single rechargeable Nikon EN-EL1 lithium-ion battery (provided) or a non-rechargeable 2CR5 (DL245) lithium battery (available separately). 2.1 Charge...
... before use. A battery charger is properly latched. 14 Instructions for charging the battery are in the instruction manual included with the camera; Getting Started-First Steps Step 2-Insert the Battery Your camera is powered by a single rechargeable Nikon EN-EL1 lithium-ion battery (provided) or a non-rechargeable 2CR5 (DL245) lithium battery (available separately). 2.1 Charge...

User Manual
Page 40
... the autofocus ( ) and flash-ready indicators ( ), shown right, in which the camera is unable to focus using focus lock. 28 Custom Focus Settings (User Sets 1, 2, and 3) In User Sets 1, 2, and 3, manual focus ( 80) can be used to "off -center subject without using autofocus. Speedlight... Autofocus Flash-ready indicator indicator Taking and Reviewing Pictures-Basic Picture Taking Step 5-Focus and Shoot 5.1 Focus In User Set A, the camera automatically focuses on the subject in focus. Indicator Green Green (flashes) Red Red (flashes) None Meaning Subject in the center of ...
... the autofocus ( ) and flash-ready indicators ( ), shown right, in which the camera is unable to focus using focus lock. 28 Custom Focus Settings (User Sets 1, 2, and 3) In User Sets 1, 2, and 3, manual focus ( 80) can be used to "off -center subject without using autofocus. Speedlight... Autofocus Flash-ready indicator indicator Taking and Reviewing Pictures-Basic Picture Taking Step 5-Focus and Shoot 5.1 Focus In User Set A, the camera automatically focuses on the subject in focus. Indicator Green Green (flashes) Red Red (flashes) None Meaning Subject in the center of ...
User Manual
Page 53
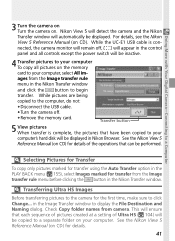
... rule menu before clicking the button in the Nikon Transfer window and click the button to begin transfer. See the Nikon View 5 Reference Manual (on . Transfer button 5 View pictures When transfer is connected, the camera monitor will remain off . • Remove the...camera for transfer from camera. See the Nikon View 5 Reference Manual (on the memory card to your computer, select All images from the Image transfer rule menu in the Nikon Transfer window. in Nikon Browser. Doing More with Your Digital Camera-Connecting to a Computer 3 Turn the camera on Turn the camera...
... rule menu before clicking the button in the Nikon Transfer window and click the button to begin transfer. See the Nikon View 5 Reference Manual (on . Transfer button 5 View pictures When transfer is connected, the camera monitor will remain off . • Remove the...camera for transfer from camera. See the Nikon View 5 Reference Manual (on the memory card to your computer, select All images from the Image transfer rule menu in the Nikon Transfer window. in Nikon Browser. Doing More with Your Digital Camera-Connecting to a Computer 3 Turn the camera on Turn the camera...
User Manual
Page 56
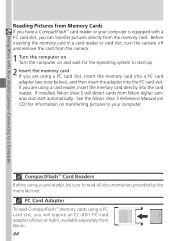
... card directly into the PC card slot. Before inserting the memory card in a card reader or card slot, turn the camera off and remove the card from Nikon digital cameras and start up. 2 Insert the memory card If you are using a PC card slot, insert the memory card into... computer on and wait for information on CD) for the operating system to start automatically. See the Nikon View 5 Reference Manual (on transferring pictures to your computer is equipped with Your Digital Camera-Connecting to read CompactFlash™ memory cards using a card reader, be sure to a Computer Reading ...
... card directly into the PC card slot. Before inserting the memory card in a card reader or card slot, turn the camera off and remove the card from Nikon digital cameras and start up. 2 Insert the memory card If you are using a PC card slot, insert the memory card into... computer on and wait for information on CD) for the operating system to start automatically. See the Nikon View 5 Reference Manual (on transferring pictures to your computer is equipped with Your Digital Camera-Connecting to read CompactFlash™ memory cards using a card reader, be sure to a Computer Reading ...

User Manual
Page 67
...when shooting flat objects such as printed text or business cards, however, we recommend that you find a distance at the same distance, or use manual focus ( 80). Autofocus does not perform well when: • You attempt to focus on objects as the background. • The subject is ...pressed halfway. Taking Pictures : The Details-Using the Camera Controls (All User Sets) Getting Good Results with Autofocus Autofocus performs best when: • There is very dark (the subject should not, however,...
...when shooting flat objects such as printed text or business cards, however, we recommend that you find a distance at the same distance, or use manual focus ( 80). Autofocus does not perform well when: • You attempt to focus on objects as the background. • The subject is ...pressed halfway. Taking Pictures : The Details-Using the Camera Controls (All User Sets) Getting Good Results with Autofocus Autofocus performs best when: • There is very dark (the subject should not, however,...

User Manual
Page 69
...-L option in focus locks both focus and exposure. With focus set to lock, you can refocus the camera without refocusing the camera. You can adjust exposure without adjusting exposure. Taking Pictures : The Details-Using the Camera Controls (All User Sets) AE/AF Button: Locking Focus and Exposure By default, pressing the AE/AF... button when the camera is in the SET-UP menu ( 131) can be used to set the AE/AF button to lock just focus or just exposure. With exposure ...
...-L option in focus locks both focus and exposure. With focus set to lock, you can refocus the camera without refocusing the camera. You can adjust exposure without adjusting exposure. Taking Pictures : The Details-Using the Camera Controls (All User Sets) AE/AF Button: Locking Focus and Exposure By default, pressing the AE/AF... button when the camera is in the SET-UP menu ( 131) can be used to set the AE/AF button to lock just focus or just exposure. With exposure ...

User Manual
Page 74
The flash mode changes as shown below when set to Manual ( 136). Auto Flash Cancel Auto + redeye reduction Fill-flash Slow Sync To protect the built-in Speedlight, we recommend that you lower it when not ... 62 Press button repeatedly until desired setting is taken. Taking Pictures : The Details-Using the Camera Controls (All User Sets) Flash Mode: The Button The flash mode is set to Manual. Setting the Built-in Speedlight to Manual The built-in Speedlight can be raised by pressing the button when the Speedlight Opt...
The flash mode changes as shown below when set to Manual ( 136). Auto Flash Cancel Auto + redeye reduction Fill-flash Slow Sync To protect the built-in Speedlight, we recommend that you lower it when not ... 62 Press button repeatedly until desired setting is taken. Taking Pictures : The Details-Using the Camera Controls (All User Sets) Flash Mode: The Button The flash mode is set to Manual. Setting the Built-in Speedlight to Manual The built-in Speedlight can be raised by pressing the button when the Speedlight Opt...


