
User Manual
Page 5
Removing memory cards Memory cards may become hot during use only the cables provided or sold by Nikon for an extended period, the battery may be hot. Avoid contact...viewfinder, care should you notice any changes in your eye accidentally. Before removing the battery, turn the camera off and allow the battery to prevent liquid crystal from putting the battery or other small parts into their...care should be taken to remove the battery when no less than one meter (39˝) from the camera. To avoid damage to the product, be played back on which the software and manuals are prone to...
Removing memory cards Memory cards may become hot during use only the cables provided or sold by Nikon for an extended period, the battery may be hot. Avoid contact...viewfinder, care should you notice any changes in your eye accidentally. Before removing the battery, turn the camera off and allow the battery to prevent liquid crystal from putting the battery or other small parts into their...care should be taken to remove the battery when no less than one meter (39˝) from the camera. To avoid damage to the product, be played back on which the software and manuals are prone to...
User Manual
Page 6
... control panel and the camera may stop functioning. Data already recorded to ensure that disconnecting the power source as described above may result in loss of any data not recorded to the memory card at any time and without Nikon's prior written permission. • Nikon reserves the right to... from the use of this product. • While every effort has been made to the memory card will not be held liable for customers in Canada CAUTION This class B digital apparatus meets all requirements of the Canadian Interference Causing Equipment Regulations. Notices • No part of ...
... control panel and the camera may stop functioning. Data already recorded to ensure that disconnecting the power source as described above may result in loss of any data not recorded to the memory card at any time and without Nikon's prior written permission. • Nikon reserves the right to... from the use of this product. • While every effort has been made to the memory card will not be held liable for customers in Canada CAUTION This class B digital apparatus meets all requirements of the Canadian Interference Causing Equipment Regulations. Notices • No part of ...

User Manual
Page 8
...of unused postage stamps or post cards issued by the government is issued by the government, licenses issued by public agencies and private groups, ID cards, and tickets, such as ... Prohibition of Copying or Reproduction Note that has been digitally copied or reproduced by means of a scanner, digital camera or other documentation provided with copyright notices The copying or...are registered trademarks of International Business Machines Corporation. prohibited. • Comply with your Nikon product are registered trademarks of their respective holders. culated in the U.S. and other ...
...of unused postage stamps or post cards issued by the government is issued by the government, licenses issued by public agencies and private groups, ID cards, and tickets, such as ... Prohibition of Copying or Reproduction Note that has been digitally copied or reproduced by means of a scanner, digital camera or other documentation provided with copyright notices The copying or...are registered trademarks of International Business Machines Corporation. prohibited. • Comply with your Nikon product are registered trademarks of their respective holders. culated in the U.S. and other ...
User Manual
Page 9
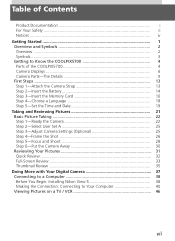
... ...2 Symbols ...3 Getting to Know the COOLPIX5700 4 Parts of the COOLPIX5700 4 Camera Displays 6 Camera Parts-The Details 9 First Steps ...13 Step 1-Attach the Camera Strap 13 Step 2-Insert the Battery 14 Step 3-Insert the Memory Card 16 Step 4-Choose a Language 18 Step 5-Set the Time and Date 19 ...5-Focus and Shoot 28 Step 6-Put the Camera Away 30 Reviewing Your Pictures 31 Quick Review 32 Full-Screen Review 33 Thumbnail Review 35 Doing More with Your Digital Camera 37 Connecting to a Computer 38 Before You Begin: Installing Nikon View 5 38 Making the Connection: Connecting ...
... ...2 Symbols ...3 Getting to Know the COOLPIX5700 4 Parts of the COOLPIX5700 4 Camera Displays 6 Camera Parts-The Details 9 First Steps ...13 Step 1-Attach the Camera Strap 13 Step 2-Insert the Battery 14 Step 3-Insert the Memory Card 16 Step 4-Choose a Language 18 Step 5-Set the Time and Date 19 ...5-Focus and Shoot 28 Step 6-Put the Camera Away 30 Reviewing Your Pictures 31 Quick Review 32 Full-Screen Review 33 Thumbnail Review 35 Doing More with Your Digital Camera 37 Connecting to a Computer 38 Before You Begin: Installing Nikon View 5 38 Making the Connection: Connecting ...

User Manual
Page 11
... Folders 121 Adjusting Monitor Settings: Monitor Options 126 Customizing Camera Controls: Controls 129 Controlling Zoom: Zoom Options 131 Conserving Battery Power: Auto Off 133 File Numbering: Seq. Numbers 134 Formatting Memory Cards: CF Card Format 135 Controlling the Flash: Speedlight Options 136 Audio...152 Ordering Prints: Print Set 153 Selecting Images for Transfer: Auto Transfer 155 Technical Notes: Camera Care, Options, and Resources 157 Optional Accessories 158 Caring for the Camera and Battery 160 Web Resources 163 Troubleshooting 164 Specifications 171 Index ...175 ix
... Folders 121 Adjusting Monitor Settings: Monitor Options 126 Customizing Camera Controls: Controls 129 Controlling Zoom: Zoom Options 131 Conserving Battery Power: Auto Off 133 File Numbering: Seq. Numbers 134 Formatting Memory Cards: CF Card Format 135 Controlling the Flash: Speedlight Options 136 Audio...152 Ordering Prints: Print Set 153 Selecting Images for Transfer: Auto Transfer 155 Technical Notes: Camera Care, Options, and Resources 157 Optional Accessories 158 Caring for the Camera and Battery 160 Web Resources 163 Troubleshooting 164 Specifications 171 Index ...175 ix
User Manual
Page 13
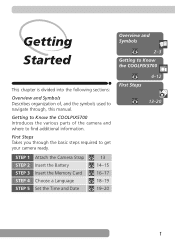
...Symbols 2-3 Getting to Know the COOLPIX5700 This chapter is divided into the following sections: Overview and Symbols Describes organization of the camera and where to get your camera ready. Getting to Know the COOLPIX5700 Introduces the various parts of , and the symbols used to navigate through the basic steps... required to find additional information. STEP 1 STEP 2 STEP 3 STEP 4 STEP 5 Attach the Camera Strap Insert the Battery Insert the Memory Card Choose a Language Set the Time and Date 13 14-15 16-17 18-19 19-20 First Steps 4-12 13-20 1 ...
...Symbols 2-3 Getting to Know the COOLPIX5700 This chapter is divided into the following sections: Overview and Symbols Describes organization of the camera and where to get your camera ready. Getting to Know the COOLPIX5700 Introduces the various parts of , and the symbols used to navigate through the basic steps... required to find additional information. STEP 1 STEP 2 STEP 3 STEP 4 STEP 5 Attach the Camera Strap Insert the Battery Insert the Memory Card Choose a Language Set the Time and Date 13 14-15 16-17 18-19 19-20 First Steps 4-12 13-20 1 ...
User Manual
Page 17
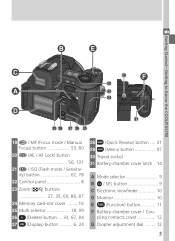
... Lock) button 56, 131 21 / ISO (Flash mode / Sensitivity) button 62, 78 22 Control panel 8 23 Zoom ( / ) buttons 27, 35, 60, 86, 87 24 Memory card-slot cover ........ 16 25 Multi selector 18, 99 26 (Delete) button ... 33, 67, 84 27 (Display) button .......... 6, 24 28 (Quick Review) button .... 31 29 (Menu...
... Lock) button 56, 131 21 / ISO (Flash mode / Sensitivity) button 62, 78 22 Control panel 8 23 Zoom ( / ) buttons 27, 35, 60, 86, 87 24 Memory card-slot cover ........ 16 25 Multi selector 18, 99 26 (Delete) button ... 33, 67, 84 27 (Display) button .......... 6, 24 28 (Quick Review) button .... 31 29 (Menu...

User Manual
Page 27
... may be exchanged. Removing the Battery The battery can be sure to refer to appear in the monitor, indicating that on the memory card. The MB-E5700 battery pack (available separately), which is charged as necessary when the main battery is complete, a flashing icon may ...charger (both available separately). Turn the camera off and wait for the battery to power the camera for an extended period, or removed before charging is installed or the camera powered by an AC adapter (available separately). Alternative Power Sources Besides the Nikon EN-EL1, the COOLPIX5700 can provide...
... may be exchanged. Removing the Battery The battery can be sure to refer to appear in the monitor, indicating that on the memory card. The MB-E5700 battery pack (available separately), which is charged as necessary when the main battery is complete, a flashing icon may ...charger (both available separately). Turn the camera off and wait for the battery to power the camera for an extended period, or removed before charging is installed or the camera powered by an AC adapter (available separately). Alternative Power Sources Besides the Nikon EN-EL1, the COOLPIX5700 can provide...
User Manual
Page 28
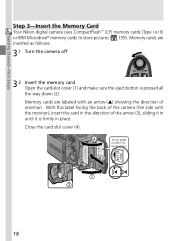
Getting Started-First Steps Step 3-Insert the Memory Card Your Nikon digital camera uses CompactFlash™ (CF) memory cards (Type I or II) or IBM Microdrive® memory cards to store pictures ( 159). Memory cards are inserted as follows: 3.1 Turn the camera off 3.2 Insert the memory card Open the card-slot cover (1) and make sure the eject button is firmly in place...
Getting Started-First Steps Step 3-Insert the Memory Card Your Nikon digital camera uses CompactFlash™ (CF) memory cards (Type I or II) or IBM Microdrive® memory cards to store pictures ( 159). Memory cards are inserted as follows: 3.1 Turn the camera off 3.2 Insert the memory card Open the card-slot cover (1) and make sure the eject button is firmly in place...
User Manual
Page 29
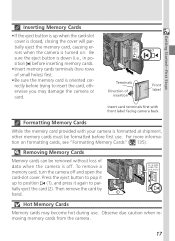
... loss of insertion Front label Insert card terminals first with front label facing camera back Formatting Memory Cards While the memory card provided with your camera is oriented correctly before first use . Terminals Direction of data when the camera is turned on formatting cards, see "Formatting Memory Cards" ( 135). Removing Memory Cards Memory cards can be formatted before trying to...
... loss of insertion Front label Insert card terminals first with front label facing camera back Formatting Memory Cards While the memory card provided with your camera is oriented correctly before first use . Terminals Direction of data when the camera is turned on formatting cards, see "Formatting Memory Cards" ( 135). Removing Memory Cards Memory cards can be formatted before trying to...

User Manual
Page 30
If no images exist on and turn cam- ignore it and proceed to next step 4.3 4.4 Press menu 4.5 button to era on memory card, "CARD CONTAINS NO IMAGES" message will appear in SET-UP menu 18 Getting Started-First Steps Step 4-Choose a Language Menus and messages can be displayed in German, English, French, Japanese, and Spanish. 4.1 4.2 Set mode selector to display PLAY BACK 4.6 Highlight page tab Highlight SET-UP menu page tab (S) Position cursor in monitor; Open the monitor.
If no images exist on and turn cam- ignore it and proceed to next step 4.3 4.4 Press menu 4.5 button to era on memory card, "CARD CONTAINS NO IMAGES" message will appear in SET-UP menu 18 Getting Started-First Steps Step 4-Choose a Language Menus and messages can be displayed in German, English, French, Japanese, and Spanish. 4.1 4.2 Set mode selector to display PLAY BACK 4.6 Highlight page tab Highlight SET-UP menu page tab (S) Position cursor in monitor; Open the monitor.

User Manual
Page 31
... Started-First Steps 4.7 Highlight Language 4.8 Monitor Options Shutter Sound Auto Off CF Card Format Date Video Mode Language Display options 4.9 Monitor Options Shutter Sound Auto Off CF Card Format Date Video Mode Language 4.10 Choose a language from: De Deutsch (German...) En English Fr Français (French) Japanese Es Español (Spanish) Make selection and return to 4.6 in the previous section, then follow the steps below: 5.1 5.2 Highlight Date Display Date menu 19 To set the camera...
... Started-First Steps 4.7 Highlight Language 4.8 Monitor Options Shutter Sound Auto Off CF Card Format Date Video Mode Language Display options 4.9 Monitor Options Shutter Sound Auto Off CF Card Format Date Video Mode Language 4.10 Choose a language from: De Deutsch (German...) En English Fr Français (French) Japanese Es Español (Spanish) Make selection and return to 4.6 in the previous section, then follow the steps below: 5.1 5.2 Highlight Date Display Date menu 19 To set the camera...

User Manual
Page 35
... use a new 2CR5 No pictures can be possible to record more pictures at a different image quality or size ( 49). Make sure the memory card has enough memory. As above, except that monitor will go blank after using flash as possible or ready a new 2CR5 (DL245) battery. Low ...(Flashes) (Flashes) Battery exhausted. Taking and Reviewing Pictures-Basic Picture Taking 1.5 Check indicators in the monitor or viewfinder, change the memory card or delete some images ( 33, 35) to free up space on the card. If the number of exposures remaining Monitor Control panel Monitor Control Panel Meaning...
... use a new 2CR5 No pictures can be possible to record more pictures at a different image quality or size ( 49). Make sure the memory card has enough memory. As above, except that monitor will go blank after using flash as possible or ready a new 2CR5 (DL245) battery. Low ...(Flashes) (Flashes) Battery exhausted. Taking and Reviewing Pictures-Basic Picture Taking 1.5 Check indicators in the monitor or viewfinder, change the memory card or delete some images ( 33, 35) to free up space on the card. If the number of exposures remaining Monitor Control panel Monitor Control Panel Meaning...
User Manual
Page 41
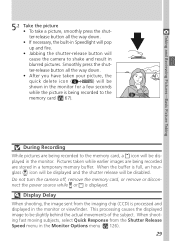
...Reviewing Pictures-Basic Picture Taking 5.2 Take the picture • To take a picture, smoothly press the shut- Do not turn the camera off, remove the memory card, or remove or disconnect the power source while or is full, an hourglass ( ) icon will be displayed and the shutter release ...Recording While pictures are stored in blurred pictures. Pictures taken while earlier images are being recorded are being recorded to the memory card, a icon will cause the camera to be slightly behind the actual movements of the subject. ter-release button all the way down . • After you...
...Reviewing Pictures-Basic Picture Taking 5.2 Take the picture • To take a picture, smoothly press the shut- Do not turn the camera off, remove the memory card, or remove or disconnect the power source while or is full, an hourglass ( ) icon will be displayed and the shutter release ...Recording While pictures are stored in blurred pictures. Pictures taken while earlier images are being recorded are being recorded to the memory card, a icon will cause the camera to be slightly behind the actual movements of the subject. ter-release button all the way down . • After you...
User Manual
Page 50
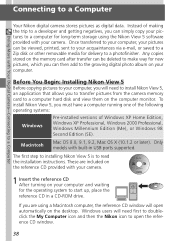
Only models with Your Digital Camera-Connecting to a Computer Your Nikon digital camera stores pictures as digital data. Connecting to a Computer Doing More with built-in a CD-ROM drive. Any copies stored on the memory card after transfer can be viewed, printed, sent to your acquaintances via e-mail, or ...the reference CD window. 38 To install Nikon View 5, you to transfer pictures from the camera memory card to start up, place the reference CD in USB ports supported. These are using the Nikon View 5 software provided with your camera. 1 Insert the reference CD After turning...
Only models with Your Digital Camera-Connecting to a Computer Your Nikon digital camera stores pictures as digital data. Connecting to a Computer Doing More with built-in a CD-ROM drive. Any copies stored on the memory card after transfer can be viewed, printed, sent to your acquaintances via e-mail, or ...the reference CD window. 38 To install Nikon View 5, you to transfer pictures from the camera memory card to start up, place the reference CD in USB ports supported. These are using the Nikon View 5 software provided with your camera. 1 Insert the reference CD After turning...
User Manual
Page 52
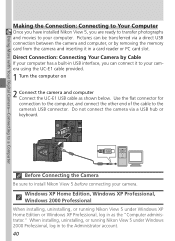
...Connect the UC-E1 USB cable as the "Computer administrator." Doing More with Your Digital Camera-Connecting to a Computer Making the Connection: Connecting to Your Computer Once you have installed Nikon View 5, you can be transferred via a USB hub or keyboard. Use the ...of the cable to install Nikon View 5 before connecting your computer. When installing, uninstalling, or running Nikon View 5 under Windows 2000 Professional, log in a card reader or PC card slot. Direct Connection: Connecting Your Camera by removing the memory card from the camera and inserting it to your ...
...Connect the UC-E1 USB cable as the "Computer administrator." Doing More with Your Digital Camera-Connecting to a Computer Making the Connection: Connecting to Your Computer Once you have installed Nikon View 5, you can be transferred via a USB hub or keyboard. Use the ...of the cable to install Nikon View 5 before connecting your computer. When installing, uninstalling, or running Nikon View 5 under Windows 2000 Professional, log in a card reader or PC card slot. Direct Connection: Connecting Your Camera by removing the memory card from the camera and inserting it to your ...
User Manual
Page 53
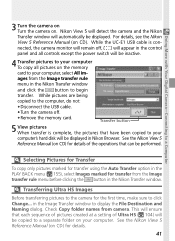
...names from the Image transfer rule menu in Nikon Browser. Transfer button 5 View pictures When transfer is connected, the camera monitor will remain off . • Remove the memory card. Nikon View 5 will detect the camera and the Nikon Transfer window will be displayed. Selecting Pictures ... be displayed in the Nikon Transfer window and click the button to the camera for details. 41 For details, see the Nikon View 5 Reference Manual (on . Doing More with Your Digital Camera-Connecting to a Computer 3 Turn the camera on Turn the camera on CD). Transferring Ultra...
...names from the Image transfer rule menu in Nikon Browser. Transfer button 5 View pictures When transfer is connected, the camera monitor will remain off . • Remove the memory card. Nikon View 5 will detect the camera and the Nikon Transfer window will be displayed. Selecting Pictures ... be displayed in the Nikon Transfer window and click the button to the camera for details. 41 For details, see the Nikon View 5 Reference Manual (on . Doing More with Your Digital Camera-Connecting to a Computer 3 Turn the camera on Turn the camera on CD). Transferring Ultra...
User Manual
Page 56
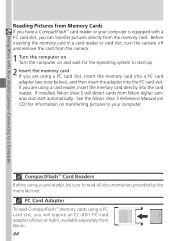
...card reader, insert the memory card directly into the PC card slot. Before inserting the memory card in a card reader or card slot, turn the camera off and remove the card from the camera. 1 Turn the computer on Turn the computer on transferring pictures to your computer is equipped with a PC card slot, you will detect cards from Nikon digital cameras... and start up. 2 Insert the memory card If you are using a PC card slot, you can transfer pictures directly from the memory card. PC Card Adapter To read all...
...card reader, insert the memory card directly into the PC card slot. Before inserting the memory card in a card reader or card slot, turn the camera off and remove the card from the camera. 1 Turn the computer on Turn the computer on transferring pictures to your computer is equipped with a PC card slot, you will detect cards from Nikon digital cameras... and start up. 2 Insert the memory card If you are using a PC card slot, you can transfer pictures directly from the memory card. PC Card Adapter To read all...
User Manual
Page 57
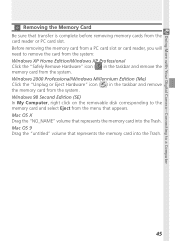
... remove the memory card from the card reader or PC card slot. Windows 98 Second Edition (SE) In My Computer, right click on the removable disk corresponding to the memory card and select Eject from the menu that transfer is complete before removing memory cards from the system. Doing More with Your Digital Camera-Connecting to a Computer...
... remove the memory card from the card reader or PC card slot. Windows 98 Second Edition (SE) In My Computer, right click on the removable disk corresponding to the memory card and select Eject from the menu that transfer is complete before removing memory cards from the system. Doing More with Your Digital Camera-Connecting to a Computer...
User Manual
Page 60
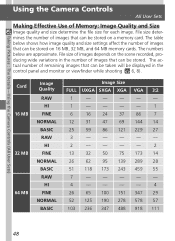
... Quality and Size Image quality and size determine the file size for each image. Taking Pictures : The Details-Using the Camera Controls (All User Sets) Using the Camera Controls All User Sets Making Effective Use of remaining images that can be taken will be displayed in the number of images... that can be stored. The numbers below shows how image quality and size settings affect the number of images that can be stored on a memory card. Card ...
... Quality and Size Image quality and size determine the file size for each image. Taking Pictures : The Details-Using the Camera Controls (All User Sets) Using the Camera Controls All User Sets Making Effective Use of remaining images that can be taken will be displayed in the number of images... that can be stored. The numbers below shows how image quality and size settings affect the number of images that can be stored on a memory card. Card ...


