
User Manual
Page 2
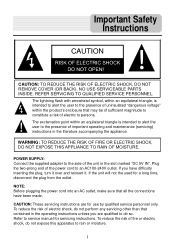
... connections have difficulty inserting the plug, turn it over and reinsert it. To reduce the risk of the power cord to service manual for servicing instructions. Important Safety Instructions , CAUTION: TO REDUCE THE RISK OF ELECTRIC SHOCK, DO NOT REMOVE COVER (OR BACK). If the unit will not the used for use by qualified service personnel only. If you are for a long time...
... connections have difficulty inserting the plug, turn it over and reinsert it. To reduce the risk of the power cord to service manual for servicing instructions. Important Safety Instructions , CAUTION: TO REDUCE THE RISK OF ELECTRIC SHOCK, DO NOT REMOVE COVER (OR BACK). If the unit will not the used for use by qualified service personnel only. If you are for a long time...

User Manual
Page 3
...Instructions NOTES 1) Read these instructions. 2) Keep these instructions. 3) Heed all warnings. 4) Follow all servicing to dripping or splashing and no objects filled with the apparatus. Servicing is required when the apparatus has been damaged in accordance with the manufacturer's instructions. 8) Do not install...time. 14) Refer all instructions. 5) Do not use this apparatus during lightning storms or when unused for long periods of the polarized or grounding-type plug. Install..., consult an electrician for replacement of the obsolete outlet. 10) Protect the power cord from tip-over. ...
...Instructions NOTES 1) Read these instructions. 2) Keep these instructions. 3) Heed all warnings. 4) Follow all servicing to dripping or splashing and no objects filled with the apparatus. Servicing is required when the apparatus has been damaged in accordance with the manufacturer's instructions. 8) Do not install...time. 14) Refer all instructions. 5) Do not use this apparatus during lightning storms or when unused for long periods of the polarized or grounding-type plug. Install..., consult an electrician for replacement of the obsolete outlet. 10) Protect the power cord from tip-over. ...

User Manual
Page 4
... product. The batteries (or batteries installed) shall not be used to determine ground proximity for any interference received, including interference that may result in UL's Standard(s) for fire, shock or casualty hazards as sunshine, fire or the like. This device complies with part 15 of the GPS hardware and GPS operating software. The unit is incorrectly replaced. Do not attempt to use the unit for aircraft navigation. CAUTION...
... product. The batteries (or batteries installed) shall not be used to determine ground proximity for any interference received, including interference that may result in UL's Standard(s) for fire, shock or casualty hazards as sunshine, fire or the like. This device complies with part 15 of the GPS hardware and GPS operating software. The unit is incorrectly replaced. Do not attempt to use the unit for aircraft navigation. CAUTION...
User Manual
Page 5
... technician for Class B digital device, pursuant to part 15 of the following measures: 1. This equipment generates, uses and can be different from that to which can radiate radio frequency energy and, if not installed and used in a residential installation. Increase the separation between the equipment and the receiver. These limits are only for reference and they may cause harmful interference...
... technician for Class B digital device, pursuant to part 15 of the following measures: 1. This equipment generates, uses and can be different from that to which can radiate radio frequency energy and, if not installed and used in a residential installation. Increase the separation between the equipment and the receiver. These limits are only for reference and they may cause harmful interference...

User Manual
Page 7
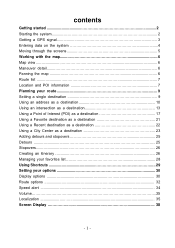
Contents Important Safety Instructions Accessories View of Main Unit System Connections Power Supply Preparation General Setup Playing Music Photo Viewer Use of the Mount Accessories Troubleshooting Specifications 1 5 7 8 9 11 15 17 19 20 21 6
Contents Important Safety Instructions Accessories View of Main Unit System Connections Power Supply Preparation General Setup Playing Music Photo Viewer Use of the Mount Accessories Troubleshooting Specifications 1 5 7 8 9 11 15 17 19 20 21 6

User Manual
Page 8
When the earphones are connected to the USB device. 7. USB port Used to connect to this jack, the speaker will be turned off automatically. 4. Card Port Insert the SD card into the port. 3. DC 5V Input Jack Used to connect to reset the system. 7 LCD Screen 6. RESET button Press to the supplied adapter. 5. View of Main Unit 1. POWER button Press for a longer time to connect earphones for private listening. Earphone Jack Used to enter or exit the standby mode. 2.
When the earphones are connected to the USB device. 7. USB port Used to connect to this jack, the speaker will be turned off automatically. 4. Card Port Insert the SD card into the port. 3. DC 5V Input Jack Used to connect to reset the system. 7 LCD Screen 6. RESET button Press to the supplied adapter. 5. View of Main Unit 1. POWER button Press for a longer time to connect earphones for private listening. Earphone Jack Used to enter or exit the standby mode. 2.
User Manual
Page 14
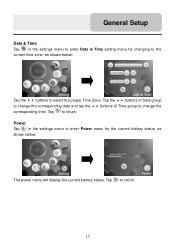
Tap the buttons of Date group to change the corresponding date and tap the buttons of Time group to return. Power Tap in the settings menu to enter Date & Time setting menu for the current battery status, as shown below : The power menu will display the current battery status. Tap to change the corresponding time. Tap to return. 13 General Setup Date & Time Tap in the settings menu to enter Power menu for changing to the current time zone, as shown below : Tap the buttons to select the proper Time Zone.
Tap the buttons of Date group to change the corresponding date and tap the buttons of Time group to return. Power Tap in the settings menu to enter Date & Time setting menu for the current battery status, as shown below : The power menu will display the current battery status. Tap to change the corresponding time. Tap to return. 13 General Setup Date & Time Tap in the settings menu to enter Power menu for changing to the current time zone, as shown below : Tap the buttons to select the proper Time Zone.
User Manual
Page 15
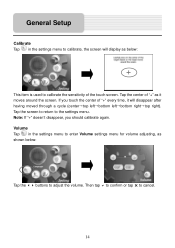
... you should calibrate again. Tap the center of "+" as shown below : This item is used to calibrate the sensitivity of "+" every time, it moves around the screen. Then tap to confirm or tap to the settings menu. General Setup Calibrate Tap in the settings menu to enter Volume settings menu for volume adjusting, as it will display as below : Tap the ...
... you should calibrate again. Tap the center of "+" as shown below : This item is used to calibrate the sensitivity of "+" every time, it moves around the screen. Then tap to confirm or tap to the settings menu. General Setup Calibrate Tap in the settings menu to enter Volume settings menu for volume adjusting, as it will display as below : Tap the ...

User Manual
Page 16
... music enjoyment. Insert the SD card with SD card slot and supports MP3 and WMA format files playback. A note regarding the MP3 function: The unit has the ability to exit. 15 Turn on a PC, using the unit's SD card slot, located on the right side. MP3 files should be imported to read and burn MP3 files from an external source. In the main menu...
... music enjoyment. Insert the SD card with SD card slot and supports MP3 and WMA format files playback. A note regarding the MP3 function: The unit has the ability to exit. 15 Turn on a PC, using the unit's SD card slot, located on the right side. MP3 files should be imported to read and burn MP3 files from an external source. In the main menu...

User Manual
Page 20
... airbags are not obstructed by the device. 19 Please take extra precaution to dashboard, use the supplied mount accessories (mount bracket, mount cradle and dashboard mount disk) to the sky. First, set the bottom edge of sight to mount the unit in the unit. 3. Then rotate the knob to adjust the unit to operate: 1. The device must not be mounted so that it to your...
... airbags are not obstructed by the device. 19 Please take extra precaution to dashboard, use the supplied mount accessories (mount bracket, mount cradle and dashboard mount disk) to the sky. First, set the bottom edge of sight to mount the unit in the unit. 3. Then rotate the knob to adjust the unit to operate: 1. The device must not be mounted so that it to your...
X3-T Software
Page 1
... started 2 Starting the system 2 Getting a GPS signal 3 Entering data on the system 4 Moving through the screens 5 Working with the map 6 Map view ...6 Maneuver detail 6 Panning the map 6 Route list ...7 Location and POI information 7 Planning your route 9 Setting a single destination 9 Using an address as a destination 10 Using an intersection as a destination 13 Using a Point of Interest (POI) as a destination 17 Using a Favorite destination as a destination 21 Using a Recent destination as a destination 22...
... started 2 Starting the system 2 Getting a GPS signal 3 Entering data on the system 4 Moving through the screens 5 Working with the map 6 Map view ...6 Maneuver detail 6 Panning the map 6 Route list ...7 Location and POI information 7 Planning your route 9 Setting a single destination 9 Using an address as a destination 10 Using an intersection as a destination 13 Using a Point of Interest (POI) as a destination 17 Using a Favorite destination as a destination 21 Using a Recent destination as a destination 22...

X3-T Software
Page 3
..., trees, and nearby tall buildings. The map view appears and you are ready to a destination, the system's GPS antenna must be obstructed by the roof of the sky. - 3 - To start the system: 1 Press the POWER button. Getting a GPS signal To use the system to guide you have read and agreed to the warning. Signals can be receiving signals. A warning screen appears. 3 Tap "I Agree" after you to...
..., trees, and nearby tall buildings. The map view appears and you are ready to a destination, the system's GPS antenna must be obstructed by the roof of the sky. - 3 - To start the system: 1 Press the POWER button. Getting a GPS signal To use the system to guide you have read and agreed to the warning. Signals can be receiving signals. A warning screen appears. 3 Tap "I Agree" after you to...
X3-T Software
Page 4
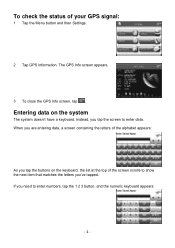
... screen scrolls to show the next item that matches the letters you've tapped. If you tap the screen to enter numbers, tap the 1 2 3 button, and the numeric keyboard appears: - 4 - Entering data on the keyboard, the list at the top of your GPS signal: 1 Tap the Menu button and then Settings. 2 Tap GPS Information. Instead, you need to enter data. The GPS Info screen appears. 3 To close the GPS Info screen...
... screen scrolls to show the next item that matches the letters you've tapped. If you tap the screen to enter numbers, tap the 1 2 3 button, and the numeric keyboard appears: - 4 - Entering data on the keyboard, the list at the top of your GPS signal: 1 Tap the Menu button and then Settings. 2 Tap GPS Information. Instead, you need to enter data. The GPS Info screen appears. 3 To close the GPS Info screen...
X3-T Software
Page 6
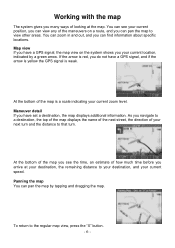
... how much time before you your current position, you can find information about specific locations. If the arrow is weak. At the bottom of the map you see your current location, indicated by tapping and dragging the map. Panning the map You can pan the map to the regular map view, press the "X" button. - 6 - Map view If you have a GPS signal, the map view on a route, and you have a GPS signal, and...
... how much time before you your current position, you can find information about specific locations. If the arrow is weak. At the bottom of the map you see your current location, indicated by tapping and dragging the map. Panning the map You can pan the map to the regular map view, press the "X" button. - 6 - Map view If you have a GPS signal, the map view on a route, and you have a GPS signal, and...
X3-T Software
Page 7
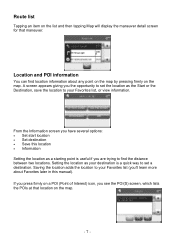
... point is useful if you the opportunity to set a destination. A screen appears giving you are trying to set the location as your Favorites list, or view information. Route list Tapping an item on the list and then tapping Map will display the maneuver detail screen for that location on the map. From the Information screen you have several options: • Set start location • Set destination • Save this manual).
... point is useful if you the opportunity to set a destination. A screen appears giving you are trying to set the location as your Favorites list, or view information. Route list Tapping an item on the list and then tapping Map will display the maneuver detail screen for that location on the map. From the Information screen you have several options: • Set start location • Set destination • Save this manual).

X3-T Software
Page 9
... change City First enter city name, tap OK 6. Tap "Save as a starting point) to . Confirm by tap OK Setting a single destination You can set a destination, you can enter up to 50 destinations and use the Itinerary screen to your destination, you like. Map displays the location on the panning map without calculating a route. - 9 - Planning your home address: 1. Tap Menu 2. Enter street name then tap OK 7. Fav adds...
... change City First enter city name, tap OK 6. Tap "Save as a starting point) to . Confirm by tap OK Setting a single destination You can set a destination, you can enter up to 50 destinations and use the Itinerary screen to your destination, you like. Map displays the location on the panning map without calculating a route. - 9 - Planning your home address: 1. Tap Menu 2. Enter street name then tap OK 7. Fav adds...

X3-T Software
Page 30
... of the map, like a traditional paper map. These options include: • display options • route options • speed alert • Volume • localization Display options The display options give you choose auto, the system will automatically switch to use the auto setting, the maneuver detail screen appears. There are two orientation settings. If you near your way. North keeps the map oriented with North at all times. - 30...
... of the map, like a traditional paper map. These options include: • display options • route options • speed alert • Volume • localization Display options The display options give you choose auto, the system will automatically switch to use the auto setting, the maneuver detail screen appears. There are two orientation settings. If you near your way. North keeps the map oriented with North at all times. - 30...

X3-T Software
Page 34
... Speed Alert screen appears. 3. Tap your Ferries preference: Include or Exclude. 5. There are two speed alert options: auto speed alert and fixed speed alert. Fixed speed alert lets you enter a speed and will warn you if that Auto Speed Alert is on . • Tap the speed you want to use the speed alert feature to warn you have finished choosing your Method preference: Quickest, Major, Shortest, or Local. 4. You return to the map. - 34 - Tap your Turns...
... Speed Alert screen appears. 3. Tap your Ferries preference: Include or Exclude. 5. There are two speed alert options: auto speed alert and fixed speed alert. Fixed speed alert lets you enter a speed and will warn you if that Auto Speed Alert is on . • Tap the speed you want to use the speed alert feature to warn you have finished choosing your Method preference: Quickest, Major, Shortest, or Local. 4. You return to the map. - 34 - Tap your Turns...

X3-T Software
Page 35
... mute shown it is also a Mute button on the Volume screen. There is muted) Localization The localization options give you . if unmute shown it is in unmute; The Menu screen appears. 2. Tap Settings. Volume You can also mute the sound. To change to the level most comfortable for you control over the settings affected by your location, including: • language • time zone • daylight savings time • units...
... mute shown it is also a Mute button on the Volume screen. There is muted) Localization The localization options give you . if unmute shown it is in unmute; The Menu screen appears. 2. Tap Settings. Volume You can also mute the sound. To change to the level most comfortable for you control over the settings affected by your location, including: • language • time zone • daylight savings time • units...
X3-T Software
Page 40
... prior notice. All specifications and features are subject to modify, amend or otherwise change without any time, without notice. All screen shots shown are the property of Nextar (Hong Kong) Limited. Unless otherwise indicated www.nextar.com Made in NextarTM. Mapping database copyright © 2006 NAVTEQ ™. No part of this manual. NextarTM, a trademark of their registered owners. - 40 - All other...
... prior notice. All specifications and features are subject to modify, amend or otherwise change without any time, without notice. All screen shots shown are the property of Nextar (Hong Kong) Limited. Unless otherwise indicated www.nextar.com Made in NextarTM. Mapping database copyright © 2006 NAVTEQ ™. No part of this manual. NextarTM, a trademark of their registered owners. - 40 - All other...


